« October 2004 | Main | December 2004 »
Tuesday, November 30, 2025
Home-Made Lo Mei Kai: Part I -- Classically Steamed
Here’s the recipe for Lo Mei Kai that I promised. Well, it isn’t really a recipe as such -- it’s more a guideline then anything else; everything is highly amenable to inspired or rebellious (whichever you may be feeling at the time) tweaking. I don’t even have exact measurements for any of the ingredients; I always make this purely by feel -- whatever feels right for the moment is just perfect.
This isn’t a difficult dish to put together; it is just somewhat fiddly in that it involves several stages, and each can take a fair bit of time -- not that you have to stand watch over the pot, but you can’t go shopping and leave it to cook itself either; you do have to stick around to give it a little bit of attention every now and again, just so the glutinous rice doesn’t start to feel neglected.
The key to good lo mei kai is of course getting the texture of the glutinous rice (otherwise known as ‘sticky rice’) right. From personal experience, the level of tenderness / chewiness of the rice can vary a fair bit depending on the brand and/or type of glutinous rice used. Not that I know much about the exact science behind this, but I suspect it has to do with, apart from the different varietals of rice, the level of starch in (and by extrapolation the amount of processing of) the rice grains. The thin, long-grained ones that I more often use tend to have a more pronounced “Q-Q” (chewy) bite to them.
Glutinous rice does need to be soaked (after it has been well-rinsed) for a few hours before being cooked. This helps to both cut down the cooking time and to get the right texture. I usually soak mine for around 4 hours or so.
Once sufficiently soaked, drain the rice well.
In a wok or deep skillet, heat a little bit of oil and very briefly sauté some minced garlic (we don’t want them to brown; only to release their aromas into the oil).
Tip in the well-drained rice and toss well to ensure each grain of rice is nicely coated with a little oil.
Season the rice with some light soy sauce, and a pinch of both sugar and salt. Sprinkle a little bit (oh, maybe a few -- 4 or 5 -- tablespoons) of chicken stock -- you don’t want the rice to be wet; it’s only to provide an added nuance of rich flavor. Mix well.
Remove the rice from the wok and loosely spoon into a stainless steel colander, ready for steaming. It’s important that glutinous rice be steamed without any added liquids.
Steam for anywhere between 45 to 90 minutes; the length of time really depends on several things: how long the rice has been soaked for, the type of rice used and the kind of texture you are looking for. Every 20-30 minutes, turn the rice in the colander so that everything cooks evenly, and also just to check if the texture has reached the desired tenderness. Keep in mind that the rice will be cooked for a further 30 minutes together with the chicken later on.
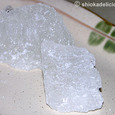
Here’s a close-up look at the freshly steamed glutinous rice.
While the rice is steaming, prepare some chicken and Chinese mushrooms. The latter is optional; I just think they add a nice bit of color, flavor and textural contrast to the chicken and rice.
Normally, I keep a stash of prepped Chinese dried mushrooms in the freezer; there are thus always some mushrooms conveniently at hand and ready to go, which really cuts down the amount of time needed to pull dishes together. Once prepped and frozen, the mushrooms will keep well for a couple of months. To rehydrate the dried mushrooms and to get them to a nicely tender and succulent state, simply rinse the dried mushrooms well and add to a pot of boiling water that has been lightly seasoned with a dash of cooking oil and a pinch of sugar. Gently simmer the mushrooms for about 45 to 90 minutes (depending on the quality of mushrooms used and how tender you like your mushrooms). Drain well; divide into small portions and place in separate freezer bags, ready to be popped into the freezer. And anytime you feel like adding some Chinese mushrooms to a dish, simply pull a bag of the prepped mushrooms from the freezer, defrost, remove the stems, and you’re good to go.
For the lo mai kai, I allow about 3 or 4 mushrooms (depending on their size) per serving. Once the mushrooms have thawed, season with a little oyster sauce and Chinese rice or glutinous rice wine. Arrange the mushrooms, smooth side down, in the bottom of several small bowls.
Top the mushrooms with marinated cubes of skinless chicken thigh meat. [The chicken meat is simply seasoned with some light soy sauce, oyster sauce, Chinese rice or glutinous rice wine, a dash of sesame oil, a pinch of sugar and pepper, and a little bit of cornflour/cornstarch. The latter is just to give the chicken a wonderfully smooth, succulent texture.]
Once the glutinous rice comes out of the steamer, divide the rice evenly among the small bowls.
Cover each bowl with aluminium foil, and steam for about 30 minutes, until the chicken is cooked through. [This picture is actually of the lo mai kai after it has just come out of the steamer.]
And a closer look… Notice how each grain of rice has maintained its distinct shape and has a smooth shiny sheen; if the grains meld into each other, the rice has been overcooked.
When cooked like this, the rice has a pronounced chewy, sticky texture. For those who, like me, prefer a more tender bite to their glutinous rice: after the 30 minutes of cooking time, remove the foil cover and steam the lo mai kai, uncovered, for a further 30 minutes or so.
To serve: invert the bowls of rice onto plates. The chicken is beautifully tender, moist, succulent and tasty. The mushrooms, having absorbed the juices from the chicken during the steaming, are also richly flavorful. Both make perfect accompaniments to the sticky, chewy rice.
Chow time!
Happy lo mai kai-ing!
Copyright © 2004 Renee Kho. All Rights Reserved.
Please contact me for permission to copy, publish, distribute or display any of the images or text contained in this article.
10:31 AM in Home Cook: Rice, Noodles etc | Permalink | Comments (33) | TrackBack
Monday, November 29, 2025
Chicken Run
No, not really. More accurately, it’s lunch-on-the-run with glutinous rice chicken or lo mei kai.
Sometimes, when I’m too busy to stop and eat a ‘proper’ lunch, my mum (ever doting and loving that she is) will, on occasions, buy various types of dim sum (literally translated as “touch the heart” -- small Chinese tapas-style food items) for me; foods that I can eat on the go.
One of my favorite “Chinese fast food” is pau / bao or steamed buns; which I have already talked about in quite long-winded depth previously. Another classic Cantonese dim sum item that I enjoy is glutinous rice chicken -- pieces of marinated chicken and a little bit of gravy steamed with glutinous rice. I really like the whole concept of a simple dish that encompasses many different textural and taste experiences in one, that has both carbs and protein, and… as an added bonus, is highly portable and convenient.
I have two ‘regulars’ when it comes to ready-made, take-away lo mei kai -- I like the one from Teck Kee Tanglin Pau and the version by Tiong Bahru Pau. The latter, at S$1.30 (US$0.80), is ten cents cheaper, but the eating experience can be somewhat inconsistent at times, depending on which part of the large, multi-layered steamer your particular serving of lo mei kai is taken from (more on this later). Still, I have to say, it edges out -- by the width of a chicken feather -- Teck Kee’s offering in my hierarchy of food-likes; I much prefer the texture and flavors of Tiong Bahru’s rice. Having said that, I probably eat Teck Kee more often, simply because it is more convenient. Besides, it is tastily satisfying enough.
It used to be that lo mei kai always come wrapped and steamed in lotus leaves. That still happens in some of the better Chinese restaurants, but for these quick take-out dim sum outlets, convenient disposable tin foil containers have become the norm.
Or, as in the case of Tiong Bahru Pau, the lo mei kai are steamed in individual aluminium bowls, and then emptied onto and wrapped up in greaseproof brown paper for the customer to take home.
The two key components of a good lo mei kai are the texture (mouth-feel) of the glutinous rice, and of course, the flavors of the chicken, from which the rice gets most of its taste also.
The glutinous rice by Teck Kee has a more pronounced “Q-Q” mouth-feel -- that characteristic chewy, sticky bite of glutinous rice. Many people highly enjoy (and seek out) this “Q-Q” bite (like my mum), whereas my dad and I belong to the group more partial to glutinous rice that starts with a somewhat softer, almost meltingly tender mouth-feel, before finishing with a softer, less pronounced chewy bite.
Like that from Tiong Bahru Pau.
As mentioned earlier, it is not necessarily a given that you will get that perfect balance of soft tenderness, and firm, chewy bite each time. I have found that the texture of Tiong Bahru Pau’s glutinous rice can depend a lot on which part of the steamer that particular bowl of rice is cooked in. Some parts of the steamer seem to produce rice that is excessively hard and chewy (almost falling a tad on the side of undercooked), while other parts can give rice that is too soft and mushy. Then there are the “sweet spots” in the steamer that produce perfectly tender, yet slightly chewy rice -- and when I get one of those, it is all pretty darn tasty! Good enough to send me back time and again, even though there are many times when I get ones I don’t like!
I’m also more partial to the taste of the chicken and gravy at Tiong Bahru -- the flavors just seem fuller and deeper, with a more pronounced peppery overtone. They also add enough gravy to nicely moisten the rice, and to give it a darker color which I find highly appealing.
Teck Kee’s flavors, on the other hand, are lighter and more restrained. They are also generally more generous with the chicken pieces, and even throw in a slice of char siew (Chinese bbq pork) for good measure.
Over all, I like both -- one more than the other depending on my mood. Either way, they are a deliciously quick and easy way to have a cheap lunch on the go.
Of course, one of my all-time favorite lo mei kai is the home-made version, where everything can be cooked to suit my personal preferences. It’s a fairly involved process, but well worth the effort I think. The recipe will be coming up in a couple of days (I hope).
Copyright © 2004 Renee Kho. All Rights Reserved.
Please contact me for permission to copy, publish, distribute or display any of the images or text contained in this article.
06:35 PM in Lion City Shiok-Eats: Fast Eats | Permalink | Comments (14) | TrackBack
Sunday, November 21, 2025
IMBB 10 - Cookie Swap : Sunset Delight
So there I was on a tranquil, serene Sunday afternoon, sitting on the kitchen backdoor steps, watching the sun begin to dip into the horizon, throwing its last fiery rays across the sky in swaths of oranges, reds and pinks. The warm glow of sunset bounced happily off the glistening white surfaces of the balls of cookies sitting in the champagne glass that I held in my hand. One of our resident squirrels watched me from its perch on the garden wall, perhaps wishing to share in my bounty. But it was too shy, and soon skipped off with long tail bobbing. A small smile tugged at the corners of my lips as I contentedly popped one cookie after another into my mouth, letting each dissolve gently in a sugary sweet dance across my tongue. My heart whispered a soft sigh of thanks and gratitude to Jennifer for precipitating this stolen moment of serendipity.
You see, it was her idea to have a cookie swap for IMBB 10. I had missed her previous two installments of SHF (that’s Sugar High Fridays, if you’re wondering) -- either because I found out too late, or because Life had me gripped tightly in its frenetic pace -- but I wasn’t about to miss this IMBB which she is hosting. Besides, how could I turn down a chance to make cookies?
But cookies, perhaps due to the stronger British influence, do not feature very prominently in my idea of Christmas -- a festival I associate more with mince pies (Christmas just isn’t Christmas without mince pies, in my opinion), rich fruit cakes, yule logs and plum puddings. Yet, it matters not. Chinese New Year follows hot on the heels of Christmas and the Gregorian New Year, and that is a celebration where there must be, as a matter of course, rivers of cookies of all shapes, sizes, tastes and textures. And so what better opportunity than this to get a head-start on recipe experimentation for the early-February festival?
Almost as soon as I heard about the theme for IMBB 10, I already knew which cookie I wanted to try… a cookie that is, as I recently realized, found in many different cultures; various versions of it go by such monikers as Mexican Wedding Cakes, Russian Tea Cakes, Snowballs (how’s that for a Christmas-sounding name) or… quite simply “white balls”. In South East Asia, and more specifically, in East Malaysia and Brunei, we have a variant called the kueh mur (click and scroll down until you see round white balls), which is a must-have for both the Muslim Hari Raya and the Chinese New Year. And so, this cookie seems rather appropriate for this IMBB -- it can be Christmas-y or Chinese New Year-y according to whim.
How I came upon an enlightened (read: lower fat) version of the recipe was also a stroke of serendipity. I was walking through Borders to get to my car. I happened to walk through (not past… it’s funny how we sometimes feel the need to not take the shortest route from point A to point B! ![]() ) the cookbook section. Inexplicably, my eye caught sight of a very slim volume tucked in amongst hundreds of other bigger, bulkier, more prominently displayed cookbooks. I stopped, pulled it out, flipped through it for like 20 seconds, and proceeded to pay for it. That was it. And so I ended up buying “One Smart Cookie” (I just love that title) by Julie Van Rosendaal, a Canadian author (how appropriate, no?).
) the cookbook section. Inexplicably, my eye caught sight of a very slim volume tucked in amongst hundreds of other bigger, bulkier, more prominently displayed cookbooks. I stopped, pulled it out, flipped through it for like 20 seconds, and proceeded to pay for it. That was it. And so I ended up buying “One Smart Cookie” (I just love that title) by Julie Van Rosendaal, a Canadian author (how appropriate, no?).
In her book, Julie calls these cookies Russian Tea Cakes, but mentions in the head-note that they are also know as Mexican Wedding Cakes ; to me, they look rather like kueh mur. I have been looking, for the longest time, for a way to lighten the artery-clogging recipe for kueh mur, as well as for a more hassle-free way of making them too.
This particular recipe seems almost perfect -- it doesn’t require me to stand in front of the stove dry-frying the flour until my arms drop off; it uses very little butter (using cornstarch instead to give the cookies their characteristic melt-in-your-mouth texture -- so says the head-note); plus, it calls for the use of nuts, which I figure will lend incredible aromas to the cookies.
Trying out the inaugural recipe from any new cookbook is usually an iffy business, especially from an author I have never heard of before, and from a book that I bought on a whim (not that that is a bad thing at all, of course; I have found many a cookbook gem that way) -- I’m never sure what to expect, and the results are usually either stunningly good or shockingly ‘bleh’, with the occasional “okay, but who cares”.
These cookies from Julie’s recipe are fun (and easy) to make, and festive to look at. Tastewise… I’ll get to that after the recipe…
Russian Tea Cakes - Mexican Wedding Cakes
[from “One Smart Cookie” by Julie Van Rosendaal]
¾ cup (120g) almonds *
1½ cups (175g) cake flour **
¼ cup (30g) cornstarch ***
¼ tsp salt
1/3 cup (80g) butter (not margarine), softened
1 tbsp canola oil
¾ cup (90g) confectioners’ (icing) sugar
2 tbsp milk ****
1 tsp vanilla
¼ to 1/3 cup (30-40g) confectioners’ (icing) sugar, for rolling
* I used almonds, but the recipe allows for pecans, hazelnuts, walnuts or a combination of these.
** Although the recipe calls for regular plain flour, I opted to use cake flour, to help keep the crumb very tender. I also chose not to make any compensation and used the same volume of cake flour as for plain flour. If you are using the latter, 1½ cups will weigh in at around 210g instead of 175g as for cake flour.
*** This is the same as what is commonly called “cornflour” in the UK and in this part of the world ; it is, however, very different from what the Americans call “corn flour” which is finely ground cornmeal, and which should not be used in this recipe.
**** I used 1.5% milk.
• Preheat oven to 350F or 175C.
• Toast nuts until lightly browned and fragrant. Cool and finely chop in a food processor.
• In a medium bowl, combine flour, cornstarch, salt and nuts; set aside.
• In a large bowl, beat butter, oil and ¾ cup confectioners’ sugar with an electric mixer for 2 minutes, until light and fluffy. Add milk and vanilla and beat until smooth.
• Add the flour mixture to the butter mixture, and stir by hand just until the dough comes together.
• Shape the dough into 1” to 1¼” balls (I made them into smaller ¾” ones that can be popped whole into the mouth), and place 1”-2” apart on an ungreased cookie sheet.
• Bake for 15-18 minutes (12-14 minutes if making smaller balls) until golden on the bottoms.
• Meanwhile, place additional confectioners’ sugar in a shallow dish. Remove cooked cookies from the cookie sheet and immediately roll in the sugar while they are still hot, then place on a wire rack to cool. (I like my cookies evenly coated with sugar and snowy white in appearance, so I roll them a second time in sugar after they have cooled.)
• (I managed to get 66 small cookies out of the recipe, which originally allows for 2 dozen cookies from one batch of dough.)
So, how do they taste?
Not brilliant, unfortunately. The texture is fairly tender, though I won’t exactly call it “melt-in-the-mouth” tender. The crumb is very nicely refined and smooth though. The initial flavor notes of the cookie are rather pleasant -- that sugary zip as the confectioners’ sugar hits the tongue. However, this is then followed by a certain blandness; there is nary a taste of the almonds -- nothing nutty at all about these cookies. Even if left to stand for the night (and a couple of days after that), the almond flavors fail to develop and intensify. Perhaps peanuts (or some other stronger tasting nuts) may be a better option?
But it is the aftertaste that unsettles me -- this almost pasty, cornflour-y aftertaste, which I find rather disconcerting. I’m not sure why there is this aftertaste at all; I’ve seen many cookie recipes that use cornstarch as a crumb tenderizer and I have not experienced this pastiness in flavor before. Perhaps it is the combination of cornstarch with confectioners’ sugar (which in itself is made up of around 3% cornstarch) that compounds the problem -- too much cornstarch and not enough sweetness from the confectioners’ sugar to counter-balance it. I think caster sugar that has been quickly pulsed a few times in the food processor may do a better job -- it will be fine enough to melt quickly during baking (as seems to be the author’s intention in using confectioners’ sugar) and to still give a velvety smooth texture to the cookies.
So sadly, while the cookies are wonderful to look at (and oh how temptingly gorgeous and festive they look in the champagne glass), their taste do not quite match up to their appearance. Still, they are a lot of fun to make, and I think with some tweaking, the recipe can work very well.
For me, the best part of this cookie-swap has been the chance to start getting into the festive mood, and start thinking about all the goodies I want to cook and bake for Christmas and New Year’s.
So, thanks Jennifer for a great IMBB theme! And a toast to all the great cookie recipes that I know will be rolling in ; I can’t wait to read them all.
Copyright © 2004 Renee Kho. All Rights Reserved.
Please contact me for permission to copy, publish, distribute or display any of the images or text contained in this article.
02:03 PM in Home Baker: Lighten Up! Cookies | Permalink | Comments (20) | TrackBack
Sometimes I forget…
… how pretty our City’s waterfront skyline looks at night.
This picture is snitched from City Developments’ website, simply because I think it’s a very pretty photo (if you ignore the ultra-fake, photoshopped-in humungous moon and the obtrusive and intrusive camera) and simply because I’m not able to capture the same kind of “Marina magic” with my lil’ ol’ camera.
For those new to Singapore: that’s our “beloved” pair of “durians” in the foreground (a.k.a. The Esplanade: Theatres on the Bay). And just behind that is The Padang and City Hall.
Okay, moment of contemplation over… we now return you to regular programming…
01:31 PM in Crumbs & Tidbits | Permalink | Comments (2) | TrackBack
Friday, November 19, 2025
We’re One!
And so… 366 days… 255 posts… several hundreds of thousands logged-visits… and many, many new friends later… shiokadelicious! turns one today.
This past year has been an amazing journey for me, and I would like to take this time to thank all of you for making it so special.
When I first started this blog, I never imagined it would turn out to be so much fun, and to be such an educational, eye-opening, horizon-expanding, soul-enriching experience. But it has been all this, and more.
Gastronomically, I’ve grown so much over the last 12 months; having to write about and describe food -- how it looks, tastes, feels and the emotions it evokes in me -- has “forced” me to become more acutely aware of the eternal, exquisite dance of flavors, textures and aromas (even blandness is an integral musical note in the symphony of taste), and to become more finely attuned to the magical alchemy that is cooking and baking. Suddenly, my eyes see the bounty of Nature in a fresh, new light; the mystery of the intricate synergies of disparate ingredients coming together into one spectacular whole -- be it a complex or simple, elegant or hearthy, delicate or robust dish -- takes on new dimensions. I feel, see and taste more intensely and more vividly.
Many times too I have been struck by the transformation in my own family and among my friends. They too have become more food-centric -- or more accurately perhaps, more aware of the joy of eating. There seems to be a renewed love affair with food -- good food. Many who in the past could not be persuaded into the kitchen, have started whipping out pots, pans, wooden spoons and whisks, and have started cooking and baking with gusto! In my own family, even the men have started venturing, with great enthusiasm, into the culinary arts!
But most of all, what has made this blog and my blogging experience so fulfilling and special is you! I feel so very blessed and privileged to have been touched by so many wonderful people, all of whom do not know me except through reading this website. The several thousands of sincere comments and thoughtful sharings and opinions that have been left on the site, and the hundreds of mostly friendly emails that I have received have encouraged, supported and, most of all, inspired me.
I am continually surprised, delighted and humbled by the correspondence I receive from all over the globe -- from Hungary to India, from Italy to New Zealand, from Finland to Brazil, from England to Australia, from Spain to South East Asia, from Netherlands to China, from Israel to France, from Germany to Iran, from Russia to Canada and many more countries, cities and towns in between. I could never have imagined such support, warmth and friendliness. Many write just simply to say “hi” and to say they are enjoying the blog -- I can’t tell you how heart-warming those messages are. And many others have shared openly with me -- I’ve enjoyed receiving your recipes, and have celebrated your triumphs and commiserated with you in your let-downs in the kitchen. I’ve learnt much from you about food, cooking, baking, eating and your different cultures. It has been so much fun sharing this journey with you, and I hope you will continue to drop me comments or messages. Thank you for making this blog a scintillating conversation, and not one woman’s mad, food-crazed monologue.
I am thankful for and deeply touched by the friends I have made through this blog -- perfect strangers who have opened their hearts and reached out their hands with such generosity, kindness and warmth to help me or to just bring me joy and happiness in ways big and small. My heartfelt gratitude to all of you -- you know who you are.
And since this is not the Oscars, I shan’t thank my hairdresser, the guy in the factory who assembled my PC, the man who sold me my digital camera and…
Okay, enough of the navel-gazing already! Where’s the food?
Of course, no post is complete without at least some food-talk…
I was going to bake some quadruple (yes, quadruple -- you read right) chocolate cupcakes -- the ultimate indulgence I think -- to celebrate this one-year milestone, but Life would not give me the time to do so. Instead, I was surprised (I just love yummy surprises) with a gift of a luscious Nutella cupcake, bought from Toast.
I think I’ll just let the pictures do the talking this time…
Here’s to more shiokaliciously delicious shiok-eats to come!
Copyright © 2004 Renee Kho. All Rights Reserved.
Please contact me for permission to copy, publish, distribute or display any of the images or text contained in this article.
12:38 PM in Crumbs & Tidbits, Food and Drink | Permalink | Comments (61) | TrackBack
Wednesday, November 17, 2025
Long Horny Beans
I know, I know, that is a ridiculous title; but I think it’s rather catchy and suits my current silly mood. Besides, that is what these beans can be called if we take a literal play on the sounds of their Chinese moniker: “chang dou jiao” (here, the Chinese character “jiao” being the one for “horn” and not “legs”, in case you are interested). These beans are also variously known as “dau gok” (in Cantonese), “Thai long beans”, “yard beans” and “snake beans”. Although you may, if you wish, also call them “yak’s tails” (don’t ask me why -- do they look anything like yak’s tails? I for one have never seen a yak in person, much less its tail).
Whatever you choose to call them, I like these long beans a lot -- be they simply stir-fried with carrots and lots of garlic; sautéed with minced pork, preserved radish (chai poh) and spicy bean paste; or fried with eggs, sort of omelette-style.
By now, some of you will probably have realized, from several of my previous posts, that I like cooking with eggs -- a lot. Especially when it comes to cooking soups and vegetables; I’ve already talked about eggs with ketola, eggs with matrimony vine, eggs with bittergourd, eggs with mustard vegetable (gai choy), just to name but four.
And long beans with eggs is another one of those comfortingly homey, down-to-earth and so-incredibly-easy, ready-in-minutes dishes that I come back to time and again.
I like to pan-fry the eggs and beans into pancake-like discs rather than to have them messily scrambled; I prefer their texture this way, with a hint of crispiness around the edges, but feel free to scramble if that appeals to you more.
These photos show a version that has had some finely diced leftover char siew (Chinese sweet bbq pork) thrown in, simply because I wanted to use up the meat. I don’t usually add meat to the dish; preferring to keep it simple with just three main components: garlic, beans and eggs.
• Finely mince some garlic, and chop the long beans into fine dice.
• Lightly beat a few eggs (I normally provide for 1 egg per person) and season with light soy sauce, pepper, a pinch of salt and sugar. Set aside. (I tend to keep the flavors of this dish very light, with all the seasonings going into the eggs, and I add no further flavorings to the beans. But feel free to adjust this to suit personal preferences.)
• Into a well-heated wok, add a little bit of oil (I use very little oil). Drop in the minced garlic and give a quick twirl with the sauté spatula, just to release the aromas, before putting in the long beans.
• Sauté until the beans are nicely tender. For me, because I use very little oil, this can take a while (maybe about 15 minutes or so); the more oil you use, the quicker the beans will tenderize. Do not be tempted to cover the wok; this will only cause the beans to take on a rather unappetizing yellow tinge.
• Moving in a circular motion over the wok, slowly drizzle in the eggs, ensuring that all the beans are nicely covered with egg. Press any stray beans into the egg mixture if necessary. Leave the eggs to cook, without stirring, for about 2 minutes, or until the underside is done. Then, slowly flip the eggs over (as if flipping a pancake) and fry the other side until cooked.
• [If adding finely diced char siew to the dish, stir the meat into the beans just before adding the eggs. And if you like, additional seasonings can also be added to the beans before pouring in the eggs.]
Simple. Easy. Classic home-style Chinese cooking.
Copyright © 2004 Renee Kho. All Rights Reserved.
Please contact me for permission to copy, publish, distribute or display any of the images or text contained in this article.
02:03 PM in Home Cook: Vegetables | Permalink | Comments (29) | TrackBack
Monday, November 15, 2025
Selamat Hari Raya Adilfitri!
This has been a rare mega long weekend for us. Last Thursday was the Deepavali (pronounced dee-waa-li ; the Indian Festival of Lights) holiday, and today is the make-up holiday for Hari Raya Adilfitri (the marking of the end of the Muslim Holy Month) which fell yesterday. Thus, if you had taken last Friday off (like I did), it would have given you a luxuriously long 5-day weekend. Now, how often did that happen? It was the perfect opportunity to get away from the City for a short break, to chill and to just catch some R & R.
There are many Indian and Malay snacks on my list of all-time favorite foods. These are loves that have been nurtured since I was a little girl. Long before I knew them to be Indian, I adored the deep-fried, slightly spicy muruku. As a child, I felt my Chinese god-mother made the best muruku ever. And even now, more than a decade after her death, my wistful memories still feel hers to be simply the best.
I also have many fond memories of visiting friends during Hari Raya in Brunei. Much like Chinese New Year, it is a festival that is punctuated with many, many edible goodies… biscuits (cookies), cakes, curries, rendangs, ketupat (individual savory rice cakes wrapped in small baskets woven from young coconut leaves) and all sorts of scrumptious eats.
Similar to the frenzy that usually precedes the Chinese New Year, Malay households cook and bake up a storm in preparation for the Hari Raya festivities; the array of cookies and cakes that stream out of the kitchen of a prolific baker and cook can be mind-boggling. And what I’ve always found distinctive about Malay cookies and cakes, compared with our Chinese ones, are their often eye-catching, vibrant hues and intricate (read painstakingly created) designs.
Many traditional Malay Hari Raya delicacies have even made it into mainstream Chinese New Year food customs in places like Brunei and Malaysia. Things like kueh mur (click and scroll down till you see round white balls) are much loved by people like me, and something feels amiss if they are not present during Chinese New Year!
There is one cake that my thoughts immediately turn to every time Hari Raya rolls around -- Kek Batik. This is a uniquely Bruneian cake; I haven’t seen it anywhere else. It used to be a special festive cake made only for Hari Raya. Nowadays, it is sold year-round at some cake-shops. Still, it is at Hari Raya that Kek Batik feels most special, and it is always the home-made version that is the best.
Kek Batik is a rich, densely fudgy, somewhat brownie-esque cake made with sweetened condensed milk (how can anyone not like a cake made with that?), Milo and Marie biscuits. It is incredibly easy to make (as I’ve recently found out), and enjoyably moreish to eat. Why it is named after the distinctive Indonesian wax-drawn cloth, batik, I’m not entirely sure. Perhaps it is from the patterns created by the pieces of white Marie biscuits scattered through the dark brown cake dough -- a little reminiscent of the simple yet intricately designed batik cloth.
What makes this cake rather unique (apart from its taste and texture) is the way it is made -- rather than being baked in the oven, the batter is cooked on the stove-top and then refrigerated. This makes it an unspeakably fun (kids will love making this, and it’s easy enough for them to do so) and indescribably sensuous and sensual thing to make. Imagine, standing at the stove stirring a pot of thick, luxuriously rich, chocolatily (yes, there is such a word; I just made it up) aromatic, dark fudgily brown batter. As a kid, I had fantasies of being the Goddess of Chocolate and spending my days stirring huge vats of rich chocolate. Well, making Kek Batik comes pretty close to realizing that dream! ![]()
The cake texture is interestingly unique, and a little hard to pinpoint exactly. It is sort of a cross between rich fudge and dense brownie, yet it also has a certain lightness to it. Whilst rich, it is not cloyingly so -- it doesn’t end up feeling like a rock sitting in the pit of the stomach. It is also not as sweet as fudge or brownies, or indeed as sweet as the recipe may seem to indicate -- the Marie biscuits provide a nice, bland counterbalance.
What I find rather fascinating (simple things do so intrigue me at times) is the textural change that the Marie biscuits undergo. From being hard, somewhat dry biscuits, they take on a soft, fluffy, almost cake-like (yet never soggy) texture when mixed into the hot batter. And that is what makes this cake so deliciously good to eat: that balance of texture between soft, almost sponge cake-like pieces of biscuits and rich, densely fudgy cake dough; that play of flavors between luscious chocolaty indulgence and anchoring biscuity neutrality.
A couple of months ago, during one of our email conversations, pinkcocoa and I were discussing the different Bruneian foods we were missing, and the subject of Kek Batik came up. In between us both swooning and pining for this cake and musing about how it was made, pinkcocoa sent me two web links to recipes for the cake. That inspired me to do a quick trawl of the Net, during which I found several more recipes written in Malay.
For some reason, none of the recipes really appealed to me. But now armed with a general idea of the key ingredients and a stockpile of memories of the different versions I had tasted before: the ones I liked and the ones I didn’t like, I decided to create my own recipe.
I reduced the amount of butter suggested by most of the recipes by more than half. In the past, a lot of the time, I found the cake to be overpoweringly (almost greasily) buttery; I wanted the fudge notes to come through more strongly instead. Besides, since the cake wasn’t going to be baked, the butter wasn’t needed as a leavening agent ; its role was more to enrich the batter and to enhance the rich, smooth, fudgy mouth-feel. It thus wouldn’t really matter if the quantity of butter was cut so drastically; I figured the same textural results could be achieved using other ingredients.
The amount of sugar was also halved. At the same time, instead of using just white sugar, I opted to add some dark Muscovado sugar too -- to give the batter added color, aroma and of course a denser, more fudgy texture. To help the latter cause along further, I upped the amount of sweetened condensed milk used. I mean, what better excuse reason to add more sweetened condensed milk (don’t you just love that stuff?). No, it didn't make the cake overbearingly sweet -- in fact, the cake was surprisingly not very sweet at all; it was just right. And oh, here’s something else to assuage the guilt a little (if you are feeling guilty at all that is): full cream sweetened condensed milk has, gram for gram, only one tenth the amount of fat of butter (which it partially replaced in my recipe) -- butter has over 73g of fat per 100g, whilst full cream sweetened condensed milk weighs in at a lightweight 8g per 100g! I thought it was a rather ingenious way to lighten the cake considerably and yet still give it that distinctive rich, dense, fudgy texture.
Finally, the last big change that I made was to use a mix of Dutch-process unsweetened cocoa and Milo, instead of purely just Milo. This gave the cake the most incredibly chocolatey flavor that was noticeable yet not overpowering.
I have to say, my very first attempt ever at making Kek Batik -- from my “wild concoction” of a recipe at that -- was a stunning success. Every single person I served it to raved about the cake. My domestic help, A, became an instant convert and possibly an instant addict! I’ve since made the cake another two times, and each time, people clamored for more.
And me being me, I’m now very tempted to experiment further and to add a couple of new ingredients to the recipe -- just to see what happens. But that is for another time. In the meantime, this recipe is very, very good as is. This is great to make with kids. Or, simply whenever you feel like taking a few minutes out of a hectic day to feel like a Goddess (or God) of Chocolate stirring a pot of divine ambrosia!
Before I get to the recipe proper though, just a few quick notes about some of the ingredients.
I highly recommend using dark Muscovado sugar; it may be a little bit more expensive, but I do feel it lends an added nuance of flavor and aroma to the cake. However, regular dark brown sugar can be used in substitute; this will still give that dark coloring and fudgy texture, only without the distinctive fragrance of Muscovado. If you don’t have either, simply use the same amount of white sugar.
I use full cream sweetened condensed milk, but feel free to use the skimmed or partially-skimmed versions (which cannot be found in Singapore) if that is readily available to you. This will of course lighten the fat content of the cake further.
The sweetness of Milo varies greatly depending on where it is made. The ones made in Singapore and Malaysia are considerably less sweet than those made in Australia or the UK for example. So, depending on how sweet you like the cake, you may wish to make adjustments to the sugar levels accordingly.
Dutch-process cocoa gives a smoother, more rounded flavor (in my opinion), but regular unsweetened cocoa can just as easily be substituted instead.
And finally, the Marie biscuits. I suspect these are uniquely Asian biscuits (though I could be wrong). I like the Khong Guan brand, but any brand will suffice. And if you can’t get your hands on Marie biscuits (although Khong Guan does export to many places in Europe and the US), I will hazard a guess and say that any kind of hard, fairly dry, plain biscuits will do -- such as Rich Tea maybe, for those in the UK. Sorry, I can’t, at this moment, for the world of me think of something that may be an equivalent in America. Basically, we want something that is plain (Marie biscuits do have a hint of coconut to them though), hard and fairly dry, but that won’t become soggy or disintegrate when heated or mixed with batter.
Okay, here’s the recipe…
Kek Batik a la Renee
Makes 24 pieces.
½ cup (120g) softened unsalted butter
¼ cup (35g) loosely packed dark Muscovado sugar
¼ cup (60g) caster sugar
5 medium eggs
1 396g-can sweetened condensed milk
½ cup (55g) Milo
½ cup (50g) Dutch-process unsweetened cocoa, sifted
1½ teaspoon pure vanilla extract
approx. 20 pieces (150g) big Marie biscuits
• Line an 8” square cake pan with a piece of long rectangular-shaped greaseproof paper, such that the bottom and two sides of the cake pan are lined, and that the two ends of the greaseproof paper extend a few inches beyond the cake pan. These will act as “handles” and help facilitate the easy unmoulding of the cake later. I also like to give the lined cake pan a very light spritz of cooking spray (on the bottom and sides) ; again for ease of cake removal.
• Combine the sweetened condensed milk, Milo and cocoa powder in a medium bowl. Mix well to get a smooth, thick paste. Set aside.
• Break each Marie biscuit into four or five pieces. (If using the smaller Marie biscuits, break into thirds.) Set aside.
• Using either an electric mixer or a strong arm (whichever is more readily available), beat the butter and sugars together until the sugars are just about dissolved and the mixture is light and fluffy. If using the machine, scrape down the sides of the bowl once or twice, if necessary.
• Add the eggs one at a time, and beat until just fully incorporated. Scrape the sides of the bowl as and when necessary.
• Add the vanilla and cocoa-Milo mixture. Mix on low speed until just incorporated. (The batter will be liquidy.)
• Transfer batter to a large pot (I find a deep non-stick skillet or even a non-stick wok works very well, as they remove the risk of the batter scorching).
• Cook on a low flame, stirring constantly, until the batter comes together into a soft dough. [Avoid cooking with too high a heat, as this will give the batter a rather rough, perhaps even clumpy, texture. Also avoid over-cooking the batter, as the dough will then be too hard to mix the biscuits into without them disintegrating into tiny pieces, and it will also be harder to spread the dough into the cake pan.]
• Remove from the heat. Put in the broken Marie biscuit pieces and fold until just mixed through.
• Spoon dough into the prepared cake pan, and level it out, making sure to press the dough into the corners and edges of the cake pan. [I find that the most efficient way to do this is to slip my hand into a plastic bag before using my fingertips to press the dough into shape. The dough will be hot, so be careful ; but this is the best way I’ve found to eliminate the problem of the dough sticking to the spatulas, backs of spoons or fingers.
• Put cake into the refrigerator and leave to chill overnight (yes, this will be extremely difficult to do, but try ; you’ll be glad you did). Once the cake has cooled (a couple of hours after being put into the fridge), cover the top of the cake pan with plastic wrap.
• To unmould the cake: simply run a bread knife along the two unlined sides of the cake pan, hold on to the two long ends of greaseproof paper and pull the cake free of the pan. Tear away the greaseproof paper and place the cake on a plate.
The cake is at its fudgy best when served at room temperature; but it is just as lip-smackingly good straight from the fridge.
Happy Batik Kek-ing!
And to all my Hindu readers, a belated Happy Deepavali; and to all Muslim readers, Selamat Hari Raya Adilfitri!
Copyright © 2004 Renee Kho. All Rights Reserved.
Please contact me for permission to copy, publish, distribute or display any of the images or text contained in this article.
11:30 AM in Home Baker: Cakes | Permalink | Comments (46) | TrackBack
Monday, November 08, 2025
Date Up-date
After my earlier post about fresh Chinese red dates, Cooper very kindly dropped me a comment to clarify the “real” nature of dates.
So, I guess what I really meant to say in my previous post is that I do actually like Middle Eastern fresh dates ; I just don’t like the insipid, sappy unripe ones. However, I do like the unripe/fresh Chinese red dates, and I love using the dried ones for cooking.
This year, I seem to be having a fair bit of success with my fresh Jordan Negret Noor dates purchases – for the most part, they have been perfectly soft (not too hard or overly mushy, with nicely tender, thin skin), slightly chewy (without sticking to your teeth), with the right amount of moistness and no cloying, temple-aching sweetness. Admittedly, they are rather heavy on the wallet, but oh so delightfully sweet on the palate.
A lovely year-end indulgence.
Copyright © 2004 Renee Kho. All Rights Reserved.
Please contact me for permission to copy, publish, distribute or display any of the images or text contained in this article.
10:13 PM in Other Shiok-Eats | Permalink | Comments (8) | TrackBack
Caution: Grumble Ahead
Today is the start of the 2nd week of November. Nothing unusual about that of course. Except for one small detail…
The malls have already started (they started last week actually) playing Christmas Carols ad nauseum… Yes, the sleigh-bells have started jingling, Rudolph’s nose is once again glowing, Santa is coming to town, but I already have my two front teeth, thank you very much. It’s all enough to make me want to not only be but to hide at home for Christmas!
I mean, seriously, it’s still almost a full two months to Christmas! Yet the Christmas decorations started going up along the City’s main shopping belt and within all the shopping malls in the last week of October. Yes, the Christmas trees are already standing tall in their full gold and silver glory, proudly twinkling with hundreds upon hundreds of fairy lights. Now, as we swing into November, the “noise pollution” has also started, and the supermarkets have already rolled out the puddings, mince pies and all that seems to form a necessary part of a gastronomically and commercially successful Festive Season.
Under normal circumstances, I adore the Holidays, but this slippery slope of “advance celebrations” depresses me so. We now start celebrating Christmas, Chinese New Year and the Mid-Autumn Festival two months in advance (and it gets earlier and earlier with each passing year). By the time the “real thing” rolls around, I’m so sick of everything associated with the celebration! Is it just me, or do others feel the same way as me?
Urgggh! I think I need a holiday to get away from the Holidays!
Excuse me whilst I go nurse my aching head…
09:50 PM in Crumbs & Tidbits | Permalink | Comments (14) | TrackBack
Thursday, November 04, 2025
Drowning My Sorrows In Chocolate
Sigh! What can I say?
There was nothing I could do. I was powerless. I could not partake of the process ; all I could do was watch, hope, silently plead, inwardly cajole and in the end… simply sigh…
Though I could not be a participant, the choice made by one nation (or more accurately, half a nation) will and does affect me and my life half way across the globe ; it affects the region in which my country sits ; it affects this world in which I want to live joyfully, freely and safely. A nation chose - - not only their own future, but that of the rest of the world too.
You know, change is good, and sometimes it is very necessary. But I’m also learning it doesn’t always come when you want it to.
So, last night, we joined Pim (and I’m sure many more out there) in drowning our disappointment in chocolate. For us though, it was a rich, intensely bittersweet (maybe I should have just used bitter unsweetened instead) chocolate pudding.
I figured that since I couldn’t do anything to help ensure greater multi-lateralism in the world, I could at least put some multi (lateral)-layers into the small world of chocolate, sitting in two wine glasses, that I had created and could control.
Our dark, luxurious (but low fat) chocolate pudding thus came layered with slivers of Italian ladyfingers soaked in a combination of strong espresso (we needed to stay awake) and amaretto. And finished off alternately with a sprinkling of shaved dark chocolate or a scattering of toasted almonds.
And, for a few moments at least, the world was serene and… at peace…
Copyright © 2004 Renee Kho. All Rights Reserved.
Please contact me for permission to copy, publish, distribute or display any of the images or text contained in this article.
09:23 AM in Food and Drink | Permalink | Comments (38) | TrackBack