« March 2004 | Main | May 2004 »
Friday, April 30, 2025
Sweet Labour Day Weekend to All!
As we head into the Labour Day Weekend, I just thought it would be nice to end the week on a sweet note… with a few more pictures from the Food & Hotel Asia (FHA) 2004 Culinary Competition.
These were some of the results of the pastry/sugar-works competition. Each one a piece of edible art…
This one – a fruit and picnic basket – picked up a gold medal along the way. It’s not hard to see why. Each fruit was a tantalizingly glossy and glistening sweet sculpture that looked so life-like one half-expected to find juice squirting out should one take a bite into the fruit. And oh, that slab of cheese next to the basket… anything for a piece of that luscious looking beauty on a chunk of freshly-baked crusty loaf.
This sugar/pastry sculpture (below) had more global aspirations. Although I wasn’t quite sure what the message was, I loved the filigree design and detailing of the globe stand, which was worked to very realistically resemble aged wrought iron.
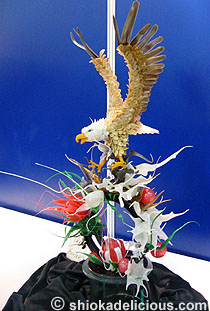
Both majestic and delicate at the same time.
Celestial beings of a less secular kind.
The detailing on the camel’s “hair”, the young lady’s gossamer thin veil and the little clay pots and vases were exquisite.
This one was quite something to behold. It was an entire scene centered around the legendary Chinese hero Zhong Kui. Here, the wedding procession of Zhong Kui’s younger sister was recreated.
The attention to detail was pretty amazing. Look at the finely crafted tassels on the shaders. Even the traditional brass corners, locks and decorations on the wooden chests were reproduced faithfully down to the last detail.
Each face and facial expression was unique and helped tell the story. Quite amazing!
The above were the pastry/sugar entries. Then of course, there were the chocolate works…
A popular theme each year is sculptures of humans. This was one of the entries for this theme in this year’s competition. Personally, I felt I had seen better ones in previous years, which had “livelier”, more “human” facial expressions, better mastery of physiological proportions and so on.
But this one was still sensational for its attention to detail. See the bead necklaces the tribesmen were wearing? Each tiny, individual bead was painstakingly crafted in full delicate detail. The body hair effect was also very “real life”! ![]()
I loved the tiny blades of grass. They almost looked like they were rustling in the breeze.
Another chocolate sculpture of humans and animals.
And of course, it would have been most remiss to not have anything from Harry Potter. So, this was a white, dark and milk chocolate recreation of Harry Potter’s chess set.
Yet another Harry Potter chess set. I preferred this one. Really liked the aged / used wood appearance of the chess table. Very, very realistic and life-like. This one even had a small drawer coming out of the chess table (and which I very conveniently chopped off in the picture, but can still be glimpsed on the left hand side of the photo). Very nice!
Finally, a modern, abstract chocolate sculpture. Oh, I’m sure many, many people were tempted to take a huge bite out of this delectable beauty!
On that sweet note, have a wonderful Labour Day Weekend.
And Happy May Day!
Copyright © 2004 Renee Kho. All Rights Reserved.
Please contact me for permission to copy, publish, distribute or display any of the images or text contained in this article.
12:38 PM in FHA 2004 | Permalink | Comments (0) | TrackBack
Thursday, April 29, 2025
Ah! There Art Few That Art As Sweet And Crunchy As Thee, My Streusel

The week before last was one of frenzied (even manic) baking activity. I was like a home-baker on steroids. There I was, baking like there was no tomorrow. Within seven days, I made some oatmeal-raisin cookies, some raisin-cinnamon scones, a chocolate marble cake, a savory ham-onion-cheese-filled bread loaf and a sweet raisin-tangerine-almond-filled loaf (my first successful bread caper! yay!), a durian fudge cake, and finally, this… an almond streusel cake.
I found the recipe for this cake – or at least, the inspiration for this cake – while surfing around the Net looking for a recipe that would help me use up half a carton of buttermilk that was sitting in the fridge. Yes, I seem to be in a constant and continuous “have you in my life, have you not in my life” vicious circle with buttermilk. I would buy a carton of the stuff for a recipe I want to make. Use a tiny bit. And the rest would sit in the fridge. It would approach expiration date. I would hastily look for something to bake or cook that would use it up. But more often than not, very soon after “clearing” the buttermilk from the fridge, I would then find something else that I really want to make and that requires buttermilk. And so I buy a carton of the stuff. Use a tiny bit… Sigh! And so it goes…
But I love buttermilk. Especially for baking. It gives the baked item an incredibly light, fluffy and tender crumb and texture. And it allows this to be achieved with a lot less fat in the recipe than normal. It’s great for cooking too. When used for things like “oven-fried chicken” it makes the meat wonderfully moist, tender and succulent.
This recipe is adapted from one that I came across on cookinglight.com. The original is an “apple streusel cake with almonds”. My family is split 80:20 when it comes to apples in baked goods. 80% doesn’t like the taste of baked apples – at all. 20% does. And naturally, being the democratic family that we are ![]() , the majority has the greater voice and the deciding vote. So, no apples in baked goods.
, the majority has the greater voice and the deciding vote. So, no apples in baked goods.
I decided to use just the streusel part, but doubling the amount, and also to make some modifications in the cake part of the recipe, to turn it into an almond streusel cake.
I had initially thought, erroneously as it turned out, that the cake would still be “low fat”. Well, not quite. It is definitely a “healthier” less-fat version of a regular streusel cake, just not “low fat” like the original apple version.
“Healthier” it may be but it tastes (and smells) so very good. Even while it was still baking in the oven, my father, who was out working in the garden, wandered into the kitchen, attracted by the glorious aromas, and wanted to know what was cooking, and whether he could have some. The other members of the family also wafted into the kitchen at various times during the baking process, demanding to know what was baking, where their share was and why it was taking so long! It smelt that good!

Almond Streusel Cake
Streusel:
4 tablespoons all-purpose flour
4 tablespoons brown sugar
2 tablespoons butter
5 tablespoons sliced almonds
Cake:
¾ cup granulated sugar
¼ cup (2 oz) “light” cream cheese, softened *
¼ cup (4 tablespoons/2 oz) butter, softened
2 tablespoons amaretto (almond-flavored liqueur)
1 ½ teaspoons pure vanilla extract
1 large egg
1 ¼ cup all-purpose flour **
½ teaspoon baking powder
¼ teaspoon baking soda
¼ teaspoon salt
¾ cup low-fat buttermilk
* I used “50%-less-fat cream cheese”.
** The original recipe used plain flour. I substituted cake flour instead when I made the cake, as I wanted a very soft and fluffy cake texture. And indeed it was. But perhaps almost a tiny bit too soft and fluffy – if such a thing was possible. So, I would recommend going back to using just plain flour.
• Preheat oven to 175C or 350F.
• Prepare the streusel: combine the flour and brown sugar in a medium bowl. Cut in the butter with a pastry blender or two knives, until the mixture resembles coarse meal. (I personally find it much easier and quicker to do it with the finger tips, provided you don’t have overly warm hands and fingers that would melt the butter and cause the mixture to get too wet and soggy.) Stir in the almonds. (I leave this step to the last, just before the streusel is about to be sprinkled onto the batter, to prevent the almonds from sitting in the moist butter environment for too long and going soft, and thus crisping up a little less beautifully.)
• Prepare the cake: measure out flour using the “swirl-lightly spoon-level” method. Combine it with the baking powder, baking soda and salt. Sift twice. Set aside.
• Combine granulated sugar, cream cheese and butter, and beat together with an electric mixer on medium speed until smooth.
• Add the amaretto, vanilla extract and the egg. Beat well.
• Add flour mixture to egg/butter mixture alternately with buttermilk, beginning and ending with the flour mixture. Beat to combine.
• Pour batter into an 8-inch round or square cake pan, coated with cooking spray. Sharply tap pan once on counter to remove air bubbles.
• Sprinkle streusel evenly over the surface of the cake batter.
• Bake for 40-45 minutes, or until a wooden skewer inserted into the center comes out clean. Cool in pan for 10 minutes on a wire rack. Remove from pan. Cool for a further few minutes on wire rack, if possible. But most probably not. Cut, serve and savor. Best eaten while still warm.

The cake tasted wonderful! Needless to say, as with all streusel toppings, this one was beautifully crispy and crunchy, with the added fragrance and crunch of the almonds.

The cake was very, very soft and fluffy, with a very tender and refined crumb.
This baked item is best eaten warm from the oven. It doesn’t keep very well, especially in our humid tropical weather. The streusel goes soft by the next day. Although popping it into the toaster oven will help crisp it back up somewhat. But then again, with the way this cake smells and tastes, it is not likely that it will last very long after it comes out of the oven.
For me, this recipe is a keeper. It’s terribly simple, quick and easy. It tastes very, very good. And… is fairly “healthy” as far as streusel-topped items go.

A cousin who happened to pop by that early evening to see my brother, upon tasting the cake, asked: “wow, where did you buy this?” For a home-baker, that was high compliment indeed, if I may say so myself. ![]()
Copyright © 2004 Renee Kho. All Rights Reserved.
Please contact me for permission to copy, publish, distribute or display any of the images or text contained in this article.
02:30 PM in Home Baker: Cakes | Permalink | Comments (19) | TrackBack
Wednesday, April 28, 2025
Please Help…
Speaking of kitchen toys… I would really like some help…
I am desperately seeking some individual-portion sized ramekins. I have searched high and low, but for some strange reason, haven’t been able to find any small ramekins on this ‘lil island of ours! I’ve scoured the “specialist” places like Sia Huat and even Phoon Huat. I’ve recced the cookery wares section of the major department stores. I’ve even rummaged through Ikea. No luck. There doesn’t seem to be any ramekins available in Singapore! But surely that can’t be true. Would you know where I can get hold of some ramekins of maybe about ½ to ¾ cup or 120ml to 180ml volume each? I would really appreciate any leads on this. I’ve been craving to try my hand at making some soufflés.
Also…
Would you know how these things should be cared for? I recently bought several of these silicon baking trays at the FHA. I was told that I cannot use washing liquid on them! Only warm water. Is this true?
I have to admit I’m slightly uncomfortable with the idea of not using detergent on them. The thought of a gazillion e-coli bacteria having a feeding frenzy on even the thinnest film of food remnants left on these trays, especially given our current very warm (34C / 93F) and humid weather, gives me the willies.
I’m not sure if the materials of these currently very popular silicon baking wares differ from brand to brand. The ones I bought are from this French company that was exhibiting at FHA. I had contemplated buying from Demarle – another French company and apparently, according to their website, the original inventor of the Silpat and the Flexipan. But they were only selling large sized trays suited for large sized commercial ovens, and even then, only in bulk.
I would appreciate it if you would share any experiences you may have in using and caring for these silicon contraptions.
Thank you!
Copyright © 2004 Renee Kho. All Rights Reserved.
Please contact me for permission to copy, publish, distribute or display any of the images or text contained in this article.
01:22 PM in Crumbs & Tidbits | Permalink | Comments (16) | TrackBack
My New Love

I know, I know, you are probably sick and tired of reading about my toast / bread / toasted sandwich escapades – which I have already written about here, here, here, here and here – in all its various guises. But, indulge me, if you will, one more time. I simply have to share this. This was probably one of my most scrumptious, delectable toasted sandwich discoveries in a long, long time. Oh! It was jaw-droppingly good. I loved it. I was oohing and aahing at the very first bite.
Well, you see, the story began like this… I had just bought myself a spanking new grill pan…

I had been wanting one of these for the longest time, but they were all so exorbitantly and prohibitively expensive – around S$200 and above. And for a pan that I would not use on a day-to-day basis, but only on occasion to achieve certain results with certain dishes, I couldn’t in all my conscience justify the indulgence. Then… the other day, I found this one… which was nicely affordable. I was delighted. I was no pan snob. I didn’t need a brand-name grill-pan. As long as it was functional and did what it was supposed to do, that worked for me. And this one worked just fine. Plus, it wasn’t arm-droppingly heavy (the weight of the pan I mean).
So anxious was I to try it out as soon as I got home, I had to think of something to make with it. Since dinner was still some hours away, what better than a stove-top grilled sandwich to inaugurate my brand new toy. Besides, I was always game for a warm sandwich at any time of the day.
I was rather conservative to begin with. I simply “dry” toasted a couple of slices of bread in the grill-pan. I wanted to see how well this pan could do a kopitiam-style (local coffee shop style) kaya toast. It would have been nice to use the white, fluffy kopitiam bread, but since there was none at home, regular whitemeal bread it was.

The grill marks were very nice. And by lightly pressing down on the bread with the sauté spatula while they were toasting, the toasts were nicely thin and crispy, almost like the kopitiam ones. Once nicely browned, I spread Hainanese kaya on one of the toast, topped it with some cheese, followed by the second piece of toast. Voila! Kaya and cheese sandwich. One of my many toasty favorites.
Yet, I wasn’t satisfied somehow. It was good. But normal. I’ve had this dozens of times. I wanted my new grill-pan to surprise me with something new and exciting.
After a bit of browsing around the pantry and the refrigerator, I suddenly thought: hmmm… I tried kaya with pork floss the other day, and it was rather tasty. How about kaya, floss and cheese? Yuk you say? I know, it does sound rather freakish, maybe even grotesque. But, hey, someone has to keep pushing the boundaries of gastronomy, no? ![]() Oh, the things I do in the name of food research!
Oh, the things I do in the name of food research! ![]()
I also decided I would do a proper grilled warm sandwich this time. So, two pieces of bread (crusts removed). One side of each piece very lightly spread with a small pat of butter. On the flip side of one of the pieces of bread, a liberal dollop of Hainanese kaya was spread. Next, a generous sprinkling of Krispee pork floss. Then, a slice of mild (this is important) cheese. Finally, it was all topped with the second piece of bread, buttered side up. And into the nicely hot grill-pan went the sandwich.
I resisted all temptation to move the sandwich around on the pan, or even to take a peak at the underside, and simply left it to “grill” on medium heat. All I allowed myself was a gentle (keyword) application of pressure to the sandwich with the sauté spatula, to get even browning on the bread and to compact the bread a little – a little like a basic, manual version of a panini press. ![]()
After 2-3 minutes, a quick check… yep, the underside was done… so gently, I turned the sandwich over. Another 2-3 minutes. Other side was also done. Removed it from the grill-pan.

It looked really good. Much better than the “dry” toasted version, of course. The butter had helped turn the toasted sides a gorgeous golden brown. And the smell of grilled buttered bread, needless to say, was pretty incredible.
Cutting the sandwich in half diagonally, another tantalizing sight greeted me. Creamy melted cheese. Crispy pork floss. Richly aromatic kaya.
And oh! that first bite! The bread was crispy on the outside, and still slightly soft and fluffy on the inside. The melted cheese had melded with the kaya to give a sumptuously smooth, creamy filling with a wonderful caramel-y overtone from the Hainanese-style kaya. Almost like dulce de leche. Only not as sweet. It was beautiful. The sweetness of the kaya was very subtly balanced out by the saltiness of the cheese. Added to this heady mix was the pork floss – slightly moistened by the melted cheese and kaya, making it soft and almost creamy in parts, and yet still crispy and somewhat crunchy in other parts. One word. WOW!
Or several words… oh la la! Or as a Singaporean may say… “wah-lau-eh”!
Somehow, by accident almost, the three incongruous flavors, textures and aromas had come together and worked stupendously well. The caramel tones and coconut-infused aromas of the Hainanese-style kaya were like magical star-dust over the sandwich. The mild-mannered ways of the cheese provided suave smoothness and creaminess without being overbearing and intrusive. It was distinctive yet subtle. A stronger flavored cheese would probably have been too crass and would have upset the balance. And the Krispee pork floss brought the finishing touch to the party with its sparkling and chirpy personality.
A well-heated grill-pan was important. It allowed the bread to crisp and brown very quickly. As I discovered from a subsequent attempt to repeat the wonderful taste experience, leaving the sandwich sitting in the pan for too long resulted in soggy and mushy pork floss, from it having sat in the kaya and melting cheese for too long. And that didn’t taste very good. So the key was to have the pan hot enough to turn the bread golden brown and crispy and to melt the cheese in a short enough time that would not adversely affect the crunchy texture of the floss.
It was a fairly sweet sandwich – not a savory option for sure. But it was so good. (Um… I think I’ve said that already). Even after devouring one kaya/cheese sandwich and one kaya/cheese/floss sandwich, it was all I could do to resist making another one for myself. I’ve made this sandwich a few more times since. And I still like it. Easily one of my favorites now.
As for my grill-pan, it did me proud on its first outing in my kitchen. And it and I… I think we will have a highly delicious future together… with many more delectable adventures to come.
Copyright © 2004 Renee Kho. All Rights Reserved.
Please contact me for permission to copy, publish, distribute or display any of the images or text contained in this article.
01:13 PM in Home Cook: Sandwiched! | Permalink | Comments (17) | TrackBack
Tuesday, April 27, 2025
The Silkroad Less Traveled

Even though it wasn’t that long ago that I posted a review on Silkroad, here is an update on the restaurant.
I finally got to try their “dao xiao mian” (knife-shaved noodles) about three and a half weeks ago, just before I left for my New York trip. We had happened to be in the Tanjong Pagar area, and decided on the spur of the moment to pop into Silkroad for a quick and simple late-ish dinner. It was a Friday, so I figured I would finally get a chance to sample the knife-shaved noodles (which are only served Mondays through Saturdays) that I have heard so much about. I wanted to see if it lived up to the “strong recommendations”.
Knife-shaved noodles (dao xiao mian) are essentially thin slices of noodle dough – the same dough that is used to make hand-pulled noodles or la mian – that are shaved off the dough block using a knife, rather than being pulled by hand into noodle strands. The key to good knife-shaved noodles is of course the knife-skills of the chef. The slices of noodles should be as thin as possible, almost translucent. This will give the noodles a silky smooth, soft texture. Too thick, and the noodles will be chewy and tough.
There were only two dao xiao mian dishes on the menu. So, we ordered both.

Beef soup dao xiao mian. This was knife-shaved noodles in a mildly (for us at least) spicy beef broth. Very similar to the Sichuan-style beef noodles I wrote about the last time. I didn’t think it was the exact same beef broth that was used in the previous beef noodles, which had been somewhat spicier and punchier. The beef in this version was rather chewy and toothsome. Quite a bit of jaw-work involved there. The broth was decent enough – flavorful and tasty. Rather unfortunate about the beef.
As for the noodles themselves, I was disappointed. Friends had spoken highly of Silkroad’s knife-shaved noodles. So, I could only think of two explanations for my experience. Either my friends “over-sold” the noodles to me, or the chef was having an “off-day”, which happened from time to time even to the best of us. I would like to think it was the latter. But I wouldn’t know unless I tried the noodles again in the future – something I don’t think I will be in a hurry to do.

The weakness was not in the noodle dough itself. Silkroad does a good noodle dough – as evidenced in their la mian. The let down was in the knife-work. There was a great unevenness in the thickness of the noodles. Some of the slices were nicely thin, and thus beautifully soft and silky smooth. But equally, there were many thick, tough and chewy slices too. The thin slices were cooked just right, which meant the thick slices were way undercooked, and just not very palatable. I abandoned the dish half way through.

Fried seafood dao xiao mian. This was the other dao xiao mian offering on the menu. The noodles were fried in the “wet style” – much like a Cantonese ho fun (flat rice noodles). Regrettably, it fared even worse than the beef version. The noodles suffered the same shortcoming as those in the beef soup noodles – lots of too thick, too chewy, undercooked pieces. However, this time, the dish was further compounded by the fact that unlike its beef soup cousin, it didn’t have the benefit of a flavorful broth to make up for the unappetizing noodles. The gravy was unexciting at best, or if brutally honest, characterless and bland. There just wasn’t anything happening there at all.

The only saving grace… the seafood. The scallops were brimming with briny freshness and were meltingly tender, with just the right amount of bite. The prawns were wonderfully crisp and crunchy, and super fresh. They were cooked to a perfect “glass prawn” (buo li xia) texture – a texture that is so crispy and crunchy it has a certain translucent quality to its bite and mouth-feel, almost like biting fine glass I suppose. It is a prawn texture that is often sought after by some foodies. This unfortunately was lost on my dining companion who doesn’t like “buo li xia” at all, preferring instead the more full-bodied texture and denser crunch of “normal” prawns.
We picked off the seafood and vegetables, and left most of the noodles untouched.
Fortunately, we had also ordered my favorite – the dried fried “four seasons beans” or gan bian shi ji dou. (A picture of this dish can be seen on the previous Silkroad post). This was, as usual, done unfailingly well. The beans were flash-fried to perfection. A fine balance of crisp crunchiness with soft tenderness. The accompanying minced meat mixture was as tasty as ever. Intensely flavorful with a finely tuned, richly complex combination of textures and tastes. This time around, I had asked what the finely minced dark-colored dried vegetable in the meat mixture was. I had thought it was wind-dried mei cai in Mandarin or mui choy in Cantonese. I was told it was a unique Sichuan wind-dried vegetable, very different from mei cai. The name completely eludes me now. But the restaurant has it specially flown in from Sichuan. It was delicious, and probably what helped make the meat topping so delectable and addictive.

With tummies still not satiated, we decided to order another noodle dish to share. We settled for “dan dan mian” – la mian (hand-pulled noodles) topped with a spicy minced meat gravy. (I forgot to take a picture of the noodles after it was tossed and covered with the gravy. It looked dry from the above photo, but the tasty sauce was resting underneath the noodles).
This was good. The meat sauce was nicely spicy with characteristic Sichuan mala (numbing and hot) peppercorns. The meat was lean, tender and very flavorful. The noodles fell just a tad on the soft side of al dente, but still good. We enjoyed this dish, with all its punchy and robust spice notes.

We rounded off the meal with my all-time favorite Chinese dessert – Shanghai pancake or “dou sa wo bing”. Thin, crispy pan-fried pancakes filled with red bean paste.

This was my first time trying Silkroad’s version, and I was pleasantly surprised. It was a rather different take on this very popular Chinese dessert. The pastry skin was unique. Instead of the usual thin, smooth batter, this one had a sort of lightly breaded texture, and yet the pancake was not breaded. From what I could tell, the “breadcrumbs effect” was inherent in the batter used, and frying the batter created this effect.
The pastry was gorgeous. Normally, most versions of this pancake (unless they were very well made) would have a very crispy, golden brown outer “skin” with a thin layer of soft dough on the inside. But Silkroad’s pastry was not only incredibly thin and very, very crispy, it also came without any soft dough layer. It was pure crispy crunchiness. Almost like a crispy dough cracker, but with a more tender and flakier crumb. It was lip-smackingly good!
The red bean paste was also interesting. I think it was homemade. A rather unique blend of two bean paste styles - the Japanese-style reddish colored whole bean paste and the more traditional Chinese-style almost-black smooth paste. More importantly, the bean paste was not overly sweet and was not oozing copious amounts of oil. In fact, the pancake as a whole was wonderfully free of greasiness. Very nicely done.
On balance, the meal was pretty good, even if not spectacular. Yes, the knife-shaved noodles were disappointments, but the other dishes more than made up for it.
I would still say the basic noodle dough and the hand-pulled noodles at Silkroad are consistently well-made. The potential weak link lies in the noodle kitchen, and its handling of the noodles. It would seem that consistent cooking is a little hit-and-miss when the restaurant is busier, thus sometimes resulting in la mian that are a tad overdone. Not catastrophically so, but still noticeable. The noodle kitchen manages well enough on quieter evenings, as evidenced from my previous visits.
Looking around at the other diners that night, most of whom had chosen to dine on “proper meals”, the main kitchen didn’t seem to have the same difficulty coping. A lot of the main dishes looked positively delectable – like the zhang cha ya (tea-smoked duck), gong bao ji ding (diced chicken sautéed with dried chillies) and several more. While in the past I have generally gone to Silkroad mainly for their noodles, I think I should try more of their main a la carte menu on my future visits.
Of note, the service that evening was excellent. Probably the best I’ve experienced at Silkroad. The servers were polite, friendly, helpful and very attentive. An experience that was common to all the diners at the restaurant that evening.
Overall, this is still a very good noodle place. So long as you stick with the hand-pulled noodles. And those selections with the “chef’s hat” icon next to them on the menu, indicating they are the chef’s specialties, tend to be safe bets for an enjoyable meal. It would also appear that this restaurant doesn’t do badly on their main cuisine dishes either. I now also have one further reason to keep going back to Silkroad… the newly discovered dou sa wo bing Shanghainese pancake.
Silkroad
Amara Hotel Singapore, Level 2
165 Tanjong Pagar Road
Singapore 088539
Tel: 6227 3848
Opens daily.
Lunch: 11.30am to 3.00pm
Dinner: 6.00pm to 10.30pm
Copyright © 2004 Renee Kho. All Rights Reserved.
Please contact me for permission to copy, publish, distribute or display any of the images or text contained in this article.
04:01 PM in Lion City Shiok-Eats: Chinese | Permalink | Comments (14) | TrackBack
Monday, April 26, 2025
Ember
I have been wanting to try this place for the longest time. Friends have spoken highly of the very good food served there. Magazines from New York to London to Sydney have lauded the unique design of the boutique hotel within which this restaurant is situated. However, for one reason or another, we have never made it to Ember – until recently. Finally, three Saturdays ago, fresh off the plane from New York, I was taken to dinner there.
Ember is the restaurant of Hotel 1929. This is a “designer” boutique hotel very similar to those now commonly found sprinkled throughout New York City. Housed in several restored conservation colonial shophouses in the heart of what used to be Singapore’s notorious red-light district, 1929 is a wonderful breath of fresh air amongst Singapore’s mass of uniform glass-marble-concrete luxuriant havens that are the 4- and 5-star hotels managed by global brands like the Ritz Carlton group and the Mandarin Oriental group. It is edgy, funky, fresh and a whole lot of fun. And yes, it is “hip”.
1929 is the brain-child of a young, obviously very courageous, entrepreneur, who despite the risks and odds, plonked down a few million dollars to buy a run-down piece of real-estate in a section of town, which although cleaned up and sanitized by the Government, was still not deemed particularly “tourist friendly”; spent another few million dollars to restore and renovate the buildings; and created what has become a trend-setting first in Singapore, and a hands-down winner. Just over a year after its opening, the hotel is now much sought after by foreign visitors (and locals too) as a unique and rather fashionable experience. It has brought renewed vigor to a part of the City that was in much need of an injection of life. Almost overnight, it has single-handedly and significantly upped the “hip & happenin’” quotient of the area.
However, enough about the hotel. If you would like more information about 1929, or wish to view a few pictures of the hotel, click here and here. And if you love the idea of a private al fresco bath and shower on a patio with a view of the Singapore skyline, then the penthouse suite in this hotel is the one for you when you visit Singapore! ![]()
Ember restaurant continues the mod chic look and feel of the hotel. Its predominantly cream and dark brown décor exudes a contemporary air. The lines are clean and spare. Large mirrors cover nearly all available wall space, drawing the eye out and maximizing the space of this small and cosy outfit. Even at full capacity, there is a feeling of spaciousness and openness with comfortable spacing between tables. The floor to ceiling glass frontage further extends the restaurant space onto the street outside, and makes it a great venue for people-watching.
It is interesting how the owners have managed to create a smart-casual ambience with very simple, almost budget materials. Tables are basic in design and make. Tablecloths are eschewed for monochrome textured placemats. Chairs are simple yet sleek and comfortable. Mirrors, curtains and glass create the spatial interests. It works. The whole package works. One almost doesn’t notice that the furniture and furnishings are not made of “designer” category materials. They look “designer”. And perhaps as testament to that, this 46-seater (yes, I counted – it’s a bad habit of mine) restaurant seems to draw a rather chi-chi crowd – mostly young, well-dressed, chic and fashionable couples or groups of friends.
From the moment we stepped through the glass doors, we experienced nothing but superb service. Smiles and warm welcomes were immediately forthcoming. And throughout the evening, the small but obviously well-oiled team of Sabrina, restaurant co-owner and wife-of-chef, and her three staff were everywhere they were needed, at the moment they were needed. Almost impeccably they walked the fine line between friendliness (but never familiarity) and professional efficiency and courtesy. They were unfailingly attentive and unobtrusive at the same time. Familiar faces were greeted by name as they arrived. Glasses were kept refilled and plates cleared in a timely manner. Even before a diner could stoop to pick up a dropped napkin, a staff was there to pick it up for her.
I have to say I was impressed that, upon being seated, we were asked if we would like iced or warm water. Now, this may sound like nothing much. But to me, it showed the level of customer sensitivity of the Ember team. You see, Asians have a peculiarity (or at least peculiar to the Western mind). It is common for people to request for warm (or even steaming hot) water rather than iced water in restaurants. Yes, even in our hot, humid tropical weather, we drink warm water. Almost all restaurants, especially “Western” restaurants will by default pour iced water as soon as the customer is seated. And it is then for the customer to indicate an alternate preference for warm water. So, this was a first for me. That they bothered to ask the customer, or that a choice was proffered without the asking. I was suitably impressed. Uppermost in their minds was not the need to be “high-class” or “westernized”, but to serve their clientele to the best of their ability. It augured well for an enjoyable evening ahead.
We started with fresh-from-the-oven, hot, crusty sundried tomato and herb bread. Home-made I presumed. It was good.
Again, instead of going down the well-trodden and all too familiar path of so many of the other restaurants of serving bread with rosemary-scented olive oil, here, the bread was accompanied by good old fashion butter. Don’t get me wrong, I like freshly baked bread dipped in olive oil, but it has become so de rigeur in restaurants, regardless of the style of food the restaurant serves, that it has become stale (excuse the pun) and just plain boring. Besides, surely there is not much that is more palate pleasing than a hunk of warm bread spread with a chunk of butter, real butter. I like their style, I have to say.
Our only gripe… it was one small bread loaf to every two persons. Each bread roll was cut into six small almost-bite-sized cubes. Three cubes per person, especially given how good the bread was, were hardly sufficient to even whet our appetite. One crusty loaf to each diner would not have been amiss. Nevertheless, the food started arriving soon enough, and we were content to feast our palates on the Chef’s deft creations.
The menu was streamlined yet comprehensive for a restaurant of this size. A fairly substantial selection of appetizers ran the gamut from foie gras and warm lamb salad to oysters, soft-shell crabs and crab cakes. Entrees seemed slightly more favored towards seafood – perhaps the Chef’s forte. There were several selections of cod and Chilean seabass alone. A scallop listing, a few pasta dishes, a lamb, a veal, a chicken and a few other dishes rounded out the offerings.
We decided to share the appetizers. We chose half a dozen oysters and the salmon cakes.
The large oysters (S$16 for half dozen; US$10) came lightly breaded, deep-fried, and accompanied by an array of six different dipping sauces. From right to left: wasabi aioli, Japanese mayonnaise, Thai-inspired lemongrass-chilli dip, “Oriental” peanut-chilli-Chinese peppercorn dip, onion-sesame dip, and orange vinaigrette-style dip.
We really liked the Thai-style dip. It was sweet and sour with a good amount of chilli kick. The lemongrass provided a wonderful, fragrant fillip to the sauce. A taste-bud tingling concoction! It was somewhat similar to the traditional dipping sauce served at Thai restaurants, only more viscous and somewhat chunky with slivers of lemongrass.
Two of the other sauces that we enjoyed were the onion-sesame and the orange vinaigrette. The latter was refreshingly zesty, while being nicely balanced out with a dash of possibly soy sauce and mirin. A lightly sweet, salty and tangy combination. Nice! The onion-sesame was a little hard to pinpoint and define – it was punchy yet subtle, slightly edgy yet suave, chunky yet elegant. Interesting. And tasty too.
The “oriental” dipping sauce, on the other hand, was not terribly inspirational – it tasted like a diluted, liquidy peanut butter-type base with a light touch of chilli and peppercorn. We skipped the Japanese mayonnaise altogether. It seemed such a shame to “waste” gorgeous oysters on a well-known condiment, when there were so many other interesting options available.
As she was clearing the plate, our server asked us which dip we enjoyed the most. She said the most popular were the wasabi aioli, the Thai-style dip and one other which I cannot now recall. We said we found the wasabi in the aioli too understated, and we could barely detect the horseradish’s flavor notes. She was surprised. She said many found the wasabi to be rather “strong”.
The oysters themselves were nicely plump and juicy. The crust was gorgeously golden brown and crispy. And best of all, with hardly any discernible greasy mouth-feel. Inside, the oysters were succulent, moist and tender.
This was a very enjoyable start to the meal. We liked the presentation. We liked the array of dipping choices. We liked the freshness of the ingredients.

This was described in the menu as “salmon cakes with homemade tofu with sweet mirin sauce” (S$10; US$6). The cakes looked interesting, but perhaps being served as they were with the oysters, they were overshadowed by the latter. The panko-crust (I think) had gone soft, almost soggy from sitting in the mirin sauce, which was rather disappointing.
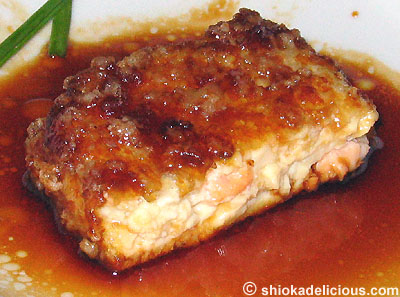
Inside, it was more like “tofu cakes with salmon” rather than “salmon cakes with tofu”. There was but a very sparse sprinkling of small salmon morsels amongst the tofu.
The tofu itself was nicely soft. And although it had a slightly lumpy appearance, it was silky smooth on the palate.
We felt the dish would have been a lot more interesting texture- and taste-wise if the ratio of fish to tofu had been reversed. The salmon would have provided more bite and a richness of flavor, which unfortunately the tofu couldn’t quite provide. However, the sweet mirin-based sauce, which perhaps also had a dash of vinegar, soy sauce and maybe a little sugar, helped the cakes go down well. Nice. Just not a very exciting dish.
Other appetizers on the menu which had caught my eye were obviously the foie gras and also a warm lamb salad with leeks. Those are perhaps for my next visit.
After much dithering, I finally settled for the “braised veal cheeks with spices, garlic pomme puree and seasonal vegetables” (S$25; US$15) for my entrée. This was, in a word, spectacular. It wasn’t much of a looker, but oh, how wonderful it tasted. The veal was meltingly tender. Every bite quite literally almost melted in the mouth. Yet, it was nicely meaty. What I really enjoyed were the generous bits of the soft, tender, dissolve-in-the-mouth gelatinous bits, which are always the best part about eating veal cheeks.
The flavors of the cheeks were richly concentrated from the long, slow cooking process. The spices were finely tuned and rounded – no jarring notes, no over-dominance of one taste sensation over another. A nicely balanced and inspired concerto of flavors and aromas.
The garlic mashed potatoes were beautifully creamy and smooth, with only a subtle (to me anyways) hint of garlic undertones. It paired wonderfully with the veal. The seasonal vegetables were a mix of baby carrots, zucchini and a sprinkling of endame (soy) beans.
This dish was a hands-down winner. I was most reluctant to share more than the initial small tasting piece I had proffered to my dining companion. I think he would have happily devoured the entire serving!
I had a small taste of the “pan-seared Chilean seabass with mushroom and smoked bacon ragout, with truffle yuzu-butter sauce” (S$25; US$15). The ragout was outstanding. Each mouthful was exquisitely infused with the rich, smoky, earthy flavors of the bacon. The flavors were rich, bold and intense. Sensational!
The seabass, unfortunately, was rather nondescript in comparison. The unctuous nature of seabass (and cod) makes it a fish that is hard to cook wrong. Here, the flesh was nicely moist, succulent, flakey and juicy, and the skin was beautifully crisp, as would be expected. But other than that, it was too understated and mild. There were no interesting flavors to lift the naturally bland fish. Yet, at the same time there was a very emphatic, almost cloying buttery feel from the yuzu-butter sauce. When paired with the naturally fatty mouth-feel of the seabass, it proved a little too rich and heavy going for the palate.
Yuzu is a Japanese citrus fruit, the rind of which is often used to flavor sauces and dishes with its distinct aroma and fragrance, which is quite different from that of lemons and limes or other Western citrus fruits. Perhaps my taste-buds were jet-lagged and travel-weary, but I couldn’t detect the yuzu, or indeed the truffle elements in the sauce.
When we asked our server for dessert recommendations, she suggested three – the warm chocolate tart with Bailey’s ice cream, the warm banana tart with home-made lavender ice cream and a spiced coffee cake. I asked about the warm Valhrona chocolate cake. Her diplomatic answer: “I still prefer the chocolate tart”. And so we plumped for the warm chocolate tart and the banana tart.
We tackled the banana tart (S$8; US$5) first, as the ice cream was melting furiously on top of the tart. It was made tartin-style, with a thin, crispy-looking puff-pastry crust, layered with thinly sliced fruit, and finished off with a sweet glaze. We weren’t overly enthusiastic about the taste experience, unfortunately. The pastry wasn’t very crispy nor tender. It took a certain amount of effort to break off each mouthful of crust from the pie. It also tasted like the bananas used were of the “pang jiao” variety, rather than the firmer “pisang raja” variety. (Both are local South East Asian banana species, for which I don’t think there are equivalent English names.) “Pang jiao” doesn’t stand up to cooking very well – it turns mushy with hardly any bite.
The saving grace was the homemade lavender ice cream. Beautifully redolent with lavender fragrance and aroma, it was different and interesting, if a tad too sweet.
The warm chocolate tart with Bailey’s ice cream (S$9; US$5.50) was much more successful.
The short pastry crust was nicely thin and very crispy with a tender crumb. And when we broke through the thin crunchy surface of the chocolate, we were greeted by a most beautiful sight… a warm lava flow of thick rich chocolate filling. Ah! Chocolate heaven! The dark chocolate was rich, smooth and fairly refined, with just the right notes of bitterness balancing out the sweet. If I was to nit-pick, it would have been even better if the filling had been less liquid, and more molten in nature. That would have made it a chocoholic’s dream.
Although the “warm-molten-center chocolate dessert” idea is starting to be worked a little to hard by most “western” eating establishments, and is becoming a tad too common-place, it is still a crowd pleaser. Few can resist, unless you are one of the few people who doesn’t like chocolate, the sight, smells and tastes of rich, gooey chocolate.
Ember’s mini-tart version was a little different from the standard cake version, which made for a nice change. And it was well-executed. Excellent crust and a good chocolate filling. I would say one of the better versions in town in this price category. It was, for me, a wonderful chocolate fix.
The Bailey’s ice cream was good – a normal, but good-quality commercial version. Perhaps Haagen Daaz or similar.
As we sat back, and allowed all the different flavors and taste-sensations of our meal to sink in, we agreed it had been a wonderful dinner. The food was of a very high quality. The talent of the chef-and-co-owner, Sebastian Ng, was clearly evident. (In fact, just this past week, Sebastian won the Best Rising Chef award at the World Gourmet Summit Awards of Excellence, held annually in the Lion City). Overall, the dishes were executed competently with a sure hand, with only a few rough edges, which is par for the course even for the most exalted of chefs. Given the small, lean team managing the front of the house, we would imagine that the team helming the kitchen was also equally lean and streamlined. And yet, the dishes were well-prepared, and equally importantly, well-timed. We weren’t rushed through our various courses, and yet neither were we left wondering if our orders had been forgotten. Not an easy balance to strike on a busy full-house Saturday evening.
The prices were very reasonable, for this quality of food. A three course meal, without wine, could be comfortably had for around S$60-65 (US$36-39), inclusive of taxes, per person. That’s not bad in this City, where the median for comparable quality meals is easily around S$80-100.
During the day, the restaurant also serves Executive Set Lunches in addition to the regular a la carte menu. A three course set lunch, in which one gets to choose a starter and main from probably about 80% of the regular a la carte menu, is a very appetizing S$35, before taxes. A second set menu goes for S$24, before taxes. The dishes in this latter set are decided by the Chef, and the menu changes every Monday and Thursday. You can call ahead to find out what’s on the menu for the day.
I have to admit that I usually make repeat visits to only a small handful of restaurants. The reason being purely that one is always spoilt for choice when it comes to eating out in Singapore. With literally thousands of options to choose from, and new ones opening up almost every other week, there are always so many interesting outlets to explore and experience - and many of them are pretty good. So, the restaurant or eating place would need to strike a deep resonant chord in me with their combination of food, service and pricing for me to make it a “regular”. And for Ember, I think I would return, if for nothing else but the veal cheeks.
It is also a great place for business luncheons. The only small negative would be the less than perfect acoustics of the place when it is running at full capacity. But then again, this is hardly unique to this place and seems to be an inherent problem in a lot of the City’s restaurants.
Another detractor would be the limited street-side parking, both during the day and in the evenings. So ladies, either leave those Manolo Blahniks at home, or have yourself dropped off in front of the restaurant before your partner goes off in search of fairly elusive parking spaces.
Over all, this is a very nice place to come for high quality food, excellent service and reasonable prices… and of course to feel and be chic, fashionable and, dare I say it, hip. All without breaking the bank.
Ember
Hotel 1929
50 Keong Saik Road
Singapore 089154
Tel: 6347 1928
Fax: 6347 1925
Email: [email protected]
Open for lunch and dinner, Mondays to Fridays; dinner only on Saturdays.
Close on Sundays.
(Reservations are necessary on weekends and highly recommended on weekdays)
Copyright © 2004 Renee Kho. All Rights Reserved.
Please contact me for permission to copy, publish, distribute or display any of the images or text contained in this article.
12:02 PM in Lion City Shiok-Eats: Western | Permalink | Comments (13) | TrackBack
Friday, April 23, 2025
Chocoholics Unite!
Don’t worry. No more cakes today, I promise. That was just a little teaser.
I was watching the very young pastry chef as she decorated this cake on Tuesday. She must have then gone on to decorate another 3, because when I walked around the display of the competition results on Thursday, she had won herself a gold medal for her quad ensemble of cakes. The other three were perhaps slightly more involved designs, with some architectural interest. Overall, very interesting and rather elegant. Of the four cakes, two were chocolate by design and the other two had fruit-based decorations. I thought this fig, blackberry and liqueur (I cannot now recall what liqueur it was) cake looked absolutely scrumptious.
I had wanted to take pictures of the results of the plated desserts competition, simply because I enjoy drooling over desserts, and also because they can be a source of wonderful ideas and inspirations for making and plating my own desserts. Unfortunately, on Tuesday the results were not out yet. Then, on Thursday, when the results were out, I didn’t have my camera with me!
So, here instead are the “after-desserts” – that is, petit-fours and pralines. Just thought they make for a rather nice sweet start to the weekend.
This collection, by either the Swisshotel Plaza Singapore or the Raffles Hotel Singapore (can’t remember which) garnered a gold medal.
The crowd around this display was too pressing and there were too many camera flashes going off. So, only one close-up shot, unfortunately…
This collection was a bronze medalist.
This was the chocolate sculpture which was partially chopped off in the above photo. Rather intriguing concept. But I couldn’t quite figure out the meaning and/or significance of that white chocolate dragon- / lizard-like creature.
Here are just a few pictures of several random petit-fours that I managed to get close enough to, to take a snapshot of…

I really liked the idea of plating on a mirrored platter. It created a beautiful effect, and really enhanced the visual appeal of the delicately crafted morsels. Hmmm… a great idea to use for a fancy dinner party at home I think. Simple and easy to do, but with a great effect.
The chocolate towers on the right were so incredibly tiny, and yet so refined and detailed! They were probably only about half the size of an average petit-fours or praline. And yet, each tiny yellow flower had distinct detailing on them.
Here’s an interesting collection worked around different grains…
In the foreground, little millet-based pralines, and behind it “Rice Checker Boxes”.
Quinoa-based petit-fours. A rather inspired melding together of two contrasts - an ancient grain and a somewhat edgy, modern, architectural structure.
These were the most delicate, refined and dainty “scarecrows” I have ever seen! These “Corn Scarecrows” were more likely to attract than repel I think!
“Oat Season”.
This next praline ensemble took inspiration from well-known and well-loved Asian flavors…
From the fruity…
To the spice- and herb-based…
If only I had a chance to taste some of these. It would have been very interesting to find out how these Asian fruits, spices and herbs flavored pralines tasted. Imagine… durian ganache praline… mmmm...
Happy chocolat-ing!
Copyright © 2004 Renee Kho. All Rights Reserved.
Please contact me for permission to copy, publish, distribute or display any of the images or text contained in this article.
07:07 PM in FHA 2004 | Permalink | Comments (4) | TrackBack
Thursday, April 22, 2025
Even More Cakes!
As promised yesterday, here are more wedding cakes… but wedding cakes with a twist. Wedding cakes of modern concept and design. Wedding cakes which are at times fantastical, at other times whimsical, and at other times still, downright fun and light-hearted. These unique, thematic cake designs inspire with their creativity that challenge the normally accepted precepts of what a wedding cake should look like.
Who says wedding cakes must be white, pretty, dainty, elegant, floral and feminine? They can be of course. But, a wedding cake is a once in a lifetime thing (or at least we usually only plan for it to be a once in a lifetime thing). You get just one wedding cake, so why not have one that represents who you are as individuals and as a couple? Why not have it reflect your interests, passions and hobbies? The wedding is about you and your partner. It’s about your special and unique relationship. It’s about your special day. So, why should your wedding cake look just like everyone else’s?
Want some ideas?
Well, for those with a love for the seas and oceans, perhaps an “Ocean Fantasy” would make your special day extra special and would most definitely wow your wedding guests.
I love the color scheme on this one. Bright, colorful and cheerful, yet at the same time, soothing and elegant even.
The vibrant and lively detailing is exquisitely crafted.
Very three dimensional with a good concept of depth and movement. See little Nemo peeking out from among the reeds?
Almost too pretty to eat!
Now, how about a Chinese theme? I really like the premise of this design. Many Chinese couples go through traditional Chinese wedding ceremonies like the tea ceremony and so on, and yet when it comes to the wedding cake, it is almost always of “Western” design. I think it would be lovely to have the option of reflecting our Chinese heritage in the cake too.
A blend of East and West. The traditional white of a Western wedding with the traditional bright red of auspicious Chinese celebrations.
The bridal dolls are dressed in the traditional wedding garb of Ancient China.
All the requisite auspicious symbols in a Chinese wedding. The Chinese place great score on symbolisms – be it for Chinese New Year, or in relation to births, birthdays, anniversaries and yes, weddings.
Bamboo symbolizes luck and good fortune. And for certain dialect groups like the Hokkiens, the groom must bring with him a gift of a bundle of long bamboos (amongst other gifts) for his new in-laws when he goes to pick up the bride on the morning of the wedding.
Red lanterns are traditionally hung on the outside of homes in times of celebrations. As long as there is an auspicious occasion in the family, the house will be decorated in red, with red cloths, red lanterns and so on.
As at Chinese New Year, fire crackers are also let off during a wedding, to chase away evil spirits and to mark the start of the marriage with a big bang!
I think this is supposed to symbolize the bridal lamp. Note the decorations of peony flowers – a much loved Chinese symbol of purity, fulfillment and achievement, usually especially in relation to matters of the heart.
This creation by a chef from Taiwan is a silver medal winner.
Okay, maybe you find the color red a little too strong and aggressive. You eschew white, and want color. But something less bright. Try this one on for size…
I personally am not too keen on the rather over-sized dolls in the display. They are not really part of the cake, and yet are rather distracting, and form a distinctly discordant juxtaposition with the more ethereal, whimsical design of the cake itself.
The color play is rather unique – and spray painted on (with food coloring of course) for a diffused effect. Something different.
The sugar work is very interesting. I particularly like the delicate and whimsical butterfly in the first picture.
This piece of edible artwork is a bronze medalist.
A great sense of fun and lighthearted humor can very often go a long way in making an event especially memorable. So, for those die-hard cartoon and animation fans, this is perhaps the ideal wedding cake…
Yep! Yabadabadoo! It’s the Flintstones!
Here’s Fred and Wilma. Don’t you just love the great attention to detail? Look at the little lady bugs, and the mushrooms and flowers sprouting from the ground.
I’ll need a little help here. I’m not very good with the names of the Flintstone characters. It’s been a long, long while since I watched my last Flintstones cartoon, and no, I did not watch the movie. I know this is Barney. (I think). But what’s the wife’s name?
The girl is Pebbles. She was my favorite Flintstone character, although this rendition is not quite how I remember her. Who’s the little boy again?
Cute house, no? Check out the detailing… the roof tiling, the cracks in the walls and the flowers blooming around the house.
It took home a gold medal.
This next one had me standing, with mouth agape, as I stood transfixed by the amount of detailing in the design. I marveled at the exquisiteness of all the fine and refined details. Nothing was missed. Imagine the number of hours of hard work needed to produce something like this!
If I remember correctly, this ensemble is named “First Kiss in Toscany”. How romantic!
Look at the way the icing has been worked to look like mosaic tiles.
Oh! Those sugar grapes look so luscious! It took a lot of willpower to stop myself from grabbing a handful and popping them into my mouth! I like this photo for the unexpected play of light. The halogen spotlight just so happens to hit the cake in such a way that it looks like the warm, tranquil sunlight at the cusp of dusk falling on the walls of a medieval castle. It enhances so aptly the feel of the Mediterranean and its romantic sunsets.
Note the very nice marbled crackle design on the bowl. And of course, those absolutely delectable-looking macaroons!
Another well-deserved gold medalist in my opinion.
But, I have left the best for last. When I laid eyes on this one, it was all I could do to keep myself from jumping up and down, clapping my hands and squealing in glee. I mean, I do know about proper public decorum after all. And I was at a trade event filled with the top professionals of the business. But oh, how I fell in love with this cake design…
This is like a magical castle out of any little girl’s fantasy world. All candy-colored and candy-filled.
Oh, oh, oh! Look at the miniature sponge ladyfingers surrounding the base. And those pastel pink macaroons with the light lemony yellow centers!! Exquisite detailing on the gold braiding work too.
I just have to show you a close up of the macaroons.
I like the second layer even more. The fluidity of the white silken curtains is well captured. The textile texture of the green marbled skirting is also exquisitely rendered. And I just love those tall, fantastical cupcake designs! I love those cupcakes! The color scheme and the expert control of the intensity and combination of colors are admirable and very well executed.
And the final golden crown topping this jewel of a cake.
Kudos indeed to this Grand Hyatt pastry chef.
This is the name of the cake. But I really don’t feel this even has to be a wedding cake. It would make the most incredible birthday cake for a girl. And not just little girls. But grown-up girls with little girls still living in their hearts too. Like, ahem… yours truly. I mean, I would so, so, so love to have a birthday cake like this. It’s like all the fantasies and dreams of childhood packaged into one sugar-coated, candy-colored feast for the eyes.
So, if anyone from the Grand Hyatt, Singapore happens to be reading this post, my email button is located near the top of the right navigational bar…. ![]()
Copyright © 2004 Renee Kho. All Rights Reserved.
Please contact me for permission to copy, publish, distribute or display any of the images or text contained in this article.
06:26 PM in FHA 2004 | Permalink | Comments (16) | TrackBack
Wednesday, April 21, 2025
More Cakes!
Just when you thought you have had enough of cakes for the week, or maybe even for the month… guess what? More cakes! But this time, by the professionals.
I was at Food & Hotel Asia 2004 yesterday afternoon. This is the biennial gathering, in Singapore, of the food and hospitality industry. It is billed as “Asia’s largest and most international food and hospitality event”. It is actually an annual event, but Singapore and Hong Kong take alternate turns to host the convention and exhibition.
So, I spent the entire afternoon, immersed and submerged in food products from around the world… tasting and testing from booth to booth. From cakes and pastries, gelatos and chocolates to wine, beef, ostrich, kangaroo… From the latest designs in candy to the newest technology in producing crisps and on and on…
Unfortunately, I was too busy munching, chatting and discussing to take photos. BUT… I did take pictures of the professional culinary competition. The annual event where the region’s top chefs pit their talents and skills against each other.
Yesterday being only the second day of the convention, only the results for the plated appetizers, the plated Asian dishes and the petit-fours competitions were out. The battle for the gold medals in entrees and desserts are still on-going.
There are tons of photos… so they will be coming up over the next few days.
Today (and tomorrow), in keeping with the cake theme of the week, I will showcase the results of the wedding cake competition. Today, it is the perhaps more traditional style of wedding cakes… and tomorrow, it will be the modern, whimsical and fantastical.
I won’t say much more. These cakes speak for themselves. Enjoy!
Over the last 5-6 years, it has been the trend in Asia (and perhaps in other parts of the world too), that wedding cakes (not just in professional exhibitions and competitions, but in real weddings too) no longer come in the traditional vertical tier, as seen in the top photo. Rather, the tiers are separate and placed at different angles and levels, creating a more dynamic, 3-dimensional effect.
However, one unchanging theme for a lot of wedding cakes is flowers.
Such as in this Bronze Medal winning entry by a pastry chef from Taipei, Taiwan. Pale primrose yellow flowers against the traditional white icing.
On a different color scheme is this one, but using a much-loved Chinese blossom – the peony – as the lead motif. The peony flower is taken by the Chinese to symbolize fulfillment and achievement.
A pair of swans symbolize the harmonious, loving and peaceful coming together of the couple.
Here’s another cake with the peony theme, this time in a pink ensemble.
(Sorry, I was moved along by the crowd before I had a chance to take close-ups of the other two tiers.)
And of course, the traditional symbol of love remains a perennial favorite for wedding cakes. Roses.
This next one I like quite a lot. I like the uniqueness of the triangular shape. I like the slightly less traditional pastel mint green color. I also like the way the chef has played with the concept of height in the flower and swan decorations.
Here’s another closer look at the flowers. Very pretty.
Oh, this one I really like. Why? It’s chocolate, that’s why. Chocolate on chocolate, if I remember correctly. Dark chocolate cake topped with white chocolate icing and bi-colored chocolate flowers, I think. This must be a chocoholic’s wedding cake dream come true!
(Notice the heaving crowds in the background, viewing the cakes in the other row of exhibits. In some places, we were standing three persons deep. Each one of us craning and straining our necks to get a peek at the cakes, and me trying to squeeze my little camera through so that I could get a few shots. I felt like a member of the cake paparazzi or something. Three seconds were all I had, and I had to make sure I got the shots. Quite a lot of fun actually!)
Not sure if you can make it out from the above picture. But I think the small, almost pin-prick sized raised dots makes for very intricate and interesting detailing on the icing’s surface. Nice.
Chocolate and nut cake… yum!
Another cake with a swan theme…
Check out the cascading bouquet of sugar flowers. Gorgeous, no?
This next one combines the traditional with a touch of the lighthearted and whimsical. A two-tiered cake with traditional white icing, but… with a big ring box, a wedding ring and a diamond ring all made from pure confectionery.
This is probably the cheapest, and yet sweetest diamond ring around. ![]()
Again, I like the very intricate 3-dimensional detailing on the surface of the icing.
Tomorrow, the wedding cakes will be a true feast for the eyes! Stay tuned.
Copyright © 2004 Renee Kho. All Rights Reserved.
Please contact me for permission to copy, publish, distribute or display any of the images or text contained in this article.
01:13 PM in FHA 2004 | Permalink | Comments (23) | TrackBack
Tuesday, April 20, 2025
IMBB? - An Update
A new pit-stop has been added to the "IMBB? - A Walk Around the World in 30 Cakes" (which has been renamed accordingly) itinerary.
So, hop on over to Austria, visit with Sasha and taste her zesty cake contribution.
[I ashamedly admit to having forgotten about Sasha, who was actually the very first person to inform me of her entry - a few days before the actual event. I feel terrible about rewarding her enthusiasm in participating in IMBB with forgetfulness. So, please help me make it up to her a little by going and tasting her very delectable looking creation.]
09:02 PM in Food and Drink | Permalink | Comments (0) | TrackBack
Monday, April 19, 2025
IMBB? – A Walk Around the World in 30 Cakes
Yesterday was “blog burning day” – third time around. And this time, our kitchens were burning and fuming with the fragrant aromas of freshly baked cakes.
Cakes in all shapes, sizes, looks, styles, colors, tastes, flavors, aromas and textures. Cakes each with their own story to tell. And, yes, each with their own style to show.
So, without much further ado, may I present to you 30 delectable, scrumptious-looking cakes from around the world…
We begin our round-the-world trip in balmy Hawaii…
To get us energized and charged up for the trip ahead, Reid, who is brand new to the food-blogging community, has made us a delicious Chocolate Rocky Road Cake, served with Dark Chocolate Chip Ice Cream. A nice sweet start to the journey.
Okay, all aboard the “IMBB flying-carpet”! (Yes, I know I said “walk around the world”, but hey, why walk when you can fly). We skim across the Pacific, on to the mainland…
And to sunny (most parts anyways) California.
In Oakland, Derrick awaits our arrival with an interesting and intriguing Terrine de Gateau of Verjus Curd with White Chocolate Cream Frosting.
We stay in the Bay Area, as Charlotte has prepared a Pound Cake – all ready for us to top with clotted cream and fresh raspberries. Ah! Yes! Clotted cream and raspberries!
And oh, oh… what’s a cake walk without Cupcakes. I mean, really? And Amy has so graciously obliged. Yay!
Owen brings along an interesting and tasty concoction of a Raspberry Cinnamon Torte. Raspberry and cinnamon, now that’s not one, but two “good things”!
Pim’s away on a business trip. But guess what? She left us the keys! So naturally, we quite happily make ourselves at home chez Pim and gleefully help ourselves to her Madeleine au Citron, made from her own original recipe.
We then sweep eastwards, to the “Windy City”, Chicago, where it is a lovely sweet, caramel-y trip down nostalgia lane in the Too Many Chefs kitchen, with Barrett’s version of “Ann Tharp – Xmas ’83 – modified by Rosalind McFall” Turtle Cake.
Next stop, Cleveland. And the spirit of Anne of Green Gables comes to life in the kitchen of LadyGoat and FoodGoat with their rendition of Anne’s Anodyne Liniment Cake.
Donna in Central Pennsylvania brings a bright, cheery, sunny whiff of summer with her very pretty Hummingbird Cake with Dried Pineapple Flowers.
Staying in the area, Mark offers us each a slice of an American classic – a Pineapple Upside-Down Cake. A must-have at any cake walk, surely.
New York City here we come!
Little Ellie gurgles in amusement as we pounce on Deb’s beautiful Freckled Mocha Cake with Chocolate-Hazelnut Mousse and Vanilla Buttercream. Coffee, chocolate and hazelnut… sorry, let me say that again… coffee, chocolate and Nutella… need I say more?
We also welcome BBRUB to our rowdy cake gathering, and very happily clear some dessert-table space for her Four-Layer Cake with Lemon Curd and Lady Crumpet’s Loving Cupcakes. Chocolate and lemon curd, how can we not love such a loving gesture.
Speaking of things yellow, Jeremy of Frost Street, provides us with a light-hearted and fun moment with his Soft-Boiled Egg Cake. You’ve got to check this one out!
Josh transports us through history as he whips up a light and elegant Food Section offering of Post-Proustian Madeleines.
Our last pit-stop in the USA… Boston, Massachusetts. The girl can eat and bake. The next cake course is served. A Red Velvet Cake with Mixed Berries.
We head North across the border and catch sight of our very own Domestic Goddess. And boy! Did she have a cake waiting for us! I won’t even describe it. It has to be seen.
Time to clamber back onto our magical IMBB flying-carpet, as we soar across the Atlantic… Europe, here we come.
First stop, London – where Anthony and Simon have baked a perennial favorite – Carrot Cake with Cream Cheese Frosting. Carrot cake… who can resist? Always a good choice for a birthday, and this one looks quick and easy to make.
A pretty and tasty sight greets us at A Spoonful of Sugar. Coffee, Bailey’s Irish Cream and chocolate all come together beautifully in Angela’s Bailey’s Irish Cream Cake.
We continue to traverse the English Isles, and pop in for a visit at Woolfit, where Meg serves up another “adult grape juice”-inspired cake… a lovely, delicately Muscat-infused Beaumes-de-Venise cake with grapes.
Now, a quick skip and a hop across the Channel we go, onwards to the “City of Lights”, Paris.
Upon arrival, we are offered fresh strawberries, whipped cream and velvet cake. What a scrumptious trio! Meg of Too Many Chefs recalls and recreates a fond, and very delicious, childhood memory – Thompson’s Cake.
Still in Paris, we visit with Clotilde of Chocolate & Zucchini. So, you have been wondering about the creative name of her website? Wonder no more. Meet the site’s namesake… the cake version, that is. A moist, chocolatey, nutty and very creative… Chocolate & Zucchini Cake, of course.
It’s a lovely Sunday afternoon, and so we linger a little longer in Paris. We stop at Pascale’s for a quintessential Parisien afternoon indulgence… a cup of coffee and some delectable Hazelnut Madeleines.
Time to move on, as we cross the border into Switzerland, and travel towards Zurich. Oh yes, by this time, after all that flying, we are in much need of some (sorry, more) libation. And of course, Maki is all ready for us with her fantastic Irish Stout Cake with Whiskey-Sour Icing. *hick* One more piece for the road?
Next stop, Jena, Germany. There, Alberto awaits… with yes, more liqueur-infused (aren’t you just loving this trip so far?) sweet decadence. We go fruity this time with the all-German classic, “Schwarzwälder Kirschtorte”, or better known to you and me as Black Forest Cake.
Our taste-buds get a small breather as we pop over to Austria where Sasha has prepared a delectably light, tangy Lemon Tart. With palates refreshed, we are off again…
Hold on to your hats. Quickly now, we zip over mountains and across seas, onward towards Asia…
In Malaysia’s capital, Kuala Lumpur, Shiewie’s kitchen is emanating tangy and fruity aromas as her beautifully colorful Apple and Cranberry Torte comes out of the oven.
And finally, we land on the little tropical isle of Singapore, the place I call home.
First, we drop in on fellow Singaporean foodie, Umami and her two cake creations – a Huat Kueh from the East and a Chestnut Orange Sandwich Cake from the West.
Lastly, welcome to the kitchen of yours truly… as we round off our whirlwind food tour on a strongly “aromatic” note with my Durian Fudge Cake.
24 hours. 18 time zones. 9 countries. 19 (maybe 21) cities. 28 food-lovers. 30 scrumptious cakes. **
Wow! It has been a glorious joy-ride. I hope you have enjoyed this spectacular sojourn around the world as much as I have. It’s been colorful, vibrant, exciting, fascinating, exhilarating, fun, and yes, very, very tasty. Thank you to each and everyone for your generous creativity and great sense of fun that has made this fantastic journey possible.
If I’ve inadvertently missed anyone, my sincere apologies. Please drop me a line, and I’ll immediately add you to the itinerary.
And as we look forward to our next international magical mystery food tour, if you have any ideas or suggestions, please drop “creative-brains-behind-IMBB” Alberto a line.
Now, if you’ll excuse me… ahem… I need to go grab that last piece of cake before it disappears…
** My apologies to those for whom I could not find information about your geographical location on your website. And may have thus wrongly placed you in the narrative and/or missed including your City in the count. Please let me know of any errors and I will very happily make the amendments.
Copyright © 2004 Renee Kho. All Rights Reserved.
Please contact me for permission to copy, publish, distribute or display any of the images or text contained in this article.
06:26 PM in Food and Drink | Permalink | Comments (15) | TrackBack
Sunday, April 18, 2025
Is My Blog Burning? – Apple Cranberry Torte
Here is a contribution which I received via email from non-food blogger, Shiewie of Malaysia. Enjoy!
Made an Apple Cranberry Torte from Marian Burros and Lois Levine's "The New Elegant But Easy Cookbook". The recipe for their plum torte (same recipe but with fresh plum halves instead) first appeared in the New York Times in 1981 and has been published in the paper almost every year in one form or another since then. It's one of my favourite cakes as the sharp tangy taste of the fruit goes very very well with the buttery cake.
The recipe is also available on numerous websites, so here's a link to a couple of them (saves me typing it out) - http://www.recipeusa.org/Cranberries/PLUM%20TORTE%20OR%20APPLE%20%20CRANBERRY%20TORTE%2021997.htm
and
http://www.recipesource.com/desserts/cakes/27/rec2718.html.
Have made the plum torte in the past - I couldn't find any plums in the supermarket so decided to make the apple cranberry version today instead. I find the plum torte a teeny bit dry so I added a quarter cup of buttermilk to the batter today (think it was just a bit too much - it was a little too moist - will reduce it to 2 tablespoons of buttermilk in the future). The buttermilk did help to make the cake texture much lighter than it is per the original recipe.
The cake before it goes into the oven…
And fresh from the oven…
Mmmm… cake is served…
Text and photos by Shiewie, Malaysia. All rights reserved. Published here with permission.
Additional text in italics by Renee.
04:28 PM in Food and Drink | Permalink | Comments (7) | TrackBack
Is My Blog Burning? – Durian Fudge Cake

My first instinct was to bake a chocolate cake, as it would combine two of my great food loves – chocolate and cake. However, I decided I wanted to try a recipe that I had never used before, and make a type of cake that I had never baked before. And if it could also be something uniquely South East Asian, then, well, that would be um… icing on the cake (pun absolutely intended, of course). The perfect candidate presented itself in the form of a durian cake.
Durian. This King of Fruits does not leave much room for ambivalence. You either love it or you loathe it. Rarely, is the reaction to it a shrug-of-the-shoulder indifference. And for the majority of South East Asians, theirs is a passionate and rapturous love affair with this highly aromatic (or pungent, depending on which side of the fence you are on) fruit. There is just something thoroughly thrilling about splitting open that hard, tough, sharp spiky husk and revealing glorious, smooth, glossy, satiny seeds of soft, creamy flesh. Ah! To smell that unique aroma, to savor that intense, rich flavor! Eating durian is quite a sensual and sensuous experience… the incredible sensation of the luscious creaminess hitting your palate, and exploding into a myriad of complex tastes and fragrances.
Coming a very close second to the love for eating the fruit fresh off the seed, is the eating of the fruit in all its many other guises – in cream puffs, cakes, tarts, pancakes, crepes, muffins and even roti prata (Indian pan-fried flaky, crispy bread dough). Singaporeans expend much energy in verbal debates as to where the best durian cream puffs and durian cakes can be found.
I have received numerous requests for a recipe for durian mousse cake (the current most popular form of durian cake). I don’t have one, unfortunately. However, as I did a little research for this event, I stumbled upon a little treasure.
Tucked away in my mother’s “treasury of recipes” is a hand-written recipe for a “Durian Fudge Cake”. Now, this little nearly-30-years-old hard-cover notebook of my mother’s is not just any ordinary notepad filled with hand-noted recipes. Only “tried-and-tested” recipes that my mum deems tasty enough and “worthy” enough are included in this exclusive collection. Admittedly, the notebook’s “database”, so to speak, doesn’t get “refreshed” very often, so some of the recipes may have been improved upon and replaced by more favored versions over the years. But more often than not, the recipes in this little notebook have withstood the test of time, and many have remained tasty favorites.
This particular durian cake recipe is more than 20 years old! My mum learnt the recipe at a cake baking class she attended way back when. At that time, the in-vogue method for making durian cakes was the “fudge cake” approach, just as nowadays almost all durian cakes are “mousse cakes”. She made it a couple of times subsequent to that baking class, and had tweaked and refined the recipe (as evidenced by the penciled-in notations in the margin). But for the last 18 years or so, this recipe has not had another outing. A-ha, what better opportunity than now, I thought. Besides, it sounds interesting. Something different. And it would be nice to re-visit an “old-style” durian cake. A mousse cake is just getting a little too run-of-the-mill.
As it turned out, my path to this Durian Fudge Cake was a long and winding one.
As I read the recipe, I became a little worried about the execution. The recipe, being as old as it was, quite obviously needed some adjustments, substitutions and modifications. Unfortunately, given my extremely limited knowledge of the technical theory behind and the principles of cake making, this was akin to shooting in the dark. What were the purposes of certain ingredients, what was the effect I was supposed to be aiming for, how else could I achieve those results and on and on. Doubts plagued my mind. But I was determined to make a go at it.
I ended up making some fairly significant adjustments throughout the recipe. Thankfully, the end result did not embarrass me, but the road to getting there had me, at various points, close to despair. I will list below the quantities and methods I actually used, as well as notes on what was substituted or changed.
A Brief Overview
The cake used is a very light sponge cake which does not contain any butter at all. Initially I thought that it might have been an error in my mum’s transcription, but it isn’t. The cake is intended to be incredibly light and fluffy in texture, to balance out the richness of the durian “fudge”. Given the lack of fats in the cake recipe, the type of flour used becomes all the more important. The original recipe calls for a mixture of “Optima flour” and Softasilk flour. I assume the former is something that existed 20 years ago. I have not seen it on supermarket shelves or at the baking supplies specialty shop. Softasilk I have seen at certain baking supplies stores, but I was not inclined to drive out to one just to get a flour that I was going to use but only a tiny portion of. So, I decided to use one type of flour only – something that is called “Top Flour” in this part of the world (not sure if it goes by the same name elsewhere). It is lighter, softer, more refined and has even less gluten and flour protein than cake flour. I figured this should work well enough if I helped it along by sifting the flour twice. At the worst, there would only be a slight difference in the texture and crumb of the sponge cake. I decided I could live with a denser crumb if it came to that.
The filling is not really a fudge in the true sense of the word. It is more like a very rich, soft yet somewhat firm, creamy filling with a fudgy, yet slightly custardy feel. (For those familiar with South East Asian food, it is sort of similar to the green-colored top half of the Nonya kueh salat, or slightly similar to the filling of a kaya cake, only not as firm).
The original ingredient list for the filling is quite a shocker. It calls for… get this, approximately 36 fluid ounces (that’s 4 ½ cups!) of coconut milk!! And this is intended for a not very large 10” cake! My arteries constrict and feel all clogged up just at the mere thought! This recipe quite obviously harks from a time when saturated fats and cholesterol perhaps did not mean too much. So, to save my heart from seizing up in horror, I lightened the recipe by partially substituting with 2% fresh milk, with no noticeable adverse effect on the aroma, taste and texture of the filling.
I also decided to make only half a recipe. Given the numerous changes and substitutions that I was making and the many unknowns I was grappling with, this felt to be the safer and less wasteful way to go. So, the quantities that were actually used are for a half recipe, while the quantities listed as being from the original recipe are for a full recipe.
I will mention the other changes as we go along. Right, on to the baking of this durian cake then…
The Durian Pulp
First off, the durians. I of course have to be difficult and try to make a cake using a fruit that is still in pre-season. The mid-year durian season usually starts proper only in mid-May or thereabouts. Sure, durians are now available throughout the year, even during traditionally off-season periods. But the fruits found during those times are definitely less intensely aromatic, flavorful and sweet. Still, I was undeterred. Off to Geylang I went, and returned with two large red plastic bagsful of suitably ripe durians. These fruits were not bad. Although definitely not at peak-quality, they were at the same time definitely not what we call in Chinese “potato-durians” – durians that are as bland as potatoes. They were still sweet enough, aromatic enough and flavorful enough. Only thing missing was that overtone of bitterness, but that’s my personal preference, and that type of durian probably wouldn’t work too well in a cake anyway.
So, how many durians does it take to make one small durian cake? This many…

No, I’m exaggerating. But I probably did use around 2-3 medium fruits worth of durian pulp in what turned out to be a small 8x4 inches cake. I think that works out to a fair bit of durian per square inch of cake!
The first task is to break open the tough husk of each fruit and extract the seeds of durian flesh. There are some important things to note while carrying out this stage of the cake-making operations. Firstly, do not be fooled by family members who enthusiastically volunteer to help you open up the durians and extract the fleshy seeds. More often than not they have an ulterior motive for getting close to the fruits. Should you fail to prevent this first point from happening, point two is very important: stand watch like a beady-eyed hawk as said family members huddle around gleefully and set upon the fruits with gusto, wielding knives and pieces of cloth. A momentary diversion of attention on your part can result in more durian seeds disappearing down open mouths than there are seeds appearing in the large bowl that you have placed next to the said enthusiastically helpful family members. Step three, be extremely wary of phrases like: this one is too mushy to be used; this one is too fibrous; this one is way too firm to be used. Under no circumstances are you to be taken in by such mutterings. They are but mere smokescreens, and are actually urgent indications of imminent danger to the safety of the precious durian seeds. Step four, as soon as all seeds have been removed from the spiky husks, as quickly as possible, remove bowl of durian seeds from the chaotic scene of discarded shells. Any delays in this crucial step of the operations will again render you with less than the desired quantity of durian pulp.
With the seeds securely in your possession, it is now necessary to separate the creamy pulp from the large hard pip in the center of each seed. This can be very easily done by using a spoon and scraping the flesh off the pips. At this point, events will feel like deja-vu. Enthusiastically helpful family members immediately re-appear like magic, making tempting offers of help. As before, assistance may be accepted at your own risk. Vigilance, however, is required if the quantity of shed pulp is to remotely match the number of discarded bald pips.
Should you manage to successfully negotiate the previous two stages of durian pulp extraction, and still manage to get sufficient quantities of target commodity, you are on the home stretch. Give yourself a pat on the back.
Just as quickly as they have appeared, all signs of help disappear just as magically. As the real work is about to begin, you are once again left on your own in the kitchen to work peacefully on the cake.
So now for the weighing of the bounty and the process of “refining” the pulp.
Once seeded, the durian pulp needs to be weighed into three different quantities, with each being used in a different way…
• approximately 4oz / 115g for the sponge cake
• approximately 9oz / 255g for the fudge filling
• approximately 3oz / 85g for the fresh cream topping
The original recipe calls for 5oz / 140g for the cake and 10oz / 280g for the filling. This is for a full portion of the recipe. Even though I was making only a half recipe, I still used nearly the full amount of durian pulp. Why? The fruit I was working with was not, as mentioned earlier, at peak-flavor. So, to maintain the intensity and richness of aroma and taste, I decided to use more pulp. Also, family members are durian fanatics! The more pulp the better is their credo. (The fresh cream topping was my own last-minute addition to the recipe, and I simply guesstimated an amount of durian pulp that I thought would be sufficient for my purposes.)
Even with the amount of pulp used, the durian aroma and flavor in the finished cake were not overwhelming – at least not for us anyway. I think the recipe allows a fair bit of leeway and flexibility in adjusting the amount of pulp either way – more pulp, or less pulp – according to personal preferences, without any adverse effect on the final cake results.
To prepare the pulp for the cake: take the 4oz / 115g of durian pulp and mix it with 1fl oz / 30ml of coconut milk (not coconut cream). I use canned coconut milk, although my mum would probably use nothing less than freshly squeezed coconut milk. But I’m a girl that is all for ease and convenience. So, canned coconut milk it is. I like the Ayam Brand simply because it has no further additives at all, and is pure coconut milk.
Mix the durian pulp and coconut milk together to get a chunky paste. Next, mash this paste through a fine mesh strainer. As the resulting smooth, creamy pulp puree accumulates on the underside of the sieve, scrape it off with a spoon. We now have a bowl of very beautiful, satiny smooth, glossy durian cream…

To prepare the pulp for the fresh cream frosting: again mash the fresh durian pulp through a fine wire mesh strainer. I didn’t add any coconut milk for this – I used just the pure durian flesh. Refrigerate the prepared durian cream until it is needed.
To prepare the pulp for the fudge filling: take the 9oz / 255g of durian pulp and combine it with approximately 1 fl oz / 30ml of fresh (2%) milk. This is just to lighten the density of the pure durian pulp slightly to a chunky paste, thus making it easier to mix into the cooked coconut milk custard later.
The original recipe calls for this durian pulp to also be sieved through a fine mesh strainer. However, as the family likes to have chunks of real fruit pulp in their durian cake, I decided to just leave the pulp in for the fudge filling. For a more refined, smoother-textured filling, simply repeat the straining step as for the cake and fresh cream frosting above.
The Sponge Cake
3 egg yolks
3oz / 85g Top Flour
¼ teaspoon baking soda
4oz / 115g durian pulp creamed with 1oz / 30ml of coconut milk (from above)
3 egg whites
2½ oz / 70g sugar
¼ teaspoon cream of tartar
• Combine the flour and baking soda, and sift twice.
• Add the yolks to the flour, and whisk together with a manual balloon whisk.
• Next, add in the durian cream, and mix well.
• In an electric mixer, whisk together the egg whites, sugar and cream of tartar. Whisk for 1 minute on medium speed, followed by approximately 3-4 minutes on high speed or until the egg whites have formed smooth, glossy, stiff (but not dry) peaks.
• Gently fold a small batch of the whisked egg whites into the durian mixture, to lighten the mixture, followed by the rest of the whites in small batches.
• Transfer batter into an 8” square cake tin, lined with parchment paper.
• Bake at 155C or 300F for about 30-35 minutes or until a skewer inserted into the center of the cake comes out clean.
[Original full-portion recipe: 5 egg yolks, 3oz Optima flour, 3oz Softasilk flour, ½ teaspoon baking soda, 5oz durian pulp creamed with 2 fl oz coconut milk, 5 egg whites, 5oz sugar, ½ teaspoon cream of tartar.
Cake is baked in a 10” round cake tin at 155C for 50 minutes to 1 hour.
Note: given the larger quantity of egg whites, whisking time for the meringue would also be longer than that indicated above.]
Making the cake was a traumatic experience for me. I was close to pulling my hair out in distress. My mum had scribbled in her notebook “whisk together yolks, flour and durian cream until the mixture is like a smooth runny cream”. Now, when I combined these ingredients together, what I got was a very thick, very sticky, gooey, gummy mixture – sort of like very sticky play-doh or sticky super glue! It was as far away from being a “smooth runny cream” as the moon is from the earth! I panicked a little. Maybe I read the recipe wrong. I went back to check. Nope. That was what it said. Oh dear, maybe I shouldn’t have used almost the full quantity of durian cream in a half portion of the recipe, I thought. Maybe that was the problem. I was supposed to get a “runny cream”?!?! It just was not possible. That was like attempting to get melted Mozzarella to be of the consistency of thick cream or something. Still, valiantly, I added a couple of tablespoons more of coconut milk, hoping to lighten the texture somewhat. It did lighten… barely. It was still a sticky, gooey glob. Sigh! I didn’t want to mix it anymore as I was worried about overmixing and overworking the gluten and flour proteins. In the back of my mind, I was ever aware that this was supposed to be a very light and fluffy sponge cake with a very tender crumb. It didn’t help that at that point I also realized I had only sifted the flour once, and not twice as I had intended to.
I contemplated starting over, thinking I had spoilt the batter beyond resurrection. But, me being me, I refused to say die. I thought: okay, if I was going to end up wasting the batter, I guess there was no harm in risking wasting the egg whites too. Since they were all whisked and ready to go, I folded them into the batter. Oh, the batter looked okay. Maybe there was hope yet. I was still worried that I had overworked the batter, and the cake was going to come out dense and heavy. But I wasn’t going to know for sure until after I had baked it. So, with fingers crossed, I popped it into the oven.
At this point I already knew that I would potentially have at least one problem to deal with after the cake was baked. I had run out of parchment paper, so I couldn’t line the cake pan. I buttered and floured it instead, but I knew that there would be a high chance of the cake sticking, and given its supposedly light and tender crumb, it would be a devil to get out of the pan without the cake breaking. And if it didn’t stick, there was a chance the cake would have developed a thicker crust than desired, owing to the floured and not lined cake tin. That would not be good news either. Oh well, I was going to have to deal with it if and when it happened.
Another point: I wanted my cake to be rectangular rather than round, simply because I thought it made for a nicer presentation. I was initially going to use a loaf tin, but due to some last minute logistical reason, I ended up having to use an 8” square cake tin instead. The original recipe used a 10” round cake tin for a full recipe. So, an 8” tin for half a recipe was going to give a rather shallow cake. That was another cause of anxiety and concern. But as it turned out, that actually worked in my favor at the end. When it came to filling and frosting the cake, I only had to cut the cake in half and then split each half horizontally once only, instead of having to cut it horizontally three times, like I would have had to if I had used the loaf tin, to get my four layers of cake. Anyway, I’m skipping ahead of myself here.
The cake was done in just under 35 minutes. It looked fine – just a tad uneven on the top surface, but that was going to be frosted over anyway. And then… it had happened. The bottom of the cake was stuck to the cake tin. And it was made worse by my ignorance of a great cake tip which my mum rather belatedly offered me when she happened to saunter into the kitchen. I had run a knife around the sides of the cake pan, hoping to loosen the cake from the edges so that I could tip it out. But because the bottom was stuck, the top edges of the cake, now freed from the sides of the cake pan, started to shrink a little as the cake cooled. So, I ended up with sloping sides on the cake, which had to be trimmed off later.
So, I learnt something new. If the cake is stuck in the pan, leave it! Do not even try to free the sides. Leave the sides “stuck” to the pan, as this keeps the cake “stretched” out as it cools.
After the cake cooled, I cut it down the middle, splitting it into half while it was still in the cake tin. This made it easier for me to manoeuvre it and remove it from the tin, which I managed to do successfully, but not without leaving the entire bottom crust behind. But that suited me just fine! The crust had come off so evenly, it left a smooth, flat, soft underside to the cake – just perfect for filling and frosting the cake. I couldn’t have done it better myself if I had attempted to trim the cake. Even I had to grin when I saw how tidily, neatly and completely the bottom crust had been separated from the rest of the cake. And, best of all, not only did the cake not break or split, its texture was nicely soft and fluffy and the crumb was tender and nicely refined (safe for an occasional tiny hole or two left by a bubble). It was all just the way it was supposed to be. Ah! The angels of baking must have been watching over me. I couldn’t believe it. The cake turned out as it was supposed to despite all that I had put it through!
It looked and smelt good!
The Durian Fudge Filling
Mixture A
4oz / 115g sugar
½ packet agar-agar powder (white color or plain)
8oz / 240ml 2% fresh milk*
8oz / 240ml coconut milk
[Original full-portion recipe: 8oz / 230g sugar; 1 packet agar-agar powder; 32 fl oz / 950ml coconut milk]
* I substituted half the required amount of coconut milk with 2% fresh milk. I was happy with the final taste of the filling in the cake – I felt there was sufficient coconut richness and creaminess. However, if a stronger coconut flavor is desired, use a higher ratio of coconut milk to fresh milk. On the other hand, I would not recommend going below half the original amount of coconut milk, as this would probably change the consistency of the filling and dilute the flavors too much. Another option would be to substitute part of the coconut milk with full cream milk instead of 2% milk.
Mixture B
1 fl oz / 30ml 2% fresh milk
1 tablespoon green bean powder (or mung bean powder)**
½ tablespoon custard powder***
½ tablespoon cornflour (or cornstarch)
[Original full-portion recipe: 2 fl oz / 60ml coconut milk; 2 tablespoons green bean powder; 1 tablespoon custard powder; 1 tablespoon cornflour]
** Green bean powder, sometimes called mung bean powder, is very commonly used in Asian, especially Nonya, desserts. It helps give the dessert a nice soft, custardy but somewhat firm texture that holds its shape. Its thickening effect is different from that of other standard starch thickeners like cornflour (cornstarch), arrowroot, tapioca starch and so on. I am not sure what an equivalent substitution for it would be. But it should be available in most Asian – Chinese, Thai, Vietnamese, Korean, Japanese – grocery stores (for those outside Asia). Alternatively, you may grind your own from dried mung beans. In Asia, mung bean powder sometimes comes in different colors like green etc, so be sure to use either the white (neutral) or yellow colored ones only for this recipe.
*** The custard powder enhances the yellow color of the durian, and thus gives a richer hue to the filling. It will not turn the filling a ghastly bright yellow. However, if desired, it can be easily substituted with cornflour, as custard powder is largely made up of cornflour/cornstarch. Simply use 2 tablespoons of cornflour instead of 1 tablespoon each of cornflour and custard powder in the full recipe.
Mixture C
9oz / 255g durian pulp mixed with 1 fl oz / 30ml fresh milk (see “to prepare the pulp for the fudge filling” above)
• In a large saucepan, combine mixture A. Cook over a medium heat until the agar-agar powder is dissolved, and the mixture is just about coming to a boil. As soon as it starts to come to a low boil, reduce the heat to a simmer.
• Dissolve together mixture B. Slowly add this to mixture A, a spoonful at a time. Stir continuously to prevent lumps from forming. Allow the coconut milk custard mixture to cook until it is a thick fudgy smooth paste.
• At the first signs of the mixture coming to a boil again, add the durian pulp (mixture C). Mix well.
• Immediately remove from heat, and allow the filling to cool before using.
This “fudge” filling is based on the traditional Nonya pengat, a thick, rich, creamy sweet dessert porridge-cum-pudding. It is essentially a fruit or several fruits (or sometimes root vegetables) that are cooked down with lots of coconut milk (santan), palm sugar (gula melaka) and sugar. Common versions are pengat pisang (bananas cooked with coconut milk, sugar and palm sugar), pengat nangka (using jackfruit) and pengat ubi kayu (using chunks of tapioca, yam and sweet potatoes). These are usually served and eaten on their own, like a sweet dessert porridge. Pengat durian is often served as a thick, creamy paste over sweet glutinous rice. Or is sometimes spooned over the popular shaved ice dessert “ice kacang”.
In the instance of this cake, the pengat durian is used as a basis to create the “fudge” filling. As the consistency and texture of pengat durian is very much like a thick, creamy paste, it is too “liquid” and not particularly suited for use as a cake filling. It is thus thickened and firmed up with a combination of agar-agar (a seaweed derived substance that is similar to gelatin, and which is sometimes referred to as vegetarian gelatin) and a mixture of three starches (green bean powder, custard powder and cornstarch).
I think the agar-agar and the starches need to be used in combination. I contemplated using only one or the other, but I don’t think that would work, or at least not work as well, as each has a different effect on the texture and consistency of the filling. Cooked agar-agar gives a firm texture that holds its shape well, while the starches help make the mixture soft, creamy and fudgy, and give its appearance a slight sheen. It is possible, if an even softer, more fudgy consistency is desired, to experiment with reducing very slightly the amount of agar-agar and/or starches indicated in the above recipe.
Heat control during the cooking process of the fudge filling is important. At one point my flame was too big, and I had difficulty keeping the mixture lump-free.
As the filling cools, a layer of “skin” will form on the surface, but nothing a quick stir prior to using it won’t solve. I know, a lot of recipes will probably tell you, in such instances to cover the filling with plastic wrap, directly onto the custard, to prevent this “skin” from forming on the top. I personally am usually not keen to do such, simply because of the potential implications (albeit unproven) of possible chemical reactions of the polyethylene with heat. It’s just a personal thing, so if you have no such qualms, then yes, a piece of cling wrap will prevent the problem of a “lumpy” custard surface.
Cake Assembly
Okay, we are almost there. Are you still with me? Well, finally, I was ready to put the cake together. This part scared me. Until that point, I had never, in my life, filled, frosted or decorated a cake before. I had always stuck to those recipes that produced cakes that were complete in themselves as they came out of the oven. At most, I would pour a glaze over the cake. That I could manage. But carefully dividing a cake into slim layers, filling it, frosting it and decorating it? Aiks! Don’t you need to go to pastry school or something to learn how to do all that fancy stuff?
Well, I decided that since I had come this far, I would just have to finish it.
• Divide the cake using a serrated cake knife. First, cut the 8x8 inches square cake into half, that is, into two 4x8 inches pieces. Next, half each piece horizontally to produce two fairly slim layers from each piece. This will give four pieces of cake in total.
[In my case, I had already cut the cake into half while trying to remove it from the cake tin. So, I nervously split the two half pieces into two layers each. Thankfully without much incident. I only had to watch out for the tendency of the knife to start dipping or rising as I moved along the cake, making the layer either thicker or thinner in some parts.]
• Trim the cake. Ideally, for an elegant-looking end result, the sides, bottom and top crusts of the cake should all be trimmed off, so that there will be no brown “skin” layers visible in the cross-section of the final assembled cake.
[Luckily for me, the cake tin took care of the bottom crust for me when I removed the stuck cake from the tin. I just didn’t feel confident enough to do the top crust, and I wasn’t prepared to risk it. After coming all this way, the last thing I wanted was to mess up at this point. So, I left it in. As you can see from the pictures, a thin brown line of crust is visible in the cake’s cross-section. Not very pretty (or professional looking), presentation wise. Oh well. And to trim the sides, I stacked all four pieces of cake together before trimming, to get perfectly even and lined-up edges.]
• Remove the top three layers of the trimmed cake, leaving the bottom piece on the cake decorating turntable, ready to receive the first layer of filling. Be sure to remember the direction and order of the three layers that were moved, so that they can stack back on nicely and neatly. It is highly unlikely that all four sides of each layer would have been trimmed equally, so rotating the direction of subsequent layers could mean an unevenly stacked cake later, and more trimming would then need to be done. I personally think it would be a lot harder to trim the cake once the layers of filling have gone in, as it would then be necessary to worry about not letting the filling ooze out while trying to slice through seven layers of cake and filling, and not applying uneven pressure and causing the filling to move and create uneven layers, and on and on.
• Drop dollops of the filling onto the cake, and spread it evenly using a metal spatula. Any filling that overflows the edges of the cake can just be leveled out into the sides of the cake, as a layer of filling will also be applied to the sides of the cake later.
• Place second layer of cake on top of the filling. Repeat process with each piece of cake, and finishing with a cake layer on top.
• Using the metal spatula, apply a thin layer of the filling to all four sides of the assembled cake, to smoothen and even out the sides.
The Durian Fresh Cream Frosting
When I got to this point, I realized I had no idea what I should do next. I knew I had to decorate the cake. But what with? Not the filling, that was for sure. Its consistency was way too thick for that. So, I improvised at the last minute and mixed some pure durian puree into some light whipped cream.
I had to use the ready-whipped cream that comes in canisters. The type we use to make home-made iced lattes with. I had not planned ahead, and did not have whipping cream at home. It would have been best to use freshly whipped cream, but there you go, life is not perfect.
The only problem with using these types of ready-whipped cream was that they deflated and became flat once I folded in the durian puree. Still, they managed to do a fairly acceptable job of covering the cake.
So, to the top and four sides of the cake I applied a layer of the durian fresh cream. Now, I wish I could claim that the ripple effect in the cream frosting was intentional. But it wasn’t. I simply didn’t have the frosting skills to create a perfectly smooth, flawless, mirror-like cover on the cake. So I figured it was better to have many “wrinkles” instead of just one or two odd-placed ones! ![]()
Cake Decoration
I was stuck again. What next? Durian cakes are difficult things to decorate. The dominating nature of the flavors and aromas of durian does not lend itself to harmonious partnerships with other ingredients that may normally be used for cake garnishing… like chocolate or maybe even nuts. I’m not even too keen on the idea of grated coconut for example on a durian cake. It just feels like too many different tastes happening at the same time. That’s why even the durian cakes sold in cake shops and hotels are usually just decorated with more durian cream, or as in the case of the famous Goodwood Park Hotel version, simply topped with cubes of durian sponge cake and sprinkled with confectioners’ sugar.
Well, my biggest obstacle was my utter lack of piping skills. Like I said, I had never frosted or decorated a cake before. Now, I’m not usually a person to run from a challenge. In fact, more often than not, I relish the thrill of trying out something I don’t think I can do. However, by this time, I had been working on this cake for HOURS. (And you probably feel like you have been reading this for hours! If you are still with me that is.) It had taken me half a day to get to that point, and I was starting to feel a little tired of the cake. Enough already! I didn’t want to continue fiddling with it. I just wanted the cake finished! I had started in the early afternoon, and it was almost time for dinner preparations to begin!
I stared at the bald-looking cake for several minutes. Walked out into the garden. Snipped off two orchids and a stalk of Heliconia (or Bird of Paradise). Made silent apologies to the flowers for sacrificing them for the sake of beautifying a cake. I figured these flowers were in keeping with the exotic Asian theme. ![]() While this particular orchid was not our national flower, the Vanda Miss Joaquim, it was still representative of Singapore I thought. And I just love Heliconias.
While this particular orchid was not our national flower, the Vanda Miss Joaquim, it was still representative of Singapore I thought. And I just love Heliconias.
So, here it is… finally…


Admittedly, this is not the most professional looking of cakes. But, I think it is not too bad for a first attempt at filling and frosting a cake, if I may say so myself. ![]() Besides, as they say, the test is in the eating, no? And this cake tastes pretty good, or so the family says.
Besides, as they say, the test is in the eating, no? And this cake tastes pretty good, or so the family says.
This morning, my mum and I were sitting at the kitchen table analyzing and dissecting the cake. We agree wholeheartedly that the cake tastes much better overnight or as is the case now, two days after it was made. The flavors have melded together more. And the texture and consistency of the durian fudge filling have also settled and relaxed, and are much nicer than on the first day.
We both really like the texture of the sponge cake. (Now I know why this cake recipe is in my mum’s little treasured notebook). Unlike a lot of or even most cakes which turn hard, rather dry and not very palatable once refrigerated, this sponge cake remains soft and fluffy even when eaten cold, straight from the refrigerator. It is thus perfect for the durian cake, or any other cake which has to be kept refrigerated. I really like this sponge cake, and can think of many other things I can use it for.
The durian flavor of the cake is very subtle – just a hint, a background note, which nicely ties the cake in with the durian filling, without tipping the balance of flavors in the assembled cake into overkill.
The rich, fudgy, custardy filling provides an excellent counterbalance to the lightness of the sponge layers. And after the cake has been sitting in the fridge for a day or so, the filling softens up slightly, becoming somewhat more custardy without being mushy. Very nice, in our opinion. We like it a lot.
We also like very much the feel of the occasional small chunks of durian pulp interspersed throughout the filling.
[On a side note, this filling can be very easily adapted and made suitable for filling choux pastry to form durian cream puffs (I have also received numerous requests and queries about how to make this). Or as a filling for durian tarts. Another option is to make a pure pengat durian (without the agar-agar and starches), and use it over sweet glutinous rice cooked in coconut milk, or over ice kacang (shaved ice dessert).]
Probably the most important factor in this cake is the quality of the durian. This can really make or break the cake. Top quality durian will make this cake out of this world. This cake that I made tastes good, but it would have been magnificent had I had top quality durian at my disposal.
The amount of work involved in this cake probably doesn’t qualify it as a “make every month” kind of cake. It is also probably more economical to buy the very readily available, ready-made durian cakes. But nothing beats a home-made cake, where copious amounts of durian can be used, and where one can choose to use the best ingredients available.
I think this recipe is a keeper. I like the sponge cake. I like the filling and its potential for versatility. This is something that would be nice to make for a special treat.
All in, this cake was a very, very long process. It was fun. It was frustrating – at times. It was exhilarating. It was tiring. But most of all it was a tasty affair. Still, I’m glad it’s all over. It has been quite an experience.
And since you are still here reading this, I thank you for your patience and for taking the time to hear out my long and convoluted durian cake story!
Copyright © 2004 Renee Kho. All Rights Reserved.
Please contact me for permission to copy, publish, distribute or display any of the images or text contained in this article.
12:38 PM in Home Baker: Cakes | Permalink | Comments (25) | TrackBack
Friday, April 16, 2025
A Truce Declared, A Partnership Forged
I love the smell of baking bread. And there’s nothing quite like the taste and aroma of a piece of warm crusty bread fresh from the oven. But I don’t bake my own bread - ever. I do not have “bread fingers”. I have always been rather wary, apprehensive even, of working with yeast and bread dough. I don’t even think about making bread. It just seems too difficult, complex and well, hard to get right. Yeast seems like such an unforgiving and exacting thing to work with. I decided, many years ago, that it is best to stay well clear of yeast, and leave all that breadmaking-stuff to others.
My relationship with yeast has been a rather tempestuous and tumultuous affair. In fact, I don’t have a relationship with yeast. We have had probably all of two encounters in my life-time thus far. And on those two occasions, our coming together was, to put it succinctly, unmitigated disasters.
The first occasion was as a pre-teen in Junior High, in Home Economics class. The lesson was about leavening agents, and we had to work with yeast. All I remember of the lesson, to this day, is the musty, almost dank smell of yeast that clung tenaciously to my hair, clothes and fingernails, no matter how much I washed. I remember how I still had the smell of yeast in my nostrils the day after the lesson. As for the bread I was supposed to have produced during that lesson? Let’s just say I could have used it as a murder weapon if I had wanted to. I decided then that yeast and bread-making was not much fun at all.
Fast forward many, many years hence. As a young adult (with no cooking experience whatsoever, and barely any baking experience), I thought I would give bread and yeast another try. No go. Same experience. I managed to produce a loaf that was so hard and dense, and smelling so strongly of yeast that it couldn’t even really be called bread. So, that was it. I declared that I would never work with yeast again.
But never is a long time. A few days ago, I was flipping through the NTUC monthly magazine “Lifestyle” (which for some reason seems to get dropped, free of charge, into our mailbox each month). There was an article on a Spanish lady who came to Singapore to work at the Spanish consulate, but ended up becoming a Singapore resident and starting a culinary school. Included in the write-up were several of her bread recipes for what she said were Spanish Easter goodies. One of the recipes, with its delectable photo of a cheesy loaf, caught my eye. And for some inexplicable reason, I decided I was going to make the bread. The recipe seemed straightforward and simple enough. There was no need to make a starter. All that was needed was just bread flour and yeast. And the bread really did look good.
Ack! Me make bread?! I must be out of my mind. But the strange urge wouldn’t go away. I wanted to make this “cheese and onion country bread” as it was called. It was a foreign feeling, this wanting to bake bread. I tried to ignore it. It persisted. Finally, I gave in. Maybe it was time, after all these years, to call a truce in the stand-off. To build a new bridge of understanding. To establish a brand new working relationship with this thing called yeast.
And so yesterday I decided to conquer two “fears” at one go. I was going to bake again to “get over” Tuesday’s nasty burn – much like needing to get back on the horse immediately after falling off and to just keep riding. And on top of that, I was going to bake bread!
The recipe, as mentioned earlier, was for the making of one loaf of “cheese and onion country bread”. However, I decided I wanted to make both a savory and a sweet bread. So, instead of making one large loaf, I opted to make two smaller loaves. I thus ended up using only the basic dough recipe from the magazine, and experimented with my own fillings.
Basic Bread Dough
½ tablespoon yeast
¼ cup lukewarm water
1 cup lukewarm water
2 tablespoons butter, softened
3 ½ cups bread flour
¼ cup sugar
½ teaspoon salt
1 egg, beaten
The recipe called simply for ½ tablespoon of dried active yeast to be mixed with ¼ cup of lukewarm water. I, however, decided to also add a pinch (maybe about ¼ teaspoon) of sugar.
There’s one thing I have never forgotten from that ill-fated Home Economics class back in school. I remember the teacher’s voice going on about how yeast must have food… how we must “feed” the yeast for it to cooperate with us. And that the one food that yeast likes most of all, above all things, is sugar. It’s strange how one remembers certain things so starkly through the fog of history.
I was determined that yeast and I were going to work harmoniously together this time around. If sugar was what it wanted, then sugar was what it would get, regardless of what the recipe said.
I watched anxiously for the yeast mixture to start bubbling. Three minutes passed. No bubbles. Flashbacks to nightmares past started to fill my mind. I decided I should go distract myself by measuring out the flour. A watched pot never boils.
And then it started to bubble, and get all foamy…

Thank goodness. And so we were on our way to home-made bread… hopefully.
Next, the 2 tablespoons of butter were dissolved in the 1 cup of lukewarm water, and set aside.
I measured out the flour using the “swirl, lightly spoon and level” method, rather than the “scoop and level” method, as I was very wary of getting a dense and heavy crumb. And I think it worked well. It gave a rather wet and tacky dough initially, but kneading it with a little additional flour brought it to the right consistency. The final bread texture was also very nicely soft and fluffy.
The flour, sugar and salt were combined together in a large mixing bowl. The beaten egg and the buttery water were added, and mixed well.
The yeast mixture was added. The resulting dough was still rather wet and tacky to the touch…

I turned it out onto a floured surface and kneaded it for about 5 minutes or so. And the dough shaped up well, with a nice springy touch…

The recipe said simply: “let rise for 1 hour or till double in bulk”.
But I was thinking I should maybe do something to help provide a nice warm environment for the dough to proof in, even though it was 34C outside and nearly just as warm inside the kitchen. So, I returned the dough to the mixing bowl and covered the bowl with cling wrap, followed by a slightly damp kitchen towel. (I read this somewhere, a long, long time ago. I do not know why I thought it relevant for proofing bread, but I did).
Meantime, I started on the fillings I had planned for the two bread loaves.
The Fillings
I decided to keep the savory loaf very similar to the original recipe, with just an addition of some ham to the onion and cheese. The sweet loaf was going to be filled with candied orange peel, raisins and almonds.

I used rosemary ham, to give the bread that little extra hint of fragrance. And one medium sized yellow onion.
The ham and onion were diced.
In about 1 tablespoon of butter, the onions were sautéed until soft and translucent. The ham was added, and given a quick sauté. If desired, a dash of pepper could also be added. The mixture was set aside to cool.

I didn’t have candied orange peel at home, so I used candied mandarin peel, which has a slightly stronger and more intense aroma than dried orange peel. I used only a small amount, as I wasn’t sure if its fragrance would overpower the raisins and almonds. And also because a family member had earlier scrunched up his nose when mandarin peel was mentioned, and had declared that it wouldn’t work in the bread. (This same family member later grumbled, upon tasting the bread, that there wasn’t enough candied mandarin peel in the bread!)
The almond slices were gently dry-toasted in a frying pan until a light golden color.
Shaping the Dough
The dough had doubled in size and was ready to go. I punched it down, and divided it into two. Each half was further divided into three pieces.
Each piece of dough was then rolled into a long rectangular shape. I found it easier to roll a piece of the dough, leave it to rest for a minute or two while I rolled the other pieces, and then come back to roll that same piece of dough again. It allowed the dough to relax a little in between rollings, so I could get nicely thin and stretched out long strips of dough.
The fillings were then sprinkled down the center of each strip of dough.
The original recipe filled the inside of the bread with only cheese, with the onions going on top of the bread. I decided to put all the fillings inside the bread (they are called fillings after all).

The onion and ham mixture went on.

Then shredded cheddar was sprinkled over.
The same thing was repeated for the sweet loaf.

Toasted almonds, raisins and candied mandarin peel were piled on. Oh, the colors and aromas. Nice! Yes, I do like to have a generous amount of stuffing in the bread. I mean, if the bread is going to be a filled-bread then I think it should be a well-filled bread.
You will notice that my dough rectangles were far from perfect, and a couple of the strips were rather mishapened even. But they still rolled up nicely and baked out beautifully. So bread is very forgiving in that way (I’ve now since found out ![]() ).
).
Each piece of dough was rolled up lengthwise, to form three long rolls of filled dough.

The shaped loaves were transferred onto a baking sheet (I used a double-layer insulated baking sheet) that had been sprayed with cooking spray, and left to rise for another half hour.
So far so good. Things were looking mighty positive.
[* Plaiting the dough is exactly like tying hair into a braid. The ladies will probably understand this. For the gentlemen, it is simply taking, alternately, the left and right outermost dough roll and crossing it over the center dough roll. For example, first, cross the left outer roll over the center roll. What was then the left roll has now become the new center roll. Take the right outer roll and cross it over this new center roll. Repeat with the left outer roll, and so forth. Finally, neatly tuck the ends of the rolls under the loaf, and it is done.]
Glazing the Dough
The recipe used one beaten egg mixed with 3 tablespoons of milk as the glazing liquid. I still didn’t have milk in the fridge (see marble cake post). So, I settled for 1 ½ tablespoons of buttermilk instead. I had no idea whether this was an appropriate substitution for a bread glaze. I mean, the last time I made bread was like 8-9 years ago, and it was an utter failure. Still, it was worth a shot. I didn’t think egg alone would be enough. It would probably color the loaf but not give it a nice sheen (at least that was what I figured was the purpose of the milk, although I could, of course, be way off in this). I used half the amount of buttermilk to milk because of its much thicker and richer consistency.
(I’m not sure if it was the buttermilk that contributed to rather darker-colored – almost too dark – final loaves. I liked the color though, even if it was much darker than normal.)
The two loaves of dough were brushed with the glazing mixture. More cheese was sprinkled over the savory loaf. And some untoasted almond slices were sprinkled over the sweet loaf.
Baking the dough
Into the preheated 200C oven they went.
My loaves were done after 25 minutes – 5 minutes shorter than the stipulated baking time. The bread was already a very rich golden brown color. I think the bread would have been ready to come out of the oven even after maybe 20-22 minutes, if I had been around to notice that they were already done.
Eating the Bread
I have to say, I was pretty stunned by the way the breads turned out. I was near speechless. Unbelievable! I made bread. And it turned out well! Woo hoo! I made bread… I made bread… I couldn’t believe it!
This was the almond-raisin-orange loaf…

It was gorgeous! Okay, so the almond flakes on top of the bread were a little charred (raisins would have been a better option for sprinkling on the surface), but the loaf looked absolutely scrumptious. And oh, the smell… the fragrance wafting from the bread!
Inside, it looked like this…


I really liked the texture of the crumb – softly dense and yet nicely fluffy and rather refined.
The raisins were soft, moist and juicy, the almonds were fragrant and crunchy and the mandarin peel… oh, the candied mandarin peel… it worked so well. It added a nice, refreshing, zesty aroma to the bread. I only wished I had put more of it in.
(I think this fruity loaf would make a sensational bread pudding the next day – assuming there is any bread left for the next day).
And here’s the cheese loaf…


On the inside…


The fillings for this bread worked very well too. The sweetness of the onions, the melted softness of the cheese, and the savory meatiness of the ham made a tasty combination.
Suffice it to say that both loaves were pretty much polished off as soon as they came out of the oven.
Further Yeasty Adventures
I like this basic dough recipe alot. It produces a loaf with a fine-textured crumb and a soft, fluffy texture. I found the density well-balanced. None of the airy nothingness of commercially produced bread, and yet not so heavy and dense as to make it heavy-going on the palate. The crust, while not crunchy, is firm with a nice bite.
And I think it can be so versatile. My mind brims with all the different fillings I could put into the loaves. Of course, this would make the bread less of a European-style country bread, but rather, it would become a distinctly Asian incarnation, much like some of the buns and rolls that can be found in our local bakeries - except that the home-baked version will have a much tastier bread surrounding the fillings!
Possible variations for a savory loaf:
• Sardines with fresh chilli and onions
• Sardines with black olives
• Tuna with chilli and onions
• Otak-otak (BBQ pieces of fish paste and coconut milk, wrapped in banana leaves)
• Sambal hae bee (chilli dried shrimps)
• Char siew with sweet wind-dried vegetables (mei cai or mui choy)
• Bak kwa (BBQ sweet meats) and pork floss
• Diced sausage, with or without cheese
• Shredded pork with rosemary
• Mixed mushrooms
• Black olives
• Sundried tomatoes with roasted vegetables like zucchini, bell peppers and mushrooms
• Smoked salmon and cream cheese, with dill or thyme
• And of course, a sure-fire success… bacon and cheese
Possible variations for a sweet loaf:
• Chunks of dark chocolate
• Chocolate chips with peanut butter chips
• Almonds or hazelnuts with chocolate
• Cranberry and candied orange peel
• Mixed candied fruit peels
• Christmas sweet mincemeat
• Raisins and cinnamon sugar
• Apples and cinnamon
• Tau sar (red bean paste)
• Ground peanuts mixed with sugar
• Nonya kaya (coconut egg jam flavored with pandan)
• Chinese-style milk custard (nai you) and sugar
Oh, the potential permutations and combinations are near endless. How exciting!
I now finally understand. I now understand what all the fuss is about. I can see why people can go on and on about baking bread. I can feel how it is possible to become totally hooked on the experience.
Bread making… it is about patience… it is about anticipation… it is about hope… it is about believe… it is about faith… and then it is about jubilation, elation and a deep, deep sense of satisfaction and pride at the sight of a golden brown loaf of bread, fresh out of the oven. It is about the aromas and the taste of that first bite into a piece of warm fresh bread.
Well, it looks like yeast and I, we have finally become friends. It isn’t as scary and menacing as I had thought it to be. I wasn’t expecting such an exhilarating, enjoyable and wonderfully successful outing with it. But it happened. And I am grateful. Hmmm… I think yeast and I will have many more interesting (and hopefully tasty) adventures together in the future.
Copyright © 2004 Renee Kho. All Rights Reserved.
Please contact me for permission to copy, publish, distribute or display any of the images or text contained in this article.
06:08 PM in Home Baker: Breads | Permalink | Comments (25) | TrackBack
Thursday, April 15, 2025
Chocolate and the Art of Low-Fat Desserts
Raise your hands those who have this problem… way too many cookbooks, way too little space. Me, me, me… I raise both my hands, and probably both feet too! Guilty as charged. Cookbooks are one of those things that I can never seem to get enough of. I swear off buying more. And yet, after each saunter through a bookshop, after a casual conversation with a fellow cooking enthusiast, or after reading a review or recommendation on the Internet or on a food blog, new acquisitions inevitably join those already on my bulging and over-flowing bookshelf. I feel guilty each time. Yet, I cannot resist the pull. And let’s not even mention my ever-lengthening “wish list” of cookbooks. Now, that is scary.
There are so many cookbooks that I have bought but have never made anything from. (That’s probably the majority of the cookbooks, I am ashamed to admit.) There are almost just as many that have languished, forgotten and neglected, on the bookshelf, as my attention is usually focused on and enamored with my newer finds. I can almost hear the plaintive pleas of these weary, dejected and somewhat dusty tomes for some attention and a little tender loving care. And so, making use of my few nights of sleeplessness earlier in the week, I have been clearing and sorting through my cookbooks… revisiting long forgotten favorites, re-discovering ones that I have forgotten I even had. Oh my! You should see how these books perk up, becoming cheery again and immediately looking spiffier at the sudden attention showered upon them. And for me, it’s like Christmas has come early. It’s almost like suddenly getting 50 new cookbooks all at once! Isn’t it amazing how things forgotten, once rediscovered, are as exciting and invigorating as if they are brand new.
This is one of my re-discoveries… Chocolate and the Art of Low Fat Desserts (CALFD), by Alice Medrich. I have had this cookbook for probably, oh, a good 5-6 years. This was one of the many, many cookbooks I bought during my frenzied “cookbook-buying” phase when I was in Vancouver. I had never made any of the recipes. Sure, I had thumbed through this book countless times, eyes hungrily devouring the glossy pictures, mind mentally noting all the recipes I wanted to try from the book. But alas, none of the recipes were ever given a chance – until two days ago that is, when I made the chocolate marble cake.
Alice Medrich comes highly qualified to write a book on desserts in general, and chocolate desserts in particular. She is the founder and owner of Cocolat in Berkeley, California, which is famous for its tantalizing desserts and indulgently decadent chocolates. Quoting from the inner cover of CALFD, Ms Medrich is America’s “First Lady of Chocolate”, as proclaimed by Entrepreneur magazine. I’ve also previously read somewhere it being said of Cocolat that it is "to chocolate what Tiffany's is to diamonds".
CALFD is her second book. Her first being the multi-award winning “Cocolat: Extraordinary Chocolate Desserts” – a recipient of the James Beard Foundation Award for Best Cookbook of the Year, the Julia Child Award for Best First Book, and the Best Book in the Bread, Other Baking and Sweets Category from the International Association of Culinary Professionals. Like its predecessor, CALFD is also a James Beard Foundation Award winner.
It is not hard to see why. This book is filled from cover to cover with the most delectable sounding of dessert recipes. Now, when you think low fat desserts, what comes to mind? Fruit-based desserts maybe. Sorbets. Poached fruits. Angel food cake. Meringue. Don’t get me wrong. There is nothing wrong with any of these desserts. They are all delicious in their own right, and often make for lovely, refreshingly light, sweet palate cleansers. But when we think dessert, and chocolate dessert at that, we WANT rich, sweet, decadent, chocolatey, indulgent. We want the full complex and multi-layered flavors of real chocolate. We want the works. And if possible, without the guilt and the extra inches around the waistline. We want chocolate desserts that are richly decadent, and yet low fat. Impossible? Not if this book is anything to go by.
It is filled with recipes for desserts that look like this…
Then there is The New Chocolate Decadence – an enlightened version of the famous 70s and 80s chocolate dessert Chocolate Decadence, which was made with only one tablespoon of flour and a full pound of dark chocolate!
Other taste-bud tantalizers in the book include such indulgent creations as Chocolate Grand Marnier Cake, Mocha Hazelnut Mousse Torte, and Bittersweet Chocolate Marquise with Praline Crème Anglaise. The names themselves evoke scintillatingly images of luxuriant lusciousness and rich decadence.
What I like about Alice’s recipes is that she doesn’t go overboard, and attempt to make the desserts completely fat-free or extremely low in fat. She keeps her perspective that these are, after all, desserts. And she keeps to the spirit of that. She trims the fat with a prudent hand, and a healthy dose of pragmatism, level headedness and common sense. It means that, in all likelihood, these recipes have kept much, if not almost all, of the rich flavors and textures of “real” desserts. Yet, most of the recipes are in the very acceptable 30% or lower fat content range, with only a few straying over into 33% fat content. This compares very favorably against regular chocolate desserts, which, if I am to hazard a guess, would probably fall in the 50-70% fat content range, and sometimes maybe even higher!
The book is organized by dessert type, ranging from the simple and homely, to the intricately refined and elegant. From the “Tea Loaves and Pound Cakes”, and “New Dessert Classics”, through to the “Dressy Desserts” and “Petite Sweets”.
A great section is “The New Basics”. Here, Alice has grouped together a pretty comprehensive collection of “foundation” recipes, which can be used for just about anything, and which enables the reader to create and build his/her own fantastical low-fat desserts. Different versions of lightened pastry creams; chocolate mousses; chocolate sauces, glazes and frostings; as well as lightened pastries and pie crusts are included. Also very helpful are basic recipes for simple cake and dessert decorations like tuiles, dessert cups and chocolate filigree.
The writing style is highly personable, with little nuggets of the author’s personal pastry experiences and philosophies sprinkled through the text. Her tone is light, non-stuffy, and yet professional and highly knowledgeable. This comes through in one of my favorite chapters of the book, “The Theory and Practice of Creating Rich Desserts with Less Fat”. Here, Alice’s pragmatism, common sense and personal ideology about desserts, as well as her vast experience, are clearly evident. She talks about pairing the light with the rich, contrasting the textures and flavors, and working with, not against, the nature and role of fat in desserts. She teaches the principles of choosing good recipe candidates for alteration, finding the fat in those recipes and the ways in which ingredient substitutions can be done with minimal sacrifice of flavors and textures. She talks about what can be done, with what, and how best to go about doing it. It’s about healthy eating as a lifestyle – without deprivation, without suffering! It’s about guilt-free indulgence.
Her basic philosophy is appealing. She believes in using excellent quality, natural (and “real”) ingredients – none of the artificial sweeteners or other such like substitutions to bring the calorie and fat content down. It’s working with the full potential of nature’s bounty to create maximum taste enjoyment.
Some of the recipes are highly involved. Such as for something like this…
However, this is what is nice about the book. It covers the full gamut – the easy loaf cakes that one can make for daily indulgence, and then the truly dressy and elegant creations that would wow your guests at the classiest of dinners. Then, there are also the simple, easy yet beautifully refined and well-presented creations like this…
My only gripe about the book – and it is a small one – is that I would prefer that each recipe be accompanied by a large, glossy photo of the creation. The book would then be pretty close to perfect. But I’m just nit-picking. And this desire is but a reflection of my own quirky preference for cookbooks with a high gloss factor – lots and lots of full-color, scrumptious photos of each recipe. This book, as it stands, is already very lavishly illustrated with dozens of full-page, full-color, drool-worthy shots of Alice’s stunning desserts. There are also many thumbnail sized colored shots of most of the other recipes. A book that is a pleasure to browse through, if for nothing else other than to gaze at the pictures.
Now that I’ve tried one of her recipes, I am keen and ready to move on to her more “demanding” creations. From my one experience, I have to say it would appear she knows what she is talking about. The chocolate marble cake was incredibly moist and fluffy of texture, and tender of crumb. Who would have guessed it was low fat.
For a chocoholic like me, the re-discovery of this book has been an elating experience. It is chocolate and chocolate desserts as they should be – rich, indulgent and highly enjoyable. And as a bonus, low fat.
I am now also very keen to track down her original best-seller: “Cocolat: Extraordinary Chocolate Desserts”, which I think is now out of print. She has also recently (November 2003) launched her newest creation – “Bittersweet: Recipes and Tales from a Life in Chocolate”. This sounds like another fabulous tome of enlightening chocolate wisdom and experience, mixed with enticing, mouth-wateringly delicious chocolate creations. Sagging, overloaded bookshelf not withstanding, my chocolate cookbook collection would not be complete without these two numbers.
Copyright © 2004 Renee Kho. All Rights Reserved.
Please contact me for permission to copy, publish, distribute or display any of the images or text contained in this article.
11:03 PM in From The Bookshelf | Permalink | Comments (4) | TrackBack
Wednesday, April 14, 2025
Well Worth The Skin On The Back Of My Hand
After several days of wanting to bake a cake, but not managing to, due to the odd middle-of-the-night hours that I have been doing my baking at over the last few days, I finally decided enough was enough. I was going to make a cake, and I was going to make it NOW. So, yesterday afternoon, I decided that no amount of distractions was going to keep me from baking my cake. (And no, this is not my contribution for IMBB this Sunday… I have yet to start on that). This was merely my attempt to satisfy a deep-seated craving for a home-baked cake. You know how it is… when you have a craving for a certain food… it JUST won’t go away… it’s like a bad itch that just has to be scratched. Ah! And then… bliss…
I decided to try out a recipe from a fabulous cookbook that I very recently re-discovered. I had never made anything from the book before, even though I have owned it for perhaps 5-6 years. It’s called “Chocolate and the Art of Low Fat Desserts” by the highly regarded Californian pastry maestro, Alice Medrich. I will post a full review of the book tomorrow.
Anyway, I opted to try out her “chocolate marble cake”. I love marble cakes. We buy them on a regular basis. But nothing quite beats the taste of a home-made marble cake. I myself have never made one from scratch before. I’ve always taken the easy route… buy it from the store… or eat the one mum makes! But some time ago, when Alberto posted about his marble cake, it had me thinking about and wanting a delicious piece of home-made marble cake. And yes, it has taken me this long to scratch that itch! When I saw Alice’s low fat version, it seemed a perfect sign… it was time to make my marble cake!
Making the cake, which was a very simple and straightforward recipe, turned out to be a very painful experience for me.
In the midst of making the cake, I very cleverly gave myself a rather nasty burn on the back of my hand. How was I so careless? A combination of factors I guess. Not fully concentrating, for one. Trying to do too many things all at the same time, for another. And being harassed at the wrong moment, and getting distracted.
I was half way through mixing the cake batter when the oven timer went off. Something else that I was preparing was ready to come out of the oven. So with grubby hands I tried to remove the item from the oven. Just at that moment, the phone decided to ring. I tried to hurry, so I could get to the phone. Then, the doorbell rang. And this person pressed the doorbell not once, not twice, but four times in quick succession, and then just decided to keep his finger on the buzzer! I yanked the pan out of the oven, and in the process the back of my right hand touched the top element of the oven. I yelped. Actually, more like I screamed. A big patch of skin had come off, and was now probably stuck to the red-hot top element of my oven. The back of my hand immediately turned a bright lobster red, searing pain shot through my entire hand, and it felt like it was on fire. I dropped the hot pan I was holding. I screamed again. All the contents of the pan were now on the floor. I ran to the sink, and placed my hand under running water. It didn’t work. I was nearly in tears. I had to stop the pain. Ran to the fridge. Ack! Of all times to be out of milk. No milk. Yogurt! That should work, shouldn’t it? Dug my fingers into the pot of yogurt. Slathered it onto the wound. Temporary relief. Then the pain returned. I could feel my flesh “cooking”. The heat was no longer on the surface of the hand (or at least I could no longer feel it there, or perhaps more accurately, I could no longer feel the surface of my hand). Instead, I felt intense heat inside, “cooking” my flesh. Oh boy, this must be what it feels like for a piece of meat to be cooked. Tears were really threatening by this time.
A, our domestic helper had sprinted into the kitchen from the backyard when she heard my first scream. She suggested ice. No way! That was a very bad idea. My mind was blank from the pain. I couldn’t for the world of me think of something sensible to put on the wound. Tried to stay calm. Tried to think. Then, simultaneously we both said “aloe”. And so A ran back out into the garden and snipped off a fresh sheaf of aloe vera from the nearest plant. With a slab of freshly cut aloe on the wound, sanity started to return, very slowly. After about 20 minutes, the pain was getting near bearable. The wound looked real nasty. A chunk of skin was gone. Red. Swollen. Oozing. Not pretty. The zigzag outline of the oven element was clearly stamped on the back of my hand. I felt like one of those farm animals branded with a hot iron stamp! I just hope it doesn’t leave an unsightly scar.
Aloe vera – especially fresh aloe vera – is a true miracle worker. Very quickly it stopped the intensely hot “cooking” feeling in the flesh. And it sealed the wound too, substantially reducing the oozing and all that horrible stuff.
Slowly, as the fog of pain started to dissipate, I could begin to see the lighter side of things. What was it that Anthony Bourdain always used to say on his show? Something about how all good cooks must have “battle scars” of burns and cuts to show that they have paid their dues in the kitchen. Well, I guess this would definitely count as a significant “war scar” in my portfolio!
I even went back to the oven to check to see if there was any smell of burning flesh emanating from it. Perverse, huh? But no, all clear. It was quite safe to put the cake into the oven.
So, I went back to finishing the cake. I was clearly no longer in the mood for cake making. Like a one-armed Jack, with my right hand still pretty much immobilized by pain, I perfunctorily layered the batter into the cake pan, gave it a “who-cares” swirl of a knife, and popped it into the oven.
But you know what? The resulting cake was quite incredible. And yes, even worth giving up a piece of my skin for, literally.
Oh, you should have smelt the aromas wafting from the oven as the cake baked. It was heavenly! At times like this, I really wish I have smell-a-blog so that I can capture smells and share it online!
The cake itself was gorgeous. It was very moist and beautifully soft and fluffy, with a very tender and refined crumb. It tasted wonderful. Or as A declared: so much better than the one we buy from the shop. The chocolate bits tasted smooth and chocolatey, even with just the use of cocoa powder. And one would never have guessed that there was only 6 tablespoons of butter in this lightened version. It tasted as rich and flavorful as a regular marble butter cake.
The only thing I wasn’t overly pleased with was the look of the cake. I would have preferred more refined and elegant swirls of chocolate throughout the white batter, rather than a big central lump of chocolate batter as was the case with this cake. Well, I guess that came about from several elements. Firstly, my intimate encounter with my oven element. Secondly, the layering instructions given by the recipe. And thirdly, the chocolate batter instructions in the recipe, which resulted in too much chocolate batter in relation to the white batter.
The next time round, apart from reducing the amount of chocolate batter created, I would also probably have more layers of the batter as it goes into the cake pan, and start with a chocolate layer rather than white – that is, a layer of chocolate batter, a layer of white, another layer of chocolate and a final layer of white. This would give less batter per layer, and so when it comes to swirling it, it should produce a much prettier effect. Of course, this version of the cake, with the large chocolate center, made for very enjoyable eating for chocolate lovers, as there were large parts of chocolatey cake to savor, whereas a more diffused marbling effect would give a less concentrated chocolate sensation. So, I guess maybe it’s more a case of different styles for different cravings? ![]()
I was also not too happy about the fissures that appeared in the top of the cake as it baked. I would like some help and advice on this. What are the reasons for the cake “cracking”? Anyone know? How can I prevent this? Would love some suggestions or opinions on this. Thank you.
Other than the minor cosmetic imperfections, the cake was a taste-winner. This is definitely one recipe I would make on a regular basis.
Low-Fat Chocolate Marble Cake
[adapted from “Chocolate and the Art of Low-Fat Desserts” by Alice Medrich]
2 cups (8 oz) cake flour *
1 teaspoon baking powder
½ teaspoon baking soda
½ teaspoon salt
1 teaspoon instant espresso powder or coffee powder
1/3 cup unsweetened Dutch Process cocoa, sifted
1 1/3 cup sugar
1 egg
1 egg white
6 tablespoons butter
1 cup nonfat plain yogurt **
2 teaspoons pure vanilla extract
* I recommend using the “swirl, lightly spoon into cup and level” method to measure out the cup measurements. Using this method, 2 cups of flour gave me exactly 8 oz of flour by weight. Using the regular “scoop and level” method would definitely provide too much flour, and result in a dry and dense cake texture.
** I used low fat yogurt, as I don’t usually have nonfat yogurt at home.
• Have all the ingredients at room temperature before starting. Spray a bundt pan with cooking spray and set aside. (Instead of the bundt pan, I used two 8x4” loaf pans).
• Combine the flour, baking powder, baking soda and salt, and sift together into a medium bowl. (I sifted the flour mixture twice, as per my usual habit for making cakes, instead of just the one time as instructed by the recipe). Set aside.
• In a small bowl, combine the coffee powder, sifted cocoa powder, 1/3 cup of sugar and ¼ cup of room temperature water. Whisk together until smooth. Set aside.
• In another small bowl, whisk together the one egg and one egg white. Set aside.
• Cut the butter into small pieces, and using an electric mixer, beat for approximately 1 minute to soften the butter. Gradually add the remaining 1 cup of sugar and beat at high speed for about 3 minutes. Scrape down the sides of the mixing bowl periodically.
• Slowly dribble the whisked eggs into the butter mixture, one tablespoonful at a time, beating constantly for about 2 minutes.
• Reduce the speed of the mixer to low, and add 1/3 of the flour. Beat to incorporate.
• Add ½ the yogurt, and beat at medium speed until well-combined.
• Return to low speed, and add ½ of the remaining flour.
• Next, add the rest of the yogurt and also the vanilla extract, and beat at high speed to combine.
• Add the final batch of flour, and beat at low speed to incorporate. The mixture should be smooth, thick and creamy.
• Measure out 1 cup of the batter (the recipe actually called for 1 ½ cups to be measured out but I found that gave too much chocolate batter and not enough white batter). Gently fold the cocoa mixture into this 1 cup of batter.
• Using a large spoon, fill bottom of the cake pan(s) with ¾ of the white batter, placed in dollops. Cover the white batter with dollops of the chocolate batter. Top this with small dollops of more white batter, spaced out so that the chocolate batter shows through. Using a table knife, marble the batter together by swirling the batter with either a circular or zigzag motion. Do not over-blend. (These are the original recipe instructions. I would prefer the alternative as suggested in my narrative above).
• Bake in the lower 1/3 of a preheated 350F / 175C oven for approximately 45-50 minutes, or until the cake starts to pull away from the sides of the pan, or until a skewer inserted into the center of the cake comes out clean. Let cool for 10-15 minutes on a rack before unmolding.
Fresh out of the oven, the cake tasted amazing! Here is a picture of the last bite on the second piece (or perhaps more aptly “thick slab”) of cake that I devoured… not sure if you can see it, but look how tender, soft and fluffy the texture was…
Mmmm-hmmm… Shiokadelicious indeed!
Copyright © 2004 Renee Kho. All Rights Reserved.
Please contact me for permission to copy, publish, distribute or display any of the images or text contained in this article.
12:02 PM in Home Baker: Lighten Up! Cakes | Permalink | Comments (32) | TrackBack
Tuesday, April 13, 2025
It Would Be My Pleasure To…
I have had a couple of enquiries / requests from people who do not have blogs or personal websites about joining in the “Is My Blog Burning – A Cake Walk” fun, which will be happening this Sunday 18 April 2004.
I would love to include everyone. I think that would be very much in keeping with the spirit of the event, which is to come together as a community, to create, share and have some fun at the same time. After a quick “discussion” with Alberto, we both agreed that it would be nice to have the IMBB event be as inclusive as possible. So, for this third installment of IMBB – A Cake Walk, I would personally be very honored and most happy to post on this blog the picture and recipe contributions of those who do not have a blog / website, but who would love to join in the fun. Please just drop me a line so that I know to expect your contribution, and I will post the picture and recipe when I have received them by email from you.
My apologies for confirming this rather late in the week, but I think there is still lots of time to put on the baker’s creativity hat, and bake up a storm in the kitchen. ![]()
Have fun!
05:00 PM in Food and Drink | Permalink | Comments (2) | TrackBack
A Scone Scorned, A Muffin Maketh?
I’m really wishing my body clock will come home soon! Well, it was another night of weird sleeping patterns, and mad middle-of-the-night baking frenzies. Fell asleep before 8.30pm, and woke just before 1.00am. And despite my darnest efforts, no further sleep would come. I was bored, I was restless. I opened the fridge door a dozen times, wanting to eat, not wanting to eat. Then I saw it. The expiry date on the buttermilk carton – the same carton of buttermilk that has been sitting in my fridge since before the trip. Okay, it had given me fair warning. It was about to cross over into buttermilk heaven pretty soon. Time to swing into action. 4.45am. Perfect time for a little baking, no?
Looney Spoons and Crazy Plates (those are cookbooks by the way, in case you missed the previous post – and not wacky cutlery and quirky flatware ![]() – not that I don’t have some of those as well
– not that I don’t have some of those as well ![]() ) were still lying on the kitchen table from last night’s kitchen escapades. A quick flip through the back index pages… um… let’s see… under “buttermilk”… aha! Cranberry and orange scones. That sounded mighty delicious!
) were still lying on the kitchen table from last night’s kitchen escapades. A quick flip through the back index pages… um… let’s see… under “buttermilk”… aha! Cranberry and orange scones. That sounded mighty delicious!
Only problem… I didn’t have any cranberries on hand. Oh, but I did have raisins. I know, not quite the same as the refreshing tartness of cranberries. But hey, raisins would be nice too. Hmmm… raisins and orange? That didn’t sound right. Raisins and cinnamon? Bingo. So, I ended up substituting the two key flavors which defined the recipe! Hmmm… that was a good start.
While I was gathering the rest of the ingredients together, I started to have cravings for traditional English scones. This recipe was for American-style scones – which are usually made using what I call the “muffin method” of combining all the dry ingredients together, combining all the wet ingredients together, and then combining the wet and the dry with each other. But instead of using muffin pans, the dough is shaped into a large round disk and cut into wedges before being baked. English scones on the other hand are more like enriched American biscuits – made richer with eggs and lots more butter or shortening. The “rub-in” method, where the butter or fat is rubbed into the flour to resemble coarse breadcrumbs before the liquids are added, is usually used for English scones.
Since I did not have any buttermilk-using English scones recipes on hand, American scones it would be.
Buttermilk Raisin Cinnamon Scones
2 cups flour
1/3 cup packed brown sugar
2 teaspoons baking powder
¾ teaspoon baking soda
1 teaspoon ground cinnamon
½ teaspoon salt
1 cup + 2 tablespoons buttermilk
1/3 cup raisins
2 tablespoons butter, melted
½ teaspoon vanilla
1 egg
1 tablespoon water
Sift the flour, baking powder, baking soda, cinnamon and salt together. Combine well with the sugar, and set aside.
Whisk together the buttermilk, melted butter, vanilla and raisins.
Add the wet ingredients to the dry ingredients, and stir until a soft dough is formed.
From past experiences with this cookbook, I have found its recipes for scones and biscuits tend to produce rather wet and tacky dough – a dough that will not be shaped or rolled without being fairly generously floured and lightly kneaded. And this always overworks the dough, producing insipid creations.
So, instead of trying to shape the dough into two round flat circles and cutting them into wedges, as instructed by the recipe, alternatively drop the dough by the heaping tablespoonfuls onto the greased baking sheet, to create individual scones. Then, using dampened fingertips, gently shape each scone into ¾” thick rounds.
Lightly beat the egg together with the 1 tablespoon of water, and glaze the tops of each scone using a pastry brush.
Bake at 205C or 400F, for about 15-17 minutes, until the scones are puffed up and golden.
Serve warm.
Makes 12.
Note:
An alternative to baking the dough on a baking sheet would be to use a muffin pan. This would also help give the scones better height and more uniformity of shape, compared to the free-form shapes obtained from a baking sheet.
The scones did spread ever so slightly during the baking, but still had fairly good height…
Sorry, I couldn’t resist posting this picture. I thought it resembled “something” and looked rather “naughty” ![]() . Ahem… don’t mind me, I’m just feeling a little silly from lack of sleep.
. Ahem… don’t mind me, I’m just feeling a little silly from lack of sleep.
The scones’ texture and crumb were sort of a cross between an American scone and an American muffin, with a touch of the English muffin. It was tender and fluffy, and yet moist and slightly dense at the same time.
The family seemed to like it. I went back to bed at 6.30am, having left the scones to cool on wire racks. I woke up again at 11.00am to find that the family had devoured three quarters of all the scones for breakfast! They figured they should at least save three for me, since I had made them. How thoughtful! And I have to say, they were pretty good, especially for something so low fat. They may not have looked terribly attractive. I admit, they were not the most elegant and refined-looking scones you’d have ever seen. But they tasted good. I had all the remaining three for brunch… one on its own, with no embellishments. Nice.
I had one the traditional English scone-eating way… albeit slightly adapted…
I didn’t have clotted cream, nor did I have any whipping cream to whip. (Heh! Boy! My English is in top form today, isn’t it?) So, I made do with ready-whipped light cream – those that come in those aerosol canisters, the type for making café mochas and iced lattes. Yes, that type. Don’t scrunch your nose. It worked. Rather well at that. Added a nice dollop of strawberry preserves with chunks of real fruit. Fabulicious!
And of course, I had to have the third with my (still) current favorite flavor of the month… Hainanese kaya…
Very, very delicious!
Copyright © 2004 Renee Kho. All Rights Reserved.
Please contact me for permission to copy, publish, distribute or display any of the images or text contained in this article.
02:21 PM in Home Baker: Lighten Up! Muffins, Scones etc. | Permalink | Comments (7) | TrackBack
Monday, April 12, 2025
Mad Midnight Cookie Capers
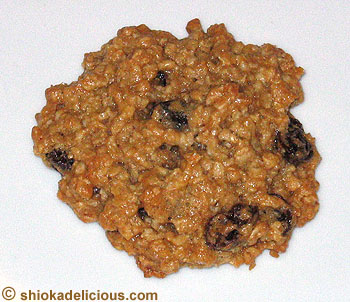
My apologies for the lack of posts over the last few days. I was on a business trip for most of this past week. I was away for about 140 hours or so, give and take a few hours. But over 55 of those hours were spent stuck in gloriously unexciting airplane cabins, in some wonderfully boring airport lounge, or in exhilaratingly slow-moving security lines. That accounted for nearly 40% of the trip. And the rest of the 85 hours? Well, I lost quite a few hours crossing the International Dateline. And I spent the rest of the time in stuffy hotel function rooms that were too crowded, elegant meeting rooms that all looked like each other, and fluorescent-lit offices that all looked grey. Then there was the small matter of giving in to the insistent demands of my severely sleep-deprived and time-zone-confused body for some rest. Food-wise, I got to eat airplane food, hotel food, more hotel food, and then more airplane food. Boy! Did I have an exciting trip!
And of course, all this was made totally bearable by the thought that I was merely in one of the most exciting cities in the world – New York. Urggh! Yup, that’s a good word. Urggh! It has been a few years since my last trip to the Big Apple. And that’s how I “wasted” my trip. I was hoping to have time to say “hi” to a New Yorker food-blogging friend. I had also so desperately wanted to at least pop into Williams & Sonoma and NY Cake Supplies (which Deb had mentioned before and from where I was hoping to pick up some much-wanted baking tools). Well, scrapped those ideas! Who was I kidding? As for the plan to satiate my recent near-unbearable cravings for cupcakes with a visit to Buttercup and/or Crumbs (oh, did you see their Reese’s cupcake which was pictured on NYT’s website some time back? Talk about a little piece of heaven!)… Hah! Think again! I couldn’t believe none of that happened for me. How depressing!
Anyway, Body is now back in Singapore, safe and sound. Ummm… but we seem to have left Body-Clock behind in New York. And Body is feeling kind of lost without Body-Clock. The two were inseparable, you see. One would always be with the other. They would not be parted. But something happened a few years ago. Body-Clock started to feel “less young”, and decided to give up its jet-setting lifestyle. It now baulked at having to travel vast distances across multiple time zones. It didn’t like moving around. It wanted to stay in one spot, where it was comfortable and secure in its daily routine. Therefore, much as it loved and wanted to be with Body, it did not want to cross 12 time zones, just so it could be with its beloved Body. And having been dragged, almost forcibly, by Body to New York, it was hell-bent on not being made to make a second 24-hour long journey back across another 12 time zones, all within the space of three days. Heck no! No one was making Body-Clock get on another plane. Not yet anyway. And so, Body is now back in Singapore. And Body-Clock… well, it is still in New York. And me, I am caught in the cross-fire.
Body is inextricably linked to Body-Clock. It can feel Body-Clock’s moods, emotions, thoughts and desires even when they are tens of thousands of kilometers apart. Body defers to Body-Clock in all matters, foregoing its own needs and desires. Whatever Body-Clock wants, Body-Clock gets. Yes, even when it is on the other side of the world.
It was 4am Easter Sunday morning in Singapore (where Body is). It was 4pm Saturday-before-Easter-Sunday afternoon in New York (where Body-Clock is). Body wanted to sleep. In fact, so did Mind. Both desperately craved sleep. Body-Clock however decided that it was a glorious Saturday afternoon – a perfect time to do something exciting. So, here in Singapore, Body picked up on Body-Clock’s vibes, and despite the hollers of protestations from Mind, Body decided it was the perfect time to do some baking. Yep, baking. Oh, did I mention it was 4am in Singapore?
Well, what Body-Clock wanted and what Body has decided, Mind and Renee had to follow. So, we baked. At 4am in the morning.
Mind, having resigned itself to the thought of baking, decided it wanted to bake a cake. But Renee, the one remaining sane voice in this midnight madness, reminded Body and Mind that cranking up an electric mixer at 4am in the morning was NOT a good idea. Not unless we wanted the neighborhood policemen to drop by and invite themselves in for a cuppa, taste-test our cake and thereafter to offer us a serious “discussion” on the foibles of using electric stand mixers at 4am in the morning.
Okay, how about hot cross buns then? Perfect for Easter morning breakfast, no? Nah… Mind knew full well that Renee was not much of a bread maker. And messing around with bread dough, albeit a very simple bread dough, in the wee hours of the morning did not sound like a good idea at all. Finally, Mind, Body and Renee came to a consensus, and settled for cookies. Yeah, cookies. They were quiet things. Not attention-seeking noise-makers like cakes.
Mind wanted oatmeal raisin cookies. Renee seconded that. Body acquiesced. We grabbed the first cookbook off the shelf. Ah! Looney Spoons. Good! We haven’t made anything from that in a long while. And hey, we bought that book during our stay in Vancouver, Canada. That’s fairly close to where Body-Clock, our absent yet ever omni-present partner-in-crime, is currently. Perfect.
It’s a fun book – low fat cooking made fun, quirky and well, just a little bit looney. It was a massive hit during the time I was in Vancouver a few years back. A lot of the stuff I have made from it (and its companion volume, Crazy Plates – don’t you just love the names of these two cookbooks?) have been successes, although there have also been a few disastrous misses.
And so we made oatmeal raisin cookies. These were decidedly oaty oatmeal cookies. Compared to the usual proportions of flour and oats in other oatmeal cookies, this recipe used a heck of a lot of oats – 2 cups of oats to just over ¾ cup flour. So the texture of the cookies was more akin to perhaps a soft, chewy granola bar rather than a cookie per se.
Oh, another thing, Mind was so sleep-deprived, it did not read the instructions properly BEFORE we started. Only after we were elbow-deep in flour and oats, did Mind shout out: hey, wait, we are supposed to cream the butter and sugar together in an electric mixer. What?! Wait a minute. Cookies are supposed to be quiet things. What electric mixer are you talking about? Sure enough. That was what the recipe said. Well, never mind the recipe. It was there for guidance, right? Who said anything about following it to the 'T'. Renee decided that butter and sugar shall thus be creamed by hand. Besides, Body needed the exercise. And it also did not seem to cause any irreparable or permanent damage or harm to cookie subject.
We made a few other adjustments, but we’ll talk about that as we go along.
Oatmeal Raisin Cookies
(adapted from Looney Spoons by Janet & Greta Podleski)
2 cups quick-cooking rolled oats
¾ cup + 2 tablespoons flour
½ teaspoon baking soda
½ teaspoon salt
1 cup lightly packed brown sugar
1/3 cup margarine or reduced fat margarine
¼ cup buttermilk
1 teaspoon vanilla
½ cup dark raisins
The recipe did not ask for the flour to be sifted. But I always sift my flour, even for cookies. And so, the flour, baking soda and salt were sifted together, before being combined with the oats. This was then set aside.
The recipe asked that the margarine, sugar, buttermilk and vanilla be mixed together. I didn’t think that sounded too right. So, I decided to cream the margarine and sugar together first before adding the buttermilk and vanilla. The margarine and sugar were vigorously mixed together in a large bowl, with a wooden spoon and much arm power. However, if not making cookies at 4am, an electric mixer would be useful for this purpose. The margarine and sugar were beaten until creamy and fluffy. The buttermilk and vanilla were then added and mixed well.
The dry ingredients were folded in, stirring only until they were just moistened.
Lastly, the raisins were stirred in.
Heaping tablespoons of the batter were dropped onto a baking sheet that had been coated with cooking spray. Ample space was allowed between each cookie. The dough was first quickly and gently patted into nicely rounded shapes using the fingertips which had been moistened with water, and then flattened to approximately ¼ inch thickness using the back of a teaspoon that had been dipped in water.
Into a 160C or 325F preheated oven went the cookies, for approximately 20 minutes. The recipe gave 13-14 minutes, but I had to return the cookies to the oven for another 6 minutes or so. The cookies were done when the tops were dry to the touch and the bottoms were golden brown.
They were removed from the tray immediately and left to cool on a wire rack.
The book said the recipe would make 16 large cookies. I made 22 good-sized ones.
The cookies were alright. I wouldn’t say they were overwhelmingly good. But at the same time, they weren’t underwhelming. They were okay. Soft, chewy, very oaty, not too sweet, with nice plump juicy raisins. They were nice for something this healthy and low in fat. And yes, they were very healthy indeed. They were like a rounder, flatter presentation of a granola bar I guess. Perhaps lowering the oat to flour ratio the next time round would make for a lighter and more interesting texture.
And so, at 5.30am, with warm freshly baked cookies in our tummies, off to bed we went – Mind, Body and me. And Body-Clock also finally decided to give us some peace.
Lastyly, on a separate note, I would like to wish one and all (albeit 1½ hours belatedly…) a blessed, joyful and safe Easter!
Copyright © 2004 Renee Kho. All Rights Reserved.
Please contact me for permission to copy, publish, distribute or display any of the images or text contained in this article.
01:22 AM in Home Baker: Lighten Up! Cookies | Permalink | Comments (14) | TrackBack
Monday, April 05, 2025
Is My Blog Burning? – A Cake Walk
It’s here again! Yes, ladies and gentlemen, blog-burning day is back!
For those not already familiar with this event, “Is My Blog Burning?” (IMMB) is a distributed food blogging event which was created and inspired by baking maestro, Alberto. It can perhaps be described as an international cook-out session. A date and a theme are set, and each participating blogger produces a food dish according to the set theme, and posts about his/her creation on the set day.
Since its inaugural run in February 2004, this wonderful event has garnered much support and participation, with resultant great fun and creative-energy all round, and it has informally evolved into a monthly affair.
When I made a “sweet suggestion” ![]() to Alberto over a month ago, he very kindly offered to have me host the third installment of this enjoyable and inspiring event. And so, our blogs will burn once more on Sunday 18 April 2025.
to Alberto over a month ago, he very kindly offered to have me host the third installment of this enjoyable and inspiring event. And so, our blogs will burn once more on Sunday 18 April 2025.
So, what be the theme of this round of blog cooking mania you ask? Well, Alberto inspired us to cook a heart-warming soup dish in the opening round. We then moved on to a delectable tartine (sandwich) entrée course, hosted by the ever-talented and creative Clotilde. So I thought it would be nice to follow up with a sweet “dessert” course. Therefore, it is time for a… Cake Walk! (Blog world style.)
What is a cake walk? It is an event, probably of English origin, which is usually held at local fun fairs. Cakes are baked and donated by members of the community. Each cake is given a number. Those who wish to take part in the cake walk buy a number, or as many numbers as they want, for a nominal sum (ranging from a few cents to a couple of dollars per number). Numbers are then drawn out of a bag, and the person whose number is drawn gets to take home that particular cake. I personally have a lot of happy and fun childhood memories of participating in cake walks. It is a wonderful (and exceedingly cheap) way to taste and enjoy the home-baked cakes of many different people.
I would like to re-create some of this fun and excitement in the virtual world. Any type of cake can be submitted for this cake walk. It can be a homely, rustic coffee cake. Or it can be an intricately decorated and frosted creation. It can be a de-constructed masterpiece. Or it can be of architectural construction and design. It can be traditional, or it can be modern and avant-garde. It can be hearty. Or it can be delicately refined. Let it be fun and quirky. Or let it be elegant and regal. Make it light and ethereal, or make it thick, rich and gooey. Use a family heirloom recipe. Or use something festive that you are baking for Easter. Take a nostalgic walk back to a tasty childhood memory. Or take a bold step forward and carve out the future path of cake-making. It is all about cakes, cakes and more cakes!
Wait… before you rush off into the kitchen, here is a break-down of the guidelines:
• All are welcome to take part. You need not be a food blogger to participate. We would love to see lots of new as well as familiar names.
• The theme is “A Cake Walk”. Create a cake – any cake.
• The date is Sunday 18 April 2025.
• The cake does not have to be made on the “IMBB?” date itself. Only your entry has to be posted on that day.
• Share the recipe for the cake you have made. It would be wonderful if a photo could also be included. We would love to be able to drool over your cake, and taste it vicariously through our eyes!
• Once your entry has been posted, please email me with the link to it.
• A full list of the participants and the links to their creations will be posted here after the event closes.
• And of course, if you have any comments, suggestions, requests or queries, I would love to hear from you.
Oh! This will be fun!
Mmmmm… I think I already smell a cake baking…
Copyright © 2004 Renee Kho. All Rights Reserved.
Please contact me for permission to copy, publish, distribute or display any of the images or text contained in this article.
11:57 PM in Food and Drink | Permalink | Comments (34) | TrackBack
Sunday, April 04, 2025
Mighty Meaty Beany Dumpling
Remember the green bean dumpling I mentioned in my reply to one of the comments made on my earlier post about the nonya zhong zhi (glutinous rice dumpling)? Well, here are some pictures of one such green bean zhong zhi that I had for supper just a few hours ago.
It was billed as being a green bean (aka mung green bean) dumpling. But the beans shared the limelight with chunks of pork cooked in dark soy sauce.
Skinned green beans were used, so that as these were cooked down during the fairly lengthy boiling process for the dumplings, their yellow flesh became soft, almost fluffy, blending in well with the soft, smooth glutinous rice. They melded almost imperceptibly with the rice, and yet at the same time provided an interesting contrast of texture – the soft, near-mushiness of the beans against the soft yet springy bite of the glutinous rice.
This dumpling also included a yolk of a salted egg, which added a nice little zing. The rice and beans on the right half of the above picture had taken on an orangey hue from the egg yolk.
The meat was very flavorful, providing a tasty counterbalance to the bland beans. I loved its rich coloring from the dark soy sauce. However, because it was very lean, it didn’t quite have the “melt-in-your-mouth” tenderness and lusciousness of fattier cuts of meat. But that actually suited me just fine, being as I am a person who gets the willies when confronted with fatty meat on my plate. There were a few small bits of fat interspersed through the chunks of meat, and these provided a subtle tinge of rich smoothness to the rice and beans.
The serving of meat in this dumpling was very generous. It was filled with chunks of meat. One would be forgiven for almost thinking this was a bak zhang (meat dumpling in Hokkien), rather than a bean zhang.
I personally am not much of a bean zhang, or for that matter bak zhang, person. My preferences lie with my mum’s home-made ground peanuts, mushrooms, chestnuts and meat dumpling, and the nonya sambal hae bee (dried shrimp) dumpling.
But this dumpling was a nice complete meal on its own… rice, meat and pulses… all conveniently wrapped in bamboo leaves… very compact, highly portable and easy to eat!
Oops, that’s me… gotta go…
Copyright © 2004 Renee Kho. All Rights Reserved.
Please contact me for permission to copy, publish, distribute or display any of the images or text contained in this article.
05:27 AM in Tastes of South East Asia | Permalink | Comments (6) | TrackBack
Friday, April 02, 2025
Angled Silk…

Angled silk gourd, that is. A.K.A. angled luffa or ridged gourd or Chinese okra in the English language. In Asia, it is usually referred to as either “shi gua” in Mandarin or “ketola” in Malay.
This Asian vegetable with the deep-green skin and unique angled ridges is a common ingredient in most Chinese homes. In fact, nearly all families cook it in very similar ways. There are several popular methods of preparation, the most common of which is cooking it with eggs. It is also very often cooked with either chicken or just some large sweet onions.
However, even though almost every family serves up very similar recipes of this vegetable, each family’s version is completely unique. Even if I taste 20 families’ presentation of shi gua with eggs for example, each family’s interpretation will look, feel and taste different. Some cook it akin to a shi-gua-scrambled-eggs dish, along the lines of fluffy fu yong dan. Some prefer the gourd in a somewhat watery gravy with strands of egg in it. Others like it fried into pancake-shaped disks of egg-and-gourd. Yet still others like the eggs in soft, fluffy clumps, without any gravy at all. Each version reflects intimately the epicurean preferences of that family. From a simply humble gourd, much can be revealed about a family’s eating style. How fascinating.
As I was clearing out my photo archives this evening, I came across picture after picture of shi gua in various guises. I had taken photos of the gourd dish each time we had it, but had never posted about it. So, it is time. Today is the day. I shall honor some of the photos (great though they are not) and make use of them, and at the same time, share my family’s recipes for this well-liked gourd dish. (Yes, I am aware that it has been quite sometime since I last posted a recipe, and so it is also time to make amends in that arena.)
We usually cook this gourd in one of four ways, with two of them (cooked with egg or in a mixed vegetable dish) making the most frequent appearances, and the other two (cooked with chicken or with large onions) putting in the occasional guest-starring visit.
Shi Gua with Egg
This makes for a tasty dish that is also very colorful with great eye-appeal. Carrots and mushrooms are added for color. And the eggs are sautéed with the vegetables to give a gravy-less, chunky, scrambled eggs-like dish.
First, a few points:
• The gourd shrinks quite a bit during the cooking process, so it is best to prepare more gourd than would appear to be needed. Usually, a medium sized gourd will probably serve around 2 persons.
• To prep the gourd: cut both ends of the gourd off; trim off the ridges and remove the fairly thick skin with a potato peeler; cut the gourd in half lengthways and scoop out the large core of seeds. The core is fairly substantial. Be sure to generously remove all of it, as remnants of it could sometimes give the cooked gourd a slight bitter taste. Only a fairly thin slice of gourd flesh will be left. This can then be cut into the desired shape and size.
• Unlike the stir-frying of other vegetables, no water needs to be added when cooking shi gua. The gourd will release some liquid as it is being cooked. To achieve the dry, gravy-less dish that I prefer, simply sauté the gourd until this liquid has been cooked off. A higher flame/heat setting will also help achieve this without the gourd turning soggy or too soft from prolonged cooking.
• The amount of eggs used can be varied depending on mood and personal preference. Sometimes I use more eggs to make a very eggy dish, where the egg becomes almost the central ingredient and the gourd takes on a supporting role. Here, I would use what I call the “coffee-making rule” (i.e. 1 teaspoon of coffee for each person plus one additional teaspoon for the pot). So, I usually use one egg for each diner plus one additional egg. Other times, the eggs are added as a complement to the gourd, and I use only a couple of eggs as accents.
• I usually use either dried Chinese mushrooms (as in the top picture) or fresh shitake mushrooms...

• To pre-prep Chinese mushrooms: rinse the dried mushrooms; remove stems; add mushrooms to a pot of boiling water that has been seasoned with a little bit of cooking oil and sugar; cover pot and leave to simmer for between 1-2 hours or until the mushrooms are nearly fork tender; remove and drain well. These prepped mushrooms can be sealed in zip-lock bags in small batches and kept in the freezer for a few months. To use, simply thaw a small bag of the mushrooms.
Ingredients:
Shi gua gourd – cut into thin strips
Carrots – cut into thin strips
Mushrooms – thinly sliced
Eggs
Shallots – finely chopped
1. To a hot wok or pan, add a little bit of oil and the shallots.
2. Immediately follow with the carrots. Sauté for a short time, until the carrots are just about to start to soften.
3. The gourd, which requires the next longest cooking time, is then added. Sauté until the gourd is just starting to soften.
4. Finally, add the pre-prepped Chinese mushrooms or the fresh shitakes. These cook in the shortest time.
5. Season with a pinch of salt, a pinch of sugar and some pepper. I don’t usually add much seasoning to the vegetables at this point. Instead, I prefer to add most of the flavorings to the eggs, and let that flavor the dish. Sauté to mix.
6. Cover the pan for approximately two minutes, to allow the vegetables to soften.
7. Lightly beat the eggs and season well with light soy sauce, pepper and a pinch of sugar.
8. Remove the lid, and add the eggs. Gently sauté – much like cooking scrambled eggs – until eggs form fluffy curds around the vegetables.
9. When the eggs are still a tad under-cooked, remove from the heat. The eggs will finish cooking on their own.
Shi Gua with Mushrooms and Carrots

The cooking procedure is pretty much the same as for the egg version above, except without the eggs of course, and with a slight difference in the seasonings used.
I prefer slightly stronger flavorings in this all-vegetable version – oyster sauce, light sauce and pepper.
After the seasonings go in, the pan is covered for a couple of minutes. Once the gourd is tender, remove from the heat.
I like this version without any gravy as well, so heat control is fairly important to ensure the liquid that is released by the gourd is cooked off in sufficient time without over-cooking the gourd.
Shi Gua with Sweet Onions
The cooking method for this version is slightly different. Also, this dish, unlike the above two, has a little gravy.
Ingredients
Shi gua gourd – cut into squares
Large onion – cut into squares
1. Par-boil the gourd in boiling water for approximately 1 minute. Drain well.
2. In a little hot oil, sweat the onions.
3. Add the gourd. Sauté until the gourd is tender.
4. Dissolve the seasonings of oyster sauce, light soy sauce and pepper in a little bit of hot water. This forms the basis of the gravy. Add to gourd.
5. Leave to simmer, uncovered, for a couple of minutes. Remove from heat.
Shi gua with chicken
This is a variation on the “shi gua with sweet onions”. Some bite-sized chicken thigh meat is added to the gourd to enhance sweetness and flavor.
[Update 21/06/04: For pictures of this dish, click here.]
The method for cooking the gourd is the same as above, except for the addition of the partially cooked chicken meat to the almost-cooked gourd just before the seasonings are added to the dish.
To prepare the chicken: Using chicken thigh fillets, remove the skin and trim off excess fat. Cut each thigh into eight bite-sized pieces. Marinade the meat with a little light soy sauce, sugar, sesame oil and cornflour. Sauté the chicken in a little bit of hot oil until it is partially cooked. Set aside.
As the seasonings are added to the gourd (in the preceding recipe), add the half-cooked chicken, and allow the meat to finish cooking together with the gourd. Leave to simmer, uncovered, for a few minutes. Remove from heat.
Four dishes and a gourd. A box-office hit in the making, perhaps.
[Update 21/06/04: There are some tips on choosing the angled luffa gourd here.]
Copyright © 2004 Renee Kho. All Rights Reserved.
Please contact me for permission to copy, publish, distribute or display any of the images or text contained in this article.
01:22 AM in Home Cook: Vegetables | Permalink | Comments (8) | TrackBack