Tuesday, October 12, 2025
Honey, Does My Breath Stink?
This is another one of those homey “non-recipe” dishes that is unspeakably simple and easy, takes no time at all to put together, and yet is incredibly tasty.
I like this recipe quite a lot. The ingredients are basic : just fresh salmon, honey, garlic and light soy sauce; but the final flavors belie the simplicity of the dish’s components.
The key to getting tasty salmon from such pared-down ingredients is of course - as with most other dishes, really - the freshness of the fish. The fresher and better quality the fish, the tastier this will be. I generally like to use freshly-bought salmon, rather than ones thawed from my freezer compartment. Yes, I know. All the salmon sold here in the markets and supermarkets come flash-frozen anyway. But they are thawed before being sold. And when we re-freeze them after getting them home, then defrost them again at a later date, the flavor and texture are somewhat compromised. I mean, they’re still great for a lot of other dishes - and I almost always have batches of salmon filets (one of my favorite fish) in the freezer, and use them for lots of different recipes. But for this particular dish, I would suggest that “fresh” from the supermarket is best - the flavoring ingredients don’t have to work so hard to “neutralize” any fishiness that may be there. Plus, for broiling, the texture of fresh salmon usually works much better.
This salmon uses lots (and I mean lots) of garlic. And therein lies its appeal (unless of course you have a phobia of this aromatic bulb). And no, you do not get stinky breath from eating this. Or at least I haven’t received any complaints thus far. ![]()
The flavor combination works, and the overall taste is light and fairly delicate (which may seem surprising, given the amount of garlic used). There is the wonderfully fragrant aroma and subtle sweetness of finely chopped garlic that has been lightly caramelized, mellowed and rounded out by the honey. There is also the nice balance between the sweetness of the honey and the savory tones of the soy sauce.
We usually make extra sauce (which is always in high demand) and drizzle it over the salmon. And it’s gorgeous.
Broiled Honey Garlic Salmon Filets
Serves 4
4 pieces salmon filets
10 cloves garlic - finely chopped *
4 tablespoons honey
3 tablespoons light soy sauce
* I sometimes use up to one whole head of garlic. Feel free to increase or decrease the quantity according to your garlic comfort level.
• Clean the salmon filets and pat dry.
• In a medium bowl, stir together the honey and soy sauce, until the honey is dissolved. Add the finely chopped garlic, and stir to mix.
• Marinade the salmon filets in the honey-soy sauce mixture for about 20-30 minutes.
• Place under the broiler for about 4-6 minutes (for filets with thickness of about ¾ to 1 inch), or until fish is cooked to the desired doneness.
• Serve hot.
We usually like our salmon a touch underdone - where the center still has a hint of translucency. Personally, I find it rather offensive to have to eat over-cooked, dry and coarse-as-tree-bark salmon; preferring instead the juicy, melt-in-the-mouth, unctuous succulence of “just cooked” fish.
And then, every mouthful becomes a sensual and sensuous delight.
Keep in mind that the fish (unless you are using huge, thick slabs of them) will continue to cook a little bit more even after they have been yanked from under the broiler. I tend to find that leaving them under the heat until they are cooked through and fully opaque produces somewhat overdone fish by the time they are served; whilst cooking them only until they are just a tad underdone will produce fish that is “just right” once they’ve been left to rest for a couple of minutes.
But this is all really down to personal preferences, so just do what feels the most comfortable for you.
Variations
As with most home-style dishes, this one is also open to lots of fun and imaginative flavor-experimentation. And I think it beats the standard, rather too tried-and-tasted (albeit tasty) teriyaki option for broiling fish.
Here are a couple of suggestions, but otherwise, just have fun with it.
• Reduce the amount of garlic used, and add a sprinkling of finely grated lemon or orange zest.
• Instead of using garlic, add finely grated ginger and some lemon or orange zest to the honey-soy sauce mixture.
• If a more robust flavor is desired, try adding a touch of hoisin sauce to the garlic-honey-soy sauce combination.
Happy salmon broiling!
Copyright © 2004 Renee Kho. All Rights Reserved.
Please contact me for permission to copy, publish, distribute or display any of the images or text contained in this article.
05:27 PM in Home Cook: Fish & Seafood | Permalink | Comments (18) | TrackBack
Wednesday, July 07, 2025
Gingery Good

My apologies for the (nearly) one week of silence; I was traveling and then I was feeling lazy about blogging – there were just too many enjoyable distractions happening in “real-life”. ![]()
However, I have been doing quite a bit of cooking: some long-time favorites and some brand new recipes that I tried out. So, lots to share with you. And today, I’ll start with a simple yet delicious dish…
In our home, for the most part, we usually cook two types of oily fish – the “snow-fish” (or cod, I think) and the salmon. I personally am more a salmon person – I cook it in all sorts of ways and use it in all sorts of things – but every so often, I do enjoy the snow-fish.
Our two favorite ways of cooking the snow-fish is either to pan-fry it plain and serve it with a ginger and soy sauce dip, or to steam it with Chinese rice wine and lots and lots of ginger.
The latter is a really simple, easy and quick dish to prepare; it is tasty and healthy too. A copious amount of ginger is used, and this provides a wonderfully zesty and aromatic counter-balance to the richness of the fish.
Steamed Snow-Fish with Rice Wine and Ginger
(serves 4)
4 large pieces snow-fish
2 cloves garlic, minced
1 to 2 tsps vegetable oil
5 tbsps light soy sauce
¼ - ½ tsp sugar
4 tbsps Chinese rice wine or glutinous rice wine *
pepper to taste
2-3” knob of fresh ginger
8 pieces spring onion (scallions) – white part only
garnish:
chopped spring onions
3 tbsps Chinese rice wine or glutinous rice wine *
* May be substituted with white wine, if desired.
• Wash and remove skin from the fish. [We prefer to remove the skin, but by all means keep it on if that is preferred.] Pat dry and set aside.
• Peel the ginger and slice thinly. Using a pestle and mortar, pound the ginger slices until it resembles a chunky thick paste. [You should get about 4 rounded tablespoons worth of ginger paste.] Set aside.
• Place the minced garlic in a microwave oven-proof bowl together with just enough oil to cover the garlic, and nuke on high for one minute. [This is a quick and easy way to produce a small amount of fragrant garlic oil.] Remove from the oven and stir to mix.
• Add the rest of the seasonings – the light soy sauce, sugar, rice wine and pepper – to the garlic oil. Mix well. The sauce is ready.
• Arrange the fish on a large serving platter; place each piece of fish on two pieces of the white stems of the spring onion. [This elevates the fish, allowing for even circulation of heat and steam, and cooks the fish perfectly.] Pour the marinade sauce over the fish. Divide the ginger paste evenly among the fish and spread over the top.
• Steam, on a medium-high flame, for about 10 minutes (depending on the thickness and size of the fish pieces). [For snow-fish, the cooking time is less critical than it is for the steaming of other types of fish, as it doesn’t dry up even when over-cooked. In that sense, it is a very easy fish to work with.]
• Once the fish is cooked, sprinkle some chopped green onion over the top, and drizzle the remaining 3 tablespoons of rice wine, around the fish, into the sauce. Replace the wok cover for a few minutes. Serve immediately.
Notes:
• The final touch of rice wine provides an additional nuance of aroma to the sauce, and is usually barely detectable. However, if serving the fish to children too, then this step may be omitted. (The alcohol from the initial addition of wine into the pre-cooked sauce would have been cooked off during the steaming process.)
• I usually steam my fish in the wok. I personally find this to be the easiest and quickest way. Put a little water into the wok; stand a metal rack on the bottom of the wok, making sure the top of the rack is above the water level. Bring the water to a boil; then place the plate of fish onto the metal rack. Cover the wok and leave to steam.
• Unlike most other types of fish which are only suitable for steaming when fresh, the snow-fish can be steamed without any problems even after it has been frozen then thawed. The flesh remains incredibly tender, moist, juicy and succulent. A great fish to have on stand-by in the freezer for when you feel like having steamed fish for dinner but can’t quite make it to the fishmonger’s for some fresh catch.


Snow-fish, by virtue of its full and luscious mouth-feel, can sometimes feel a little heavy on the palate. However, with this dish, the wonderfully light rice wine-infused sauce and the tangy ginger paste cut through the richness, and provide a delightfully refreshing and zesty feel to the fish.
Copyright © 2004 Renee Kho. All Rights Reserved.
Please contact me for permission to copy, publish, distribute or display any of the images or text contained in this article.
12:38 PM in Home Cook: Fish & Seafood | Permalink | Comments (9) | TrackBack
Tuesday, May 25, 2025
Spice It Up!

What do you do with a surfeit of banana leaves (leftover from making nasi briyani the other night)? Why, make ikan pangang of course. “Ikan pangang” is Malay for grilled/barbecued fish, and if you visit the hawker centers (in Singapore) or the roadside stalls (in Malaysia) this is one of the simplest, yet tastiest seafood dishes available.
Usually, fish such as stingray or pomfret is used. It is slathered with spicy sambal belacan (dried shrimp and chilli paste) and then cooked over a smouldering charcoal fire. Traditionally, the fish is wrapped in banana leaves before being barbecued, but this has, in recent times, become more an optional item. The fish cooked in this way takes on a gorgeous smoky flavor, intermingling with the perky and punchy spice paste, with the banana leaves providing a wonderful fragrance and aroma as a finishing touch.
We had three pomfrets fresh from the market that morning – two white pomfrets and one black pomfret. This meant that two different treatments were required where the fish marinades were concerned, as white and black pomfrets have very different textures and tastes. The Chinese hardly ever use black pomfret, favoring instead the silkier, smoother and more refined flesh, and the more delicate flavors of the white pomfret. On the other hand, the Indians tend to prefer the black pomfret, for its denser flesh and stronger, earthier flavors. While white pomfret can be either steamed or fried, the black pomfret doesn’t take well to steaming at all and is usually fried. But both can be very happily and tastily grilled or barbecued.
I didn’t feel like using the usual sambal belacan marinade, yet I wasn’t sure what I wanted to use. So, it was a case of simply throwing together various condiments, and hoping for the best! The logical thing was to do the white pomfrets sort of Chinese-style, and the black pomfret Indian-style.
What follows are not really recipes, as there are no hard and fast rules as to what spices or condiments to use, or in what quantities. There is a great deal of room for experimentation and creativity. Pretty much whatever strikes your fancy, within reason, would work.
The fish were cooked under the kitchen broiler. Sure, they would have tasted even better if grilled over charcoal, but these were still very flavorful and tasty renditions.
Spicy Grilled Black Pomfret
For the black pomfret, I used a mix of various spices combined with a little yogurt to form a nice smooth paste.

First off, I prepared some ginger and garlic paste. This was just 6 cloves of garlic whizzed together in the food processor with about 1½” of peeled ginger to form a paste. The yield was about 3 heaping tablespoonfuls of paste, which was just nice for the three fish.
The spice paste was made up of 1 heaped tablespoon of ginger/garlic paste, 1½ rounded heaping teaspoons of curry powder (any kind would do), ¾ rounded teaspoons of home-made chilli paste (our home-made paste hits fairly high notes on the heat scale, so I used a fairly moderate amount, but if using chilli powder, 1 to 1½ rounded teaspoons would be fine, depending on the desired heat level), 1 rounded teaspoon coriander powder, ½ rounded teaspoon cumin powder, ½ rounded teaspoon fennel powder, 2 heaping tablespoons of low fat plain natural yogurt, and about 1 to 1½ heaped tablespoons of chopped fresh coriander leaves (on hindsight, I should have added more of the latter).

The black pomfret was slathered liberally on both sides as well as in the cavity with the spice paste, and left to macerate in the refrigerator for a couple of hours.

It was then placed on a piece of banana leaf (which in turn was placed on a baking sheet) and cooked under the broiler for about 13-14 minutes. (Cooking times will vary depending on the size and thickness of the fish.)
I experimented with cooking the black pomfret and one of the white pomfret uncovered – simply placed on top of the banana leaf, and turned them half way through the cooking time. For the other white pomfret, I sealed it completely in a banana leaf “packet” and grilled it for the same amount of time. I wanted to see if there were any differences in the “crust” and texture of the fish between the two methods. I had expected the covered fish to be “wetter”, as the sealed banana leaf packet would trap the steam and thus cook the fish by a sort of combined steam-and-grill method. And I had expected the uncovered fish to have a crispier skin from being broiled directly under the broiler.
Well, as it turned out, the fish in the sealed banana leaf packet came out nicely crusty and with intensified flavors, as all the aromas were “trapped” and thus absorbed by the fish. The texture was pretty much the same as the uncovered fish, only more flavorful and aromatic. So, fully sealed packets are the way to go. On hindsight, it was all very logical, but I didn’t think of it at the time.
Grilled White Pomfret with Spicy Bean Paste
For the Chinese-style white pomfret, I opted to use spicy bean paste with a touch of hoisin sauce. I had just bought a new brand of spicy bean paste that was highly recommended by my neighborhood grocer as being very tasty. He was suggesting it be used as a topping for noodles to make zha jiang mian or dan dan mian (which I subsequently did, and that post will be coming up). But first, I decided to try it out on fish.

I don’t actually know the exact quantities I used to make up this marinade, because of a funny incident while I was putting it together. I had just finished mixing up the curry spice marinade, and was about to start on this one, when someone called for me from upstairs. As I walked out of the kitchen to see what the fuss was about, I said to A., our domestic helper: “use 4 big tablespoons of the spicy bean paste, and about 2 tablespoons of hoisin sauce, just to give a little bit of sweetness”. I came back into the kitchen 4 minutes later, and guess what? Yep, she had mixed 4 big tablespoons of hoisin sauce and 2 small tablespoons of spicy bean paste. I was wondering why the color of the marinade was so dark, and when I first tasted the marinade I was surprised that it was so sweet. Bean pastes were usually very salty. Could this have been a sweetened version that my grocer had recommended? I tasted the bean paste from the jar. Nope, it was very salty! I asked A. about it, and she then confirmed what I was beginning to suspect.
At first I tried adding more of the spicy bean paste to balance out the sweetness. But one quarter jar of bean paste later, the marinade was still cloyingly sweet (for what was meant to be a savory mixture). So, I scooped out half the marinade and reserved it for some other use (surely I would be able to think of something to use it for when the time came). And to the remaining half of the marinade, I added a lot more spicy bean paste. In the end, I had used half a jar of bean paste (including the quarter that had gone in previously) before the marinade started tasting about right, to me at least.
So, if I was to hazard a guess, I would say maybe about 4-5 tablespoons of spicy bean paste (depending on how salty and spicy the brand of bean paste is) with about 1 to 1½ scant tablespoons of hoisin sauce would be about right. This gave a marinade with a distinct note of spicy heat, so less spicy bean paste would be recommended if a milder version is desired.
To the bean paste-hoisin mixture, I also added the remaining 2 tablespoons of ginger/garlic paste (1 tablespoon per fish), and 3 heaped tablespoons of chopped fresh coriander leaves (about 1½ tablespoons per fish).

Again the fish was marinated for a couple of hours in the refrigerator.

Then wrapped in banana leaves, and placed under broiler for about 14 minutes, or until just cooked.
Yes, I know, it’s a rather messy and not very pretty photo, but the fish tasted wonderful!
Both the white and black pomfrets were a success with the family. The curry powder and spice mix worked very well with the black pomfret, while the spicy bean paste worked superbly with the white pomfret. One family member declared that it was tasty like fried fish but as healthy as steamed fish.
I myself was a little surprised at how well the spicy bean paste-hoisin sauce marinade worked. It was richly flavorful, with a nice spicy kick and just enough sweetness to balance out the saltiness of the bean paste. The flavors were complex with just the right amount of intensity. This is something that is definitely worth repeating. Only the next time, for both marinades, I would add even more chopped coriander leaves. The whole family loves coriander, and we all felt there wasn’t quite enough, even though I had used a big bunch for the three fish.
There were three fairly large pomfrets for five people. That was quite a lot of fish to go around. But there wasn’t a scrap of meat to be found by the time we were done. I think the bare skeletons of the fish spoke for themselves.
Copyright © 2004 Renee Kho. All Rights Reserved.
Please contact me for permission to copy, publish, distribute or display any of the images or text contained in this article.
03:38 PM in Home Cook: Fish & Seafood | Permalink | Comments (14) | TrackBack
Wednesday, May 05, 2025
Dinner in a Jiffy with C T O R P
Prawns sautéed with a sweet, sour, slightly spicy, very, very flavorful chilli tomato onion relish.
This is a dish that is so incredibly quick and easy to prepare, and yet packs a titillating taste punch. It goes great with steamed rice or noodles, or even pasta.
With this dish, dinner can be on the table within minutes.

Sautéed Prawns with Chilli Tomato Onion Relish
1 kg large prawns *
1 tablespoon light soy sauce
1 tablespoon sweet rice wine
pepper
¼ teaspoon sugar
2 large onions
10 scant heaping tablespoons tomato ketchup
5 - 7 tablespoons sweet chilli sauce **
½ - 1 tablespoon light soy sauce
½ - 1½ scant tablespoons sugar
3 - 5 tablespoons hot water ***
[The ingredient quantities are approximates, as I don’t usually measure out the ingredients, but simply use visual and taste gauges to determine how much of each ingredient to add. All the ingredients can very easily be adjusted to suit personal tastes – be it to have a stronger or weaker tangy tomato overtone; to have more chilli heat or less; to make it more or less sweet; or to make it more or less salty.]
* I prefer to use large prawns as I find that their firmer, crunchier and more compact texture works very well with the robust flavors of the onion relish. Also, they make for prettier presentation. However, any type and sized prawns would work for this dish.
** I use Lingham’s Sweet Chilli Sauce
*** Quantity of water added can be altered to adjust the consistency of the gravy, depending on whether the prawns are to be eaten with rice, or to be tossed with noodles or pasta.
• Wash, shell and de-vein the prawns. Keep the tails on for a nicer presentation. Pat the prawns dry, and refrigerate until needed. (I generally do not season prawns ahead of time, with the exception of maybe just a light dusting of pepper, as I find that the texture of prawns is adversely affected by most condiments, even salt or soy sauce, if left sitting in them for a period of time, and the prawns take on a rather unpleasant mushy bite when cooked. Seasoning the prawns immediately before they are cooked gives them a nice crunchy bite and texture.)
• Cut onions into thin strips.
• In a hot wok or pan, with a little bit of oil, sauté the onions until soft and translucent.
• Season the prawns with light soy sauce, rice wine, sugar and pepper. Add to the onions. Sauté until the prawns have changed color and are nearly cooked. (Tip: try “flipping” the prawns rather than “stir-frying”, as this helps keep the prawns’ flesh smooth and pretty looking.)
• Add the gravy ingredients – tomato ketchup, chilli sauce, light soy sauce, sugar and hot water. Mix well. Allow the gravy to come to a boil. Immediately remove from heat. Avoid over-cooking the prawns. Serve.

If made with a slightly less viscous gravy, these prawns offer a delectable option for topping noodles or pasta.
A very enjoyable, rich and rather intense combination of flavors – sweet, sour, spicy and salty. It’s all there. And it’s all ready within minutes.
Copyright © 2004 Renee Kho. All Rights Reserved.
Please contact me for permission to copy, publish, distribute or display any of the images or text contained in this article.
04:01 PM in Home Cook: Fish & Seafood | Permalink | Comments (5) | TrackBack
Monday, May 03, 2025
Fried Fish 101
One of the things I used to have a great fear of cooking was deep-fried fish, or pretty much deep-fried anything. I just wasn’t comfortable working with that much oil, at that high a temperature. I was always all timid and apprehensive when the time came to put the food into the oil. I was taught to “gently slide” the food into the hot oil, to prevent the oil from splattering and giving me a nasty burn. But almost inevitably I would do a hasty plonk simply because I would release the food item and withdraw my hand too soon, for fear of the big sizzle and splatter that would greet the food as it met the hot oil. By so doing, I ensured that the very thing I feared was created – a big sizzle and splatter. As a result, I hardly ever deep fried food. Of course, there were also the obvious health reasons for not consuming fried foods on a regular basis.
Chinese food, or for that matter Asian food, can involve a lot of deep fried dishes. Certainly a lot of the internationally popular Chinese dishes and food items are deep fried… sweet and sour pork/fish/prawns, deep fried chicken wings, crispy tofu, almost all eggplant dishes (in restaurants at least), crispy noodles, even certain so-called “stir-fried” vegetables, banana fritters, curry puffs, you tiao (dough sticks) and countless others.
One of the most basic and very well-loved food dish in a lot of Chinese (and Malay) homes is the simple fried fish – just a whole fish, deep fried, with no embellishments, garnishings, sauces or gravies. At the most, it is served with a simple accompaniment of dark soy sauce, chilli sauce or sambal belacan (fermented prawn paste fried with chilli). The dish is done using either larger fish like the pomfret (chang yu) or with small local fishes. In the latter case, the fish is deep fried to such a crispy texture that nearly the entire fish, including the bones and the head can be eaten. Oh! The pleasure of crunching into all the deep golden brown, crispy bits. Never mind the health subtractors of such a dish, it is still something that I look forward to indulging in every once in a while.
Asians rarely use an electric deep-fryer for deep frying foods. Almost all deep frying is done in the wok. It’s kept simple. The same wok is used to cook just about all the dishes that would appear on the dinner table.
Today I thought I would share with you a sort of “Fried Fish 101” that my mother gave me a while back, and which helped me finally overcome my fear of deep frying foods...
I like this method simply because it uses very little oil compared to “standard” deep frying, and yet still achieves beautiful color and texture in the fried foods.
Here’s a little pictorial sequence for deep frying a whole white pomfret (bai chang).

Using a cast iron or heavy steel (not non-stick) wok*, pour enough oil (about 1 to 1½ inches deep) to cover half or one side of the fish. This is much less than the usual 4-6 inches of oil that is normally used to deep fry fish.
There are several benefits to this. One, there is less wastage of oil. Of course, some people save the used oil and re-use it in the next round of deep frying. I personally don’t like to keep used oil as it tends to go rancid easily in our humid weather. Two, there is less chance of severe splattering when the food is placed in the oil. Three, it takes a much shorter time to heat the oil to the right temperature. Four, it is easier to control the temperature of the oil. Five, I just like the thought of the food swimming in a lot less oil in the process of getting to my table!
* A wok is actually very good for deep frying due to its rounded bottom, as less oil is needed to get the required depth of oil.

To test whether the oil is at the right temperature, simply place one or a pair of wooden chopsticks into the hot oil. If there are lots of tiny bubbles sizzling away around the chopsticks, the oil is ready. There is also the old stand-by method of dropping a tiny piece of food into the oil to test its readiness. I personally prefer this method, as I like my oil to stay pristinely clean before the main food goes in. ![]()
[I’ve just noticed the rather interesting pattern that has shown up in the above picture of the wok. In “real life” this wok is black, and yet in the photo it shows up golden with all that patterning. Interesting.]

De-scale, gut and clean the fish. (I regretfully don’t really know how to do the first two very well, as the fishmonger does it for me each time, and does a great job too).
Rub a liberal amount of salt around the insides of the cavity, and rinse well. This is a great way to rid all traces of “fishiness” from the gut cavity, which is one of the best and most delicious part of a fried fish… very crispy and crunchy. **
Meticulously pat the fish (including the insides) dry with a paper towel. We don’t want any moisture at all on the fish as it goes into the hot oil.
Liberally dust both sides of the fish, as well as the cavity, with pepper. (If the fish is to be served with dark soy sauce, there is no need to season it with salt, as the dark soy sauce will be salty enough. Otherwise, also sprinkle fish with salt to taste.)
** At this point the fish can be refrigerated or frozen until needed. Be sure to pat the fish dry before refrigerating or freezing, so that it keeps better.

Lightly coat fish with a thin layer of corn flour (or corn starch).

Gently slide fish into the hot oil. The oil should just cover the underside of the fish. (If deep frying the very small local fish, it would be fine to have the whole fish completely submerged in the oil.)
Leave the fish to fry. Resist all temptation to touch it, move it around, flip it over or to peek at its underside. This will ensure that the skin of the fish stays intact and smooth. If moved around too much or too early, the flesh will start to flake off. The result, while still edible, will be a less visually appealing fish.

Once the meat on the underside has been nicely sealed, and is a light golden brown color (after 5 minutes of so), flip the fish over – gently – to seal and brown the other side.
Let it fry until that side is a nice deep golden brown, before flipping the first side back down into the oil for another few more minutes to let it also come to a deep golden brown color.
Depending on the size and thickness of the fish, it can take anywhere from 5 to 8 minutes in total per side.

Ta-da! Golden brown perfection! (Oops! Except for that tiny little nick in the flesh that I made while transferring the fish from the wok onto the plate.)
Place a small metal rack onto a plate, and cover metal rack with paper towels. Drain the fish on the paper towels. I find that using a metal rack between the plate and the paper towels, rather than placing the paper towels directly onto the plate, really helps the texture of the fish. It allows a certain amount of air circulation and provides for better oil drainage at the same time, so the fish is not sitting in a soggy pool of greasy paper towels. This helps keep the skin nicely crispy and firm.

This is my favorite way of eating deep fried fish – with a very simple ginger, rice wine and sweet dark soy sauce dip. Lots of fresh young ginger, cut into fine strips, is quickly and very briefly sautéed in a dry wok or pan (no oil). A little sweet glutinous rice wine is added. Mixture is sautéed again quickly for another couple of minutes, and then removed from the heat. Lots of dark soy sauce – the thick type that is normally served with chicken rice – is added. A quick stir later, and the fried fish with ginger-dark soy sauce dip is ready to be served.
Delicious!
Happy deep-frying!
Copyright © 2004 Renee Kho. All Rights Reserved.
Please contact me for permission to copy, publish, distribute or display any of the images or text contained in this article.
01:13 PM in Home Cook: Fish & Seafood | Permalink | Comments (11) | TrackBack
Saturday, March 13, 2025
First Time Lucky

You know that happy little feeling you have inside when you’re trying to do something you’ve never done before, and you suspect you could well end up falling flat on your face, but then you don’t, and you succeed beyond what you thought you would? Well, I had that little feeling today. And it felt good. A nice way to start the weekend.
Okay, it was no big deal – I made fish cakes… salmon fish cakes to be precise. Still, I felt quite proud of myself. I had never made fish cakes (i.e. those along the lines of crab cakes, and not the regular Chinese fish cakes sold in the markets and supermarkets here) before. I had mentioned in my “ramekin” post that I was thinking of making salmon fish cakes with the leftover breadcrumbs. I have actually been thinking about making salmon fish cakes for months, but have just never gotten around to looking for a recipe from which to make them.
Yesterday a girlfriend had called to say she wanted to stop by and drop off some stuff, so I invited her and her 5 year old little girl over for lunch today. I would make something light I said. As it turned out, events of this morning didn’t give me time to cook. So I needed to make something quick and easy. I decided to make the salmon fish cakes – sans recipe. I was just going to fly by the seat of my pants.
Took out a piece of salmon fillet from the freezer (approximately 350g), and left it to thaw while I busied myself with whatever it was that I had to be busy with. By the time I returned to the kitchen, the salmon was ready to be cut into approximately 1 cm cubes. Can you believe I even vacillated as to what sized cubes to cut the salmon into? I wanted the salmon dice to be bigger, but was afraid they wouldn’t “stick” nicely together to form well-shaped cakes. I didn’t want to cut them too small because they would cook too easily, and I really, really cannot stand over-cooked, dried-out salmon. And so I settled on the in-between size of 1 cm. Ha! So, now I know how some of those cookbooks come up with instructions like “dice celery into 7mm cubes”! Anyway, that is another story.
With the salmon all nicely cut, I was stuck as to how I wanted to flavor it. Time was short, so I fell back on my old perennial favorite... the marinade for my hoisin sauce salmon. I didn’t want the salmon too “wet”, so only 2 heaping teaspoons of hoisin sauce and a generous sprinkling of pepper went into the fish. I left it to sit for a few minutes while I chopped up a sizeable bunch of coriander.
In went the chopped coriander, and the leftover bread (crumbled into coarse crumbs with the fingers). I don’t know how much breadcrumbs there was. I simply emptied the whole zip-lock bag worth of leftover bread. If I was to hazard a guess, I’ll say maybe between ½ and ¾ cup? However, after seeing and tasting the final result, I would say breadcrumbs are not really necessary. I think the cakes will hold together fine without any binder, as long as they have had enough time to sit in the fridge before being pan-fried.
Once the salmon, coriander and breadcrumbs were evenly mixed, I immediately formed them into cakes of approximately 2 to 2½ inches across and around ¾ to 1 inch thick. Each of the five salmon cakes was individually wrapped in cling film and molded into the desired pattie shape. It’s best not to form and wrap them into ball-shaped cakes, as there will be difficulties, when the time comes to cook them, in flattening them out without them breaking apart. The cakes went back into the fridge, to allow the shapes to set and to allow the fish to macerate a little longer in the marinade. I left them in the fridge for around 40 minutes. But if there is time, I think 1-2 hours would be ideal, and then the cakes can do without the breadcrumbs, and still hold their shape nicely.
With the salmon out of the way, I started worrying about a condiment for the fish cakes. It just felt too plain and boring to serve salmon cakes on their own. What to do? What to do? The simplest thing I could think of was a light, refreshing, maybe piquant salsa of some kind, to balance out the rich fattiness of the salmon meat.
I settled on a cucumber chilli salsa…

First, one Japanese cucumber was finely diced. Then, I had to play around with the flavorings, as I did not even have any concrete ideas about what I was trying to achieve. I was just going along, hoping to create something that tasted good.
The quantities are thus, once again, very “agak” (estimations by sight), as I was adding and re-adding as I tasted and mixed. To cut a long story short, at the end of it, I had used approximately 2 tablespoons Thai sweet chilli sauce (for its nice chunky texture with chilli flakes and seeds), 1 tablespoon Lingham’s chilli sauce (to give more body to the sauce and balance out the weak, liquidy body of the Thai chilli sauce), ½ tablespoon of tomato ketchup (for a touch of tangy overtones), ½ tablespoon of white rice vinegar, ¼ to ½ teaspoon of sugar and a pinch of salt. Everything was mixed together with the cucumbers, and popped back into the fridge to chill and macerate. It would have been really nice to have been able to add some finely diced fresh red chillis and fresh pineapple, but I had neither on hand. Still, the salsa worked really well with the salmon cakes.
The cakes were fried up after my friend arrived. And I had the wonderful help of a little 5 year old sous-chef. Each cake was dipped in some lightly beaten eggs, and then coated with panko (Japanese breadcrumbs), before being pan-fried in a non-stick frying pan with very little oil - just a few tablespoonfuls for the whole batch – until it was a rich golden brown on both sides.
My biggest concern while frying the cakes was that maybe I had made the cakes too thick, and that the centers were not going to get cooked through. As it turned out they came out just right. I was really surprised how much so. The salmon was just about cooked through… right on that borderline between being undercooked and overcooked. Ha! What fluke! What luck! But I think it helped that I used a very low flame to fry the cakes, so it gave enough time to cook the fish while the cakes were browning. I also think it was quite important that the cakes were not flipped until one side had reached the desired color. I just feel it would have worked less well if I had kept flipping the cakes.

The cucumber salsa-ish condiment - sweet, tangy, piquant, crunchy - worked really well with the salmon cakes. The fish was nicely moist, juicy and tender.
As for the little one, I made her a salmon burger. I simply split a small wholemeal soft dinner roll, and lightly toasted it in the toaster oven. Added the salmon fish cake and a dash of tomato ketchup. Her verdict? She declared it the “best hamburger she has ever eaten”. So juicy she said. Her only complaint… I didn’t have any fries to offer her. But she was willing to settle for some potato crisps (if you’re English) or chips (if you’re American).
Unfortunately, there are no pictures of the mini salmon burger. The little one had watched with spellbound fascination as I took pictures of the salmon cakes. She too wanted to take her own picture of her salmon burger. Alas, a little too much camera shake and her picture didn’t turn out. She was disappointed, but we promised we would make these “pink hamburgers” (as she called it) again soon. And I do think these salmon cakes would make great “adult burgers” too – maybe with a mango salsa, pineapple salsa or onion marmalade, and with sweet potato fries on the side.
Copyright © 2004 Renee Kho. All Rights Reserved.
Please contact me for permission to copy, publish, distribute or display any of the images or text contained in this article.
03:20 AM in Home Cook: Fish & Seafood, Home Cook: Light Touches | Permalink | Comments (16) | TrackBack
Tuesday, February 24, 2025
Great Balls of F… Fish!

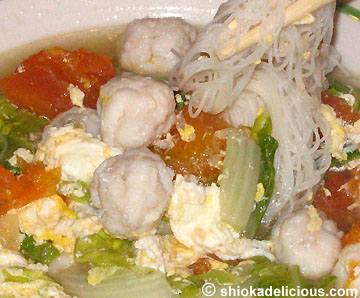
Made this for lunch last Friday. Home-made fish balls with some bee hoon (rice vermicelli) in a vegetable soup.
I had wanted something light, healthy, colorful, and quick and easy to prepare, and I didn’t want instant noodles. It so happened that my mum had just bought some “ma kau” (sorry, I don’t know the English equivalent for this… Chinese mackerel maybe?? if such a thing exists!) fish meat from Chinatown that same morning. Aha! Fresh home-made fish balls from very fresh fish meat. Sounded perfect.
This stall at the Smith Street wet market sells copious amounts of this fresh fish flesh (try saying that really quickly ten times in a row ![]() ) everyday. Two elderly Cantonese ladies sit there the whole morning just scraping meat off the fish and beating it into a smooth pulp. The beating is done by hand (I think) in a large wooden bowl, with maybe just a little salt water added to the fish meat. By the time my mum got to the stall they were out of the ready-prepared fish pulp, and were still in the midst of preparing the next batch. Not wanting to wait, my mum simply bought the scraped fish mash, and had planned to beat it into the smooth pulp herself when she got home. I was lazy and couldn’t be bothered, so I gave the fish meat only a quick mash before shaping them into balls. I thought it produced a rather interesting texture - different from the usual fish balls. There was a less refined, almost rustic, look, feel and texture to my fish balls.
) everyday. Two elderly Cantonese ladies sit there the whole morning just scraping meat off the fish and beating it into a smooth pulp. The beating is done by hand (I think) in a large wooden bowl, with maybe just a little salt water added to the fish meat. By the time my mum got to the stall they were out of the ready-prepared fish pulp, and were still in the midst of preparing the next batch. Not wanting to wait, my mum simply bought the scraped fish mash, and had planned to beat it into the smooth pulp herself when she got home. I was lazy and couldn’t be bothered, so I gave the fish meat only a quick mash before shaping them into balls. I thought it produced a rather interesting texture - different from the usual fish balls. There was a less refined, almost rustic, look, feel and texture to my fish balls.
Wanting to keep the taste of the fish balls as “pure” as possible, I added only a bit of salt water (rather than salt itself, as salt water, according to my mum – and I’ve learnt not to question her culinary wisdom on such things – enhances the texture and smoothness of the fish meat) and a little pepper to the meat. Then it was simply rolled into tiny bite sized balls. No flour or other binder was needed.
Next, I brought some chicken broth to a boil, added in some fresh veggie and tomato, and seasoned the soup to taste. When the vegetables were almost at the doneness I wanted, in went the fish balls. As they started to float to the top (indicating they were cooked), I let the soup come to a quick rolling boil, and quickly added in two lightly beaten eggs (seasoned with a dash of light soy sauce and pepper). I reduced the heat, and quickly but gently swirled the eggs to form smooth loose strands throughout the soup. Just before the eggs were fully cooked, I turned off the flame and allowed them to finish cooking in the residual heat, so that the egg texture would stay smooth.
Unfortunately, after removing the soup from the heat, I discovered that not all the fish balls were fully cooked through. Like I said, I was feeling lazy. So instead of removing the undercooked fish balls from the soup and cooking them again separately, I just plonked the whole pot back on the flame for another minute or two. The result? Somewhat overcooked eggs with a slightly “rough” texture (as you can see from the picture). They tasted fine. But I’m just picky sometimes about the eggs having a smooth, refined texture.
At this stage, this chunky concoction already made for a delicious stand-alone soup. But I wanted to make a full meal of it, and so while the soup was cooking, I also boiled some rice vermicelli in a separate pot of water. It’s best not to cook the vermicelli in the soup, as this tends to turn the soup "cloudy", and makes it that little bit less visually appealing. My laziness and hunger again dictated that I didn’t bother with the cold rinse for the bee hoon. Once it was cooked, and the soup was ready, I added the two together, and it was good to go. Time to eat!
Oh… and where’s the bee hoon in the picture you ask? Err… let’s see… it’s… here… ![]()
Copyright © 2004 Renee Kho. All rights reserved.
Please contact me for permission to copy, distribute or display any of the images or text contained in this article.
11:57 PM in Home Cook: Fish & Seafood, Home Cook: Rice, Noodles etc | Permalink | Comments (11) | TrackBack
Monday, February 23, 2025
Sweet and Sour – A Reflection of Life?

After posting about Hillman last Friday, it occurred to me that while I have talked a lot about how much I love sweet and sour dishes and about the ones I have eaten at various places, I have never posted my own recipe for sweet and sour fish, sweet and sour prawns, sweet and sour pork or basically, sweet and sour just about anything you choose. So, here it is… my family’s version of the sweet and sour sauce…
The sauce is very versatile and can be used for a lot of things – fish, prawns, pork and chicken just to name a few. For fish, there is the choice of using a whole fish, lightly coated with cornflour and fried; or using small pieces of fish fillet, coated with batter and deep fried…

If you look carefully enough, you should be able to see a few pieces of fish fillets peeking out from under the vegetables and sauce topping. ![]()
At home, a lot of the time we buy just the tail section of a large garoupa (see first picture), instead of the whole fish, as we find the meat more succulent and with less bones! Prawns can also be either lightly dusted with cornflour or dipped in batter. For pork, usually small pieces of pork tenderloin, coated with a light batter, are used, but I suspect one could just as easily use ribs, lightly dusted with cornflour before being deep fried, as another tasty option. Again, with chicken, the more common practice would be to use small pieces of chicken fillets coated with batter, but equally, it should be fine to use whole chicken pieces with bone-in. Although I have never tried it, I would think firm pressed tofu or tau kwa, coated in light batter and fried, could be an option for vegetarians. Sweet and sour tofu. Why not?
First though, maybe I can share a few tips that I have picked up from my mum about preparing the various seafood or meat, and which I find rather useful:
• For fish: after cleaning the fish, pat dry with paper towels and simply sprinkle with some pepper and refrigerate until it is ready to be cooked. Just before frying the fish, season it with a little light soy sauce and Chinese rice wine, before coating it with cornflour or batter. It is not advisable to season the fish too early, as it tends the make the flesh go “mushy” (or “mei” in Mandarin) and it loses its texture and bite.
• For prawns: always wash the prawns before shelling them, and do NOT wash them again after they have been shelled (my mum drummed this prawn-preparation fundamental into me when I first started out cooking). It affects the texture of the prawns. Devein the prawns, pat dry with paper towels, and again like the fish, sprinkle only with pepper and refrigerate until ready to use. The seasonings of light soy sauce and rice wine go on just before cooking.
• Just as an aside: if freezing prawns after purchasing them, do not wash them. Simply place them, with shells intact, neatly in freezer bags in single layers and freeze. According to my mum (another “food fundamental” that she drilled into me), prawns do not keep well – even in the freezer – after they have been washed, and even if they are then well-dried with paper towels. Their flesh will taste mushy (“mei”) when they are subsequently cooked. Simply defrost and wash and clean them before cooking.
• For pork and chicken: season the meat with some light soy sauce, a dash of dark soy sauce (optional – leave out if you wish for a lighter color), a little sugar, a dash of sesame oil and pepper to taste.
• Frying the seafood or meat: either lightly coat meat with cornflour and fry; or use a batter made from “specialty crispy deep frying flour” and water.
The Sauce
Mixture A
½ large onion – cut into squares
2 red chilli – seeded and cut into squares (optional)
1 large tomato – seeded and diced
½ cucumber – peeled, seeded and cut into squares
2 pieces fresh pineapple (optional – leave out if unable to get nice fresh pineapple, as this is not easily substitutable with the canned version)
1 clove garlic – minced
Mixture B
3 tablespoons plum sauce
2 tablespoons tomato sauce (ketchup)
1 tablespoon sweet chilli sauce
1 tablespoon sugar
1 tablespoon rice vinegar
1 tablespoon light soy sauce
salt to taste
½ small bowl hot water
Mixture C
A little cornflour
Some hot water
Once again, all the above quantities are estimations or based on the “agak-agak” method, as we like to say ![]() . I do apologize to those who like to have precise recipes and measurements. Unfortunately, almost all Chinese family recipes do not come with exact quantities. Our mothers, and their mothers before them, all cooked from instinct and experience. Recipes are passed down from generation to generation verbally, with nothing written, nothing noted. And each generation may tweak the recipe slightly to suit personal tastes, and so it goes on. So it is with me. When I learnt to cook, my mum would just stand by the stove while I cooked, and tell me the steps, ingredients and any special tips she learnt along the way through hard-earned experience as we went along. And that was it. After that, it was for me to follow or adapt as I wished.
. I do apologize to those who like to have precise recipes and measurements. Unfortunately, almost all Chinese family recipes do not come with exact quantities. Our mothers, and their mothers before them, all cooked from instinct and experience. Recipes are passed down from generation to generation verbally, with nothing written, nothing noted. And each generation may tweak the recipe slightly to suit personal tastes, and so it goes on. So it is with me. When I learnt to cook, my mum would just stand by the stove while I cooked, and tell me the steps, ingredients and any special tips she learnt along the way through hard-earned experience as we went along. And that was it. After that, it was for me to follow or adapt as I wished.
The ingredients in Mixture A are for the vegetable topping in the sauce, so just use as much or as little as you like. Other vegetables can be substituted – such as green bell pepper instead of cucumber and so on. A nice mix of colors in the vegetables adds a nice touch to the dish.
Mixture B can also be varied according to personal preferences – whether one wants it sweeter, more tangy or with a stronger chilli note. I find that the quantities I use sometimes vary according to how my taste buds are feeling on that particular day! And of course, the amounts would vary according to the amount of seafood/meat being used, and how much gravy you would like the dish to have. I personally prefer to have a little more gravy to mix with rice and so on.
• Mix all the ingredients in Mixture B together. Set aside.
• In a hot wok or pan, sauté the minced garlic and vegetables in a little hot oil. Add Mixture B, and allow it to come to a boil.
• Add Mixture C (just enough to thicken the sauce). Return the sauce to a boil, and remove from the heat.
• Pour over ready-cooked (and fried) fish, prawns, pork or chicken just before serving, and serve immediately. Try to avoid adding the sauce to the seafood/meat too early, as they will turn soft from sitting in the gravy for too long.
A perfect balance of sweet and sour… a little like life itself, n’est-ce pas? ![]()
Copyright © 2004 Renee Kho. All rights reserved.
Please contact me for permission to copy, distribute and display any of the images and text contained in this article.
05:45 PM in Home Cook: Fish & Seafood | Permalink | Comments (5) | TrackBack
Saturday, February 07, 2026
Growing Blessings and Fortune
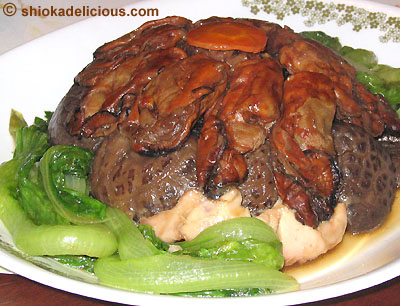
Shen Cai Hao Shi Fa Cai [Dried Oysters and Black Moss with Chinese Lettuce]. This is a Chinese New Year dish with a very auspicious sounding name. “Hao shi” (dried oyster) sounds like “good things”; “fa cai” (desert black moss) sounds like “to prosper or strike a fortune”; and “shen cai” (lettuce) sounds like “to grow wealth/fortune”. And so you have a dish that is not only scrumptiously tasty, but also one which can “grow blessings and fortune” in your life. Hey, how much better can it get? ![]()
![]()
This is a dish that requires a lot of preparation work. None of it difficult. Just many different steps to get through. Each taste component has to be separately prepared, before they are all brought together into a symphonic display of flavors. The result is well worth the effort.

Taking the spotlight in the dish is of course the hao shi (dried oyster) and fa cai (black moss).
Chinese cuisine regularly likes to make use of dried seafood, such as dried fish (eg bian yu / bian hu), dried shrimp (hae bee), dried scallops (konpoy) and dried abalone. These are often preferred over their fresh counterparts for their rich concentrated flavor and intense aromas. Just a little can go a long way.
Certain types of dried seafood are used mainly as accents in a dish – enriching and intensifying the overall taste. All it takes is a few pieces of dried fish sprinkled on a plate of stir-fried vegetables to change the nuances of the dish. Chopped dried scallops, when added to simple fried noodles or to plain white congee, gives the dish a whole new level of flavor intensity and complexity. At other times, the dried seafood is the key player and defines the dish. Nonya rice dumplings (zhong zhi) would not taste the same if made with fresh shrimps rather than hae bee.
Other types of dried seafood are so prized that they become stars in their own right, and are much sought after by gourmets. Take the abalone. In Chinese cuisine, the dried versions can command up to hundreds of dollars for just one piece of the delicacy, whilst the fresh version may go for a fraction of the price. This dried shellfish often requires no accompaniment. It is lovingly braised for many hours, and served whole, on its own. The flavors are rapturously intense, rich and aromatic. Each mouthful to be slowly savored and enjoyed.
The dried oyster, while often considered the poor cousin of the dried abalone, is another highly prized taste sensation. Its highly concentrated and intense flavors could be an acquired taste for some, but once one comes to appreciate its unique taste, the tastebuds sing with the varying notes of flavors and textures as they explode on the palate. As with the abalone, the dried oyster’s auspicious sounding name also adds much to its cachet. Both these seafood delicacies can be found not only on New Year menus, but also at special celebratory occasions.
To prepare the oysters: first they have to be rinsed, then soaked briefly (maybe 10-20 minutes) in warm water. As dried oysters (as well with dried scallops) are usually soaked in brine before being sun-dried, the rinsing and soaking will help remove the excess saltiness. Next, pour some Chinese rice wine over the drained dried oysters and steam for approximately 30 minutes. This helps to soften them.
Fa cai or black moss is another much-loved delicacy in Chinese cuisine. Many people think that this moss comes from the sea. In actual fact, it is a wild-growing desert moss, mainly harvested from the arid plains of Mongolia and North Central China. In recent years, its supply has been restricted by legislation, as over-harvesting has resulted in severe sand-storm problems for Beijing and large parts of North and North-East China.
Black moss, in of itself, is bland, taking instead all its flavors from surrounding ingredients and seasonings. It is appreciated for its unique texture (and appearance, looking as it does almost like human hair!).
To prepare the black moss: rinse the moss under running water, to remove sand particles that may still be trapped in the moss. Drain and gently squeeze out the excess water. In a hot wok, sauté a few slices of ginger in a little hot oil. Add the black moss. Do not attempt to sauté or stir-fry the moss. It will break into an unrecognizable mound of black mess! Simply flip the slab of moss from side to side. Add some Chinese rice wine, light soy sauce and a little water. Very quickly cook the moss. It is important not to over-cook it, as it will become too mushy and lose that unique, slightly crunchy texture.
Remove from the wok, and strain, gently pressing out the oil and water with the back of a spoon. If there is still sand particles in the moss, rinse it under running water again at this stage, and gently squeeze out the excess water. (The oil used in the sauteeing helps to "bring out" the sand particles, if any). The moss is now soaked in some chicken broth/stock, seasoned with a little Chinese rice wine and light soy sauce, and set aside to allow it to absorb the flavors of the marinade.
The other ingredients in the dish also have to be similarly prepared individually before the final assembly.
To prepare the mushrooms: using dried Chinese mushrooms that have been rinsed and de-stemmed (is that a word?), add the mushrooms to a pot of boiling water which has had a little cooking oil and sugar added to it. Simmer and cook on low heat for at least 45 minutes to an hour, until tender.
Choose nine pieces of nicely shaped, large-sized mushrooms and set aside for the final assembly. Marinade these with a bit of light soy sauce, oyster sauce and rice wine, and set aside.
The rest of the mushrooms can be kept in the freezer for several weeks. In fact, we often prep large batches of mushrooms and have them conveniently on standby. When the need arises, just defrost a few pieces for adding to various recipes. They’re great for using in fried noodles, vegetable stir-fries, steamed tofu, steamed fish, chawan mushi and many, many other dishes.
Another variation of prepping the mushrooms would be to pre-season the mushrooms. Add the rice wine, light soy sauce and oyster sauce together with the sugar and oil into the boiling water, before adding the mushrooms. Once drained well, the flavored mushrooms can again be frozen for later use. But I digress…
To prepare the chicken: cut two pieces of de-boned chicken thighs into 16 bite-sized pieces (i.e. 8 pieces per thigh). Marinade with a little light soy sauce, oyster sauce, rice wine, sugar, pepper, cornflour and the tiniest dash of sesame oil. The last has very strong flavors and only the teeniest amount is needed, otherwise its aromas overwhelms the chicken meat. The cornflour helps make the meat very smooth and succulent.
And now the dish is ready to be assembled. If possible, use a deep bowl so that the final presentation will have a nice high-domed effect.
To assemble: place a small slice of red carrot at the bottom of the bowl (this provides a nice dash of color in the final presentation). We used 9 pieces of dried oysters and 9 pieces of mushrooms for nice symbolism, as “nine” in Chinese sounds like “forever”. Next, arrange the oysters vertically around the bottom of the bowl, almost like the petals of a blooming flower. The mushrooms are added next, ringing the bowl just above the oysters. The center of the bowl is then filled with the black moss (which would have soaked up most of the chicken broth marinade). Finally, top with the raw marinated chicken pieces. The meat is placed at the top for a couple of reasons: 1) this is the only raw ingredient in the dish, and will cook easier at the top, 2) as the chicken cooks, its juices will trickle down to the other ingredients further down in the bowl, providing additional fragrant sweetness and flavors.
Usually, this dish is cooked with pork belly meat or roast pork (siew yuk or sio bak). We used chicken simply because we didn’t have any of the pork at home and were too lazy to go out and get some.

The bowl is covered with a plate.

Over the plate, a piece of tin foil is used to “seal” the bowl to ensure no water gets into the food during the steaming process.
The dish is steamed on medium heat for about half an hour. The bowl was too “tall” to fit into the steamer, so we just used a small pot with a little water and a metal stand in it. This works fine.
While the dish is steaming, quickly stir-fry the Chinese lettuce in a little hot oil, and season with some light soy sauce.

When the oyster dish is cooked, remove the tin foil, and before removing the plate “cover” pour out the juices that would have formed during the cooking process. This is set aside for making the gravy.

Voila! All cooked.

Carefully… very carefully, turn the bowl onto a serving plate. Lift to reveal a nicely shaped dome.
To prepare the sauce: in a pan, heat the excess juices that were removed from the cooked dish earlier. Add some chicken broth/stock, a little bit of sugar, salt and pepper to taste. Bring to a boil, and add a little cornflour solution to thicken the gravy. Remove from the heat once it comes to a boil again. Pour sauce over the oyster dome.

For the final touch, place the sautéed Chinese lettuce around the oyster dome. And it’s good to go.
I personally think this is a rather elegant presentation. The oysters and mushrooms form a beautiful pattern, and when the dome is opened up, it reveals a “surprising” center of luscious black moss.

Each diner gets a myriad of tastes, flavors and textures. There’s the rich, intense aromas and denseness of the oysters, contrasting with and complemented by the light crispiness and crunchiness of the lettuce; the soft, slightly chewy moistness of the moss and the flavorful tenderness of the chicken thigh meat. Each component so different, and yet coming together so beautifully.
Copyright © 2004 Renee Kho. All rights reserved.
Please contact me for permission to copy, distribute and display any of the images and text contained in this article.
02:54 AM in Festivals: Chinese New Year 2004, Home Cook: Fish & Seafood | Permalink | Comments (12) | TrackBack
Tuesday, January 06, 2026
From Lobster To Fish

There was still some tau cheong (soy bean paste) mix left over from making the chilli lobsters. The mix was spice-free – just ginger, garlic and bean paste blended in the food processor – and so was perfect for use in steaming fish.
Used it on Sunday evening with the above fish. I’m not even sure what fish it was. The fishmonger called it “wu” fish. Never heard of it before. He insisted it was a really tasty fish, with flesh of very smooth and refined texture. Well, it was worth a try. And he was right. Very smooth and succulent flesh. Nice! I liked it.
Bought the tail section, and had it cut into about ¾” thick slices. Placed stalks of spring onions on dish (I usually do this when steaming fish, to “raise” the fish a little off the plate, so that it cooks more evenly), and placed the fish on top. Combined the bean paste mix with a little bit of sugar, a dash of light soy sauce (yes, the tau cheong is already salty in itself, but adding the light soy sauce gives a different dimension of saltiness, not so "flat"), and 3-4 sui suan mei (sweet & sour plums), and liberally spread over the fish pieces. Next, topped each piece of fish with slices of ginger and red chillis. (I love bright colors in food. Makes the dish look so much more appetizing). That’s it. Into the steamer for just 8 minutes (I always steam my fish in the wok, on a gas stove, so I’m not sure what the timing would be on an electric stove). Then, with a liberal sprinkle of green onion and a quick cover of the wok (maybe 30 seconds or so, just to wilt the spring onions a little), it’s ready to be served.
A nice homely Sunday dinner to end a nice weekend.
Copyright © 2004 Renee Kho. All rights reserved.
Please contact me for permission to copy, distribute or display any of the images and text contained in this article.
05:19 AM in Home Cook: Fish & Seafood | Permalink | Comments (2) | TrackBack
Saturday, January 03, 2026
Finger Lickin’ Good!

This is a laggard Christmas post. Yeah, yeah, I know, we are already into the third day of the New Year, and I’m still posting about the food we ate over Christmas… but, I do have a valid excuse you see. I have only just “rediscovered” some “missing” pictures which were in the other memory card and which I had clear forgotten about, and have only now just downloaded onto the PC.
This dish was a run-away favorite with family and friends. To borrow a line from the dear ol’ Colonel himself, it was decidedly finger lickin’ good! It’s a twist on the very famous food dish that Singapore can proudly call its own, and which has put Singapore on the International food map… the chilli crab. Or in our case, chilli lobster.
Singaporeans just love chilli crabs. It’s all in the gravy… that rich, thick, spicy, eggy gravy that is so shiokadeliciously good when eaten with mantou (steamed Chinese buns) or just chunks of crusty bread. The gravy is addictive. Once you start, it’s hard to stop. I used to think it was very difficult to replicate the same gravy at home, until an aunt passed on a recipe to me (not sure where she got it from). I think it tastes pretty authentic… as good as the restaurant version, if you ask me. Plus, and this is a big plus for me, the home-made version is minus the copious amounts of MSG, which leaves one’s throat slaked and thirsty for hours after the meal.
The recipe is very simple, though it may seem otherwise from looking at the final dish. And there is plenty of room to adjust the flavors to suit personal preferences.
The following quantities were enough for about 6 lobsters, chopped into small chunks instead of being served in full halves. (We were serving the dish buffet style, so it just made more sense to present the lobsters in manageable sized pieces, which can be easily eaten whilst trying to balance a plate on your lap!) Presentation-wise, it would probably have looked nicer if the lobsters had been kept “intact”.
18 slices ginger
6 cloves garlic
2 gently heaped tablespoons soy bean paste (tau cheong)
2 tablespoons light soy sauce
3 tablespoons sugar
8 tablespoons chilli sauce
10 tablespoons tomato sauce (ketchup)
1 cup chicken stock
½ tablespoon tapioca or corn flour (optional)
½ cup water (optional)
chopped parsley
chopped green onions
2 eggs, lightly beaten with a fork
• In a food processor, blend together the first 3 ingredients, to form a paste, which is then sautéed in hot oil until it is fragrant. This rempah (spice mix) can be made in advance and refrigerated.
• To cook the lobster (or other crustaceans): saute the rempah in a little hot oil, before adding the crustaceans.
• When the crustaceans have changed color, add the seasonings: light soy sauce, sugar, chilli sauce and tomato sauce.
• Next, add the chicken stock (or water), and allow the crustaceans to cook through completely (do not overcook though).
• If the gravy is not thick enough, add some of the tapioca/cornflour solution (the ½ tablespoon starch dissolved in the additional ½ cup of water). Be sure to have the gravy at a rolling boil before adding the starch solution, and allow the gravy to come to a boil again after adding the thickening agent. I find I usually do not need this step, as the gravy is already at the right consistency.
• Stir in the parsley and green onions.
• Finally, bring the gravy to a boil again, and very quickly swirl in the 2 lightly beaten eggs. The idea is to create thin, long strands of egg running throughout the gravy. The keys to this are to have the gravy at a boil before adding the eggs and to stir continuously and quickly as soon as the eggs are added. Personally, I find it works very well to add the eggs, stir quickly to prevent the eggs from cooking into clumps, and then to remove the heat as soon as the eggs are semi-cooked and to continue stirring to allow the eggs to finish cooking in the residual heat. This helps to prevent unsightly chunks of eggs, and to create nice eggy strands throughout the gravy.
Notes:
• This gravy works great too with crabs (of course), crayfish, king prawns (with shell) and probably just about any other crustacean. I would imagine it would work equally well with mollusks like oysters and mussels, although I haven’t tried using these before.
• The dish can be made spicier or less so by adjusting the amount of chilli sauce and tomato sauce used.
• The taste of the dish can also vary somewhat depending on the brand of tomato sauce (and sometimes chilli sauce) being used. Certain brands of ketchup tend to be more sour, and this gets reflected in the dish. This can be compensated by adding more sugar.
• Certain brands of bean paste (tau cheong) may also be more salty than other brands, so some adjustments may be required in the amount of light soy sauce used.
• It would be preferable to use low sodium stock.
• Sometimes I add the smallest dash of dark soy sauce when I want the dish to look less red.
This gravy is so unbelievably delicious with mantou and bread! Yum!
Copyright © 2004 Renee Kho. All rights reserved.
Please contact me for permission to copy, distribute or display any of the images and text contained in this article.
04:29 AM in Home Cook: Fish & Seafood | Permalink | Comments (4) | TrackBack
Thursday, December 18, 2025
Lobster, Lobster, Lobster

We had lobsters for dinner tonight. ![]() They were done very simply… A LOT of minced garlic, some minced red chillis, some minced spring onions (scallions), salt and pepper, combined with softened butter, and spread over the lobsters. They were popped under the broiler for 8 minutes. That’s it. The flavors were nice without being over-powering, allowing the natural sweetness of the lobsters to come through. The lobster flesh was sweet, juicy and succulent… a sublime mid-week treat!
They were done very simply… A LOT of minced garlic, some minced red chillis, some minced spring onions (scallions), salt and pepper, combined with softened butter, and spread over the lobsters. They were popped under the broiler for 8 minutes. That’s it. The flavors were nice without being over-powering, allowing the natural sweetness of the lobsters to come through. The lobster flesh was sweet, juicy and succulent… a sublime mid-week treat!

I’m already brimming with ideas for the other lobsters now in the freezer (all courtesy of my dad!). I can just imagine...
• Lobsters sautéed with wine, ginger and scallions
• Lobsters sautéed with black pepper
• Lobsters sautéed with black bean paste
• Chilli lobsters (a la chilli crabs)
Urgh… choices, choices…
But three cheers for dad! Thanks for the lobsters! ![]()
Copyright © 2003 Renee Kho. All rights reserved.
Please contact me for permission to copy, distribute or display any of the images and text contained in this article.
01:51 AM in Home Cook: Fish & Seafood | Permalink | Comments (2) | TrackBack
Tuesday, December 16, 2025
Mango Tango

I have been experimenting with mango salsas over the last couple of days. Yes, we are still (valiantly) trying to eat and use up all the mangoes that came off the two trees in the garden over the last few weeks. I thought I would take up a suggestion Wena gave me and use it with fish.
The idea was to make a Thai-style mango salsa. After all, mangoes are an integral part of Thai cuisine – they are used raw in salads, added to cooked dishes and are a popular ingredient for Thai desserts. The sweet and tangy flavors of mangoes are a sublime match for the sweet, sour, salty, spicy tones of Thai food. I wanted to create the sweet, sour, tangy flavors, maybe with a slight Chinese touch, and match it with a simple steamed or fried fish. It had to be quick, it had to be easy. I also decided I would prefer a salsa with some “gravy” to it, rather than a standard “dry” salsa.
Japanese cucumber (unpeeled), onion or shallots (I tried both, and both work very well, with just a slight difference in sweetness between the two) and carrots were cut into thin strips. These were combined and soaked in a marinade of vinegar, salt and sugar. The vegetables were left to marinade for a good few hours, to allow all the flavors to meld. Just before putting the salsa together, some sweet Thai chilli sauce was added to the vegetables.
The mangoes were also cut into thin strips, and set aside. I didn’t want to add this to the vegetable marinade as I suspected the mangoes might go too mushy from sitting in the vinegar. Also, I wanted to keep the taste of the mangoes very pure.
Separately, some Chinese plum sauce (approximately 6 tbsps?) and a little hot water was put into a frying pan, and seasoned with Thai fish sauce (nam pla) to taste. As the sauces came to a boil, a little cornstarch solution (cornstarch dissolved in a little hot water) was added to thicken the sauce to the desired consistency. Once the sauce came to a boil again, it was removed from the heat and the vinegar-marinated vegetables, together with the mangoes, were added and mixed well .
The colors were beautiful – vibrant yellow mixed with green, white and orange, with specks of red from the chilli sauce. On hindsight, perhaps I should have also added strips of fresh red chilli for even more vibrant colors. I had been wary of making the salsa too spicy, but I think it would have been fine with some chilli strips, adding a different layer of flavors on top of the chilli sauce seasoning. In fact, I should have added more chilli sauce than I did.
I served the salsa on both steamed and pan-fried whole pomfret. I would have preferred using fish fillets, but I didn’t have any in the freezer. I think the salsa probably worked better with the pan-fried fish than the steamed. Either way though, the flavors were great! Very appetizing… tangy, sweet and very slightly spicy. Really shiok!
Another idea occurred to me… this would work great with deep-fried battered fish nuggets or fish fillets (a la fish & chips). I think a beer batter with this might be interesting or a Japanese tempura-inspired batter would be nice too. And instead of a “watery” salsa, I would dice the vegetables, marinade them in the vinegar mixture, add the chilli sauce, plum sauce and fish sauce (but no water), before adding them to plain yogurt, and using it as a dip.
Hmmm… well, there is still half a carton box of mangoes sitting in the pantry… and they do have to be used up before they become over-ripe... hahaha… I think the family could be quite sick of mangoes by the time I’m through! ![]()
Happy mango tango-ing!
Copyright © 2003 Renee Kho. All rights reserved.
Please contact me for permission to copy, distribute or display any of the images and text contained in this article.
02:52 AM in Home Cook: Fish & Seafood, Home Cook: Light Touches | Permalink | Comments (2) | TrackBack
Saturday, December 13, 2025
You Salmon, Me Hoisin

This is a great alternative to the standard teriyaki salmon. In fact, nowadays, I hardly ever cook teriyaki salmon. Much prefer this version – tasty and extremely easy to cook.
This can be done several ways… Usually, I would dice the salmon and marinade it generously with hoisin sauce, for at least 20-30 minutes. Then, it is simply a matter of sautéing minced garlic and shallots in hot oil (very little oil, as the salmon is a rather “fatty” fish, and its natural oils will be “excreted”… sorry I really can’t think of a more elegant word at the moment… as it is cooked), until softened and browned, before adding the salmon. I always undercook salmon. I just think they taste really horrible when overdone. For diced salmon, I think about 4-7 minutes would be sufficient. If I was using the salmon in fried rice (see previous post), I would probably sauté them for 3-5 minutes only, as they will be cooked further with the rice.
I like this diced salmon version. It can be served as is, and eaten with steamed rice. Or it can be used in fried rice. Or as a sandwich filling. Or to top noodles or pasta…
Sometimes I use salmon steaks or fillets with the same marinade. (I sauté the garlic and shallots and add it to the hoisin sauce to form the marinade). And grill or pan-roast the salmon for about 4-7 minutes, depending on the thickness of the steaks or fillets. It works well too on the BBQ… wrapping the marinated salmon in banana leaves or even lotus leaves.
You salmon, me hoisin… a perfect match, I think. ![]()
Copyright © 2003 Renee Kho. All rights reserved.
Please contact me for permission to copy, distribute or display any of the images and text contained in this article.
05:56 AM in Home Cook: Fish & Seafood | Permalink | Comments (0) | TrackBack
Friday, November 28, 2025
Teochew Steamed Fish

This is a nice, light, tangy fish dish that’s very easy to prepare. It’s done in the classic Teochew style, which is an amalgamation of sourness, sweetness and saltiness. When all the tastes are well-balanced, it produces a dish that is refreshing and light on the palate, with no hint of fishiness.
The Teochews almost always use the Pomfret fish for this dish, although I suppose other lean, firm-fleshed fish would work equally well (I’ve never tried this personally).
Once the fish has been gutted, salt is rubbed into the cavity and then rinsed well to remove all traces of fishiness. The fish is lightly seasoned with pepper (especially in the gut cavity). Generally, I leave out the salt when seasoning the fish as there will be plenty of saltiness coming from the other ingredients in the dish.
The fish is very simply topped with strips of salted vegetable (giam cai), around 3 pieces of sweet sour preserved plum (sui suan mei), 2-3 large fresh tomatoes that have been quartered and lots of julienne of young ginger. Very often juliennes of red chillies are also added for color and just a touch of heat and spiciness. (I didn’t have any chillies in the fridge today, so that was left out).
The gravy is just a simple concoction of light soy sauce, sugar (to balance out the sourness of the plums and the saltiness of the giam cai) and garlic oil (finely chopped garlic stir-fried in oil). I think bottled sesame oil could very easily be used as a substitute for the garlic oil, if preferred, although the minced garlic does give an added taste dimension to the fish. All the ingredients are dissolved in Chinese rice wine, and poured over the fish. Proportions for the ingredients depend somewhat on the size of the fish, and on personal preferences. Today I used about 5 tbsps each of light soy sauce and Chinese rice wine, around 1 tbsp of sugar and 3 cloves of garlic sauteed in a little vegetable oil.
For a large fish like today’s, steam for 8-10 minutes. For smaller fish, I tend to steam just 6-8 minutes. I really don’t like over-cooked fish. There’s nothing worse than over-cooked fish. It’s dry, it’s scratchy on the throat, it tastes like dressed up cardboard. Yuk! This is one of my biggest gripe about a lot of restaurants, even top ones. A lot of the time, everything is cooked right, except the fish. [Incidentally, in my humble opinion, that’s how you can tell how good a chef is – by how well he cooks his fish, and in a Chinese restaurant, by how well he steams his fish, where not only the fish texture but also ensuring there is no "fishiness" are major factors. Heat control and timing is absolutely key]. Anyway, enough about that… sorry, didn’t mean to gripe so much… it’s always best not to get me started on over-cooked fish! : P
Once the fish is done, turn off the heat, and quickly sprinkle some julienne of spring onions on top of the fish, cover again briefly and allow the residual heat to slightly wilt the spring onions before serving. And there you have it, a fish dish that’s done in just a few minutes, and it’s pretty yummy too!
Happy fish steaming!
Copyright © 2003 Renee Kho. All rights reserved.
Please contact me for permission to copy, distribute or display any of the images and text contained in this article.
11:21 PM in Home Cook: Fish & Seafood | Permalink | Comments (2) | TrackBack
Thursday, November 27, 2025
Assam Fish Curry
Here’s the recipe that I promised for the Assam Fish that my mum cooked on Sunday…
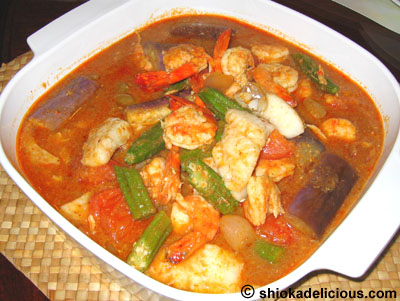
This is essentially a Nyonya or Straits Chinese dish - an interesting amalgamation of Chinese and Malay influences. The Nyonya or Peranakan culture is a unique and very elaborate one which originated from the Peranakan (Straits Chinese) of Malacca over 400 years ago, and was the result of inter-marriages between Chinese immigrants and local Malays.
From intricate hand-beading on shoes and clothes to labor-intensive, time-consuming grinding of spices to make dishes with complex preparation procedures, the Nyonyas (female Straits Chinese – males are known as Babas) were fiercely proud of their unique culture and their standards for detail, quality, creativity and craftsmanship.
Traditional Nyonya food requires hours and hours of preparation, starting from the pounding and grinding of the all-essential rempah (or spice mix) that forms the basis of all the dishes. Nyonya housewives of the past literally spent their entire days in the kitchen cooking up dishes for their families. Indeed, it is often said that in those days, a Nyonya matriarch would decide upon a prospective bride for her son by listening to the pounding of spices by the young lady. From this she would be able to tell how devoted and skilled the prospect was in her cooking, and thus worthy of marrying into her family!
Nowadays, Nyonya food is also native to Singapore as well as Penang in Peninsula Malaysia, and enjoyed by Chinese, Malays, Indians and Caucasians alike. However, there are some distinct differences that have evolved in the Nyonya food found in Singapore, Melacca and Penang. Malaccan and Singaporean Nyonya food, on the whole, have also taken on Indonesian influences, due to geographical proximity, and are generally sweeter, richer in coconut milk, and has the addition of more Malay spices like coriander and cumin. Penang Nyonya food incorporates Thai cooking styles, with greater tones of sourness, and the greater use of hot chilies, fragrant herbs, and pungent black prawn paste (belacan).
Anyway, back to the fish… we cooked this from store-bought, ready-prepared Assam Curry Paste. Unfortunately, we don’t have the time nor the inclination to spend hours and hours pounding and frying the spices to cook just one dish for dinner. Alas! The lost art of patience and dedication in this fast-food world of instant noodles and burgers! Just give us the taste, minus the hassle.
The main ingredient of the paste is assam jawa (tamarind fruit) which gives the dish its distinctive sour, tangy taste. The pulp of the fruit is pounded together with things like shallots, garlic, lengkuas (galangal), buah keras (candlenut), serai (lemongrass), daun kesom (laksa leaf or Vietnamese coriander), chillies, tumeric powder, belacan and sugar. The paste is then fried in oil until the flavors of all the ingredients have melded together.
We used two types of fish – seabass or cod and small local fish for which I do not know the proper English name. A direct translation of the Chinese name would be “small silver fish”. Hmmm… not much help I know. But any type of firm-fleshed fish would suit this dish fine – tenggiri, even garoupa and mahi-mahi I would think.

Normally, the fish would be cooked in the gravy, however, this time around, we steamed the fish separately first for about 5 minutes or so. These small silver fish are very bony, with REALLY tiny bones, so we didn’t want to cook them in the gravy and maybe have them break apart, dispersing their tiny bones into the gravy.
We also steamed the eggplants for about 5 minutes, and par-boiled the okra/lady’s fingers for about the same amount of time.
Whole shallots (to give added sweetness to the gravy) were given a quick sauté in hot oil, before the prepared assam curry paste was added. We added more assam juice for extra tanginess. Then some sugar and soy sauce (or salt, if preferred) was added, to taste. Unfortunately, a lot of my home recipes won’t have exact measurements – both my mum and I (me learning from her) tend to cook with the agar-agar (guesstimate or instinctive) method. Just add what feels, looks and tastes right, and the dish will come out right. I do apologize if some of these recipes appear rather vague.
Once the curry has come to a rolling boil, pop in the shelled and deveined prawns (seasoned with pepper and soy sauce or salt). [Add the fish at this point too, if it was not steamed beforehand]. Next, add the diced tomatoes. Simmer till the seafood is cooked through (about 5 minutes). Add the steamed okra and eggplant. Mix well.
The gravy is done. Pour over the previously steamed fish and serve. The gravy is really good with steaming white rice or mopped up with chunks of crusty bread!
Happy Assam Curry-ing!
Update (31/12/03): As I was replying to an email query about this recipe, I realized I had forgotten to clarify something.
I forgot to mention that only fresh fish that has not been frozen and thawed should be used for steaming. (Some fishmongers sell defrosted fish together with fresh without differentiation, so it might be best to ask). Previously frozen fish, when steamed, tends to have a very "fishy" taste, and the texture becomes rather "off", for want of a better word. The only exception to this would be fish like Chilean seabass or cod (sometimes known as "snowfish" in Asia). This fish is absolutely fine for steaming even after being stored in the freezer for months.
If using frozen fish for this dish, it would be best to fry the fish instead. If using fish fillets, gently dry the fillets with kitchen towels, pat a light coating of cornflour onto the fillets on all sides and pan-fry in hot oil. Similarly, for a whole fish, lightly coat the fish with cornflour and liberally sprinkle salt and pepper in its cavity before frying.
The fried fish can then either be added into the gravy for the last 5 minutes of cooking time or it can be plated and the cooked gravy poured over it.
Copyright © 2003 Renee Kho. All rights reserved.
Please contact me for permission to copy, distribute or display any of the images and text contained in this article.
02:26 AM in Home Cook: Fish & Seafood | Permalink | Comments (2) | TrackBack