Thursday, October 14, 2025
Tasty “Trash” Un-Burger Burger
It’s amazing what can sometimes be created from leftovers found lying in the fridge. On occasion, simply throwing together a hodge-podge of bits and pieces of food remnants can produce a stunning epicurean experience that may even rival the most well-planned and holistically designed recipe.
That was the case when I made myself a hastily put-together burger lunch. It turned out to be one of the tastiest burgers I’ve had in a long while!
Rummaging around the fridge, I found several pieces of braised beef shin left over from dinner several nights ago, together with the last remaining portion of sautéed, lightly caramelized onions. Then, on the kitchen table, I saw the last two buns from my Hong Kong-style “bolo” bun experiment-gone-wrong the day before. All were food that were waiting to be made useful.
The beef was cooked in the style of the lamb shanks which I have posted about previously. I used almost the exact same recipe to braise whole pieces of beef shin. Only after the beef was cooked to fork tender perfection was it cut into slices of medium thickness, and then served with lots of sautéed onions and delicious gravy.
I usually cook beef shin (ideally, from the fore-limbs, as it is more tender) stew-style, with the meat cut into small chunks before cooking. But once in a while, I like to slow-braise the beef shins whole. This gives a completely different textural result which is wonderful.
The buns were the evidence of my latest kitchen sortie to try and achieve super fluffy and soft buns without the use of bread improver. These buns were nicely soft and very aromatic (the whole family commented on the delicious smells that emanated from the bread box each time it was opened, even one day after the breads were made), but they were not of the Japanese-style cottony soft texture that Asians seemed to adore with a vengeance and which I was trying desperately to achieve. While these buns weren’t what I had intended them to be, they nevertheless made for superb burger buns.
And so, all it took was a few minutes, and these leftover food “trash” became the most delicious “un-burger” burger. I don’t think I could have done much better if I had intentionally set out to make a good burger.
I popped the beef slices into the leftover gravy, and heated them up together on low heat on the stove, until everything was nicely warmed through. In a separate pan, I quickly “freshened up” the onions. Meantime, the buns were halved and popped into the oven toaster for a couple of minutes.
Buns ready. Beef ready. Gravy ready. Onions ready.
A slice of beef went on the bottom half of the bun, and was topped generously with the onions.
Next, a drizzle of the richly flavorful gravy. And it was good to go.
As with most braised meat dishes, the time spent sitting in the fridge meant that the flavors of the beef had intensified and deepened considerably, and were a delight on the palate. I would never have thought that a whole slice of meat would make for a good burger “patty”, but it worked stupendously well. I admit : it was rather un-burger-like, but I really enjoyed having a non-minced-meat burger. I adored the texture - meltingly tender with just enough meaty bite. And the soft, cooked down tendons that were marbled through the meat made everything all the more interesting and tasty, in my opinion.
The onions provided a richly flavorful, slightly sweet counterpoint to the savory beef and gravy.
The marriage of all the different flavors and textures was almost heaven-made; they truly worked well together. It was a most enjoyable burger lunch! So who says you can’t have a gastronomic experience with leftovers?
Copyright © 2004 Renee Kho. All Rights Reserved.
Please contact me for permission to copy, publish, distribute or display any of the images or text contained in this article.
01:13 PM in Home Cook: Sandwiched! | Permalink | Comments (14) | TrackBack
Tuesday, August 31, 2025
Giving KFC a Run For Its Money – Maybe
There are just some days when, at the mere thought of having to fire up the wok and rustle up some dinner, you can immediately feel the onset of a headache. Inwardly you groan and drag your emotional feet. You would do anything to not have to cook…
Your heart is tempted… oh so tempted… to just step into the nearest fast-food joint and pick up a couple of burgers…
But wait!
You don’t have to cook… still get to eat your burgers… and still feel virtuously healthy…
How?
Well…
You make your own burgers…
Wait. Where you’re goin’? Come back. I haven’t finished yet.
C’mon. Bunging something into the oven, and cutting open a packet of pre-made sauce can hardly constitute cooking. Right? And there really is only just the one pot and one baking sheet to wash. Promise. (Okay, except for the plates. But that’s not too bad, surely.)
Some time ago, the ads for KFC’s seasonal offering of Satay Burger were screaming out from print and screen media left, right and center… cajoling, nay, “demanding” that I try their special concoction of “juicy, tasty” (their words, not mine) chicken topped with spicy, peanutty satay sauce, and sandwiched between a soft, fluffy hamburger bun. But I steadfastly refused to partake in all that greasy and oily deep-fried-ness. Besides, since when had real-life burgers ever come any where close to those depicted in the advertisement photos? Yet, it sounded like a wonderful idea… crispy chicken with spicy, nutty sauce…
Okay, I’d make my own then. But no deep-fried chicken. This would be the perfect time to finally try out the oven-fried method that I had read about on Owen’s site some time back and had been meaning to attempt.
The picture in my mind looked and sounded good… whole filets of boneless chicken thigh, moist, juicy and succulent from being marinated in buttermilk, crisply coated with panko and tastefully paired with the deep, intensely rich flavors of satay sauce. And it couldn’t be easier.
I don’t know about you, but I usually know in the morning, when I start my day, that I’m going to be feeling lazy about cooking that evening. Correction. Actually, I know the night before that I’m going to be feeling lazy about cooking on the evening after. I call it the “art of laziness”! And I think I’ve mastered the art form pretty well – right down to all the fine details!
So, this is what you do when you feel an episode of “artistic laziness” setting in: just before going to bed the night before, take out several boneless chicken thighs (you can use breasts if you want; I’m okay with that) from the freezer and pop them into the fridge to defrost overnight.
[De-boned chicken thighs are some of the greatest things to keep on hand in the freezer at all times; so incredibly useful and versatile. We usually buy a couple of dozen thighs and have the poultry guy filet them for us. Once home, they are placed in a single layer in freezer bags, and frozen. Whenever we need some chicken meat for stir-fries or any other dish really, we simply break off and defrost just the number of chicken thighs we need. They can be diced and sautéed with vegetables, used in green curries and all sorts of dishes. Really, very convenient indeed.]
Anyway, the next morning, simply and quickly trim away the skin (or just keep it on, if you prefer) and any excess fat. Oh alright, my house-help does this for me, but it is still a relatively brief and painless process. Then, it’s just another few minutes to put the marinade together. I used (for four chicken thigh filets) two whole cloves of garlic, lightly bruised; about an one inch knob of ginger, cut into rough chunks and bruised; a small bunch of fresh coriander (cilantro / Chinese parsley), roughly chopped; about three tablespoons of light soy sauce; a generous sprinkling of ground white pepper; and enough low fat buttermilk to thoroughly coat all the chicken.* Mix well, plonk it into the fridge, and leave to macerate while you go about your day. And by the time you get home in the evening, the chicken is all moist and juicy, and ready to be cooked.
[* I kept the seasonings very light as the satay sauce packs a powerful taste punch. But if serving the “fried” chicken on its own, feel free to add a variety of herbs (dried or fresh), paprika or any other flavorings that you may fancy. No rules here at all.]
In the evening, it is just a simple matter of pre-heating the oven to about 200C (400F) and removing the chicken from the fridge to allow them to come back to room temperature. That gives you 15-20 minutes or so to change into comfy, slouchy home clothes, to make yourself a nice warm drink (or a stiff, highly alcoholic one, if that is your preferred poison), and to just relax a little before putting the dinner together. Once you are sufficiently soothed, pour some panko Japanese breadcrumbs (I find these to be one of the most useful things to have a bag of, sitting in the freezer at any one time; they store well there, are truly great as coating for all sorts of dishes, or even as a binder, and are way better tasting than the insipid, stale pre-made regular breadcrumbs that are sold in the supermarkets – plus, who has the time to blitz up some freshly made breadcrumbs whenever the need arise, right?) into a shallow dish.
[Again, if not serving the chicken with a strongly flavored accompaniment like satay sauce, feel free to season the panko with dried herbs, salt, pepper or even Old Bay Seasoning.]
Take another sip of your drink as you grab a baking sheet and coat it liberally with cooking spray (or, if preferred, with about 2-3 tablespoons of vegetable cooking oil). Remove the chicken, piece by piece, from the marinade, allow any excess buttermilk to drip off (you don’t want the chicken too wet and thus making the breadcrumbs all soggy), and scrape off any bits of coriander that may be sticking to the meat. Place the filet in the panko and coat evenly on all sides before putting it onto the greased baking sheet. Once all the chicken is ready, spray the meat surface with a light layer of cooking spray. (I forgot this time, but it would be a good thing to do.) That’s it. Into the oven they go, for about 15 minutes or so.
Meantime, rustle up the satay sauce. This is as simple as simple is. Grab a packet of pre-made, store-bought satay sauce. (This time, instead of using my regular version from the Malay lady at Redhill Market, I decided to try out a new offering that I spotted at NTUC Supermarket the other day…)
Pour the contents of the entire pack into a medium pot, add just under one cup of hot water, and stir to combine. I think I used just under one cup of water, I can’t be too sure; I was just adding it in dribs and drabs until I got the desired consistency. The package label recommended about 1¾ cups of water, and that would have given a fairly liquid sauce, which would be great for things like satay bee hoon (rice vermicelli) or other dishes. For the burger, I wanted the gravy relatively thick and chunky – something that would stay in the bun and not ooze out all over the place.
Allow the sauce to come to a gentle boil, taste it and adjust the flavorings according to personal preferences. I added (as I usually do, to any store-bought satay sauce) a small chunk of gula melaka (palm sugar), a tiny dash of light soy sauce and a fair bit of ground peanuts (I like my satay sauce nicely chunky and highly redolent of peanuts.) Do whatever it is that pleases you. Let the gravy return to a boil, and you’re done. That’s it. And it takes all of 4-5 minutes. Painless.
This brand’s offering is actually very good. Note the nicely authentic, tasty and required layer of chilli oil rimming the gravy. The flavors are punchy, with just enough spicy heat – the taste is fairly suave, rounded and smooth. Not bad at all. I like it.
[Since you are at it, it’s an useful idea to make plenty of extra gravy. Pop the leftovers into the fridge, and it can be the basis for a scrumptious lunch the next day: simply reheat the gravy, add a little more water if necessary to bring it to the correct consistency, and pour it over some cooked rice vermicelli (bee hoon) to create the uniquely Singaporean dish “Satay Bee Hoon”. Add some cubed tau kwa (firm bean curd) or tau pok (fried bean curd skin), shredded chicken meat, blanched kangkong (water spinach), sliced hard boiled eggs or whatever you have on hand really – there’s no need to worry greatly about authenticity or creating unnecessary work for yourself. And lunch can be ready within minutes. Or, chop up various vegetables and make the Indonesian salad gado-gado, using the satay sauce as dressing. Extra gravy can also be used to stir-fry chicken or beef for a dinner dish. Of course, needless to say, it is also great with satay.]
Okay, you still have many minutes more before the oven timer goes off. So, busy yourself with cutting up some cucumber (I like the dark green Japanese variety, but any type will do) into thin slices. And whilst you have the knife and chopping board out, cut more cucumber into medium cubes, together with a few lush, ripe fresh tomatoes, a bunch of fresh coriander, and a couple of shallots or red onions (whichever you have on hand). Place all the diced vegetables into a large bowl, toss with some rice vinegar (or lime juice), a couple of teaspoons of extra virgin olive oil, some sugar, pepper and salt to taste – and for me, a couple of tablespoons of Thai chilli sauce… and you have a refreshing salsa to go with the burgers.
If you want to get really fancy (and go one up on KFC), prepare some onions to go into the burgers too. Slice one large yellow onion into rings, and sauté in a little bit of oil until soft, translucent and barely colored. No need for seasonings or flavorings; it’ll all come from the satay gravy.
Yep, some of mine got a little charred – I was momentarily distracted by something far more interesting than frying onions. But hey, the charred bits were great – giving a wonderful smoky flavor to the onions.
Oh, alright, so making the onions will mean another pan to wash. It isn’t necessary to do the onions; KFC didn’t, and I really don’t think the burgers missed them. However, I won’t deny that they do add a rather nice sweet and crunchy touch to the burgers. Just do as you please or feel up to.
Right on cue, the oven timer goes off. Yank the chicken out, and carefully flip them over**. Coat the freshly exposed side with more cooking spray and pop the filets back into the oven. ***
[** Take care when doing this. There is a tendency for chunks of the panko coating to be left behind on the tray – as I found out. Probably, the next time, I will want to bake the chicken on a rack; this will help keep the panko crust intact.]
[*** At this point, I suddenly decided to stop baking the chicken and to broil them instead. They were pretty much cooked through already, and just needed more coloring and crispiness on the crust. So, I switched the oven to “grill” mode, popped the chicken back in (keeping the tray on the middle rack of the oven) for oh, about 5 minutes or so, until the tops were nicely golden brown. If necessary, you can flip the chicken back over, and grill the other side too for 3-4 minutes to get the required deep, rich color and crunch. Just be sure to keep an eye on them the whole time. With the broiler, they go from nicely brown to charred in a blink of an eye.]
Ta-da…
… oven-fried chicken. Not a bad looker - for a first attempt, no? Okay, it got a little charred in some places – my 18 year old oven is notoriously temperamental and uneven at the best of times.
But it was scrummy.
Okay, assembly time. Split burger buns into half (I like to use the kitchen scissors for this; it makes for perfectly halved buns that are not inadvertently flattened or misshapened by heavy fingers, and that stay nicely soft and fluffy). If desired, pop the cut bun halves into the toaster oven (cut side up) for a couple of minutes to give a light touch of crispiness, and to help prevent the buns from going soggy too quickly from the gravy. Not necessary at all, but nice if you have the inclination.
Place a layer of cucumber slices on the bottom half, top with the chicken filet, add some onions (if using) then finish off with a liberal dollop of satay gravy. Cap with the top half of the bun. Dinner is served.
The burger was seriously good. In the words of A, our house-help: way better than KFC’s version (which she had tried) – our gravy was not as sweet and the fresh-out-of-the-oven chicken was crispier, tastier, more juicy, moist and succulent than the commercial offering. She really liked the buttermilk-marinated, oven-fried chicken. So did I. As did everyone else.
I really like this way of cooking chicken. The buttermilk gives the meat incredible moistness and tenderness. I can just see me making all sorts of chicken this way – the flavorings can be varied endlessly (using hoisin sauce, teriyaki sauce, herbs and spices – whatever I may fancy – with the buttermilk). And it doesn’t even have to be oven-fried chicken each time. I think this would be a great way to marinade chicken for grilling or roasting. Great stuff.
Oh, I can also see doing this chicken burger in different styles too. One in a Californian-style would be delectable… with some sprouts and an avocado-tomato salsa topping the chicken filet instead of the satay sauce. Or, borrowing an idea from Burger King, pour some spicy rendang sauce over the meat. Yum!
And after that rather simple but healthy and very tasty dinner, time for a luscious reward – a Ben & Jerry’s sundae. Cookie dough ice cream, here I come! Oh yeah!
Copyright © 2004 Renee Kho. All Rights Reserved.
Please contact me for permission to copy, publish, distribute or display any of the images or text contained in this article.
03:20 PM in Home Cook: Poultry & Meats, Home Cook: Sandwiched! | Permalink | Comments (15) | TrackBack
Wednesday, April 28, 2025
My New Love

I know, I know, you are probably sick and tired of reading about my toast / bread / toasted sandwich escapades – which I have already written about here, here, here, here and here – in all its various guises. But, indulge me, if you will, one more time. I simply have to share this. This was probably one of my most scrumptious, delectable toasted sandwich discoveries in a long, long time. Oh! It was jaw-droppingly good. I loved it. I was oohing and aahing at the very first bite.
Well, you see, the story began like this… I had just bought myself a spanking new grill pan…

I had been wanting one of these for the longest time, but they were all so exorbitantly and prohibitively expensive – around S$200 and above. And for a pan that I would not use on a day-to-day basis, but only on occasion to achieve certain results with certain dishes, I couldn’t in all my conscience justify the indulgence. Then… the other day, I found this one… which was nicely affordable. I was delighted. I was no pan snob. I didn’t need a brand-name grill-pan. As long as it was functional and did what it was supposed to do, that worked for me. And this one worked just fine. Plus, it wasn’t arm-droppingly heavy (the weight of the pan I mean).
So anxious was I to try it out as soon as I got home, I had to think of something to make with it. Since dinner was still some hours away, what better than a stove-top grilled sandwich to inaugurate my brand new toy. Besides, I was always game for a warm sandwich at any time of the day.
I was rather conservative to begin with. I simply “dry” toasted a couple of slices of bread in the grill-pan. I wanted to see how well this pan could do a kopitiam-style (local coffee shop style) kaya toast. It would have been nice to use the white, fluffy kopitiam bread, but since there was none at home, regular whitemeal bread it was.

The grill marks were very nice. And by lightly pressing down on the bread with the sauté spatula while they were toasting, the toasts were nicely thin and crispy, almost like the kopitiam ones. Once nicely browned, I spread Hainanese kaya on one of the toast, topped it with some cheese, followed by the second piece of toast. Voila! Kaya and cheese sandwich. One of my many toasty favorites.
Yet, I wasn’t satisfied somehow. It was good. But normal. I’ve had this dozens of times. I wanted my new grill-pan to surprise me with something new and exciting.
After a bit of browsing around the pantry and the refrigerator, I suddenly thought: hmmm… I tried kaya with pork floss the other day, and it was rather tasty. How about kaya, floss and cheese? Yuk you say? I know, it does sound rather freakish, maybe even grotesque. But, hey, someone has to keep pushing the boundaries of gastronomy, no? ![]() Oh, the things I do in the name of food research!
Oh, the things I do in the name of food research! ![]()
I also decided I would do a proper grilled warm sandwich this time. So, two pieces of bread (crusts removed). One side of each piece very lightly spread with a small pat of butter. On the flip side of one of the pieces of bread, a liberal dollop of Hainanese kaya was spread. Next, a generous sprinkling of Krispee pork floss. Then, a slice of mild (this is important) cheese. Finally, it was all topped with the second piece of bread, buttered side up. And into the nicely hot grill-pan went the sandwich.
I resisted all temptation to move the sandwich around on the pan, or even to take a peak at the underside, and simply left it to “grill” on medium heat. All I allowed myself was a gentle (keyword) application of pressure to the sandwich with the sauté spatula, to get even browning on the bread and to compact the bread a little – a little like a basic, manual version of a panini press. ![]()
After 2-3 minutes, a quick check… yep, the underside was done… so gently, I turned the sandwich over. Another 2-3 minutes. Other side was also done. Removed it from the grill-pan.

It looked really good. Much better than the “dry” toasted version, of course. The butter had helped turn the toasted sides a gorgeous golden brown. And the smell of grilled buttered bread, needless to say, was pretty incredible.
Cutting the sandwich in half diagonally, another tantalizing sight greeted me. Creamy melted cheese. Crispy pork floss. Richly aromatic kaya.
And oh! that first bite! The bread was crispy on the outside, and still slightly soft and fluffy on the inside. The melted cheese had melded with the kaya to give a sumptuously smooth, creamy filling with a wonderful caramel-y overtone from the Hainanese-style kaya. Almost like dulce de leche. Only not as sweet. It was beautiful. The sweetness of the kaya was very subtly balanced out by the saltiness of the cheese. Added to this heady mix was the pork floss – slightly moistened by the melted cheese and kaya, making it soft and almost creamy in parts, and yet still crispy and somewhat crunchy in other parts. One word. WOW!
Or several words… oh la la! Or as a Singaporean may say… “wah-lau-eh”!
Somehow, by accident almost, the three incongruous flavors, textures and aromas had come together and worked stupendously well. The caramel tones and coconut-infused aromas of the Hainanese-style kaya were like magical star-dust over the sandwich. The mild-mannered ways of the cheese provided suave smoothness and creaminess without being overbearing and intrusive. It was distinctive yet subtle. A stronger flavored cheese would probably have been too crass and would have upset the balance. And the Krispee pork floss brought the finishing touch to the party with its sparkling and chirpy personality.
A well-heated grill-pan was important. It allowed the bread to crisp and brown very quickly. As I discovered from a subsequent attempt to repeat the wonderful taste experience, leaving the sandwich sitting in the pan for too long resulted in soggy and mushy pork floss, from it having sat in the kaya and melting cheese for too long. And that didn’t taste very good. So the key was to have the pan hot enough to turn the bread golden brown and crispy and to melt the cheese in a short enough time that would not adversely affect the crunchy texture of the floss.
It was a fairly sweet sandwich – not a savory option for sure. But it was so good. (Um… I think I’ve said that already). Even after devouring one kaya/cheese sandwich and one kaya/cheese/floss sandwich, it was all I could do to resist making another one for myself. I’ve made this sandwich a few more times since. And I still like it. Easily one of my favorites now.
As for my grill-pan, it did me proud on its first outing in my kitchen. And it and I… I think we will have a highly delicious future together… with many more delectable adventures to come.
Copyright © 2004 Renee Kho. All Rights Reserved.
Please contact me for permission to copy, publish, distribute or display any of the images or text contained in this article.
01:13 PM in Home Cook: Sandwiched! | Permalink | Comments (17) | TrackBack
Thursday, March 11, 2025
Croque Renee

More sandwiches I’m afraid. Yes, I’m still going through my little sandwich-craving phase, so please bear with me.
For lunch today, I made my all-time favorite sandwich…
When I visited Lourdes, France many years ago, it was off-season. This meant that for a small French town like Lourdes, which caters almost exclusively to tourists and Catholic pilgrims, just about everything was shut down. Only a tiny handful of shops, cafes and bistros were open. Hardly any restaurants were open. And the cafes and bistros that were opened served severely streamlined menus. It was wintry and cold, and there were only limited fresh items on offer. So, for the few days that I was there, I practically subsisted on soups and either Croque Monsieurs or Croque Madames. Yet, I was one happy camper. In fact, I couldn’t get enough of these deliciously crunchy (and thus its name: croque), warm, slightly gooey, grilled sandwiches. And I was quite contented to live on this fairly one dimensional diet for those few days.
Oh how I loved these crispy and heart-warming sandwiches! Even after copious amounts of ham and cheese, or ham, cheese and egg toasted sandwiches, the adoration did not fade. And, a decade on, these sandwiches still remain one of my firm favorites, if not my favorite.
Whenever I want a light meal or am just craving a sandwich (like today), almost inevitably this is what I would make for myself. Of course, my version has evolved to incorporate a couple of elements that I like, and so I guess it can’t really accurately be called a croque monsieur or a croque madame. Perhaps it should then be called (with tongue firmly in cheek) Croque Renee? ![]()
My memories of the croque monsieurs and croque madames that I enjoyed in France have now been clouded by my experiences of the various other versions of these simple yet delicious sandwiches that I have tasted over the years, in various bistros, in different countries. If I recall correctly, in France, a croque monsieur is a simple cheese and ham sandwich either heated under a broiler or sautéed in a little butter. While a croque madame is simply a croque monsieur topped with a fried egg (usually sunny-side-up).
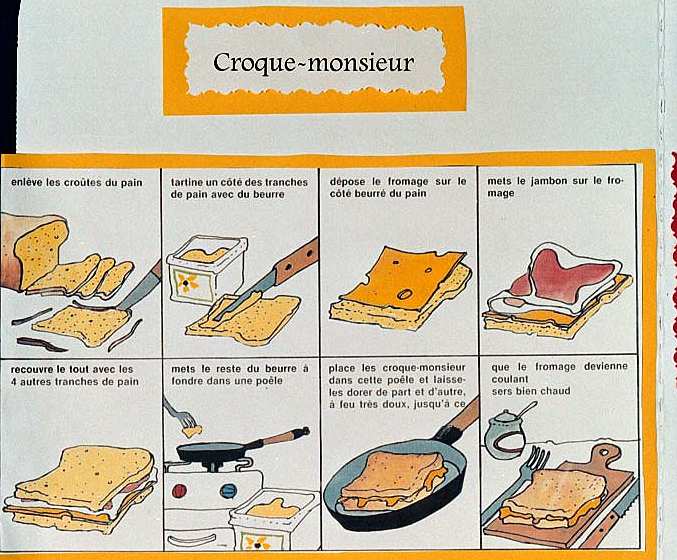
Here’s a great little "how-to" cartoon on how to make a croque monsieur.
However, I have tasted versions that were dipped in egg before being sautéed in butter, then topped with another egg, and this was in turn topped with either mornay or béchamel sauce! Yikes! Only in America, I guess.
Anyway, here is my version…
• Fry an egg in a tiny bit of butter. Rather than sunny-side-up, I prefer it over-easy with a suitably runny yolk. (I find it quite hard to eat a fried egg with a hard yolk, but that’s just me.) Set aside.
• Take two slices of lightmeal (i.e. more grain than white, but finer textured than wholegrain – don’t you just love these marketers?) and very lightly butter on one side.
• Flip the bread over, and spread or squeeze a liberal amount of honey mustard on the unbuttered sides of both pieces of bread.
• On one piece of bread, on top of the mustard, goes a big slice (folded or cut in half) of either smoked or roasted turkey breast (my preferred meat, but I do sometimes use various types of ham).
• Next, on goes a slice of cheese - usually Swiss, Emmental or Cheddar; or if I’m looking for a suitably stretchy and gooey experience, Mozzarella; or basically whatever cheese is in the fridge, even the processed kind, fresh out of their individual plastic pockets.
• If I’m feeling more liberal with my waistline, I use two pieces of cheese, on either side of the turkey breast deli slice.
• Slide this piece of bread (with the turkey and cheese toppings), butter side down, onto a non-stick frying pan that has been heating up on a low flame. I prefer to do the transfer from plate to pan at this stage, without the egg, to minimize the risk of injury to my precious runny yolk! Also, it minimizes the time the egg spends on the heat, so the yolk won’t get overcooked.
• As this piece of bread becomes nicely toasted and golden brown, carefully slide the egg onto the sandwich. Top with the remaining piece of bread, mustard side down.
• [For me, the egg always goes inside the sandwich, rather than the traditional croque madame style of going on top of the finished sandwich – purely for a practical reason. I’m a firm believer in the “sandwiches must be eaten with the fingers” school of thought. I mean, seriously, sandwiches are finger foods, and just taste so much better, in my opinion, when eaten with the hands. It just doesn’t feel quite right eating a sandwich with a knife and fork. And I haven’t been able to figure out the logistics of eating, by hand, a sandwich that has an egg, complete with a runny yolk, right where my fingers are supposed to go to hold the sandwich.]
• As gently as possible, flip the sandwich over to toast the other piece of bread. As soon as that too is golden brown, and the cheese is nicely melted, remove from the heat immediately.
• Cut sandwich in half diagonally. Watch lovely thick golden egg yolk ooze out and intermingle with gooey melted cheese. Sink teeth into sandwich. Close eyes and allow taste buds to savor each and every flavor and texture as they explode in the mouth.
This sandwich has just about everything I love in a sandwich. It is warm (give me a warm sandwich over a cold sandwich anytime). It is crispy. It is cheesy. It has egg in it. It has mustard in it. It has enough of the “goo” factor…
It is a piece of sandwich heaven in under 10 minutes.
Copyright © 2004 Renee Kho. All Rights Reserved.
Please contact me for permission to copy, publish, distribute or display any of the images or text contained in this article.
02:12 AM in Home Cook: Sandwiched! | Permalink | Comments (16) | TrackBack
Tuesday, March 09, 2025
Edible Ramekins

The tartines did it. All this tartine-ing that has been going on of late… it’s gotten me suddenly hooked on sandwiches. I mean, I do normally eat sandwiches fairly regularly. My “regularly” being maybe once or twice a week, at least where sandwiches are concerned. Simply because that’s about how frequently the urge to eat a sandwich strikes me! But yesterday, all I could think about was having a sandwich. And as I was staring at the big crusty rye and potato roll that was sitting in the bread box, wondering what sort of sandwich I wanted to make for my lunch, the idea struck me… I knew exactly what I was going to make, or at least attempt to make!
When Clotilde made her first tantalizing post about oeuf cocotte back in December, I was very inspired and tempted to try out and experiment with my own versions of oeuf cocottes. But alas, I was stopped by one reason… I do not own a single ramekin. (Sorry, Clotilde!) But it is true. Incredible though that may be. And so, I put off making an oeuf cocotte until I could go get myself some lovely, pretty ramekins. Well, the weeks turned into months, and still no ramekins.
Until yesterday.
Yesterday afternoon, as I stared at my rye and potato roll, I suddenly saw a ramekin! That’s it! I would use the roll as a sort of ramekin. Afterall, bread rolls are regularly used as soup bowls are they not? So why not a ramekin? And hey, it’s even edible… one less thing to wash up! A girl couldn’t ask for more!
In fact, I made not one, but two “cocotte-in-a-roll”. Heh! We’ve all had, I’m sure, “chicken in a biscuit” (oh! how I used to love those), so now I present, erm… “chicken in a roll”?! (Cocotte in French being “a cute word for a hen”, according to Clotilde).
I ended up using both the rye and potato roll as well as a small wholemeal soft dinner roll. Why the latter? Well, I really wanted to use quail’s eggs, which I adore, in my oeuf cocotte, but they would be “lost” in the much larger rye and potato roll. I also didn’t want to put in multiple quail’s eggs, as I preferred the cleaner appearance of just one egg yolk peeking out from the roll. And the only smaller roll I had was the soft dinner roll. I was a little concerned as to whether it was too soft to hold the liquids in, but it worked just fine.
• The tops of both rolls were cut off, and the centers scooped out, leaving just enough shell to form a sturdy “ramekin”. The crusty roll was obviously sturdier and I could remove pretty much almost all the insides, leaving more space to fill up with the delectable fillers. I was more conservative in scooping out the soft wholemeal roll. (The crumbs were reserved for the salmon cakes that I’m planning to make.)
• Dijon mustard was spread all around the insides of the rye roll, with careful attention given to make sure all surfaces were nicely covered. (I love mustard, but this can be easily substituted for other spreads, even horseradish or something). I spread the wholemeal roll with butter – just to see the difference in tastes.
• Next, the fillers. A large onion, cut into strips, was sautéed in about one tablespoon of butter until soft, before some sliced fresh shitakes were added. When the mushrooms were nicely tender and fragrant (a few minutes later), in went the strips of ham. Any flavor and type of ham would work, but I think thinly sliced ham might work somewhat better than thick sliced ones in terms of balance of texture. Salt and pepper were added to taste and the pan was deglazed with a little wine (white or even Chinese rice wine would work).
• The filling was placed inside the prepared rolls, followed by some grated French Emmental cheese.
• Finally, an egg was broken into a bowl, and then carefully slid into the roll. Here, a minor “accident” occurred. I had put a little too much filling and cheese into the rye roll. Room was a little short for the egg, and so some of the egg white spilt out and slid down the sides of the roll, and created a small mess. Oh well. At least the bread roll got an unintended egg white wash, which is not a bad thing.
• Similarly, a small quail’s egg was slid into the wholemeal roll.
• Onto a baking sheet went both rolls, and into a pre-heated oven – approximately 160C. At this point, I wish I could tell you a fairly accurate time that the rolls were in the oven for, but I can’t, simply because I didn’t look at the clock nor used a timer. I simply popped the rolls in, kept an eye on them and just took them out when the egg whites were set and the yolks still runny. Unfortunately, this is normally how I cook, unless I was planning to write the recipe down or something. Heh. I almost didn’t remember the temperature at which I set the oven – I just turned the knob until it felt instinctively right for heating a bread roll and cooking an egg at the same time. I think it was round about a “6” on my oven knob, so that makes it round about 160C. And I think the wholemeal roll was in there for approximately 5-9 minutes, I’m guessing. While the larger rye roll was probably in the oven for maybe between 15-19 minutes. Sorry, I wish I could give better indications than that.
The temperature worked very well I thought. It was low enough that the bread didn’t burn (which was one of my concerns), and gave enough time for the eggs to cook nicely, without the yolks turning hard before the whites had time to set.

It felt so good to see the runny yolk starting to ooze out as I cut into the potato and rye roll cocotte. And of course, I had to stop to take a picture! ![]() I just love eggs with runny yolks, don’t you? The whites were opague and largely firm, with some areas that were still slightly soft and “jiggly” – just the way I like them! The bread was very crispy and crunchy with only the top edges of the “opening” being a little dried out.
I just love eggs with runny yolks, don’t you? The whites were opague and largely firm, with some areas that were still slightly soft and “jiggly” – just the way I like them! The bread was very crispy and crunchy with only the top edges of the “opening” being a little dried out.

It does look a little messy with the runny yolk running ![]() (what else would runny yolks do?) everywhere. But it tasted really good.
(what else would runny yolks do?) everywhere. But it tasted really good.
The small wholemeal soft roll came out just as well...

The bread was crispy on the outside but still soft on the inside. I had accidentally punctured the yolk a little bit whilst transferring the egg from bowl to roll, but otherwise, it looked pretty good. My only complaints… firstly, because the roll was rather small, there wasn’t much filling; secondly, the quail’s egg was so tiny that, whilst eating the sandwich, I had wished for it to have been a little more eggy. (And if aesthetics matter, the lighter yellow of the quail’s egg yolk was slightly less visually appealing than that of the regular egg).
So, a larger roll that can accommodate more filling seems to work better. Plus, much as I love the idea of quail’s eggs, chicken eggs seem to work better, unless multiple quail’s eggs are put into the roll. And oh, the mustard works better than just plain butter.
Some Other Notes:
• I think some crème fraiche or sour cream would have been a very delicious addition.
• Crispy bacon strips instead of ham would also have worked wondrously.
• I really wished I had some chopped fresh cilantro/coriander to add into the fillings. That would have added a really nice fragrant layer of flavor to the sandwich.
• Using Chinese style seasonings in the filling would have been very interesting… fish sauce, hoisin sauce or oyster sauce…
• The next time around, I would also probably prefer to go with a sharp cheddar or some other more strongly flavored cheese. The emmental, which was the only thing I had in the fridge, didn’t seem to have strong enough flavors, and didn’t add much to the sandwich flavor-wise, other than the soft texture of melted cheese.
• It would also be interesting to experiment with softer cheeses like brie, camembert or boursin too.
• I would also probably adjust the fillings-to-cheese ratio the next time around. This time it was maybe approximately 3:1, simply because I was a little over enthusiastic in adding the filling, and there wasn’t much room left for the cheese, and I was too lazy to remove some of the filling! I’m thinking a ratio of maybe 2:1 might work nicely.
• A tapenade spread sounds interestingly flavorful too.
• As I was eating the sandwich, my mind was racing with ideas of what I would like to try. An assorted mushrooms (enoki mushrooms, golden mushrooms, oyster mushrooms, button mushrooms, cepes…) version with onion marmalade sounds absolutely divine!
• Smoked salmon, chives or dill and cream cheese…
• Even canned sardines in tomato sauce, with onions and strips of fresh red chilli!
• Or maybe a meat version – made from leftover beef stew, braised beef shanks etc. Ooh, yum!
• And I love the idea of a sweet, dessert variation – imagine… thin slices of camembert cheese arranged with alternate layers of thin slices of gorgonzola and thin slices of pears or even nectarines (as inspired by some of the tartine entries), with generous sprinklings of chopped walnuts, pecans or almonds. I think this would make a great picnic item – place the “top” back on the bread roll, wrap the whole thing in tin foil and pop it in the oven, and it should still be slightly warm when it is unwrapped at the picnic.
I have to say, I quite like my edible ramekins. I can even change the flavor of the ramekins as I choose. ![]()
Copyright © 2004 Renee Kho. All Rights Reserved.
Please contact me for permission to copy, publish, distribute or display any of the images or text contained in this article.
06:08 PM in Home Cook: Sandwiched! | Permalink | Comments (8) | TrackBack
Sunday, March 07, 2025
Is My Blog Burning? – The South East Asian Tartine

Blog burning day is here again. This is the day when food bloggers from around the world cook up a storm based on a set theme. The excellent idea was cooked up and served by Alberto last month, and is this month inspired and hosted by Clotilde. The theme? Tartine. Which, as Clotilde elegantly puts it, is “a popular Parisian dish, in which different ingredients are arranged and served on a slice of bread – a sort of open-faced sandwich if you will”. How exciting! This leaves so much space for interpretation and innovation.
As I pondered on the theme, I decided I wanted to bring my Parisian friend, Tartine, to Asia and offer her a distinctly South East Asian experience. But, what constitutes “South East Asian”? I mean, we are such a hodge-podge melting pot of so many different cultures. Chinese food is no more South East Asian than Indian food or Malay food or Peranakan food. Hmmm… So, I finally decided to call upon my friends Roti, Satay and Floss from the Indian, Indonesian/Malay and Chinese epicurean community respectively and to enlist their help in coming up with something that would offer Tartine a tasty glimpse of South East Asia, all encapsulated in just one bite.
I asked but only two requirements of my willing helpers. First, it must not be a jarring culture shock that would send Tartine fleeing back to Paris, never wanting to set foot in Asia again. It had to be a harmonious snapshot of the three cultures. Elegance would be nice but was optional. Harmony and tastefulness were a must.
Second, the entire production must be ready to be served by dinner time. It was already 3 o’ clock on Saturday afternoon, which meant they had just over 4 hours to get the show on the road.
And so they were off…
The Indian Foundation
Roti returned soon after, all flushed and excited, bearing her find. She had found the perfect South East Asian representative of bread, she declared. I looked expectantly into her shopping bag, and pulled out two packs of frozen roti prata – plain and onion. I looked at Roti quizzically. She gushed: “it’s perfect! See, I was inspired by my own name – Roti. It also means “bread”. And roti prata is the perfect introduction to South East Asian breads, and it’s great for putting toppings on, and it tastes great, all crispy, light, fluffy and flakey, and….”
I stopped her before her face became any redder from all that excitement. Oh alright, we would use roti prata for the bread base. But really, I was expecting to make something from scratch, and not use something yanked out of the freezer box of a supermarket. Roti rolled her eyes. “Well”, she asked pointedly, “do you know how to do all that flipping and twirling? Because I don’t.” So, I conceded defeat. Besides, I have tasted this Spring Home brand of frozen roti prata before (yes, I finally admitted it), and it had tasted pretty good. And hey, I was all for ease and speed. So that settled it.
Whilst waiting for the others to return, Roti and I decided to start frying up the pratas. (Directorial aside: remember, this is a production where concepts of time and space are sometimes skewed. In real life, pratas are not amenable to early preparation).
Oh, by the way, maybe we should add at this juncture that roti prata goes by its other name, roti canai over in Malaysia… just in case you bump into it over on the other side of the Causeway, and fail to acknowledge it and it gets all offended and sulky.
Roti prata’s name label had declared that no oil was necessary in bringing it to its peak taste performance. We could heat it up either in a frying pan or in the oven. We opted for the former. But, just so as to ensure a truly tip-top display of taste, we decided a light coating of Pam cooking spray would help roti prata to its peak condition.
It was quite fascinating to watch… as roti prata started to metamorphosize from a flat, ghostly white nondescript being into a bubbly, puffy, tanned, golden brown beauty. Now, the key to keeping roti prata happy is to have the pan all nice and hot before putting it in. Next, don’t bother it once it goes into the pan! Let it sit happily, soaking up the heat. Wait until it starts to turn slightly translucent and starts puffing up with exuberance from all that warmth. Only then should you even dare to take a quick peek on its underside. If the bottom is showing signs of having had enough of the heat, and is all nice and golden brown, quickly flip it pale face down. When face is golden brown too, it’s done. Now, the golden rule (pun intended) here is to ensure roti prata doesn’t get too tanned. Over-do the heating, and you end up with one dark, moody and cranky roti prata which will be pretty much useless for any purpose. So, watch the heat and make sure roti prata doesn’t sit in it for too long. It’s sensitive like that.

Now, isn’t that some beauty?
As we began working on plain prata’s cousin, onion prata, Satay returned with the haul of her own treasure hunt.
The Indonesian/Malay Filler
Roti and I descended on Satay, all eager to see what she had found. Triumphantly, she pulled out a tub of peanut paste, a packet of err… more peanut paste, and erm… some ground peanuts… With our eyes opened wide, both Roti and I chimed in unison, “have you gone nuts??”

“Wait… there’s more”, promised Satay. She pulled out fresh de-boned chicken thighs, some beef tenderloin and some tempeh.
By now I was smiling. Oooh, tempeh! I like! I haven’t had it in a long time. How sweet of Satay to have remembered. Tempeh (cultured soy bean cake) is supposed to be good for you – what with all that protein, minerals and soy isoflavones…
Satay’s voice broke through my thoughts. “… and so I decided I would take inspiration from my name, Satay…” Inwardly, I rolled my eyes (humor me… just pretend this is possible). “We are going to do a combination of influences from the Indonesian salad gado-gado and the Malay satay, but without the sticks”, she continued enthusiastically. Roti and I listened intently. “Here’s the plan… we have the spicy peanut sauce from the gado-gado and satay, we have tempeh from the gado-gado and chicken like in satay. Oh, and since you mentioned that one of the guests doesn’t eat chicken, I got some beef too…”
“But you didn’t even buy taugay (beansprouts)”, I interjected abruptly.
“Oops! Never mind. We will use cucumber… there is cucumber in gado-gado too. And we’ll grate it so that it looks like taugay. How’s that?” She’s good. I’ll give her that. That was fairly quick thinking on Satay’s part. So, I decided to let her off.
“How are we going to bbq the meats?” asked Roti.
“No need for that. We’ll just sauté them in the wok”, replied Satay.
“But that’s not satay”, Roti persisted.
“I said influence of satay. I didn’t say satay”, irritation creeped into Satay’s voice.
“Okay, girls, I think we need to get cracking if everything is going to be ready in time for dinner”, I intercepted.
Phew! And so our attentions were diverted to getting all the stuff ready…
Peanut Sauce
As I examined the peanut pastes that Satay had bought, I thought out loud: “we are supposed to try and make things from scratch you know?”
“Dearie, we are not going to have time to pound all the spices and fry up the rempah (spice mix). It will take us a good 1-2 hours to get really fragrant rempah.” I sighed. Again, I conceded defeat. But it was okay. Afterall, I have been taking the peanut sauce shortcut all these years, so why should this time around be any different. And I was glad Satay had thought to buy the “home-made” version from my regular satay beehoon hawker, who sells her home-made peanut paste in little plastic tubs. Hers was always nicely fragrant with belacan, in addition to the usual spices.
The supermarket-bought pack of “instant peanut gravy” didn’t have belacan – it was a simpler “formulation”, with just the usual spices. It smelt less fragrant. We decided to use both anyway. The former for the chicken and the latter for the beef.
I set two saucepans on the stove, and emptied the peanut pastes into each one. Next, about ¾ to 1 cup of hot water was added to each pot. I normally would add just enough liquid to get the sauce to the consistency I want – sometimes I want it thicker and chunkier for use as a dip, and sometimes I prefer it more liquid when using it as a gravy to pour over bee hoon (rice vermicelli) to make satay bee hoon. (Okay, here’s a little confession. We took a little artistic license here. For aesthetic purposes – you see, we knew Tartine would be wanting to take pictures of the food – we added only ½ cup of water, so that things wouldn’t look too liquid in the photos. But ideally, it would be about ¾ cup to 1 cup. And this is just between you and me.) Now, of course, if you wanted to up the richness level by several notches, you could add more coconut milk instead of water. But that can make the coconut taste too overwhelming. Besides, the peanuts are already rather rich, so my personal opinion is that water works better. Your guests are less likely to feel jelak (our South East Asian lingo for “over-full, over-rich, sick”) too quickly.
As the sauces started to warm up, I rummaged in the pantry for some gula melaka (palm sugar) and dropped a small piece into each pot. I also added, as I normally do, a little more ground peanuts for added fragrance and to, well, make the peanut sauce more erm… peanutey. About five lightly heaped tablespoons was good enough.
And that was it. I allowed the sauces to simmer on low heat for about 15 minutes, and went to check what Roti and Satay were up to.
Satay Chicken
Satay had cut each of three pieces of skinned and de-boned chicken thigh meat into sixteen small bite-sized pieces, and seasoned the meat with about 1 tablespoon of light soy sauce, ¼ to ½ teaspoon of sugar and a little bit of cornflour. (We made enough to serve about 5 persons).
I watched as she heated a little oil in a frying pan and quickly sautéed some minced garlic and shallots. In went the marinated chicken. It was stir-fried until just about half-cooked. Then, right on cue, my peanut sauces were done simmering. One pot of the gravy was added to the chicken, and stirred well. We left the chicken to simmer in the sauce for a few minutes (3-4 minutes) to allow the meat to finish cooking and to absorb the flavors from the gravy.
Yay, the chicken was done.
Satay Beef
We repeated the process with the beef. We sliced it into fairly thin bite-sized pieces, and seasoned it with light soy sauce, sugar and cornflour. We sweated some shallots in hot oil, and added the beef. Again, as the beef reached half-doneness, we added the peanut gravy and left it to simmer for a few minutes.
Now, that was pretty easy… Satay and I grinned in satisfaction.
Tempeh
We looked over to see how Roti was doing. She had already finished preparing the tempeh, which she had cut into thin slices and fried in a little hot oil until they were beautifully golden brown. Very little oil was needed for this – only about 2-3 tablespoons for the entire batch.
The Supporting Cast
Roti had already begun to busily prepare our supporting cast members… the cucumber and onions.
She used one Japanese cucumber. After removing the skin, she grated it into long elegant strips. We were all unanimous on this – Japanese cucumber was definitely sweeter, juicier and crunchier than the normal varieties. Good choice.
Two large onions were also cut into long strips, sautéed in a little hot oil and seasoned with light soy sauce and pepper. We took another creative license here too. Ideally, we wanted to caramelize the onions to a rich brown color, but we were ever aware that this would make the onions less than photogenic. And so we settled for a paler color and hoped Tartine wouldn’t notice the difference in taste too much.
Wow, we were done. The three of us stood in the kitchen proudly surveying our handiwork. Not bad for creativity on short notice we thought. But hey, where was Floss? What was taking her so long?
The Chinese Topper
Right on cue, Floss drifted (like Floss always does) through the door and dramatically placed a red and yellow plastic bag on the kitchen table. We waited, knowing full well a story was about to unfold, whether we wanted to listen to it or not.
“Yeah, yeah, I know I’m late”, Floss begins. “But I was wracking my brains trying to think of what to buy. And then… guess what?!”
“What?” we sighed.
“As I was walking down Orchard Road thinking and thinking, it suddenly hit me, I would bet my bottom dollar that both Roti and Satay would buy something related to their name…”
Suddenly, Floss’ eyes caught sight of the food spread on the table. “Aha! See I was right!” she yelped triumphantly. “Luckily, I too decided to buy something related to my name. Because just at that moment, I was passing by a Bee Cheng Hiang shop. Now, how is that for serendipity, huh? I was so sure it was a divine sign, telling me something. So, I went in and bought… (drum roll…) pork floss!”
“I knew Satay would probably buy chicken, but I don’t like the texture of chicken floss as much as I like pork floss, so I bought pork floss, and so there”, she continued. “Plus, it is krispee pork floss!”
“Pork floss is good, I like pork floss. Krispee pork floss is even better. And it will make an interesting topping for the satay chicken”, I smiled.
The Whole Ensemble
“Okay, girls, we are ready. Let’s get the show on the road”.
Roti and I worked on the satay chicken plating, while Satay and Floss did the beef sandwich.
I topped a nice crispy, flakey plain roti prata with some shredded cucumbers, while Roti arranged pieces of the beautifully golden brown tempeh on top of that…

Next, a generous serving of spicy, fragrant chicken with peanut gravy…

Finally, it was all topped with krispee pork floss…
Just then, Satay looked over and remarked: “it looks like a mountain… why is the floss pointed like that... like some kind of cone?”
“Oi! Don’t you come stabbing your finger into our satay chicken sandwich! You go back there and concentrate on your own beef sandwich.” Roti was on the defensive, brandishing a fork and waving it menacingly in the air. “Besides, it’s called style… you know? Have you seen those fancy restaurants? The higher you pile the food, the classier it’s supposed to be… you know?”
The rest of us could barely suppress our giggles.
“And let’s see you do any better”, challenged Roti.
Satay and Floss had placed some shredded cucumber on the onion roti prata, followed by the sautéed onions… (nice continuity there we thought, and praised the girls accordingly).

And they finished the sandwich off with a generous dollop of beef in satay peanut sauce and a sprinkling of toasted sesame seeds…

We stepped back to admire our creations. Not bad. Now, the test is in the tasting.
Just then, the doorbell rang. It was Tartine. Right on time.
[Fast forward one and a half hours later…]
Throughout the whole dinner production, Tartine had eaten with great concentration, eyes wide as she savored the different tastes and textures of South East Asia laid out before her. As the table cleared of all visible signs of food, she took the final sip of her warm teh helia (ginger tea) and sat back in her chair. Slowly a big smile started to form on her face. “When may I come again?” she asked. “Oh, anytime, we would love to have you back, anytime…” we chimed. Tartine smiled even wider. “It was good. I will be back…”
It was with a little sadness that we saw Tartine to the door. She kissed us on both cheeks, waved a cheery goodbye and walked off into the night.
Roti, Satay, Floss and I smiled at each other. It was a very pleasant evening. The company was scintillating, and our tummies were round and full. We sank onto the sofa, and I reached for the remote. The dishes can wait for tomorrow…
But before the curtain falls on this special multi-cultural South East Asian production, we would just like to highlight to you some of the other roles some of our main cast members play from time to time:
• fabulous Roti Prata often takes on a favorite breakfast role – sans embellishment, au naturel, fresh, hot and crispy, it is sprinkled with or dipped into sugar. Ah! Sweet simplicity!
• and of course, for all times of the day – breakfast, snack, lunch, tea, dinner or supper – Roti Prata is a favored companion of all sorts of curries: mutton, chicken, vegetable, dhal or whatever strikes your fancy. Curry without Prata and Prata without Curry, it just isn’t right…
• sometimes, Roti Prata goes the full hog and indulges in over-indulgence – it is stuffed with minced mutton or other meats, fried onions and egg before being fried to crispy perfection. For such illicit, artery clogging activities, it takes on the name of its alter ego, Murtabak.
• as for Satay Peanut Gravy, well, when it is not providing a warm bath for skewers of Satay Meat or skewers of Satay Celup or providing a spicy blanket cover for Gado Gado Salad, sometimes it likes nothing more than to chill out and spice up a plate of plain beehoon (rice vermicelli). And oh how it is loved whenever it reprises its role as Satay Bee Hoon.
• it is of course equally loved when it tops crispy deep fried tofu and takes on the character of Tauhu Goreng.
• and Floss… well, Floss is so versatile, it would probably take a book in itself to document its numerous and varied roles in the South East Asian culinary scene. So, that will have to be for another time and another place…
With that, we thank you for your patience and attention. The production was lengthier than we had planned. We hope you had as much fun as we did bringing this production to you. Until next time... au revoir!
Copyright © 2004 Renee Kho. All Rights Reserved.
Please contact me for permission to copy, publish, distribute or display any of the images or text contained in this article.
05:27 PM in Home Cook: Poultry & Meats, Home Cook: Sandwiched! | Permalink | Comments (17) | TrackBack
Tuesday, January 06, 2026
A Toasty Sunday Brunch

It was one of those lazy Sundays. Woke up late, perused the Sunday papers… then contemplated what we should/wanted to have for brunch. I remembered Wena’s post on having French toast in KL. I love French toast, especially the type that Wena had. They looked like the Taiwanese-style version – more deep fried rather than pan-fried. These have the crispiest outside with soft fluffy insides, but they also come swimming in a deep pool of oil! So sinful, but oh so delicious! So, guess what? Yep, that’s right. We had French toast for brunch.
As usual, I wanted to try something different. I decided to stuff the French toast instead of doing the normal dipping in egg and pan-frying. Sunday brunch should be exciting! I tried several versions of the stuffing. I also tried to get a crispy outside without the deep frying and the oil.
This is what I tried…
Fillings:
• Peanut butter and banana [I remember reading somewhere, a long time ago, that the King himself, Elvis, loved peanut butter and banana deep fried sandwiches. Just a little bit of trivia. ![]() )
)
• Peanut butter, Nutella and banana
• Nutella and banana
Dip/Batter:
• Lightly beaten egg only
• Egg then corn flour
• Cornflour then egg
I used thick sliced white bread – ½” or more thick (Gardenia’s Classic Loaf), and instead of using a knife to try to split the bread, I used the kitchen scissors to cut a pocket into the bread . So much easier and quicker with the scissors. I could cut evenly into the bread without one side being thinner than the other. This helped ensure the fillings didn’t break through or leak out through the bread.
The fillings were all very good actually. They may sound weird to some of you. But to me, peanut butter and bananas are a natural partnership. Needless to say, chocolate (in this case, Nutella) and banana works beautifully. All three together though I felt was a bit too confused. Too many flavors going on in a small piece of sandwich.
It wasn’t possible (nor advisable) to stuff too much into each piece of bread. I didn’t want the fillings oozing out and creating a mess in the frying pan.
I didn’t manage to get a crispy outside. The egg version (eggs plus 1 tablespoon of milk and ¼ to ½ teaspoon of sugar to each egg used, lightly beaten together with a fork) was like your standard French toast. Dipping the bread into cornflour after dipping it into the egg didn’t produce a very noticeable difference, although there was a very light “crust”. Dipping the bread into the flour first, before the egg just didn’t work. The toast tasted of raw flour. Yuk!
I didn’t even use oil for the frying – just cooking spray, and that worked fine. (Of course, using oil would have probably given me the crispiness I was looking for. And the more oil, the crispier. But I wanted to see if I could get the crispiness without the oil. Stubborn, I know) ![]()
Well, it produced a pretty tasty sandwich…

These could have been served with a dusting of powdered sugar on top, or with the usual honey or maple syrup. But I liked them as they were. ![]()
My mind was racing… the possible variations seemed endless. I was thinking: maybe if I used a crepe-like batter, using both plain flour and rice flour (maybe in a ratio of 4:1 or 5:1). That might produce a crispy outside with very little oil. (Rice flour when mixed into a plain flour batter can usually produce a crispier effect).
As for the fillings, there were countless possibilities, both sweet and savory.
Savory:
• Cream cheese, chives and smoked salmon
• Ham and cheese
• Cheese, cheese and more cheese
• Sardines
• Tuna
Sweet:
• Cream cheese with raisins or nuts
• Sweetened condensed milk with Milo (yes, Milo straight from the tin! I used to eat this alot as a kid. Sweetened condensed milk spread onto a piece of bread, and Milo sprinkled over it. I know it sounds incredibly, cloyingly sweet. It sounds that way to me too nowadays. But I adored it as a kid! I haven’t had it in decades! Maybe it is time to revisit some of these quirky childhood eating habits!)
I didn’t get round to trying any of the other ideas this time. I was trying to make the toast, cook them, plate them and take photos – all at the same time. And everyone was getting hungry and impatient. They threatened to throw my camera away. ![]() So, we ate instead…
So, we ate instead… ![]()
Note:
The dipping (be it egg or batter) can be adjusted for making either sweet or savory sandwiches by adding either sugar or salt.
We also had these for brunch…

An early bird, who had already been up for hours, gone out and had dim sum breakfast, came home with an assortment of dim sum items from Crystal Jade in Ngee Ann City. I only took a picture of three… (from left) char siew sou (baked roast pork pastry), dan ta (egg tart) and chicken pie. I love char siew sou. And this was a nice version. Flaky pastry, lean pork filling. Mmmm… I enjoyed the egg tart too. I always prefer the Hongkong pastry version, with the flaky, puff pastry crust (like this one), over the short crust pastry version. Crystal Jade’s is always well made. I didn’t get to eat the chicken pie, so I have no idea how it tasted. But the wu kok (deep fried yam paste and minced pork dumpling) (not in picture) was a taste disaster. Enuff said!
It was a nice satisfying Sunday brunch, eaten whilst still in my jammies! Wah! The ultimate luxury!
Copyright © 2004 Renee Kho. All rights reserved.
Please contact me for permission to copy, distribute or display any of the images and text contained in this article.
03:21 AM in Home Cook: Sandwiched! | Permalink | Comments (6) | TrackBack
Saturday, November 22, 2025
Stewed Dog

There was still some leftover stew from Thursday night sitting in the fridge. Today, the beef tasted absolutely fantastic. Having been heated through again, the flavors were so much richer and more intense, with a divine melt-in-the mouth texture. So, for breakfast, decided to put some of the stew into a hotdog bun, and topped it off with some cheese. Popped it into the toaster oven for 2 minutes to heat the bread through and melt down the cheese. Wasn’t sure what it would taste like – cheese with soy sauce flavored beef? - but it tasted really good! It was a good breakfast!
Copyright © 2003 Renee Kho. All rights reserved.
Please contact me for permission to copy, distribute or display any of the images and text contained in this article.
11:47 PM in Home Cook: Sandwiched! | Permalink | Comments (2) | TrackBack


