Wednesday, September 15, 2025
Matrimony is Good for Your Eyes
That title probably caught your attention! ![]()
But no, I’m not talking about marriage, but rather the “vegetable” Matrimony Vine. This is actually the branch and leaves of the same plant from which the Chinese wolfberry (gou qi) comes. In Chinese, the vine is (naturally) referred to as “gou qi cai” (in Mandarin) or “kou kay choi” (in Cantonese). [In other parts of South East Asia, it takes on the names “daun koki” (Indonesia) and “phon kao ki” (Thailand).]
Just as the dried fruit (gou qi) is very often used in Chinese cooking – most commonly in soups, both sweet and savory – so too are the leaves of the Lycium Chinensis plant cooked and eaten.
While the Chinese wolfberry is commonly accepted to have wonderful beneficial qualities for eyes, given its high beta carotene content, its leaves are less often associated with the same health benefits. However, a lot of Chinese families hold the belief, as passed down from generation to generation, that this vegetable also has amazing restorative powers for the eyes.
My uncle (mum’s older brother) for one is a firm believer. He used to often tell the story of how as a young lad, he suddenly suffered a loss of vision – not totally, but enough that he had the barest and the fuzziest of sight only. In those days (1950s), in this part of the world, top-notch specialist eye care was rare. Doctors simply told him he was going to lose his sight, and there was nothing they could do for him. In a panic, my grandmother cooked and fed him this gou qi cai, boiled into soup with the wolfberries, every day. And after a period of time, his sight was fully restored. He is now a professor of biology and he still stands by the curative powers of this vegetable!
Less dramatically, I remember as kids, all my cousins and I found, especially around the time of our exams (when we were - supposedly – mugging away at our books), that this vegetable appeared with alarming alacrity at our dinner tables. I guess our mothers fed us on the basis of the motto “bright eyes, clear eyesight… all the better to study with”! ![]()
To this day, we still cook this vegetable very regularly – either in soup or sautéed. I tend to eat it now more for the taste – which I really enjoy; the health benefits are just bonuses on the side. I like the ‘unique’ texture of this vegetable; it is not crunchy or crisp like most other vegetables. Instead, once cooked, it has a very soft, smooth tenderness to it, with a tiny touch of bite.
Soup is probably the most common way of cooking the gou qi cai. It’s a mighty simple thing to cook. The only “troublesome” bit is the prepping of the matrimony vine leaves – not difficult, just highly time-consuming.
The stems and branches are not eaten; only the leaves are used. So, each leaf has to be painstakingly snipped from the vine. For us, we like to remove the stem completely (as seen in the picture above), so that there is no trace of any “tough”, chewy bits in the vegetable. This makes for incredibly tender leaves that almost melt in the mouth after cooking.
This is a painless (and almost enjoyable) activity to do when you’re just sitting around the kitchen table in the afternoon having a chat and a cup of tea; half an hour passes a lot quicker when you have company and interesting conversation!
Once trimmed, the leaves are thoroughly washed and drained, ready to be cooked. The branches are not discarded just yet though… they still have one final use before they go into the trash can.
Gou Qi Cai Soup
• Bring a pot of water (with enough liquid to make up the amount of soup you want) to a rolling boil. Pop in the bald branches (folded, so that they fit into the pot), and leave to simmer for about 20 minutes or so. [This is just to flavor the soup and extract the nutrition and vitamins from the branches before they are discarded.]
• Remove and discard the gou qi cai sticks.
• Put one chicken breast (skin removed) into the soup and simmer for about 20 minutes. [Feel free to use chicken bones or pork bones if those are preferred.]
• Add the gou qi cai leaves and about 1-2 generously heaped tablespoons of Chinese wolfberries (gou qi). On low heat, simmer, uncovered, for about 10 minutes or until the leaves are nicely tender.
• In the meantime, lightly beat several eggs (we usually use around three; more if serving a larger group of people), and season with a dash of light soy sauce, a pinch of sugar and a sprinkling of ground white pepper.
• Bring the soup back to a rolling boil, and pour in the lightly beaten eggs. Stir gently to break up the eggs. Remove the pot from the flame and allow the eggs to finish cooking in the residual heat ; do not overcook the eggs. [For this particular soup, I tend to prefer the eggs chunky. You may choose to swirl the eggs to form thin, elongated strands instead.]
* If a more full-bodied flavor is desired, the soup can also be seasoned with salt to taste or half a square of MSG-free, low sodium bouillon cube.
Another way that we very often cook this gou qi cai is to stir-fry it with eggs – almost like an omelette or even an egg pancake. I’m not sure if other families cook it this way; I haven’t seen it outside of my extended family. But this is rather tasty, I find – and great for those who don’t like soups, or don’t like their soups chunky and filled with lots of vegetables.
This omelette is hardly classy, elegant food – not by a long shot. However, what it doesn’t have going for it in the looks department, it does compensate for in the satiation department. This is essentially another one of those homey, down-to-earth, comforting soul foods that never fail to tug at the heartstrings.
Gou Qi Cai Omelette
• Cut some carrots into very fine juliennes.
• Add a little bit of oil to a hot wok, and sauté some minced garlic until fragrant but not colored. Drop in the carrots and fry until almost tender.
• Put in the washed and well-drained gou qi cai leaves and toss briefly. Cover the wok and allow to steam-cook for about 5 minutes or until leaves are tender. Do not add any water. [The leaves will leech some liquids, but that’s okay. These will be “absorbed” once the eggs go in.]
• Uncover, season with some salt to taste. Mix well.
• Lightly beat three eggs (or however many you would like to put in), and season them with a dash of light soy sauce, a pinch of sugar and a sprinkling of ground pepper.
• Slowly dribble the eggs into the wok. Let the eggs to set a little; resist the urge to ‘stir-fry’ the eggs at this point – this will produce mushy clumps of eggs.
• Once the eggs have set a little, flip the vegetable/egg mixture over (like flipping a pancake) and cook the other side.
• When the eggs are fully set, remove from the heat.
The eggs and vegetables take on a pancake-like form. The eggs will have a slightly subdued coloring due to the juices from the gou qi cai; the taste is not affected. [I’ve never tried this, as it’s way too fiddly for me, but if the duller coloring bothers you too much, simply drain the juices that are released by the gou qi cai before adding the eggs. This will ensure the colors of the eggs stay bright and cheery.]
What is it that they say about eyes being windows to the soul? So, maybe the matrimony vine can also have some knock-on effects in the marriage sphere after all. ![]()
Here’s to bright, sparkling and captivating eyes!
Copyright © 2004 Renee Kho. All Rights Reserved.
Please contact me for permission to copy, publish, distribute or display any of the images or text contained in this article.
02:21 PM in Home Cook: Soups, Home Cook: Vegetables | Permalink | Comments (20) | TrackBack
Tuesday, August 24, 2025
A Moment
In a world of sometimes over-commercialization and endless business meetings, it’s nice to sit back and take a moment to simply marvel at the inherent beauty of…
… a home-cooked meal.
If you’ve been following this blog closely, you will probably have realized that the angled luffa gourd, or ketola as we call it in this part of the world, is among my favorite vegetables to cook and eat. After all, I’ve already written about it a couple of times.
And guess what? Yep. I’m about to write about it again.
I was actually going to post about another recipe today, but… I’m feeling really tired; so that will have to wait until tomorrow. In the meantime, here are pictures of the ketola we had for dinner a while back. This time, cooked with prawns. And let me say : ketola with prawns is even tastier than ketola with eggs or chicken (both of which I like a lot).
The method of cooking this is pretty much the same as for cooking ketola with chicken – with a simple substitution of prawns for the chicken.
Okay, moment over.
Visa…
Oops, sorry…
I meant… Shiokadelicious!... the only word for this dish…
![]()
![]()
Okay, silly mood over.
Copyright © 2004 Renee Kho. All Rights Reserved.
Please contact me for permission to copy, publish, distribute or display any of the images or text contained in this article.
10:31 PM in Home Cook: Vegetables | Permalink | Comments (5) | TrackBack
Monday, June 21, 2025
Luffa’d Chick

Sorry, I meant chicken, of course. ![]()
A couple of months back, I posted about the different ways I like to cook the angled luffa gourd (also variously known as angled silk gourd, ridged gourd, Chinese okra or ketola). One of the variations that I wrote about was cooking it with chicken, but at the time I did not have a picture to show. Now I do.
In this particular instance, instead of using diced large onions, I opted for shallots; kept them whole and cooked them until they were beautifully translucent, soft and juicily sweet. I also added a couple of red chillies (seeded and cut into long pieces) for a dash of color. Otherwise, the preparation was as described in the previous post (you’ll need to scroll to the end).

And oh, usually, if cooking the angled luffa with either chicken or just onions alone, I prefer to cut the gourd into larger, chunkier pieces, rather than the thin, long strips used when sautéing it with eggs or with mushrooms and carrots. I find that the crispier texture of the larger pieces work better in the former two dishes, while the more tender bite of julienned gourd seems to blend better in the latter two versions; but that’s just my opinion. Feel free to work it as you best prefer.
This is still one of my favorite gourds; sweet, succulent and incredibly versatile.
[Update 22/06/04: I thought it might be useful to add a few tips on how to choose these angled luffa gourds; or at least how I've been taught to select these gourds.
• The skin should be a lively olivey green; avoid gourds that look dull and tired.
• The gourd should feel softly yielding and springy under light thumb pressure. Solid feeling gourds are usually older, and thus less tender.
• Try to pick gourds which have “sharper”, more pronounced ridges, or deeper and narrower “valleys”. These tend to be the young and tender gourds.]
Copyright © 2004 Renee Kho. All Rights Reserved.
Please contact me for permission to copy, publish, distribute or display any of the images or text contained in this article.
02:12 PM in Home Cook: Vegetables | Permalink | Comments (4) | TrackBack
Wednesday, June 09, 2025
Wind-Dried, Slowly Braised

Following from yesterday’s post on braised pork and radish, here’s another slow-cooked dish that is also quintessential Chinese comfort food – braised wind-dried or preserved vegetables served with pork.
Two types of vegetables can be used in this braised dish. Either wind-dried vegetables (cai gan in Mandarin or choy kon in Cantonese, literally translated as “vegetables dried”) or preserved vegetables.
Many varieties of vegetables can be found in wind-dried versions, like xiao bai cai (this is the one we use most frequently at home) and various vegetables that are indigenous to certain provinces of China. Similarly, there are many different varieties of preserved vegetables. A very commonly used one is mei cai (in Mandarin) or mui choy (in Cantonese).
Every dialect group has their own version of braised dried/preserved vegetables, and each family also has their own variation. The basis of the dish remains the same – dried/preserved vegetables that are patiently and lovingly cooked for a long period of time. However, the type of dried/preserved vegetables used and the seasonings and flavorings added may vary a little, from family to family.
So here is my family’s version, using wind-dried xiao bai cai…
Braised cai gan (dried vegetable) is usually served with pork. Most often this would be braised pork belly. But it can also be served with braised pork. For my family, because we tend to prefer leaner cuts of meat, this would be how we would normally serve braised cai gan. We would sometimes also serve the vegetables topped with just a simple stir-fried dark soy sauce pork instead, as shown in the picture above.
Like in the restaurants, we like to cook the meat (even if it is braised meat) and dried vegetables separately. Given the very lengthy cooking time for the dried vegetables, cooking the meat together with it would result in very tasty and sweet vegetables, but rather bland and unappetizing meat, as all the flavors would have leached out from the meat.
Braised Wind-Dried Vegetable
• Wash the wind-dried vegetables well to remove sand particles. Soak in water until softened.
• Drain the vegetables, and dice finely.
• Finely slice some pre-prepped Chinese dried mushrooms (optional).
• Sauté some minced garlic in a little hot oil. Add the dried vegetables and Chinese mushrooms, and fry briefly. Add some light soy sauce, tiny dash of dark soy sauce, a little bit sugar and about 1½ to 2 cups chicken (or pork) broth/stock. [There should be enough liquid to ensure that the vegetables do not dry up during the cooking process, and that there is a small amount of gravy left at the end. The seasonings can also be adjusted to personal tastes.]
• Transfer mixture to a slow-cooker (crock pot), and leave to simmer for about 6-7 hours or until the vegetables are at the desired tenderness. [My family tends to like our braised dried vegetables very, very tender - near melt-in-the-mouth texture - with just the lightest hint of bite. Others may prefer vegetables with a crunchier mouth-feel, and the cooking time should be adjusted accordingly.]
Notes
• The same recipe can be used for braising preserved vegetables like mei cai.
• However, while wind-dried vegetables are free from any added flavors and thus take their flavors solely from the seasonings added during the cooking process, preserved vegetables on the other hand already have inherent tastes, and the seasonings need to be adjusted accordingly. Some preserved vegetables are salty and some are sweet. And the level of sweetness or saltiness can vary from vegetable type to vegetable type, as well as from batch to batch.
• Braised dried/preserved vegetables are a wonderful accompaniment to plain rice congee or porridge, but are equally good with steamed rice.
• This dish can quite happily be served on its own, or topped with pork – most often with braised pork belly, or braised pork, or sometimes, in the case of our family, with stir-fried pork tenderloin…
Stir-Fried Dark Soy Sauce Pork Tenderloin
• Slice the pork tenderloin as thinly as possible.
• Season with some light soy sauce, tiny bit of sugar, dash of sesame oil and sprinkle of corn flour.
• In a hot wok, sauté some minced garlic. Add the pork, and very quickly toss to brown the meat. As the pork is sliced so thinly it cooks very quickly indeed. As soon as the meat has changed color, add approximately 1 tablespoon dark soy sauce, 1 tablespoon oyster sauce, 1 tablespoon light soy sauce, 1 tablespoon Chinese rice wine and about 1 scant teaspoon sugar. [Seasonings can be adjusted to suit personal preferences.]
• Finally, combine a little cornstarch/cornflour with a little water (just enough to give a little bit of gravy), and pour over the pork. This will help thicken the gravy and give the meat a nice sheen at the same time.
• As soon as the gravy comes to a boil, and the pork is cooked through, immediately remove from the heat.
Notes
• As the pork is very lean, it is important to avoid over-cooking the meat to keep it very tender and moist.
• This dish, served on its own, is a sure-fire hit with kids – they simply love the combination of the pork and gravy with rice.
• The same recipe can be used with minced pork or diced chicken.
This is turning out to be quite a “bonus recipe” week, isn’t it? I think that’s one of the beauties of home-cooking… you need just a few basic recipes to create many different dishes. With the 4 recipes from today and yesterday, so many different permutations and variations can be created… braised dried vegetables with rice congee… braised preserved vegetables with braised pork belly… braised pork meat made into lor mee (noodles with braised gravy)… braised pork belly with mantou (steamed buns)… braised radish with steamed rice… stir-fried dark soy sauce pork tenderloin in a hamburger bun… stir-fried dark soy sauce minced pork over mee sua noodles… and the list goes on and on. Quite wonderful, isn’t it? And fun too… to play around with the recipes like that.
Happy cooking and experimenting!
Copyright © 2004 Renee Kho. All Rights Reserved.
Please contact me for permission to copy, publish, distribute or display any of the images or text contained in this article.
11:21 PM in Home Cook: Poultry & Meats, Home Cook: Vegetables | Permalink | Comments (5) | TrackBack
Tuesday, June 08, 2025
Slowly Does It

One of my favorite cooking methods, especially for meats, is slow-cooking – be it the slow-oven roasting of things such as ribs, or the braising of meats and/or vegetables. In my book, slow-cooking is one of the best ways, if not the best way, to intensify flavors and bring out the rich complexity of the different ingredients. In slow-cooking, the different aromas and tastes all have time to meld and harmonize. And for meats, slow-cooking produces some of the most tender and tasty meats possible. Of course, not all foods are amenable to slow-cooking. A lot of ingredients fare best when very lightly cooked, or in some cases, not cooked at all and simply eaten raw.
For the Chinese, the favorite (or at least the most common) slow-cooking method would probably be braising. Braised dishes are an integral part of the repertoire of any Chinese home-cook. It is also the cooking process by which, in many ways, the competence of a professional Chinese chef is defined. We Chinese braise just about everything – from pork to goose, from tofu to noodles even! Braised dishes are robust, hearty and yet with a touch of refinement. They are food with a lot of “honesty” and “heart”. And I like that in food.
One of the best-loved braised dishes would probably be braised pork (lor bak). Every dialect group will have their own versions. Indeed, every family will have their own unique recipe for this most humble of dishes. The dish pictured above may not look very appealing in appearance – all dark and brooding in looks it may be, but this is quintessential Chinese comfort food. In fact, it would be true to say that a lot of Chinese comfort food has dark soy sauce as a key ingredient! There is just something about dishes cooked with dark soy sauce that seems to hit the spot for many, many Chinese. Think tau yu bak (dark soy sauce pork). Think plain thick dark soy sauce drizzled over plain chicken rice. What could be better? It speaks to us on a sub-conscious emotional level.
This is one of my family’s favorite braised dishes – braised pork with Chinese radish. Different cuts of pork can be used, from pork belly to pork muscle from the leg of the pig, as is the case here. This was my first time using this cut of meat. It had come well-recommended by the butcher, and it had looked so amazingly fresh that day, so I thought it would be interesting to try and see how well it cooked in a braised dish. It was a pretty lean cut of meat, and I was a little concerned that it would turn out rather dry and tough. As it turned out, it was nicely tender, and juicy too. So now I’ve added this cut of meat to my repertoire of meat cuts that I would use in my cooking.
Braised Pork and Radish

1 medium or large white radish
1 large piece pork ** (approximately 1 kg)
minced garlic
5 cloves whole garlic, skinned
3 tablespoons dark soy sauce
3 tablespoons light soy sauce
4-5 teaspoons sugar ***
3-4 tablespoons sweet Chinese glutinous rice wine
1½ to 2 cups chicken or pork stock
* Quantities are based on estimations, and should be adjusted according to the amount of radish and pork used, as well as personal preferences.
** If using pork belly, please see recipe below.
*** Some people prefer to use a piece of rock sugar instead, and that works equally well.
• Peel radish and cut into fairly large chunks.
• Wash and clean the pork, keeping it in one large, whole piece.
• Heat a little oil in a wok or deep pot, and sauté the whole cloves of garlic until fragrant. Add the whole piece of pork, and allow it to brown on all sides. Remove from wok, and set aside.
• If necessary, heat a little more oil in the wok. Sauté the minced garlic until fragrant. Add the radish and sauté for a couple of minutes.
• Return the pork to the wok. Add all the seasonings as well as the stock.
• Cover wok, and leave to gently simmer on a very slow fire for about 2 to 3 hours, or until the meat and radish are very tender. Cooking times will vary depending on the cut of pork used. For very long-cooking cuts of meat, it may be desirable to add the radish only after the meat has been cooking for about ½ to 1 hour, so that the radish doesn’t get cooked for too long and turn mushy.
• Once the pork and radish are at the desired tenderness, turn off the heat. Leave to rest for about 10 minutes. Then, removing the pork from the wok, cut it into slightly chunky pieces. Return the pork pieces to the radish mixture. Mix well.
• If a slightly thicker gravy is preferred, simply bring the gravy to a rolling boil, add a little cornstarch (cornflour) solution, mix well, allow the gravy to return to a boil and then turn off the heat immediately.
Notes:
• The same dish can be done with just radish, using maybe a vegetable stock, for a vegetarian option. The seasonings should be adjusted accordingly, as radish does not require as much flavoring as meat. I personally use only about 1 tablespoon dark soy sauce, 1 tablespoon light soy sauce, 1 teaspoon sugar, and skip the wine altogether.
• Similarly, a version with just pork can also be done. Such a lor bak (Hokkien for braised pork) dish is very versatile and can be served with other Chinese comfort food, such has braised wind-dried vegetables (men cai gan in Mandarin), braised preserved vegetables (such as men mei cai) – recipes for which will be coming up tomorrow – or even used to make noodle dishes such as lor mee.
Braised Pork Belly
The braising of pork belly requires a slightly different treatment, as this cut of meat can sometimes have a rather overt porky, even gamey taste, which is very unappetizing. Therefore, the prepping of the pork belly before it is cooked is very important. And the following prepping steps can be used in any recipe that requires pork belly.
Prepping the Pork Belly
• Bring a large pot of water to a strong rolling boil. This is very important – that the water be at a strong rolling boil. It is also important to fill the pot with a generous amount of water.
• Place the cleaned and washed piece of pork belly into the boiling water, skin side down. Almost immediately after the meat has gone in, turn off the fire, and then remove the pork from the pot. It is essentially just a very quick boiling-water-dip to blanch and seal the surfaces of the pork belly, and the meat will still be completely raw.
• Using the sharp edge of a knife, scrape the skin’s surface. Rinse well under running water. Repeat this process if necessary. The porkiness usually stems from the skin, so doing this should remove any porky taste from the meat.
Cooking the Pork Belly
• Once the pork belly has been prepped, it can be cooked in the same way as the braised pork above. Just be sure that when adding the pork belly to the hot oil, place it skin side down first.
• For pork belly, I also usually like to use a little more garlic than I would if using other cuts of meat. 8 to 10 whole cloves of garlic would not be overpowering at all.
• There is also an alternative method that can be used for braising pork belly (or even other cuts of pork)… After the meat has been browned in the hot oil, remove the pork and garlic from the wok. Add all the gravy ingredients (dark soy sauce, light soy sauce, glutinous rice wine and sugar). Stir on low heat until the sugar has melted. Return the pork and the garlic to the wok, and stir to mix well. Add the stock, cover and leave to simmer until the pork is cooked and tender.
• Again, as with the braised pork above, if a thicker gravy is desired, add a little cornflour solution to the gravy at the end.
And there you have it, a small little bonus for today: 4-recipes-in-1…
Braised pork belly… braised pork… braised white radish… braised pork with white radish…
Meat that is melt-in-the-mouth tender, radish that is sweet, soft and succulent, and gravy that is absolutely delectable when drizzled over steaming hot rice. Chinese comfort food. Chinese braised comfort food. Ahhhh…
Copyright © 2004 Renee Kho. All Rights Reserved.
Please contact me for permission to copy, publish, distribute or display any of the images or text contained in this article.
04:28 PM in Home Cook: Poultry & Meats, Home Cook: Vegetables | Permalink | Comments (12) | TrackBack
Monday, May 24, 2025
Cool & Crispy, Sweet & Sour, Hot & H’appetizing

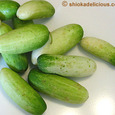
This is not really a recipe. But I had a query about the cucumber relish-salad that had accompanied the nasi briyani in yesterday’s post, so I thought I would post it up for anyone else who may be interested.
This is something we make very, very regularly at home. It is so easy, and yet really appetizing. A wonderful mix of sweet, sour and chilli-heat combined with the cool, green crispness of cucumbers.

We like to use either these small Thai cucumbers, which are a lot crispier and crunchier than regular cucumbers, or the dark green, also very crispy and crunchy, Japanese cucumbers (and as seen in the main picture above).
For the Thai cucumbers, we would simply trim the ends off each cucumber, remove the skin, cut it in half length-ways and scoop out the seeds.
For the Japanese cucumbers, sometimes we use them with the skin on, for a crunchier crunch ![]() , and other times, we skin them for a more delicate crispiness. The cucumbers are halved lengthwise, the seeds scooped out and then cut into 2” long pieces.
, and other times, we skin them for a more delicate crispiness. The cucumbers are halved lengthwise, the seeds scooped out and then cut into 2” long pieces.
Once cut, the cucumber pieces are sprinkled with salt and left to stand for about 20-30 minutes. During this time, the cucumber pieces will start “watering” and releasing liquids.
Drain the cucumber, but do not rinse. Next, sprinkle, fairly generously, with sugar and again leave to stand for about 20-30 minutes.
We sometimes add strips of fresh red chilli to the salad, for color as well as flavor. And if we happen to have good-quality sweet fresh pineapple, that is a wonderful addition too.

Toss the cucumbers, fresh red chillies (and pineapple, if using) with a very simple “dressing” of rice vinegar and Thai chilli sauce, combined roughly in a ratio of 2:1. However, either of the flavors can of course be adjusted to suit personal preferences. More sugar can also be added at this point if still insufficient.
[Personally, for me, fairly standard proportions would be approximately 3-4 tablespoons sugar, 3-4 tablespoons rice vinegar and 2-3 tablespoons Thai chilli sauce, depending on how much heat I want, and who I’m serving the salad to! And I pretty much scale from here according to the amount of cucumbers I’m using.]
The key is to achieve a fresh and refreshing balance of sweetness, tangy tartness and a suitably sharp spicy kick. It should feel like a stimulating, bright, sunny taste of summer in every bite. Each piece of cucumber is both a soothing, cool crispness, and at the same time, a revitalizing, warm, sunshine-y burst of flavor as it hits the palate.
It is best to make the salad ahead of time, so that it can macerate in the refrigerator for a few hours after being tossed. This ensures the cucumbers have absorbed all the flavors and really helps them to crisp up very nicely too. Plus, the relish tastes best, in my opinion, well-chilled.
I actually sometimes like to make the salad with “a lot” of dressing, so that it forms a sort of liquidy “gravy”, which I then mix into my rice for a very appetizing sweet and sour rice concoction. Now, no matter how jaded my taste-buds may be feeling that day, or how much of a “do not feel like eating” feeling I may be having, with just a few mouthfuls of this relish-salad and/or the dressing over my rice, my appetite is whet once again, and I’m tucking in with gusto! ![]()
(By the way, the above picture shows the relish made with whole small Thai cucumbers, simply skinned, halved and with seeds scooped out.)
This is also a great side accompaniment for sandwiches, roast chicken, roast pork… just about anything really.
A great palate “waker-upper”!
Copyright © 2004 Renee Kho. All Rights Reserved.
Please contact me for permission to copy, publish, distribute or display any of the images or text contained in this article.
11:30 PM in Home Cook: Vegetables | Permalink | Comments (6) | TrackBack
Tuesday, May 11, 2025
Serenading Love; Teasing the Palate

The “ye lai xiang” flower. A bloom that has been made famous by the popular 1960s Chinese ballad of the same name. I think many a Chinese Romeo would have serenaded their loves with this song. Indeed, I’m sure my own parents can recall well this song! And even to this day, the song “ye lai xiang” is still making the rounds in karaoke lounges across Asia.
“Ye lai xiang” when literally translated, means “night comes, fragrance”. And it perfectly describes this humble, warm-climate, flora. In a non-bloomed state, the flower is an almost non-descript green, as seen in the picture above. However, come nightfall, it blossoms into small off-white/cream-colored flowers, with a scintillating and heady fragrance that literally has had poets and writers, through the ages, waxing lyrical over it. Women have been entranced by its aroma, and have indeed, since ancient times, used it to help enhance their own attractiveness and their appeal to the opposite sex. So much so that the flower (and its fragrance) has acquired a reputation for being able to put people under an amorous spell!
And it is not only the Chinese culture that holds the ye lai xiang (Telosma Cordata) in high esteem. The Aztecs, in ancient times, used it as a natural remedy for such things as inflammation and spasms. The Indians, in modern times, continue to use it as part of Ayurvedic medicine. The essential oils extracted from the flower are still highly-prized to this day as an aid for achieving a meditative state, opening the crown chakra, enhancing psychic abilities, promoting serenity and peace of mind and heart, and stimulating creativity. Such wondrous capabilities all attributed to one single humble bloom.
For the Chinese, the ye lai xiang is not only used for its fragrance, but also as a refreshing and light culinary ingredient.
We cook the ye lai xiang very regularly at home. Very often in a soup. Sometimes in a simple stir-fry.
Only the young flower, that has yet to bloom, is used in cooking.
First, each tiny bud has to be separated from its sepals (the small petal-like parts at the base of the flower). In the top left hand corner are the whole flower buds. In the bottom left corner are the discarded stems and sepals. And in the top right corner are the small, tender, young buds that will be cooked and eaten.

This is a rather time-consuming and labor-intensive process. But finally, it is done, and it is a nice cheery sight to see a bowl full of the young ye lai xiang flowers.
Ye Lai Xiang Soup with Egg


This is such a quick and easy soup. It doesn’t even qualify as a recipe. But I really do enjoy the lightness and freshness of a ye lai xiang soup.
• In a medium saucepan, bring some water (or vegetable stock) to a rolling boil. Add some finely julienned carrots, and let them cook until almost tender.
• Add the ye lai xiang flowers. (I usually allow for about one large bloom per diner). Allow them to cook for 2-3 minutes.
• Bring the soup back to a rolling boil, and if not using vegetable stock, add one bouillon cube. Stir to dissolve. Return the soup to a boil.
• Add lightly beaten eggs that have been lightly seasoned with a dash of light soy sauce, a pinch of sugar and a dash of pepper (again, I usually provide for one egg per diner). Either swirl gently through the soup to form wispy egg strands, or, as I sometimes prefer, allow the eggs to cook into large pieces, to make for a chunkier soup. To get smooth, silky egg strands, it is important to have the soup at a strong rolling boil before adding the egg, and almost immediately after adding the egg, turn off the heat, and swirl quickly but gently to let the strands form and cook in the residual heat.
• Season soup with salt to taste, if necessary. I personally prefer a lighter, less salty soup, and so usually find that if using a bouillon cube, that in itself more than sufficiently salts the soup, and no additional seasoning is required.
• Serve immediately.
Ye Lai Xiang Soup with Home-made Fishballs

Sometimes, when I want a “higher-protein”, but light lunch, I would make this ye lai xiang soup, but with the addition of fresh, home-made fish balls.
• Simply add the uncooked fishballs together with the ye lai xiang flowers, and cook the soup as per the above.
• If making the soup as a meal in itself, I sometimes pop in two eggs (or more) per person.
And it’s done. And it’s scrummy!
Stir-Fried Ye Lai Xiang

We have only recently started to sauté the ye lai xiang flowers. We had not realized that the flowers could be stir-fried to delicious results, until we saw it on television not too long ago. Can’t remember what program it was, but a noted Chinese chef was demonstrating his favorite way of cooking the ye lai xiang.
We have sort of adapted it a little, and this is our family’s version.
• In a hot wok with a little oil, sauté some finely julienned carrots, until nearly tender.
• Add some finely julienned fresh young ginger, finely chopped shallots and garlic. Sauté briefly.
• Add finely sliced Chinese mushrooms (or fresh shitakes), and sauté until tender.
• Put the ye lai xiang flowers into the pan. Give it a quick stir-fry, before adding just a little bit of hot water, to give it a light gravy, and season with a little light soy sauce, a dash of Chinese rice wine, a light sprinkle of pepper and a pinch of sugar. Sauté to mix well, and allow the gravy to come to a boil.
• Remove from the heat. The flowers should still have a refreshing light crunch to them.
Everything (the seasonings used, cooking time and method) is kept very light, to complement the delicate nature of the flower and its taste.

It’s great when served simply with steaming hot rice.
Ye lai xiang… a delicate beauty that is light on the palate; soothing to the mind; uplifting on the heart; and inspirational to the soul.
Copyright © 2004 Renee Kho. All Rights Reserved.
Please contact me for permission to copy, publish, distribute or display any of the images or text contained in this article.
06:35 PM in Home Cook: Soups, Home Cook: Vegetables | Permalink | Comments (20) | TrackBack
Friday, April 02, 2025
Angled Silk…

Angled silk gourd, that is. A.K.A. angled luffa or ridged gourd or Chinese okra in the English language. In Asia, it is usually referred to as either “shi gua” in Mandarin or “ketola” in Malay.
This Asian vegetable with the deep-green skin and unique angled ridges is a common ingredient in most Chinese homes. In fact, nearly all families cook it in very similar ways. There are several popular methods of preparation, the most common of which is cooking it with eggs. It is also very often cooked with either chicken or just some large sweet onions.
However, even though almost every family serves up very similar recipes of this vegetable, each family’s version is completely unique. Even if I taste 20 families’ presentation of shi gua with eggs for example, each family’s interpretation will look, feel and taste different. Some cook it akin to a shi-gua-scrambled-eggs dish, along the lines of fluffy fu yong dan. Some prefer the gourd in a somewhat watery gravy with strands of egg in it. Others like it fried into pancake-shaped disks of egg-and-gourd. Yet still others like the eggs in soft, fluffy clumps, without any gravy at all. Each version reflects intimately the epicurean preferences of that family. From a simply humble gourd, much can be revealed about a family’s eating style. How fascinating.
As I was clearing out my photo archives this evening, I came across picture after picture of shi gua in various guises. I had taken photos of the gourd dish each time we had it, but had never posted about it. So, it is time. Today is the day. I shall honor some of the photos (great though they are not) and make use of them, and at the same time, share my family’s recipes for this well-liked gourd dish. (Yes, I am aware that it has been quite sometime since I last posted a recipe, and so it is also time to make amends in that arena.)
We usually cook this gourd in one of four ways, with two of them (cooked with egg or in a mixed vegetable dish) making the most frequent appearances, and the other two (cooked with chicken or with large onions) putting in the occasional guest-starring visit.
Shi Gua with Egg
This makes for a tasty dish that is also very colorful with great eye-appeal. Carrots and mushrooms are added for color. And the eggs are sautéed with the vegetables to give a gravy-less, chunky, scrambled eggs-like dish.
First, a few points:
• The gourd shrinks quite a bit during the cooking process, so it is best to prepare more gourd than would appear to be needed. Usually, a medium sized gourd will probably serve around 2 persons.
• To prep the gourd: cut both ends of the gourd off; trim off the ridges and remove the fairly thick skin with a potato peeler; cut the gourd in half lengthways and scoop out the large core of seeds. The core is fairly substantial. Be sure to generously remove all of it, as remnants of it could sometimes give the cooked gourd a slight bitter taste. Only a fairly thin slice of gourd flesh will be left. This can then be cut into the desired shape and size.
• Unlike the stir-frying of other vegetables, no water needs to be added when cooking shi gua. The gourd will release some liquid as it is being cooked. To achieve the dry, gravy-less dish that I prefer, simply sauté the gourd until this liquid has been cooked off. A higher flame/heat setting will also help achieve this without the gourd turning soggy or too soft from prolonged cooking.
• The amount of eggs used can be varied depending on mood and personal preference. Sometimes I use more eggs to make a very eggy dish, where the egg becomes almost the central ingredient and the gourd takes on a supporting role. Here, I would use what I call the “coffee-making rule” (i.e. 1 teaspoon of coffee for each person plus one additional teaspoon for the pot). So, I usually use one egg for each diner plus one additional egg. Other times, the eggs are added as a complement to the gourd, and I use only a couple of eggs as accents.
• I usually use either dried Chinese mushrooms (as in the top picture) or fresh shitake mushrooms...

• To pre-prep Chinese mushrooms: rinse the dried mushrooms; remove stems; add mushrooms to a pot of boiling water that has been seasoned with a little bit of cooking oil and sugar; cover pot and leave to simmer for between 1-2 hours or until the mushrooms are nearly fork tender; remove and drain well. These prepped mushrooms can be sealed in zip-lock bags in small batches and kept in the freezer for a few months. To use, simply thaw a small bag of the mushrooms.
Ingredients:
Shi gua gourd – cut into thin strips
Carrots – cut into thin strips
Mushrooms – thinly sliced
Eggs
Shallots – finely chopped
1. To a hot wok or pan, add a little bit of oil and the shallots.
2. Immediately follow with the carrots. Sauté for a short time, until the carrots are just about to start to soften.
3. The gourd, which requires the next longest cooking time, is then added. Sauté until the gourd is just starting to soften.
4. Finally, add the pre-prepped Chinese mushrooms or the fresh shitakes. These cook in the shortest time.
5. Season with a pinch of salt, a pinch of sugar and some pepper. I don’t usually add much seasoning to the vegetables at this point. Instead, I prefer to add most of the flavorings to the eggs, and let that flavor the dish. Sauté to mix.
6. Cover the pan for approximately two minutes, to allow the vegetables to soften.
7. Lightly beat the eggs and season well with light soy sauce, pepper and a pinch of sugar.
8. Remove the lid, and add the eggs. Gently sauté – much like cooking scrambled eggs – until eggs form fluffy curds around the vegetables.
9. When the eggs are still a tad under-cooked, remove from the heat. The eggs will finish cooking on their own.
Shi Gua with Mushrooms and Carrots

The cooking procedure is pretty much the same as for the egg version above, except without the eggs of course, and with a slight difference in the seasonings used.
I prefer slightly stronger flavorings in this all-vegetable version – oyster sauce, light sauce and pepper.
After the seasonings go in, the pan is covered for a couple of minutes. Once the gourd is tender, remove from the heat.
I like this version without any gravy as well, so heat control is fairly important to ensure the liquid that is released by the gourd is cooked off in sufficient time without over-cooking the gourd.
Shi Gua with Sweet Onions
The cooking method for this version is slightly different. Also, this dish, unlike the above two, has a little gravy.
Ingredients
Shi gua gourd – cut into squares
Large onion – cut into squares
1. Par-boil the gourd in boiling water for approximately 1 minute. Drain well.
2. In a little hot oil, sweat the onions.
3. Add the gourd. Sauté until the gourd is tender.
4. Dissolve the seasonings of oyster sauce, light soy sauce and pepper in a little bit of hot water. This forms the basis of the gravy. Add to gourd.
5. Leave to simmer, uncovered, for a couple of minutes. Remove from heat.
Shi gua with chicken
This is a variation on the “shi gua with sweet onions”. Some bite-sized chicken thigh meat is added to the gourd to enhance sweetness and flavor.
[Update 21/06/04: For pictures of this dish, click here.]
The method for cooking the gourd is the same as above, except for the addition of the partially cooked chicken meat to the almost-cooked gourd just before the seasonings are added to the dish.
To prepare the chicken: Using chicken thigh fillets, remove the skin and trim off excess fat. Cut each thigh into eight bite-sized pieces. Marinade the meat with a little light soy sauce, sugar, sesame oil and cornflour. Sauté the chicken in a little bit of hot oil until it is partially cooked. Set aside.
As the seasonings are added to the gourd (in the preceding recipe), add the half-cooked chicken, and allow the meat to finish cooking together with the gourd. Leave to simmer, uncovered, for a few minutes. Remove from heat.
Four dishes and a gourd. A box-office hit in the making, perhaps.
[Update 21/06/04: There are some tips on choosing the angled luffa gourd here.]
Copyright © 2004 Renee Kho. All Rights Reserved.
Please contact me for permission to copy, publish, distribute or display any of the images or text contained in this article.
01:22 AM in Home Cook: Vegetables | Permalink | Comments (8) | TrackBack
Wednesday, March 03, 2025
Braised Mung Guang
Some time ago, Maki posted about braised vegetables and the beauty of their simplicity. As I read that post, I was nodding my head in agreement. There is just something quite elegant yet homey and comforting about braised vegetables. Like the Japanese, the Chinese too have a tradition of braised vegetable dishes. Some of my favorites that immediately come to mind are braised radish, sometimes served with pork or beef, and braised turnip. There are of course many other braised vegetable dishes, but these two make it to our dining table fairly regularly, simply because they are easy to prepare and taste good.
We made braised turnips the other night.
First off though, perhaps a quick word about the name of our local turnip. Some people, as is the case in my family, call it “mung guang”, others call it “bang kwang”. Even the different local supermarket chains term the same humble turnip differently. NTUC Fairprice opts for plain language, calling it “local turnip”, while Cold Storage calls it “banguang”. Other names I’ve heard include yam bean and jicama, although I believe both these actually refer to the turnip of Mexican and Central American origins. I’ve never tasted a “jicama”, but I presume it is pretty close to a mung guang. From the picture, it looks a tad different from the mung guang that I know, and there could be very slight differences in texture and sweetness purely due to the climate and soil it is grown in. But hey, a turnip by any other name is well, a turnip.
In South East Asia, slow-cooked mung guang is most commonly used as the filling for the very healthy, Nonya springroll "popiah" (Mandarin: bao bing). Thin strips of turnip are gently stewed with carrots and dried shrimp (hae bee), and wrapped in a soft, paper-thin, almost translucent, crepe-like pancake, together with crushed peanuts, crumbled hard-boiled eggs, boiled prawn slivers, minced raw garlic, fresh lettuce leaves, bean sprouts, sweet fruit sauce and chilli paste. A little more on this later.
The same mung guang mixture can also be used to fill “kueh pie tie” – another Nonya delicacy. This is a deep fried crispy, tall, mini pie shell filled with mung guang and sometimes topped with various garnishes.
I like mung guang for its rather unique texture – somewhat starchy, yet with a delicious slightly sweet crunch, almost like that of a water chestnut without the intense sweetness. Braised mung guang has a nice, soft, tender bite with a light undertone of crunchiness.
When cooking mung guang as a main dish, rather than as a popiah filling, I like to cut the turnip up into bigger chunks, almost like potato wedges or at least like fat fries. I find this gives them a better texture and crunch even after being stewed for a few hours, and makes them a wonderful accompaniment to plain rice congee or freshly steamed rice.
Braised Mung Guang
Ingredients
1 whole mung guang – skinned and cut into long, chunky strips
½ carrot – very finely julienned
4-5 pieces large Chinese dried mushroom – pre-prepped and thinly sliced
finely minced garlic
• Sauté the minced garlic in a little hot oil until fragrant. Add the carrots and mushrooms. Sauté briefly.
• Add the mung guang, and stir-fry for approximately 5 minutes. Season with 4 tablespoons light soy sauce, ¼ to ½ teaspoon sugar and pepper.
• Add approximately 1½ cups of hot water or chicken/vegetable stock. Cover, and leave to simmer, on very low heat, for around 2 hours or until the liquid has reduced to a small amount of rich gravy and the mung guang is tender but still with a slight crunch.
• An optional garnish would be to sprinkle a little bit of deep fried crispy shallots on top.
Variations
• Add dried shrimps (hae bee): rinse the dried shrimps well, and pat dry. Add them to the minced garlic and sauté until fragrant before adding the carrots and mushrooms.
• Add strips of pork or chicken: marinade the meat with light soy sauce, pepper, sesame oil and a little cornflour. Sauté the meat separately in a little hot oil until very nearly cooked, and set aside. Add into the mung guang 10-15 minutes before the latter is done, just to allow the flavors of the meat to meld with the braised vegetables. Adding the meat too early will result in tough, over-cooked meat.
• Add strips of tau pok (deep fried beancurd skin) or tau kwa (firm pressed beancurd): sauté separately in a tiny bit of hot oil, to enhance their flavors. Add to the braised vegetables towards the end of the cooking time, as with the meat.
These variations can also be cooked as main dishes, to be eaten with rice, or can be made into popiah fillings. (For the latter, the mung guang is cut into fine strips rather than chunky wedges).
Popiah parties are great fun! All the ingredients are prepared and laid out on the table, and guests help themselves and roll their own popiah. All that is needed are (good quality) popiah skin, braised mung guang filling, minced raw garlic, sweet sauce, chilli paste, raw lettuce leaves, lightly blanched beansprouts (taugay), boiled prawns, crumbled hard boiled egg and ground peanuts. An optional garnish that requires a little more work but is a firm favorite among Singaporeans is deep fried crispy bits. There are various versions of this. Some people make it from deep frying very small crumbled pieces of dried sole fish. Others mash tau kwa (pressed firm tofu) through a sieve and deep fry this to get crispy tau kwa “crumbs”. Yet others may just used crispy deep fried dried shrimps. Again, as with so many Asian dishes, innovation and personal preferences are the ways to go.
D-I-Y popiah… it’s simple, easy and lots and lots of finger-licking fun!
Copyright © 2004 Renee Kho. All Rights Reserved.
Please contact me for permission to copy, publish, distribute or display any of the images or text contained in this article.
11:57 PM in Home Cook: Vegetables | Permalink | Comments (2) | TrackBack
Monday, February 16, 2025
Red Rice

After a gastronomic weekend, all I wanted was a light dinner tonight. Something easy on the digestive system. For me, this usually means a simple meal of rice and lots and lots of vegetables.
At home, I only eat red rice. Yes, the rice is naturally red, or more accurately, reddish black when uncooked, and red when cooked. It looks a little like the black glutinous rice used to cook pulot hitam (a dessert porridge of black glutinous rice cooked in sugar syrup and served with a dash of thick coconut milk), but it is completely different. This red rice has the flavorful nuttiness of (Western) wild rice, but with the soft fluffiness of regular white rice (if cooked right). I much prefer this red rice over brown rice too, as I find the latter to be rather “hard” and chewy even when cooked with plenty of water.
I cook the red rice as I would regular white rice… into the rice cooker, with just a tad more water… and it comes out soft and fluffy. No pre-soaking, no extra long cooking time.
It’s supposed to be good for you too, replete as it is with abundant B vitamins and folic acid. ![]()
I’m so used to eating this rice now that sometimes when I do eat white rice, I miss the nutty flavors and “bite” of the red rice. Food even tastes different when eaten with white rice. ![]()
[Unfortunately, the red rice is not available in Singapore. We buy ours from Brunei. It is also available in Sarawak and Sabah, and the rice is usually grown by the indigenous natives of these two Malaysian states.]
Tonight, we had three vegetable dishes, and this is one of my favorites…

Cauliflower stir-fried with tomatoes and carrots. What do I like so much about this dish? I love tomatoes. Especially when they have been cooked down, and are soft, tender and richly flavorful. I love the taste of the gravy, robustly flavored with the fresh tomatoes. Absolutely delectable when poured over steaming hot rice. I enjoy the natural tanginess and sweetness of the tomatoes. I just think it complements the cauliflower really well. The carrots give added color as well as a different texture and sweetness. It’s simple and it’s good.
Firstly, blanche, peel, seed then dice large ripe tomatoes.
Heat a wok or any other frying pan and add a little oil. Allow the oil to heat until the palm, when held a couple of inches above the surface of the pan, senses heat rising from the oil. Add minced garlic and chopped shallots, and quickly sauté until they are fragrant but not brown. Add the carrot slices, and after a quick sauté, followed by the cauliflower. After another brief sauté, add the seasonings: light soy sauce, salt, sugar, pepper and some hot boiling water or chicken/vegetable stock/broth*. Cover the pan, and allow the cauliflower to cook until it is slightly tender (approximately 5 minutes). Add the tomatoes, and re-cover the pan. Allow the tomatoes to cook down until soft and mushy, and partially dissolved into the gravy (approximately 5 minutes). Remove from the heat and serve.
[The cauliflower may alternatively be par-boiled in water first, so that the cooking time required during the stir-fry is reduced.]
This cauliflower-tomato dish is based on the standard “basic” vegetable stir-fry method, which can be used to sauté all sorts of vegetables and legumes, with variations only in the timing of the adding of different vegetables or parts of the vegetables; the cooking time; and the seasonings used.
The “de rigeur” steps are:
• heat pan
• heat oil, until slight warmth is detected at the center of the palm, when it is held a couple of inches above the surface of the pan
• sauté minced garlic, shallots or both (or sometimes just ginger eg for kai lan)
• add vegetables in stages, in the order of ease of cooking, with those with the longest cooking time going in first, such as the stems of green leafy vegetables, carrots and so on, followed by the leaves of the vegetables or other quick-cooking vegetables. This allows for even crunchiness in all the vegetables in the final dish.
• add seasonings (various combinations of light soy sauce, tiny bit salt, a little sugar, pepper, sometimes oyster sauce) together with some hot boiling water or broth/stock* once the vegetables have turned color
• cover the wok or pan, and allow the vegetables to cook until the pan cover is warm to the touch**
• uncover, remove from the heat and serve
For certain vegetables, such as kai lan, a little rice wine is added just before the vegetable is removed from the heat.
A slight variation to the routine is when sautéing beans or other long-cooking legumes. The beans are sautéed in the hot oil until their color has changed before adding the minced garlic. As the beans require a fairly lengthy cooking time, this will prevent the garlic from burning. Then, simply add the seasonings and cover the pan** as per normal.
* Chinese stir-frying of vegetables always involves the adding of a little water/stock - even in vegetable dishes that appear "dry" at the end – i.e. no gravy. This is true of both home and restaurant cooking. The amount of water/stock added will determine how much gravy, if any, the final dish will have. Adding just a little bit of water/stock, which will be absorbed during the cooking process, will result in a “dry” dish.
** This little trick was taught to me by my mum, who in turn learnt it from her mum. It’s a quick and easy way to know when the vegetables have been thoroughly cooked through without having to constantly lift the pan cover to take a peek, and thus disrupting the temperature in the pan.
Why do we add liquid and cover the pan? The reasoning is to quickly and thoroughly cook the vegetables in a very short time, and to maximize the heat in the pan. The Chinese are quite particular about having the vegetable being completely cooked through, and yet still crunchy. Just sautéing without adding liquid or covering the pan will generally result in a vegetable that is not completely cooked through and the "crunch" is different. And sautéing until the vegetables are completely cooked will result in rather unappetizingly yellowed vegetables. Adding liquid and immediately covering the pan and allowing the vegetables to cook through will ensure a nice green color plus well-cooked vegetables.
Note: Chinese stir-fries are usually done on a gas-stove, so perhaps the timing and the control of heat may need to be adjusted for an electric stove, and may require some experimentation. The level of crunchiness can also be adjusted to suit personal preferences.
Happy vegetable stir-frying!
Copyright © 2004 Renee Kho. All rights reserved.
Please contact me for permission to copy, distribute and display any of the images and text contained in this article.
10:40 PM in Home Cook: Rice, Noodles etc, Home Cook: Vegetables | Permalink | Comments (4) | TrackBack
Saturday, December 27, 2025
Mr Cool Cucumber, Ms Sweet Carrots and the Cilantro Patch Potato Kids

I was tasked with coming up with several “veggie” dishes for Christmas Eve dinner. Ah-ha! I thought. What better time then this to start my new quest for health-ful cooking. No, no bland rabbit food, no green salads (how boring), no stir-fried vegetables (we eat that everyday)…
There has been a jar of St Dalfour fig jam sitting, forlorn and lonely, in my fridge for a good many months now. The family obviously doesn’t seem to like it on their toast. And I had a high suspicion that if left there, that jar of jam would just continue sitting in the fridge, untouched, unwanted and rejected until it was ready to leave this world… So, I decided that, this Christmas, I would try to fulfill its life purpose to be used and enjoyed. ![]()
How about glazed baby carrots with fig jam? Sure, why not? The Chinese have the famous ribs dish “Pai Kuat Wong” (literally translated as King of Ribs) which many restaurants cook with a combination of different jams (pineapple, marmalade and others I think) to create that signature sweet and sour taste.
These glazed carrots are almost completely fat-free, yet very flavorful, and so easy to make. The baby carrots were steamed for about 15 minutes or until tender. I combined about 6 slightly heaped tablespoons of fig jam (apricot jam, marmalade or even peach jam would work very well too, I would imagine), with just over a 1 teaspoon of grated orange zest, 2 teaspoons of honey mustard (Dijon would probably have been preferable, but I was out of that), and some roughly chopped cilantro (or parsley) leaves. These were cooked over medium heat until bubbly (approximately 2 minutes or less). The steamed baby carrots were added, and tossed to coat evenly with the jam glaze. Voila! Ready to go.
* * * * * *
Some time back, Josh posted about pommes persillade – potatoes with a simple paste of parsley and garlic. I finally got around to trying this recipe out. I used cilantro instead of parsley (my family strangely will eat cilantro but not parsley), and it worked well.
A huge bunch of cilantro was very finely minced, and combined with finely minced garlic, to form an almost paste-like salsa .
I made this dish with both USA Russet Burbank potatoes and the local yellow-fleshed potatoes. The former worked better – their fluffy texture was more conducive to this type of cooking than the firmer fleshed local variety which is more suited for use in cooking curries.
I soaked the cubes of potatoes in some iced water in the refrigerator for about half hour or so before cooking, hoping that this would help the potatoes crisp up with minimal oil being used. A lot of patience was required to get the potatoes to cook and brown when sautéed in so little oil. Having never sautéed potatoes in this manner before, I had begun to worry that the potatoes just were not going to brown nor cook. But brown they did… after maybe a good 15-20 minutes.
Once they were cooked, the cilantro mixture was added, and mixed well to coat the potatoes evenly. After a quick seasoning of salt and pepper to taste, it was ready to be served.
Come to think of it, this persillade would have worked well with the baby carrots too. Hmmm… that’s an idea for the next time around.
* * * * * *

I decided to add this dish at the last minute. This cool, creamy cucumber salad was inspired by the Indian raita, which is usually served with curries to cool the palate. It was creamy yet low in fat, with the creaminess coming from yogurt instead of cream. Instead of having finely diced cucumbers, I decided to have chunkier pieces of the vegetable in my version. The Indian versions (of which there are countless different versions) very often have raw onions and various spices in them. I wanted to keep the flavors of mine somewhat “cleaner”.
I used a combination of plain yogurt, a touch of lemon juice, salt, sugar, some chopped green onions and some chopped cilantro. I think fresh dill would work beautifully too, instead of the cilantro. The yogurt used was a low fat one. I would have preferred maybe a Greek-style or European-style natural set yogurt which has a richer, creamier texture without being significantly much higher in fat. It wasn’t available at the neighborhood grocery shop, and I didn’t have the time to run out to the supermarket. So, we had to make do. Also, I think the next time around, I would probably use a touch of vinegar instead of the lemon juice. The approximate ratio of quantities I used was: 200g carton yogurt, 1 scant tablespoon lemon juice, ½ teaspoon salt, 3-4 tablespoons sugar. After the dressing was made, it was refrigerated for at least ½ hour for it to chill and for the flavors to meld.
I used small Japanese cucumbers, as they are a lot crispier and crunchier in texture. These were cubed and refrigerated to dry and crisp up a little, before being tossed with the yogurt dressing. The salad was then returned to the refrigerator for at least another 1 hour or more before it was ready to be served.
The final touch: a dash of paprika powder (or cayenne pepper) for a splash of color. A nice, cool, creamy treat without the fat and calories.
Just a thought: this would be a great way to make a fruit salad too… mangoes, watermelon, honeydew, rock melon, bananas, apples, maybe even papaya... wow! limitless possibilities...
Happy Salad-ing!
Copyright © 2003 Renee Kho. All rights reserved.
Please contact me for permission to copy, distribute or display any of the images and text contained in this article.
04:59 AM in Home Cook: Vegetables | Permalink | Comments (0) | TrackBack
Friday, December 12, 2025
The Green, Green Vege of Home
Yes, we are still on the green theme today. More rabbit food, I’m afraid. But hey, I love vegetables, I really do. And sometimes it fascinates me how some people can eat nothing but meat every day, day in, day out, throughout the year. I have a few cousins and some friends who refuse to imbibe even a single stalk of vegetable. I’m pretty much the reverse. A meal just doesn’t seem quite complete to me without some bright-colored plant material ![]()
And guess what? Today’s “show and tell” day. (Ha ha! I almost feel like I’m back in grade school.) And of course, the theme of the day is: the different ways vegetables can be stir-fried…
I think the Chinese pretty much stir-fry every type of vegetable that gets served at their table. The most basic would be vegetables stir-fried with minced garlic, and seasoned simply with light soy sauce or oyster sauce and sometimes a little rich flavorful stock. This method works for just about every type of vegetable…
From spinach…

To cai xin (a green leafy vege with small yellow flowers)…
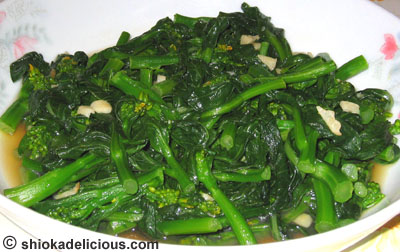
And any other green vegetable one can think of: broccoli, xiao bai cai (baby pak-choy), long beans, French beans, cauliflower, Chinese cabbage (bok-choy) (okay, okay, the last two are not green, but still vegetables) ![]()
The only variants would be the length of time the vegetables are sautéed for, depending on their hardness, and also the aromatics and flavorings used in the sauté.
Kailan (Chinese broccoli) usually requires ginger slices or strips to be added as well, to remove the “grassy” taste. And a dash of Chinese rice wine, Japanese mirin (rice) wine or even a fairly dry white wine works wonders with this vegetable. I would add the ginger with the garlic to the hot oil for a quick sauté, before adding the kai lan. And just before it is plated, after all the seasonings have been added, add a dash of the wine. The best would be to flambé the vegetable, but unfortunately, the home gas stove just doesn’t have a large enough flame for this. So, I normally just give a quick sauté to allow some of the alcohol to evaporate, leaving just the taste of the wine on the vegetable.
I love kai lan stems – a seasonal vegetable – cooked in this way. Compared to the regular leafy kai lan, these stems are easily 5-8 times thicker, and are usually sold without the leafy part of the vegetable. These are very crunchy and sweet!
I really like fresh shitake mushrooms cooked in this way too…

The tiny juliennes of ginger and the wine really lift the taste of these very aromatic and flavorful mushrooms. Just be sure not to overcook the mushrooms. It takes just 2-3 minutes in the wok, and it’s good to go.
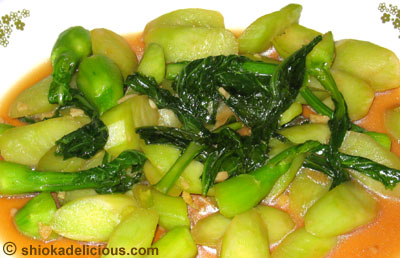
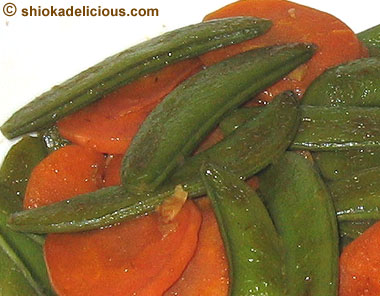
And when we get tired of all that green stuff, we add a dash of red to the stir-fry… Carrots immediately brighten up any vegetable dish, be it cabbage (winter-time cabbages from China are especially sweet and crunchy)…

Or snow peas…
And… the mix and match game continues… on top of the carrots, throw in some fresh shitakes, and hey presto! brand new vegetable dishes…
Asparagus with carrots and shitakes…

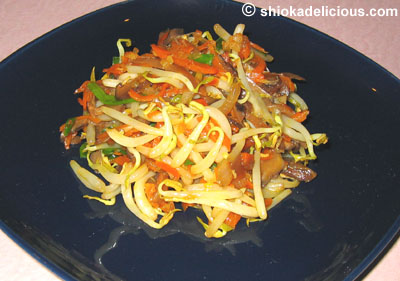
Bean sprouts with julienne of ginger, carrots and Chinese dried mushrooms, and some scallions for a touch of green…
Lettuce with carrots and shitakes…

Then, we start adding different sauces to the same vegetables. Instead of stir frying the lettuce, sometimes I like to quickly blanch them in boiling water (seasoned with a touch of cooking oil, pinch of salt). And top it with various “sauces”.

This one here has three types of fresh mushrooms, carrots, onions and diced chicken. Other “toppings” I regularly use are shallots with oyster sauce; diced chicken with teriyaki or dark soy sauce; shitake mushrooms with ginger and rice wine… I guess the combinations are pretty endless – whatever you fancy, and whatever is in the fridge.
I do baby kai lan (the ones with the rounded ends), kai lan, cai xin, broccoli in these ways too.
Hey, this “match the vegetable to the ingredients” game isn’t so bad now is it? ![]() But after all that mixing and matching, it is time to spice things up! It starts getting hot, hot, hot…
But after all that mixing and matching, it is time to spice things up! It starts getting hot, hot, hot…
Another perennial favorite way to stir fry vegetables is to use sambal belachan or just simple chilli sambal. (This is a very South East Asian way of cooking, although in Sichuan, China incredibly spicy peppercorns are also used in their cooking).
A lot of vegetables can be fried with chilli, from okra or lady fingers and long beans to kang kong or tong xin cai (translated as “hollowed stem vegetable” – very aptly named, as it is the only type of vegetable with a hollow stem!)

At home, we usually do not use sambal belachan (fermented dried shrimp paste with chilli) although it is a must in a large majority of households. We usually make our own chilli paste (grind fresh red chillis and sauté in oil until fragrant), which is more acceptable and palatable than belachan for young and old alike. This chilli paste will keep in the fridge for a couple of weeks, and can be easily added to any type of dish. There is then also the flexibility to add dried shrimps or other ingredients to the vegetable when sautéing it with the chilli paste.
There are many, many more ways to cook vegetables… and you thought vegetables were boring? ![]() But I think that’s enough rabbit food for one night
But I think that’s enough rabbit food for one night ![]() The rest will have to wait for another time…
The rest will have to wait for another time…
Happy vegetable stir-frying!
Copyright © 2003 Renee Kho. All rights reserved.
Please contact me for permission to copy, distribute or display any of the images and text contained in this article.
01:36 AM in Home Cook: Vegetables | Permalink | Comments (3) | TrackBack
Thursday, December 11, 2025
Bitterness is Good for You

I’m trying to “detox” for a few days before the orgy of feasting, dining and wining begins in 12 days time, and which could potentially continue right up to 5 February next year, when Chinese New Year celebration ends!! My tastebuds leap in anticipation, but my digestive system shudders in horror. ![]()
Well, I did say “trying”, with the emphasis on the word “trying”. I had intended to start today… cut (or at least reduce) the sugar, i.e. less (preferably no) cookies and chocolates, cut the meat, and just more vege, fruits and complex carbs. (Those on Atkins or high protein diets, this is the cue to stop reading) ![]() Well, today was a non-starter… had some homemade smores (toasted marshmallows covered with bittersweet chocolate on graham crackers) and some chocolate cookies… Oh well, tomorrow is another day!
Well, today was a non-starter… had some homemade smores (toasted marshmallows covered with bittersweet chocolate on graham crackers) and some chocolate cookies… Oh well, tomorrow is another day! ![]()
However, I’m going to make myself feel slightly better tonight by writing about some vegetable dishes. ![]() The Chinese have a saying: “the more bitter it is, the better it is for you”. And the bitter gourd is held by Chinese traditional medicine to have many health-giving and healing properties. It is said to be able to help with high blood pressure, high blood cholesterol and some forms of diabetes. It is also believed to be good for acne, eczema, psoriasis and other skin conditions. Very often, it is made into a tea (by boiling in water) and drunk much like a tincture. I think nowadays it even comes in tea bags for convenience! This is also said to be a great cure for a hangover
The Chinese have a saying: “the more bitter it is, the better it is for you”. And the bitter gourd is held by Chinese traditional medicine to have many health-giving and healing properties. It is said to be able to help with high blood pressure, high blood cholesterol and some forms of diabetes. It is also believed to be good for acne, eczema, psoriasis and other skin conditions. Very often, it is made into a tea (by boiling in water) and drunk much like a tincture. I think nowadays it even comes in tea bags for convenience! This is also said to be a great cure for a hangover ![]() – flushes out the alcohol from the system!
– flushes out the alcohol from the system!
If I’m not wrong, it is the compound that gives the vegetable its distinctive bitter taste that makes it a very efficient detoxifying food substance. It “cleanses” the blood and digestive system.
This vegetable tastes a lot more palatable than it sounds. And its bitter taste can be easily removed (whilst still retaining its “cleansing” and “detoxifying” properties) by simply soaking it in some salt water for a few minutes after it has been cut. Just rinse well after the soak, and it’s good to go. It’s actually quite a versatile vegetable, and can be cooked in several ways:
- stir-fried with shallots and fish cakes (as in the above picture) or fresh fish slices
- stir-fried with garlic, ginger and fermented black soy beans
- stir-fried with spring onions and miso
- stir-fried with garlic, ginger and diced chicken
- stir-fried with garlic, ginger, thin slices of beef and a black pepper sauce
It is of course also a popular ingredient in “yong tau foo” where it is stuffed with minced fish or pork and either steamed or fried.
I also like it cooked sort of omelet-style…

Saute some shallots in hot oil to soften slightly. Add the bitter gourd slices and give it a good stir-fry. Season with salt and sugar. Cover for a few minutes to allow the gourd to soften somewhat.
In the meantime, lightly beat a few eggs and season with salt and pepper. Add to the gourd, making sure all the gourd is covered with egg. I usually allow the eggs to cook in one of two ways. Sometimes I make a sort of gourd-and-eggs “pancake” (as in the above picture). I allow the eggs to start to solidify into a “pancake” before flipping it to cook the other side. Other times, I like the egg sort of scrambled, so I start stirring the egg as it begins to cook and solidify, so that it forms soft, fluffy clusters of egg and gourd. (A little bit of water has to be added to the egg when it is beaten for the latter version).
Note: whilst preparing the bitter gourd, be sure to remove all the seeds and white “veining” on the inside of the gourd – these don’t taste good, at all. There’s no need to skin the gourd though.
And so a detoxifying we go.... ![]()
Copyright © 2003 Renee Kho. All rights reserved.
Please contact me for permission to copy, distribute or display any of the images and text contained in this article.
02:31 AM in Home Cook: Vegetables | Permalink | Comments (0) | TrackBack
Tuesday, December 02, 2025
Mustard Vegetable with Salted Duck’s Egg

We had another family favorite for dinner tonight – mustard vegetable (“gai choy” in Cantonese) topped with a salted egg sauce. It’s a popular dish in Cantonese restaurants, and it’s real easy to make at home too.
Gai choy generally has a slight bitterness, and I think it is probably an acquired taste. Whilst many people love this vegetable precisely for its slight bitterness and unique flavor, it took me a long, long time before I was even willing to eat it! The gai choy is first boiled in water that has had a little sugar, salt and oil added to it. Once the vegetables are at the crunchiness or softness that is preferred, drain well and place on serving platter.
The sauce: combine in a small bowl 2 tbsps of light soy sauce, ½ tbsp oyster sauce, 1 tbsp Chinese rice wine, pepper and sugar (again, the measurements are only estimates based what it looked like as I poured the ingredients from their bottles!), and set aside.
Dice the hard-boiled salted duck’s egg and set aside.
In hot oil, sauté some minced garlic. Add the above sauce mixture. A quick stir, then add a little cornstarch solution to thicken the gravy. Allow the gravy to thicken before cracking in one fresh egg. Stir the egg so that it forms nice “strands” in the gravy as it cooks. When the gravy is ready, add the diced salted egg, and allow to heat through. Pour sauce over the boiled vegetable and serve.
Happy gai-choying!
Copyright © 2003 Renee Kho. All rights reserved.
Please contact me for permission to copy, distribute or display any of the images and text contained in this article.
02:54 AM in Home Cook: Vegetables | Permalink | Comments (0) | TrackBack