« April 2004 | Main | June 2004 »
Monday, May 31, 2025
Potong! Cut the Heat!

The weather has been sizzling the past few weeks. Way hotter than it has any business being at this time of the year. Sure, we are living in the tropics, so warm weather is to be expected. But it’s only May, and not August, and yet, over the last month or so, on many (too many) days, temperatures indoors have been a melting 30-31C (that’s 86-88F, if you prefer). That’s hot! For indoors. With full ventilation. Even with the air-conditioning going, it is sometimes still a very warm 26C (79F) in the house. The occasional brief showery spells do little to cool the air.
Step outside the building, and within a couple of minutes, your clothes start to cling damply to your skin. Your brows start to bead furiously with perspiration. The skin feels the burning intensity of the relentless sun. Your breathing is weighed down by the heavy humidity that envelops the air like a deep impenetrable fog. You feel clammy, muggy and just downright uncomfortable. And you thought living in the tropics is all sun-shiney fun?
But… when it gets this hot, this sunny… when the temperature sizzles, one of the best ways to “chill” is… with ice cream!
In South East Asia, eating ice cream in a cone is a fairly recent development. Recent being in the last 25-30 years or so, I would guess. Before that, ice cream was mainly sold and eaten sandwiched between a slice of bread or two pieces of thin wafer biscuits. (Of course, before ice cream even made its entry into Asian culture, we had the now long extinct ice ball with syrup. My parents still tell stories of how, as kids, getting 5 cents to buy a huge ice ball was such a rare and luxurious treat. And that’s one ice ball shared between maybe 2-3 siblings, mind you. But those stories are for another post.)
We were walking along Orchard Road the other day, and with the heat being as oppressive as it was, we could not resist stopping at the “potong man” cart for some nostalgic ice cream. I had not had potong ice cream in a long, long time. Yes, it was true. I had become a full convert to the more “fashionable” premium ice creams and gelati. I still eat ice cream with bread – or toast, actually – at home, but it’s more likely to be Ben & Jerry’s with bread/toast. I had not had a potong with bread in ages.
But, who’s “potong man” and what is “potong ice cream” I hear you scream? (Ice cream, you scream… get it? ![]() ) Patience. I’m getting there. “Potong” is the Malay word meaning “cut” or “to cut”. And “potong ice cream” is quite literally “cut ice cream”, or ice cream that is cut with a knife rather than scooped with a, well, scoop. And naturally, the “potong man” is the man who sells potong ice cream.
) Patience. I’m getting there. “Potong” is the Malay word meaning “cut” or “to cut”. And “potong ice cream” is quite literally “cut ice cream”, or ice cream that is cut with a knife rather than scooped with a, well, scoop. And naturally, the “potong man” is the man who sells potong ice cream.
Whereas, in the good old days, the potong man would come around the housing estates on his “manual” tricycle, ringing his little bell, this particular “potong man” (pictured above) is stationed almost every day, with his motorized tricycle, on his “regular” corner at one of the busiest junctions of Orchard Road, just outside Ngee Ann City. He actually has a competitor just across the road from him, on the other corner of this busy crossroads, just outside Paragon. But there is no ill-will. Each man recognizes the other’s territory. Each sticks to his “own” side of Orchard Road. No one tries to steal the other’s customers. It’s all very gentlemanly and cordial. One will not speak ill of the other.
It is a fascinating scene of marked contrasts, and yet it seems perfectly natural to have this throw-back to a gentler, more gentlemanly way of doing business existing right on the door-steps of the icons of 21st Century cut-throat business competition and hard-sell branding. Here, on a street lined chock-a-block with modern glass, steel and concrete buildings that are temples of modern consumerism, and right in front of the glitzy Chanel and Cartier stores, this humble ice cream man with his tricycle, albeit a motorized one, sits in strange yet harmonious juxtaposition.
This ice cream man does brisk business. During the 10-15 minutes or so that we stood around eating our ice creams, he saw a near-continuous flow of customers. Many were obviously regulars, whose ice cream preferences were already known to him. Others were tourists, drawn by the small crowd around the tricycle to also try out this uniquely Asian ice cream style. And then there were the rare one or two “idiotic” Singaporeans behaving like tourists in their own land (ahem! we shan’t name any names), toting digital cameras, and trying very hard to capture the ice cream man’s every move and action, much to his bemusement and amusement.
During any brief lull in business, friends and “chatting” cronies stopped by to exchange a joke or the latest piece of gossip with him. Everyone was affable and friendly. They happily included us in their conversations simply because we had bothered to stop and eat our ice creams there, next to the cart. Quite frankly, to me, this ice cream man seemed a lot more contented and fulfilled than a lot of the well-dressed and well-heeled professionals that were hurrying past him with intense, harried frowns, many laden with shopping bags bearing designer names and logos.
But back to the ice cream. In the olden days, ice cream was sold in rectangular blocks, and not rounded scoops, with each rectangle of ice cream sandwiched between two pieces of thin wafers…

Or between a slice of local fluffy “kopitiam” bread…

The traditional “potong” flavors were distinctly South East Asian ones like red bean (with coconut milk), sweet corn and yam…

… but are now joined by more “modern” flavors like strawberry swirl, chocolate chip and chocolate. As well as some “newer” South East Asian flavors like mango, honeydew and durian (yes, it’s rather strange, isn’t it? this is such a tropical fruit, and yet until probably the last decade or so, it has not really been used to flavor ice cream).
Each flavor, regardless of whether served with bread or wafer, is priced at S$1.00 (US$0.60). Not bad at all, considering that just a few steps away, in the air-conditioned food court, a scoop of the same ice cream will probably set you back S$2.50.
Of course, even the humble potong ice cream is not completely immune to the relentless march towards modernization. The ice cream, as noted on the flavor chart, is nowadays made by the big food company Magnolia. Gone are the days when these ice creams were hand-made in small batches in small, often family-run, factories.
I had really wanted the red-bean flavor, which is my favorite. But for some strange reason, the potong version didn’t come in red bean. I could have red bean served in a plastic cup though, suggested the ice cream man helpfully. But I also had my heart set on eating my ice cream with bread, the good old-fashioned way. So I settled on yam, my next favorite flavor.

The bread used by this potong man came in cheery, pastel colors of pink, orange and green. He said they were specially made by the bread factory for potong men! These were the same type of fluffy “kopitiam bread” that one could easily buy in the supermarkets or grocery stores, only prettier (I guess) than the ubiquitous white.

I wanted the pink one, and he good-naturedly obliged.
After decades (as he informed us with pride) of serving up ice cream in this way, his movements in cutting, unwrapping and sandwiching the ice cream were so swift and practiced it was so difficult to capture him on camera! It was almost like poetry in motion, albeit speeded up poetry! ![]()
(By the way, the following three pictures are of him serving another customer… and thus the disparity between the color of this ice cream, and the one I eventually had!)

Once you inform him of your preferred flavor, and how you would like it served… with the wafer biscuits or with bread, he quickly reaches down into the metal refrigerated box of his tricycle and fishes out an oblong “brick” of ice cream measuring, oh, maybe 5 inches by 12 inches. He doesn’t need to look or check, almost just by feel he seems to know precisely which brick of ice cream in his refrigerator is which flavor!
Then using a sizeable chopping knife he proceeds to cut a small chunk of ice cream from the larger brick. The smaller rectangle of ice cream is about 2½ inches by 5 inches. Again, just by his practiced eye judgment, every single serving of ice cream comes up just about exactly equal in size.

Working very quickly, he slits and flips open the top flap of the cardboard wrapper shielding the ice cream.

Like seamless movements of a fluid dance routine, he reaches effortlessly to the side of his tricycle for a slice of bread, and cups it over the brick of ice cream. As he lifts the ice cream with the bread, his other hand, in perfect coordination, smoothly tears away the rest of the cardboard packaging. With a big warm smile he hands you your ice cream, sandwiched between the piece of soft fluffy bread, and served on a sheet of clear plastic, to help keep your hands clean and dry while tucking into the ice cream.

And here is my ice cream. Isn’t it pretty? The color pairing. The light gentle lilac of the yam ice cream with the pretty and happy pastel pink of the bread, with a swoosh of white thrown in for artistic measure.
The bread has a cloud-like softness and fluffiness (as you can see, even the lightest pressure on the bread leaves a deep and distinct thumb impression!), which goes rather well with the cold creaminess of the ice cream. It’s all about contrasts. A contrast in the textures, density and temperatures of the bread and frozen milk. And it all comes together very harmoniously.

He had opted for the sweet corn flavor with the wafer biscuits. The procedure is almost the same. The large brick of sweet corn ice cream is extricated from the refrigerated container. A perfectly sized and portioned oblong cube is sliced off. But then comes a slight difference. In the old days, the ice cream man would have to place the two pieces of wafer on either side of the ice cream cube before removing the wrapper. However, these modern factory-produced versions actually come with the wafers already packaged into the larger brick. When the wrapper is removed, the wafers are already in place and the ice cream can be served immediately. And in contrast to the bread version, you don’t get a plastic sheet to protect your fingers with. I don’t know why this is so. But it seems to be presumed that wafers offer better protection against melting ice cream than a piece of bread!

And oh, there is actually a third way in which you can choose to have your ice cream. In one of the containers is a jumble of flavors… it’s all there… chocolate, sweet corn, yam and yes, red bean. If you ask for ice cream in a cup, the ice cream man will reach deep into this cavity and scoop out a bit of each of the flavors you have requested (yes, you can have a whole mix of flavors). And to top it all off, you can even ask for a sprinkle of ground peanuts on top of the ice cream. The price? Still S$1.00.
(Sorry, slightly out of focus picture here. His hand was moving so fast, it took him mere seconds to scoop up a cupful of ice cream. It was quite a task trying to capture a single stilled moment in his frenetic and ceaseless movements!)
So we stood there, happily transported back in time almost, munching on our ice creams. But with the weather as warm as it was that day, we had to eat very quickly. It didn’t help that each serving of ice cream was huge! Probably equivalent to about 2 standard scoops of ice cream! It became almost a competition between ice cream and us. Could we eat faster than the ice cream could melt? As it turned out… Yep. Just about. But not without both of us ending up with brain freeze. You know that feeling. That achy, light headed feeling you get when you eat or drink something cold way quicker than is good for you.
Okay, after all that, here is a bit of a let down. How did the ice cream taste? Not at all like how I remembered it from my childhood days. I remember the taste of real yam and milk in the ice cream. Sure, these were very creamy concoctions. After all, factory machines are designed to ensure that everything they churn out have a smooth, creamy texture. But where was the yam flavor? On extended (or more like permanent) hiatus it would seem. The sweet corn one fared slightly better. We could taste some sweet corn with the occasional small bits of corn thrown in for good measure. But all in, it was a far cry and a pale shadow of its former tastes. Or maybe our palates had just become trained and accustomed to the more intensely and richly flavored premium ice creams and gelati. Still, I was rather disappointed.
I remember remarking at the time that I would have preferred to have gotten a McD soft-serve cone for 25 cents. Yes! 25 cents! That’s only US15 cents! For a full-sized McD ice cream cone. I mean, seriously, in this day and age, what could you possibly get for 25 cents? Not a lot. Not a lot at all. But, you could get one whole McD soft-serve. And for the two bucks we spent on the potongs, we could have gotten eight McD cones! And I think they would have tasted better than this Magnolia version.
Still, I was truly glad for the opportunity to take a walk down memory lane. It was nice. For those few minutes, time stood still. In that little corner of Orchard Road, life was slower, quieter, more relaxed. There was a certain serenity and contentment. People were friendly and chatty. Right in the midst of the hustle and bustle of Singapore’s premium shopping belt, there was this small pocket of existence where the “kampong (or village) spirit” of the 60s and 70s still prevailed.
Yam potong ice cream. $1.00. Sweet corn potong ice cream. $1.00. One of Life’s timeless and precious memories. Priceless.
Copyright © 2004 Renee Kho. All Rights Reserved.
Please contact me for permission to copy, publish, distribute or display any of the images or text contained in this article.
02:48 PM in Tastes of Nostalgia | Permalink | Comments (15) | TrackBack
Saturday, May 29, 2025
Home-Grown Honeyed Sweetness

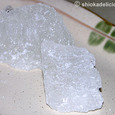
This is such a happy sight. It has been ages since we harvested a fruit off our pineapple plants.
We have several Sarawak pineapple plants in the garden. But since each plant will usually only bear one fruit (at the very most, two fruits) at a time, and the entire plant needs to be transplanted after the fruit has been harvested, it is not often that we get to savor a home-grown pineapple. But when we do, it is well-worth the wait.

The Sarawak pineapple variety is incredibly juicy and sweet. There is so much juice “oozing” from this baby that it is reflecting the camera flash and creating tons of hotspots!
This particular fruit is just a tad over-ripe, as we had left it sitting on the table for a couple of days before cutting it open. Still, it does not have what we call in Chinese a “yellow taste” – a taste that is common in some over-ripe fruits like star-fruits and pineapples.

It is sweet, sweet, sweet. With beautiful smooth honeyed notes, and no sharp edginess or sappiness. Almost like eating nectar. Luscious. Blissfully lush.
Ah! The wonderful gifts of nature.
And soon, there will be another on the way (hopefully)…

Since we're in the garden, let's go see if there are any other fruits that are ready to be picked.
This is one of the two mango trees we have in the backyard…
(One of the simplest and most basic rules of outdoor photography is to never have the subject’s back to the sun. So what does Renee promptly go and do? Take a picture with the subject’s back to the sun. Boy, I’m good.)
Anyway, the two trees produce very different fruits. One produces fruits with yellow flesh that has a firmer, more refined texture. The sweetness is delicate and pure. The fruits from the second tree, on the other hand, have bright orange flesh, with a robust fragrance. The sweetness is more voluptuous and full, the flavors more emphatic. (Oh, there is a picture of the latter fruits in the post I made last year.)

Looks like there are a few fruits that are almost ready for the picking. Ideally, it is always best to leave the fruits to ripen fully on the tree. Unfortunately we can’t do that. As we grow the trees organically, we have lots of little “secret” residents who just love these pesticide-free fruits. Yes, we regularly have to jostle with several squirrels and even a pair of wild parrots for the fruits. And they always seem to know the perfect time to harvest the fruits. So, usually we have to pick them just slightly ahead of that optimum ripeness to ensure we even get to eat any of the fruits of our labor!
See the small tree to the right of the mango tree (in the previous photo)? That is a rambutan tree. It is rather small, I know. Sandwiched as it is between the 15 feet tall mango tree and a slightly shorter star-fruit tree on either side, it has been somewhat deprived of sunshine. It does still fruit though. Unfortunately, the family is not too keen on the type of fruit that it produces. We like rambutans where the husk of the inner seed does not peel off as the flesh is bitten off. And these fruits do that. But, the squirrels seem to like the fruits well enough. So, despite the occasional thought about felling the tree, we’ve kept it. Maybe the squirrels will concentrate on the rambutans and leave the mangoes to us. (One can always hope, right?)

And here are the two star-fruit trees. The fruits are also incredibly sweet (my dad was quite merticulous in searching out good quality sapplings when he planted all the trees so many years ago). Only problem is, we have hardly gotten to eat any. Oh, maybe all of a handful of times in the last 18 years or so! Seriously. The animals beat us to them each and very time. Even when we painstakingly wrap each fruit with paper, they still get to them. So, we have admitted defeat. We nurture the trees lovingly, but it is the squirrels who reap the rewards!

Sorry, no fruits at the moment. Just tiny pink flowers.
Oh, if you are wondering what a pandan (screwpine) plant looks like (since I keep talking about using pandan leaves as flavoring in cooking), here’s one…

Oops. That is a rather messy looking plant. Try this one…

Recently transplanted plant I think.

There are also lots (and I mean lots) of aloe vera plants dotted all around the garden. (My dad loves aloe vera - loves growing them). We have them growing in pots.

And in the ground. Actually, the ones in the pots could be awaiting transplanting. I’m not sure. Can you tell? I’m really not a gardener.
So that was a little impromptu mini-tour around the garden. I wish we still had the durian tree to show you, but that succumbed to illness after never having once flowered or borne fruit in its 16 years of existence. A botanist friend told us it was because there were no durian trees in the surrounding vicinity and thus cross-pollination was not possible. And so it would seem our poor durian tree was stricken with loneliness and unbearable solitude, and eventually gave up.
Copyright © 2004 Renee Kho. All Rights Reserved.
Please contact me for permission to copy, publish, distribute or display any of the images or text contained in this article.
11:30 AM in Other Shiok-Eats | Permalink | Comments (12) | TrackBack
Petite Thai & Robust Vietnamese

I’ve written previously about the chiku fruit (known as the “fruit of life” in Chinese), and about my wondrous first experience of it.
Since then I have been eating and enjoying these fruits on a very regular basis, especially seeing how the current season seems rather extended. I’ve always bought the Vietnamese variety. However, the other day, I decided to give the Thai version a test-run.
While both are chiku fruits, the two varieties are quite different both in appearance and taste. The Vietnamese is a rounded oval shape, with medium brown colored skin that is flecked with yellow and green tones. The Thai, in contrast, is petite, elongated and slender, with a reddish-brown mien that is almost suede-like to the touch.

Inside, the Thai yields a smoother flesh, with a more refined, less grainy texture than the more robust Vietnamese. However, the latter satisfies more with its luscious, voluptuous sweetness and full-bodied, velvety caramel flavors. The Thai seems almost bland in comparison. The sweetness is more subtle and delicate. It is more of an aftertaste of sweetness rather than an emphatic and attention-grabbing lead note. It doesn’t have the assertive caramel aromas of its Vietnamese cousin. I personally think that is one of the biggest appeals of the chiku fruit – that distinctive sweet, nectar-like caramel flavor. Certainly, that is the part I like most about eating the chiku.
While we are on the subject of the Vietnamese chiku, maybe I should elaborate a little on the choosing and eating of this fruit. Since I first wrote about it back in February, I’ve received feedback that some people’s experiences of the fruit have been a lot less than what I had described.
Since that first, almost orgasmic, experience of the chiku, I too have encountered quite a few unsatisfactory experiences with the fruit. I think there are several reasons for this. Most of the fruits sold here in Singapore are picked well before they are ready. This allows the producers time enough to ship them, and gives our local retailers a sizeable storage window, to ensure they can maximize the display life of the fruit. All this just means that the fruits are ripened in storage. Not the best way for any fruit.
However, that doesn’t mean wonderful tasting fruits can’t be found. I think for the greater part, the chiku does manage to ripen well under such less-than-perfect conditions. But there are also quite a few duds in each mound of chiku. These are bland, with a watery, squishy texture that reminds me of a raw potato!
So, what to do? This is by no means scientific or a sure-fire rule, but I’ve found quite often that the less visually appealing fruits tend to ripen a lot better than the “prettier” looking ones! The chikus with the smooth, even coloring and blemish-free skin seem to ripen less readily and successfully than those that may have slight mottling or roughened skin. Certainly gives new meaning to the saying that “it’s not what’s on the outside, but what’s on the inside, that counts”! In this case, the treasure certainly seems to be the beauty within, and not the appearance with-out!
I think it is also important to choose fruits that yield a tiny bit to slight thumb pressure. (But please don’t go pressing every chiku in sight at the supermarket or the wet market, or I’ll have a bunch of irate grocers pounding on my door! ![]() ) Then, when these come home, just let them sit outside for 1-2 days (they don’t ripen so well in the fridge I find). And usually they come to their caramel-y and sweet peak when they are soft to the touch. Not just yielding slightly to pressure, but soft. Yet not mushy. It should be at a softness beyond what would normally be deemed “ripe” in other types of fruit.
) Then, when these come home, just let them sit outside for 1-2 days (they don’t ripen so well in the fridge I find). And usually they come to their caramel-y and sweet peak when they are soft to the touch. Not just yielding slightly to pressure, but soft. Yet not mushy. It should be at a softness beyond what would normally be deemed “ripe” in other types of fruit.
One caveat. The fruits have to be watched rather carefully when left out to ripen. My own experience is that they can tip from ripe to over-ripe very quickly. Sometimes within a matter of a half day or so, especially in our very warm and humid climate. So, if need be, I get them into the fridge just before they peak and let them finish ripening in the fridge.
And so far I’ve experienced many lip-smacking encounters with the chiku. I’m still well in love with this fruit! ![]()
Copyright © 2004 Renee Kho. All Rights Reserved.
Please contact me for permission to copy, publish, distribute or display any of the images or text contained in this article.
10:49 AM in Other Shiok-Eats | Permalink | Comments (8) | TrackBack
Thursday, May 27, 2025
Oodles of Noodles

More “fridge-clearing” food.
As I was clearing the fridge of food items that needed to be used up (and that prompted me to make my banana breads), I also discovered a couple of packets of dried noodles that have been sitting in the fridge for who-knows-how-long. For months, they have sat there, long-forgotten, neglected and ignored. They looked rather forlorn in their already opened packages. Some of their traveling companions have long ago already been happily utilized and turned into delicious dishes, and they have remained ever hopeful that their turn would come soon. And now, finally, the time has come.
There were some Japanese sobacha (green tea buckwheat noodles) and some Taiwanese “milk noodles”. So, we decided to have a very simple and light dinner for a change. Just noodles with some easy-to-do toppings.
There are no recipes here, and these are not “established” styles of konlo (dry-toss) noodles. That evening, it was more a case of an almost haphazard throwing together of whatever ingredients we had on hand… no worries or thoughts about presentation, ingredient color coordination and so on. The flavor combination in the case of the soba was unorthodox to say the least, but it actually worked pretty well.

First, the milk noodles. These were simply cooked in boiling water until al dente, drained and immediately tossed with a mixture of sautéed shallots, lightly sautéed minced garlic, a little shallot oil, a dash of light soy sauce and a dash of sesame oil.
The noodles were then topped with a very simple dish of thinly sliced beef tenderloin sautéed with garlic, shallots, ginger, oyster sauce and light soy sauce. It was a variation of the “beef with szechuan vegetable” recipe that I had posted previously. The differences being that the red chillies and szechuan vegetable were omitted, and instead of using large onions, I opted for shallots. The dark soy sauce was also left out this time around, as I wanted a lighter coloring. The oyster sauce thus provided the color for the dish.
And to complete the noodle dish, a serving of flowering cai xin vegetables – boiled till tender and tossed with some garlic-shallot oil.
Ta-da! Ready to be served.
This was what the rest of the family had, preferring as they did to have some meat as part of their dinner meal. I, on the other hand, wanted something very, very light, and opted for a vegetarian noodle dish…
I had the sobacha. Now, green tea soba would usually be served as a cold noodle dish – most commonly eaten plain and without embellishment, with just a simple shoyu based dipping sauce. My version, however, was a real mix of styles. It was unorthodox and unconventional, but not intentionally so. It just happened that way. I sort of simply brought together whatever it was that needed to be eaten up and arrived at something that turned out to be very tasty.
Remember the “mistake” with the spicy bean paste and hoisin sauce mixture during the making of the grilled banana leaf fish the other night? Remember how I had to scoop out half of the overly sweet sauce mixture and reserve it for another use? Well, here was the “another use”.
I added a little more of the spicy bean paste to balance the flavors out a little, and put it into a dish, together with some sautéed shallots and a little bit of shallot oil, to await the noodles.
The soba was cooked in boiling water until al dente…

…drained, placed into the dish with the sauce mixture and tossed.
Yes, I served the soba warm instead of cold, but topped instead with chilled raw carrots and cucumbers that had been very finely shredded (this was quite important, as it added to the textural experience of the noodle dish).

The combination may sound a little weird, but it tasted very good. Warm green tea soba, tossed with an intensely flavored, punchy spicy bean paste sauce, and topped with cool, refreshing vegetables. The flavors worked, the textures worked, and even the contrast between warm noodles and chilled vegetables worked – very well at that. I really enjoyed the dish!
And oh, by the way, this spicy bean paste would make a great base for dan-dan mian or zha jiang mian. For a very simplified version, simply sauté some minced pork (or chicken, if preferred) with minced garlic and the spicy bean paste sauce, and serve it atop Chinese la mian, or other types of Chinese noodles like the “milk noodles” above. For more complex flavors, include some very, very finely diced Chinese mushrooms and pressed/firm tofu in the meat mixture.
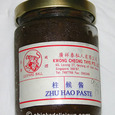
I like this brand of spicy bean paste. It’s a recent discovery. Previous brands that we’ve tried have been found wanting either in terms of the flavor balance or because of the additives and preservatives used in the production of the sauce. This version, I feel, has a nice balance between the saltiness and the spiciness of the sauce, and is richly flavorful, without any apparent additives or preservatives (if the label is to be believed). I have not detected any aftertaste of MSG or other additives, so I’m well pleased. In fact, this sauce is rather addictive. I really like it with noodles, and am already planning my next noodle sortie, with it as the starring ingredient.
I am also reminded of how much I really like the Taiwanese “milk noodles”. I had forgotten all about it, but now that I’ve re-discovered it, I think I will go out and buy another pack. It tasted so good.
I love noodles. I’m a real noodle person, probably more so than I am a rice person! Oodles of noodles. Exactly my kind of a meal!
Copyright © 2004 Renee Kho. All Rights Reserved.
Please contact me for permission to copy, publish, distribute or display any of the images or text contained in this article.
03:11 PM in Home Cook: Rice, Noodles etc | Permalink | Comments (4) | TrackBack
Wednesday, May 26, 2025
Double the Work, Twice the Enjoyment
A sudden realization hit that there were quite a few things in the kitchen that needed to be cleared / eaten / used up – and cleared / eaten / used up very, very soon, at that. There was a whole bunch of bananas that were already going mushy and that no-one seemed to want to eat. There was a whole tub of yogurt that was reaching “crossover-to-the-other-side” time. Plus, there were still a few banana leaves in the refrigerator which were already starting to turn brown from oxidation.
And the fastest and simplest way to use them all up in one go? Make banana bread.
I like banana bread, as does the family. But only if it is made with just fresh (and real) bananas, and no banana flavorings or essences. We find the taste and aromas of these additives too overpowering and artificial. So, more often than not, the only time the family gets to eat banana bread (or cake) is when I decide to make some. (Yep, in this family, I’m the designated baker and the rest are just eaters!) And I think during the past few weeks, my mum must have been wanting banana bread because she has mentioned banana bread to me (albeit in general terms) at least three times on three separate occasions whenever I have said I was going to do some baking.
So, with all these ingredients needing to be made useful, it was the perfect time to make a banana bread. No, actually two banana breads. There were a lot of bananas to be used up! But instead of simply doing a double portion of one recipe, I decided to try out two different recipes at the same time.
I have accumulated quite a number of banana bread recipes in my recipe folder… recipes that I have come across and that have looked good or interesting enough for me to clip/print and file. Most of them I have never even tested. So this was a good opportunity to give two of them an airing, and compare the differences or similarities in tastes and textures between the two.
Both recipes are for low fat banana bread. (Yes, I’m afraid the family and I are still on a period of healthier eating after an extended period of over-indulgence).
The first is one from epicurious.com, which I found by following a link given by a reader in the comments box of one of the food blogs that I read regularly (I’m forgetting which one exactly at the moment). The second is from cookinglight.com, a website that I have been frequenting fairly regularly of late, and from where I’ve found a few recipes that have worked rather well.
The first recipe is for a plain banana bread, and it uses only 1 tablespoon of oil, with buttermilk (which I substituted with yogurt) helping in the leavening and moistness departments. The second is for a chocolate marble banana bread. And of course, that was the very reason why the recipe caught my eye in the first place! I think bananas and chocolate are a very natural pairing. They have great flavor synergies – one enhancing and complementing the other, and thus in turn, becoming even better in and of themselves. Most of the time, it is pretty hard to go wrong with this combination.
Low-Fat Banana Bread
[adapted from a recipe taken from epicurious.com, which first appeared in Bon Appetit, August 1997]
1¾ cups plain flour
2 teaspoons baking powder
½ teaspoon baking soda
½ teaspoon salt
2 large eggs
¾ cup sugar
1 cup mashed ripe bananas (about 3 medium)
1/3 cup buttermilk *
1 tablespoon vegetable oil
1 tablespoon vanilla extract
* I didn’t have buttermilk, so I substituted with yogurt mixed with a dash of milk to lighten the consistency slightly, and it worked perfectly well.
I lined the 8½ x 4½ x 2½ inch loaf pan with my remaining banana leaves. I just thought the leaves would impart a lovely aroma to the loaf (banana bread with banana leaves… a natural fit, no?) and be a nice way to prevent the loaf from sticking to the pan, plus it was a good way to use up the excess leaves sitting in the fridge. Granted, it is not the common or regular thing to do with banana bread. But that’s probably because banana bread is a Western creation, and cooking (or baking, in this case) with banana leaves is more an Eastern tradition. But that’s not saying they can’t both come together in my banana bread. ![]()
• If not using banana leaves, coat the loaf pan with cooking spray.
• Pre-heat the oven to 160C or 325F.
• Lightly spoon the flour into the measuring cups, and level with a knife. Combine the flour, baking powder, baking soda and salt. Sift and set aside.
• Break the bananas into chunks, sprinkle with a little sugar (taken from the ¾ cup of sugar listed in the recipe), and mash with a fork. [The sugar helps to prevent the bananas from oxidizing into a dark, rather unappealing, color. That’s why my loaves look lighter in color than are commonly the case. I also like to leave a few small chunks of un-mashed bananas in the mixture, for added textural variety.]
• Using an electric mixer, beat the eggs and sugar, on medium-high speed, until thick and light – about 5 minutes.
• Mix in the buttermilk, bananas, oil and vanilla. Beat until blended.
• Fold in the flour mixture until just blended.
• Bake until the top is golden brown and a skewer inserted into the center comes out clean – about one hour. Turn out onto a rack, and let cool.
I have to agree with what almost all the reviewers on epicurious.com said about this recipe– this is a beautifully moist banana bread, and no, you would never guess, from tasting it, that it is low fat. The texture is nicely soft and fluffy, with just the right amount of denseness that is required of a banana bread. The crumb is tender and refined.
I think the only adjustments I will make, if I am to make any, would be to:
• Increase the sugar slightly to 1 cup. (I found the sweetness just a teeny bit too subtle and understated.)
• Increase the amount of bananas slightly to maybe about 1¼ cup. (I think this will accent the banana flavors more, without making the loaf too moist.)
Low-Fat Marbled Chocolate Banana Bread
[adapted from a recipe taken from cookinglight.com, which first appeared in Cooking Light, September 2003]
2 cups plain flour
¾ teaspoon baking soda
½ teaspoon salt
1 cup sugar
¼ cup butter, softened
2 large eggs *
1/3 cup plain low-fat yogurt
1½ cups mashed ripe banana
½ cup semisweet chocolate chips
* the original recipe used ½ cup of egg substitute, which I estimated to be equivalent to about 2 and a bit eggs. Since I did not have in my possession anything called “and a bit eggs”, and since I was not inclined to crack an egg and measure out teaspoonsful of it, I simply used 2 large eggs, with no harm done to humans or banana bread.
• Coat an 8½ x 4½ x 2½ inch loaf pan with cooking spray.
• Preheat oven to 175C or 350F.
• Lightly spoon the flour into the measuring cups, and level with a knife. Combine the flour, baking soda and salt. Sift and set aside.
• Break the bananas into chunks, sprinkle with a little sugar (taken from the 1 cup of sugar listed in the recipe), and mash with a fork. Set aside.
• Melt the chocolate chips in the microwave at HIGH for one minute or until almost melted. Stir until smooth. Allow to cool slightly.
• Using an electric mixer, beat together, on medium speed, the sugar and butter until well blended – about 1 minute.
• Add the eggs and beat until blended.
• Follow with the mashed bananas and yogurt, and again beat until blended.
• In batches, add the flour, and mix at low speed until just moist.
• Measure out 1 cup of the batter, and add it to the melted chocolate, stirring until well combined.
• Spoon the chocolate batter alternately with the plain batter into the loaf pan. Swirl batters together using a knife.
• Bake for about 1 hour and 15 minutes** or until a wooden skewer inserted into the center comes out clean. Cool 10 minutes in the pan on a wire rack. Remove from pan, and cool completely on a wire rack.
** I baked this loaf together with the previous loaf at the lower temperature of 160C/325F, and it took about 1½ hours for the loaf to cook completely.
This banana bread is incredibly moist, almost too moist. It is very, very flavorful, with a gorgeous chocolatey taste. I love how this loaf tastes – both the banana flavors and the chocolate notes are clear and distinct, and yet meld harmoniously and deliciously together.
One other thing I really like about this bread is the rich, golden brown crust. I’m a huge crust fan when it comes to cakes and bread, and this loaf has a gor-geee-ous crust! And yet, despite the lengthy cooking time, which contributes to the good-looking crust, the crumb of the bread is very soft and refined, and extremely moist.
I think I only have two minor gripes about this recipe. One is that the loaf is a tad too moist. And the second is that working with chocolate chips is less than ideal. They don’t melt well or smoothly, and make the loaf a tad too sweet. So, the next time around, I will want to make the following changes…
• Use either dark chocolate or cocoa powder. The former will melt much better, give a smoother consistency and be less sweet. The latter will also be less sweet, with the added bonus of being low fat as well.
• Use the stove-top to melt the chocolate. I’m not a big fan of using the microwave to melt chocolate, even though I can understand the argument for ease and convenience. But I think it is just as easy to do it on the stove-top – a method that I much prefer, and one which I feel gives better results, although I can be accused of being biased. ![]()
• If using chocolate chips, I will not melt them, but instead fold them in whole to create a chocolate chip banana bread, which I think has the potential to be another big hit in the “yummilicious” stakes. Better still, fold shaved dark chocolate into the batter instead of chocolate chips, for a speckled banana bread. Now, won’t that be something?
• Reduce the amount of bananas used to 1¼ cups. I’m thinking this seems to be the ideal amount for any banana bread. The previous recipe, with only 1 cup of bananas needs a little bit more, and this recipe, with 1 ½ cups, has a little too much.
But other than these minor points, this marbled chocolate banana bread was a huge hit with the family.
Marbled Marbling
I also experimented with using a different marbling technique from my previous marbling attempt.
As you can see, the result was a much more diffused effect compared to the previous attempt. Perhaps a little too diffused for my liking. Hmmm. I think I was a little over-zealous with wielding the table knife. Still, it was rather “artistic” I thought ![]() , with different effects in each slice of bread…
, with different effects in each slice of bread…
I’m not sure which I prefer actually. The large chunk of chocolate as in my previous attempt, or this more diffused version. Which do you like? Honestly speaking though, I feel I may just fall on the side of the “big chunk of chocolate” camp. I quite enjoy having that big chunk of chocolatey cake/bread to munch through and savor. From an aesthetics point of view, the diffused pattern probably works better, but even then, I still need more experimenting to get it right.
Bonus Tip
Here’s a great baking tip I would like to share with you. After my previous post on the marble cake, Reid very kindly offered me a simple, but very useful and effective solution to the cracks and fissures that I was getting on the cakes which were baked in loaf pans. He suggested wrapping the outside of the cake pan with a damp tea towel before putting the cake into the oven. I tried it out on one of the banana breads, and these were the results…
Without the damp tea towel.
With the damp tea towel.
Amazing, huh? The marbled banana bread, which had the damp towel-wrapped pan, had a beautifully even, flat and smooth surface, while the plain banana bread came out of the oven with a wide-mouth grin that stretched down its center.
So simple, and yet so effective. What a great tip! Thanks a bunch, Reid! ![]()
Which is the fairer of the two?
So, after all that, how do the two banana bread recipes compare?
The family was split into the “I like my banana bread plain” camp and the “I like anything with chocolate in it” camp. But all agreed that both versions were very good in terms of taste, flavors and aromas, and in terms of the moistness and tenderness of the crumb. All also agreed that the great part was that the loaves were healthy without tasting healthy (you know what I mean).
I think both recipes are very good in of themselves. And both will be better still with the little adjustments that I have noted above.
I also think both are very versatile – the plain banana bread recipe can very easily be made into a marbled version, and the marbled recipe can also be made into a plain loaf. Both can be further varied by adding nuts or dried fruit. They can be made even healthier by substituting some of the flour with wheatgerm or oatbran.
These banana breads are great alternatives to bread for breakfast or just as an afternoon snack. And these two recipes are simple, quick and easy (definitely quicker and easier than making bread!), and are great fall-backs for whenever we want tasty but healthy banana breads.
Happy banana bread-ing!
Copyright © 2004 Renee Kho. All Rights Reserved.
Please contact me for permission to copy, publish, distribute or display any of the images or text contained in this article.
10:22 PM in Home Baker: Lighten Up! Breads & Quick Breads | Permalink | Comments (13) | TrackBack
Information
Here's some technical/housekeeping information...
Recently, some of you may have experienced difficulties posting comments to this blog and/or other blogs that are hosted on TypePad, and here's the reason why:
(as quoted from an announcement by TypePad)
Recently we added some simple tests that eliminate a large amount of comment spam on TypePad blogs. According to our logs, most spammers try to cover their tracks by sending their posts through an "Open Proxy Server". An Open Proxy Server is a misconfigured or infected machine that forwards web requests for anyone on the entire Internet. The spammers use these proxies to avoid the one commment-per-minute restriction and the Blog Owner's IP address blocking.So, we started blocking Open Proxies -- all 1.5 million of them. It immediately reduced the comment spam problem. In fact on our first day it blocked over 20,000 spam attempts!
While effective, these open proxy checks are not always perfect. If our server thinks your machine is an open proxy it will display an error message when you try to post:
Your comment has not been posted because the computer you are using appears on a list of machines exploitable by spammers. You can fix the problem by consulting the following results:
If this happens don't panic, it's possible that a virus or malware installed an open proxy on your computer. Run a scanner from a trusted vendor, such as Trend Micro's HouseCall to rid your computer of o-pen proxies and virus infections. An extensive discussion of the problem and possible solutions written by Chrstian Wagner is also available.When you are confident your machine is secure you can remove the blocks. You can do this by visiting the web sites mentioned on the TypePad error message you received when you tried to post.
Unfortunately, I'm not very tech-savvy, so I'm really not too sure what the technical aspects entail, but I hope the above information helps those who have been experiencing difficulties to find out what is going on.
06:35 PM in Crumbs & Tidbits | Permalink | Comments (3) | TrackBack
Tuesday, May 25, 2025
Spice It Up!

What do you do with a surfeit of banana leaves (leftover from making nasi briyani the other night)? Why, make ikan pangang of course. “Ikan pangang” is Malay for grilled/barbecued fish, and if you visit the hawker centers (in Singapore) or the roadside stalls (in Malaysia) this is one of the simplest, yet tastiest seafood dishes available.
Usually, fish such as stingray or pomfret is used. It is slathered with spicy sambal belacan (dried shrimp and chilli paste) and then cooked over a smouldering charcoal fire. Traditionally, the fish is wrapped in banana leaves before being barbecued, but this has, in recent times, become more an optional item. The fish cooked in this way takes on a gorgeous smoky flavor, intermingling with the perky and punchy spice paste, with the banana leaves providing a wonderful fragrance and aroma as a finishing touch.
We had three pomfrets fresh from the market that morning – two white pomfrets and one black pomfret. This meant that two different treatments were required where the fish marinades were concerned, as white and black pomfrets have very different textures and tastes. The Chinese hardly ever use black pomfret, favoring instead the silkier, smoother and more refined flesh, and the more delicate flavors of the white pomfret. On the other hand, the Indians tend to prefer the black pomfret, for its denser flesh and stronger, earthier flavors. While white pomfret can be either steamed or fried, the black pomfret doesn’t take well to steaming at all and is usually fried. But both can be very happily and tastily grilled or barbecued.
I didn’t feel like using the usual sambal belacan marinade, yet I wasn’t sure what I wanted to use. So, it was a case of simply throwing together various condiments, and hoping for the best! The logical thing was to do the white pomfrets sort of Chinese-style, and the black pomfret Indian-style.
What follows are not really recipes, as there are no hard and fast rules as to what spices or condiments to use, or in what quantities. There is a great deal of room for experimentation and creativity. Pretty much whatever strikes your fancy, within reason, would work.
The fish were cooked under the kitchen broiler. Sure, they would have tasted even better if grilled over charcoal, but these were still very flavorful and tasty renditions.
Spicy Grilled Black Pomfret
For the black pomfret, I used a mix of various spices combined with a little yogurt to form a nice smooth paste.

First off, I prepared some ginger and garlic paste. This was just 6 cloves of garlic whizzed together in the food processor with about 1½” of peeled ginger to form a paste. The yield was about 3 heaping tablespoonfuls of paste, which was just nice for the three fish.
The spice paste was made up of 1 heaped tablespoon of ginger/garlic paste, 1½ rounded heaping teaspoons of curry powder (any kind would do), ¾ rounded teaspoons of home-made chilli paste (our home-made paste hits fairly high notes on the heat scale, so I used a fairly moderate amount, but if using chilli powder, 1 to 1½ rounded teaspoons would be fine, depending on the desired heat level), 1 rounded teaspoon coriander powder, ½ rounded teaspoon cumin powder, ½ rounded teaspoon fennel powder, 2 heaping tablespoons of low fat plain natural yogurt, and about 1 to 1½ heaped tablespoons of chopped fresh coriander leaves (on hindsight, I should have added more of the latter).

The black pomfret was slathered liberally on both sides as well as in the cavity with the spice paste, and left to macerate in the refrigerator for a couple of hours.

It was then placed on a piece of banana leaf (which in turn was placed on a baking sheet) and cooked under the broiler for about 13-14 minutes. (Cooking times will vary depending on the size and thickness of the fish.)
I experimented with cooking the black pomfret and one of the white pomfret uncovered – simply placed on top of the banana leaf, and turned them half way through the cooking time. For the other white pomfret, I sealed it completely in a banana leaf “packet” and grilled it for the same amount of time. I wanted to see if there were any differences in the “crust” and texture of the fish between the two methods. I had expected the covered fish to be “wetter”, as the sealed banana leaf packet would trap the steam and thus cook the fish by a sort of combined steam-and-grill method. And I had expected the uncovered fish to have a crispier skin from being broiled directly under the broiler.
Well, as it turned out, the fish in the sealed banana leaf packet came out nicely crusty and with intensified flavors, as all the aromas were “trapped” and thus absorbed by the fish. The texture was pretty much the same as the uncovered fish, only more flavorful and aromatic. So, fully sealed packets are the way to go. On hindsight, it was all very logical, but I didn’t think of it at the time.
Grilled White Pomfret with Spicy Bean Paste
For the Chinese-style white pomfret, I opted to use spicy bean paste with a touch of hoisin sauce. I had just bought a new brand of spicy bean paste that was highly recommended by my neighborhood grocer as being very tasty. He was suggesting it be used as a topping for noodles to make zha jiang mian or dan dan mian (which I subsequently did, and that post will be coming up). But first, I decided to try it out on fish.

I don’t actually know the exact quantities I used to make up this marinade, because of a funny incident while I was putting it together. I had just finished mixing up the curry spice marinade, and was about to start on this one, when someone called for me from upstairs. As I walked out of the kitchen to see what the fuss was about, I said to A., our domestic helper: “use 4 big tablespoons of the spicy bean paste, and about 2 tablespoons of hoisin sauce, just to give a little bit of sweetness”. I came back into the kitchen 4 minutes later, and guess what? Yep, she had mixed 4 big tablespoons of hoisin sauce and 2 small tablespoons of spicy bean paste. I was wondering why the color of the marinade was so dark, and when I first tasted the marinade I was surprised that it was so sweet. Bean pastes were usually very salty. Could this have been a sweetened version that my grocer had recommended? I tasted the bean paste from the jar. Nope, it was very salty! I asked A. about it, and she then confirmed what I was beginning to suspect.
At first I tried adding more of the spicy bean paste to balance out the sweetness. But one quarter jar of bean paste later, the marinade was still cloyingly sweet (for what was meant to be a savory mixture). So, I scooped out half the marinade and reserved it for some other use (surely I would be able to think of something to use it for when the time came). And to the remaining half of the marinade, I added a lot more spicy bean paste. In the end, I had used half a jar of bean paste (including the quarter that had gone in previously) before the marinade started tasting about right, to me at least.
So, if I was to hazard a guess, I would say maybe about 4-5 tablespoons of spicy bean paste (depending on how salty and spicy the brand of bean paste is) with about 1 to 1½ scant tablespoons of hoisin sauce would be about right. This gave a marinade with a distinct note of spicy heat, so less spicy bean paste would be recommended if a milder version is desired.
To the bean paste-hoisin mixture, I also added the remaining 2 tablespoons of ginger/garlic paste (1 tablespoon per fish), and 3 heaped tablespoons of chopped fresh coriander leaves (about 1½ tablespoons per fish).

Again the fish was marinated for a couple of hours in the refrigerator.

Then wrapped in banana leaves, and placed under broiler for about 14 minutes, or until just cooked.
Yes, I know, it’s a rather messy and not very pretty photo, but the fish tasted wonderful!
Both the white and black pomfrets were a success with the family. The curry powder and spice mix worked very well with the black pomfret, while the spicy bean paste worked superbly with the white pomfret. One family member declared that it was tasty like fried fish but as healthy as steamed fish.
I myself was a little surprised at how well the spicy bean paste-hoisin sauce marinade worked. It was richly flavorful, with a nice spicy kick and just enough sweetness to balance out the saltiness of the bean paste. The flavors were complex with just the right amount of intensity. This is something that is definitely worth repeating. Only the next time, for both marinades, I would add even more chopped coriander leaves. The whole family loves coriander, and we all felt there wasn’t quite enough, even though I had used a big bunch for the three fish.
There were three fairly large pomfrets for five people. That was quite a lot of fish to go around. But there wasn’t a scrap of meat to be found by the time we were done. I think the bare skeletons of the fish spoke for themselves.
Copyright © 2004 Renee Kho. All Rights Reserved.
Please contact me for permission to copy, publish, distribute or display any of the images or text contained in this article.
03:38 PM in Home Cook: Fish & Seafood | Permalink | Comments (14) | TrackBack
Monday, May 24, 2025
Cool & Crispy, Sweet & Sour, Hot & H’appetizing

This is not really a recipe. But I had a query about the cucumber relish-salad that had accompanied the nasi briyani in yesterday’s post, so I thought I would post it up for anyone else who may be interested.
This is something we make very, very regularly at home. It is so easy, and yet really appetizing. A wonderful mix of sweet, sour and chilli-heat combined with the cool, green crispness of cucumbers.

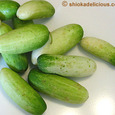
We like to use either these small Thai cucumbers, which are a lot crispier and crunchier than regular cucumbers, or the dark green, also very crispy and crunchy, Japanese cucumbers (and as seen in the main picture above).
For the Thai cucumbers, we would simply trim the ends off each cucumber, remove the skin, cut it in half length-ways and scoop out the seeds.
For the Japanese cucumbers, sometimes we use them with the skin on, for a crunchier crunch ![]() , and other times, we skin them for a more delicate crispiness. The cucumbers are halved lengthwise, the seeds scooped out and then cut into 2” long pieces.
, and other times, we skin them for a more delicate crispiness. The cucumbers are halved lengthwise, the seeds scooped out and then cut into 2” long pieces.
Once cut, the cucumber pieces are sprinkled with salt and left to stand for about 20-30 minutes. During this time, the cucumber pieces will start “watering” and releasing liquids.
Drain the cucumber, but do not rinse. Next, sprinkle, fairly generously, with sugar and again leave to stand for about 20-30 minutes.
We sometimes add strips of fresh red chilli to the salad, for color as well as flavor. And if we happen to have good-quality sweet fresh pineapple, that is a wonderful addition too.

Toss the cucumbers, fresh red chillies (and pineapple, if using) with a very simple “dressing” of rice vinegar and Thai chilli sauce, combined roughly in a ratio of 2:1. However, either of the flavors can of course be adjusted to suit personal preferences. More sugar can also be added at this point if still insufficient.
[Personally, for me, fairly standard proportions would be approximately 3-4 tablespoons sugar, 3-4 tablespoons rice vinegar and 2-3 tablespoons Thai chilli sauce, depending on how much heat I want, and who I’m serving the salad to! And I pretty much scale from here according to the amount of cucumbers I’m using.]
The key is to achieve a fresh and refreshing balance of sweetness, tangy tartness and a suitably sharp spicy kick. It should feel like a stimulating, bright, sunny taste of summer in every bite. Each piece of cucumber is both a soothing, cool crispness, and at the same time, a revitalizing, warm, sunshine-y burst of flavor as it hits the palate.
It is best to make the salad ahead of time, so that it can macerate in the refrigerator for a few hours after being tossed. This ensures the cucumbers have absorbed all the flavors and really helps them to crisp up very nicely too. Plus, the relish tastes best, in my opinion, well-chilled.
I actually sometimes like to make the salad with “a lot” of dressing, so that it forms a sort of liquidy “gravy”, which I then mix into my rice for a very appetizing sweet and sour rice concoction. Now, no matter how jaded my taste-buds may be feeling that day, or how much of a “do not feel like eating” feeling I may be having, with just a few mouthfuls of this relish-salad and/or the dressing over my rice, my appetite is whet once again, and I’m tucking in with gusto! ![]()
(By the way, the above picture shows the relish made with whole small Thai cucumbers, simply skinned, halved and with seeds scooped out.)
This is also a great side accompaniment for sandwiches, roast chicken, roast pork… just about anything really.
A great palate “waker-upper”!
Copyright © 2004 Renee Kho. All Rights Reserved.
Please contact me for permission to copy, publish, distribute or display any of the images or text contained in this article.
11:30 PM in Home Cook: Vegetables | Permalink | Comments (6) | TrackBack
Sunday, May 23, 2025
IMBB? – Around the World in a Bowl of Rice: Nasi Briyani

Last weekend, some friends came over for dinner, and I cooked up some Indian nasi briyani. This allowed me to achieve two purposes: one, a highly enjoyable evening in the wonderful company of close friends, with food that everyone thoroughly enjoyed, and two, the fulfillment of my entry requirements for this fourth installment of IMBB? “Around the World in a Bowl of Rice”.
[For those who are wondering, “Is My Blog Burning?” (IMBB) is a distributed cooking event, inspired and launched by Alberto back in February, with the inaugural edition featuring soups. The baton passed to Clotilde in March with her tartine edition, and yours truly picked up the cake in April. And now we are into May, and Pim has kindly offered to host today’s “rice-y” affair.]
Nasi briyani is Indian by birth, but has been warmly welcomed and adopted by South East Asians. This rice dish now forms an integral part of the Singaporean and Malaysian epicurean landscape, and is highly popular amongst not only the local Indians but also the Chinese and Malays as well. There is even a Malay version of nasi briyani (sometimes spelt as "biryani" or “beriyani”).
What is nasi briyani? In a nutshell, it is a fragrant and spicy delicacy of saffron-flavored basmati rice layered with an equal or greater proportion of spicy meat, with each layer sprinkled with nuts and fresh herbs, then sealed and steamed to finish. The “meat” can be chicken, lamb or mutton, and in modern times, prawns too. The key to a good nasi briyani is the basmati rice. High quality long-grained rice is of the utmost importance in the creation of delicious nasi briyani. Basmati rice is usually graded by its length and the quality of its cashew-like aroma.
I first learnt to cook this dish some 9-10 years ago. At the time, I was going through a “fixated with Indian food” phase and took some cooking classes from a lovely Indian lady. Her name was Lucky (yes, really, that was her name), and she was a wonderful, warm, highly personable grandmother, who was then already in her 60s. With children grown and grandchildren in school, she had decided to turn her great love for Indian food and its culinary culture, and her over 40 years of experience cooking for her family into a profitable hobby – teaching people how to cook authentic, tasty Indian dishes.
Hers was a blend of home-style cooking that had been honed and refined over four decades of cooking two meals a day for her husband and family, and a worldly-wise savvy about Indian restaurant cooking and the “tricks of the trade” so to speak. She loved food and eating. She would go and eat at Indian restaurants in India, Singapore and abroad, and just from tasting the food, she would pick up tips on how to further refine her own cooking style. So, lessons in her home kitchen were filled with insightful housewife tips as well as little nuggets of restaurant secrets for tasty Indian cooking. Her recipes were a wonderful combination of the honesty of home-cooked food (the best, and probably the most authentic, sort of food in any culinary tradition, in my opinion) and a certain restaurant-style refinement. Each cooking lesson culminated in a delicious lunch of 4-5 Indian dishes, enjoyed as we sat around her dining table, eating and swapping cooking and food stories.
Since learning this dish almost a decade ago, I’ve made it a few times, but not in the last 5-6 years. It was only after a recent discussion among friends as to where good authentic nasi briyani could be found in Singapore that I remembered this recipe, and decided to re-visit it and invite the friends over to enjoy it.
I’ve tweaked the original recipe slightly, adding one or two additional spices plus other ingredients, and in some cases adding greater quantities of some of the spices than originally called for.
Right, I shan’t yabber on for much more. I have been told I was too long-winded in my previous IMBB entries. ![]() So, without much further ado… here is my chicken nasi briyani (saffron-flavored rice with chicken).
So, without much further ado… here is my chicken nasi briyani (saffron-flavored rice with chicken).
Chicken Nasi Briyani
(serves 4)
The Rice
400g (approximately 3½ rice-cooker cups) basmati rice
1 litre water
1 tablespoon whole coriander seeds
1 teaspoon whole cumin seeds
2 pieces bay leaf
4 whole green cardamons – lightly broken
2 whole brown cardamons – broken and shell removed *
1” cinnamon
5 pieces cloves
½ teaspoon whole black peppercorn
½ teaspoon salt
few strands of saffron **
3 tablespoons of warm milk
* These may be substituted with green cardamons, if the brown ones are not available. In this instance, I actually used all green cardamons, as I was out of the brown ones.
** Instead of using saffron, some orange food coloring may be used. Simply dilute a couple of drops of the coloring in a little bit of warm water and sprinkle judiciously over rice.
• Wash the rice, and soak in the 1 litre of water for at least 30 minutes.

• Wrap all the spices (except the salt and the saffron) in a piece of muslin cloth and tie to form a spice bundle.
• Add the spice bag and the salt to the rice, and cook, using the soaking liquid, in a rice cooker or a large saucepan.

• In the meantime, soak the saffron strands in the warm milk and set aside.

The longer the saffron is soaked the deeper the color infusion and the more intense the fragrance.
Natural saffron will not give the intense orange coloring often seen in restaurant-versions of briyani. So, for more eye-appeal, it is also possible to use a little orange food coloring in addition to the natural saffron coloring.
The Crispy Shallots
• Peel and thinly slice 6-8 shallots.
• Fry in hot oil until crispy and a deep golden brown.
• Drain on kitchen paper towels.
• Set aside two-thirds of the shallots for the assembly of the nasi briyani, and the remaining one-third for garnish.
• Reserve about 2 tablespoons of the oil that was used to fry the onions.
The Chicken
1 kg chicken – bone-in, skinned ^
9 cloves garlic – skinned
2” piece fresh young ginger – skinned
Marinade:
1 teaspoon chilli powder
1 teaspoon garam masala
½ teaspoon turmeric powder
½ teaspoon salt
180ml natural unsweetened yogurt
Gravy:
1 big red onion (or 3-4 shallots) – finely chopped ![]()
1 teaspoon chill powder ^^
3 teaspoons coriander powder
1½ teaspoons cumin powder
½ teaspoon garam masala
salt to taste
1-2 green chillies – chopped ^^^ (optional)
3 medium tomatoes – peeled, seeded and diced ![]()
4 fl oz (½ cup) evaporated milk ^^^^
1 big bunch coriander leaves – chopped ![]()
½ bunch mint leaves - chopped ![]()
[all measurements are by the rounded spoonfuls]
^ I used 6 large whole chicken legs (with each cut into two - thigh and drumstick), and this came to about 850g.
^^ I used our own home-made chilli paste instead of the chilli powder, as I wanted a more complex flavor and more intense heat (our home-made chilli paste includes some bird chillies among other ingredients).
^^^ Seed and de-vein the chillies if a milder heat is desired.
^^^^ Evaporated milk seems to be the standard used by most Indian housewives, and most of the recipes I’ve seen also call for evaporated milk, although a few use fresh milk instead, with one or two recipes even using just water.
[On a side note, I’ve very recently discovered cooking curries with thick soy milk (Singapore local brand, Sobe, unsweetened version) and found that it actually gives a more “lemak” (rich) texture and mouth-feel than milk, with no soy milk taste at all. And it’s become one of my favorites now for cooking healthier versions of lemak curries. I think it would work just as well in this briyani. However, having said that, the soy milk sold in cartons in Europe and the US probably would not work, as they have a completely different consistency and, if I may be honest, do not really taste like soy milk! Sorry… but it’s true. So, in which case, evaporated or fresh milk would be the way to go.]

• In a food processor, grind together the ginger and garlic to form a paste. There should be roughly four tablespoons worth of ginger/garlic paste. Set aside.

• Clean the chicken and remove excess fat.
• Marinate the chicken with the marinade spices, salt, yogurt and half the ginger/garlic paste. Leave to macerate for at least an hour, but preferably for 4-6 hours.

• In a wok or large deep frying pan, heat the reserved shallot oil. Add the chopped onions and the remaining garlic/ginger paste, and sauté until the onions are soft and translucent.

• Add the marinated chicken.

• Once the chicken has changed color, the chilli powder (or paste), coriander powder and cumin powder goes in. Mix thoroughly.
• Throw in the green chillies.

• The tomatoes go in next. Stir to combine, and leave to simmer for a few minutes.

• Pour in the milk, and mix well.
• Cover the wok and allow to simmer, on low heat, until the chicken is almost cooked (about 20 minutes), stirring occasionally.
• Sprinkle half of both the coriander and mint leaves.
• Season with the garam masala and salt to taste. Mix well.
• Cover again, and leave to simmer on low heat until the chicken is cooked (approximately another 10 minutes), stirring occasionally.
• Remove from heat.
The chicken can be cooked ahead of time up to this point, and set aside. The rice can also be cooked in advance. And both can then be assembled half an hour before dinner is served.
The Assembly
Banana leaves (optional) *
Cooking spray
Deep fried crispy shallots (prepared earlier – see above section “The Crispy Shallots”)
Remaining coriander leaves (see above section “The Chicken”)
Remaining mint leaves (see above section “The Chicken”)
* This is usually not called for in recipes, and is purely optional. I’ve included it in my version of the recipe simply because I like the aromas that the banana leaves impart to the rice.
• Preheat the oven to 190-200C or 375-390F.

• Line a deep casserole dish with banana leaves. Allow enough excess “height” so that the leaves can be folded over to fully cover the assembled rice.

• Put half the chicken, without the gravy, in a single layer at the bottom of the casserole.
• Sprinkle half of the crispy fried shallots and half of the remaining amount of coriander and mint leaves.
• Spread half of the cooked rice over the chicken and herbs. Sprinkle half the amount of saffron-infused milk over the rice.
• Repeat with the remaining chicken, crispy shallots, coriander leaves, mint leaves, rice and saffron-milk.
• Fold the banana leaves down to fully cover the rice. Replace lid of the casserole dish.
• Place into the oven for 20-25 minutes, to allow to the rice and chicken to fully heat through and for the flavors to meld together.
The Gravy

In the meantime, prepare the gravy.
• Return the wok, with the residual chicken gravy, to the stove. Add between ½ to 2 cups of hot water, and simmer on low heat for about 8-10 minutes or until the gravy is reduced to the desired consistency.
[We love having quite a bit of gravy to go with the chicken and rice, and we also like the gravy slightly thick, so I add about 1 cup or so of water. The amount of water added can be varied depending on the amount of gravy desired and the consistency preferred.]
The Chicken Nasi Briyani

• Serve the rice with some raisins, the remaining reserved crispy shallots and toasted cashew nuts sprinkled on top.
If available, I highly recommend serving the nasi briyani on fresh banana leaves (as I did that evening). The entire eating and taste experience is considerably enhanced, and the aromas and flavors are just that little bit more complex and enticing, when the rice and chicken are eaten off banana leaves, instead of plates. Going further still, nasi briyani tastes absolutely divine when eaten not only from banana leaves but also with your fingers! (And not only is it a lot more enjoyable, there is a whole lot less washing up to do!)
That night, I also made up a very simple sweet, sour, spicy cucumber and chilli “salad” (something that I make very regularly) as a light and refreshing accompaniment to the rice and chicken.
Other nice side dishes would be raita (yogurt and cucumber salad), or spicy pickled vegetable salads.
The nasi briyani was a hit! Everyone ended up eating double the amount of rice they would normally eat. The only disappointment was that there wasn’t enough rice and chicken to go around! Everyone was still hankering for more!
My guests demanded to know why I’ve kept the recipe a secret for so long. I haven’t, and it wasn’t intentional. I had just forgotten the recipe existed. But now that it has been re-discovered, I’ll definitely be cooking it more regularly. Already my friends are planning the next “briyani night”…
Copyright © 2004 Renee Kho. All Rights Reserved.
Please contact me for permission to copy, publish, distribute or display any of the images or text contained in this article.
11:03 AM in Home Cook: Poultry & Meats, Home Cook: Rice, Noodles etc | Permalink | Comments (31) | TrackBack
Friday, May 21, 2025
Color My Plate Beautiful

I think sweet potatoes are such wonderful “all-in-one” foods. Wholesome, nutritious (their bright/deep coloring implying an abundance of natural anti-oxidants, vitamins like beta-carotene, as well as minerals) and tasty too. I like them plain, unembellished – in their natural state, or as close thereof as possible. They have a lovely natural sweetness and a nice soft, fluffy texture (the good ones that is), and they warm and fill the tummy in a rather comforting way.

These purple ones are great. No, they are not yams or taro, but sweet potatoes. Isn’t the color gorgeous? I adore the color – deep, luscious purple melding and harmonizing with shades of rich plum, violet, lilac and blue, and sprinkled with tiny flecks of white, almost like sparkling stardust.
We always buy some each time we come across them in the market. I find them more aromatic and fragrant than the more commonly available orange-fleshed ones, with a firmer texture and bite.
Japanese purple sweet potatoes are somewhat different…

(See the little sticker on each sweet potato? ![]() That’s “veggie man”, or so it says on the sticker, and he’s confirming that these are “original Japanese sweet potatoes”. Cute, huh? The sticker even has the Health Authority’s stamp approval, shown by the inclusion of the “eat healthy” pyramid logo on it.
That’s “veggie man”, or so it says on the sticker, and he’s confirming that these are “original Japanese sweet potatoes”. Cute, huh? The sticker even has the Health Authority’s stamp approval, shown by the inclusion of the “eat healthy” pyramid logo on it. ![]() )
)
Although these Japanese tubers have a gorgeous purple hue with a touch of fuschia overtones, the flesh inside is actually a cheery bright lemony yellow…

After cooking, the skin of the sweet potatoes turns a luxurious, dusky plummy color. Very nice.
These Japanese varieties have a somewhat firmer, denser texture – less fluffy than our purple and orange varieties. When in their prime season, they have a nice, subtle sweetness and softness.
I like the local ones with the orange-colored flesh too…

When really nice ones are available, these are so soft and fluffy, with a very tender texture, and a wonderful, subtle natural sweetness. They truly do not need further accompaniments. They are lovely on their own, or at the most, cooked in the lightest and simplest manner.
More often than not, I usually cook the sweet potatoes in one of two ways. Either in a sweet ginger “soup”, or simply steamed then baked. The local yellow-fleshed sweet potatoes I tend to cook only in the sweet soup; the local purple-fleshed ones* I would steam/bake only; while the orange-fleshed and the Japanese purple ones I would do either depending on how I feel and how good the tubers are when I buy them.
[* These also make gorgeous looking oven-baked chips or crisps. Simply slice very thinly – as thin as possible – with a mandolin, and lightly coat with some cooking spray, a light sprinkle of salt if desired, and into the oven until nicely crisp.]
To make “baked” sweet potatoes, I would steam the tubers for about 25 minutes until nicely tender, then pop them into the toaster oven for 3 minutes on one side, turn them, and toast another 2 minutes or so on the other side, just to “crisp” up the skin a little. And then, I would just munch on them whole, skin and all – like a baked potato, only sweeter, fluffier and more tender. Lovely! There’s no need for butter, sour cream or any other enhancements. Pure, simple and true.
When I want a very simple and light lunch, this is it. Just 2-3 small sweet potatoes, and I’m satiated and happy.
Sweet potatoes. Such a humble, unassuming root vegetable, and yet it can bring an amazing burst of color, texture and subtle sweetness onto our plates and into our diets.
Copyright © 2004 Renee Kho. All Rights Reserved.
Please contact me for permission to copy, publish, distribute or display any of the images or text contained in this article.
03:38 PM in Home Cook: Light Touches | Permalink | Comments (4) | TrackBack
Thursday, May 20, 2025
Modern Asian
Sorry for the lack of updates over the last few days. Life has kind of gotten a hold of my time… Hmmm… what’s that song that was a hit in the 80s? The one that went… “something’s gotten hold of my heart, spinning me around…” I think it was by a British band… No, actually, it could have been by the Irish band Simply Red. Remember them? Remember the song? Not to worry. It’s just that the tune suddenly popped into my head while I was typing the first line. Although for me, it has been more a case of “life’s gotten hold of my time, spinning me around…” and sapping my energy.
I was going to write a post today, but am completely zapped. I’ve been averaging only 3 hours of sleep every night for the past 10 days or so, and am currently functioning purely on sheer grit and will-power to keep my eyes open and brain working!
So, it will be just pictures tonight. No words.
Here’s a look at the modern face of Asian cuisine…
These are more pictures from the Food & Hotel Asia 2004 (FHA 2004) that was on in Singapore last month, and at which I spent a wonderful couple of days ogling at and tasting some gorgeous food.
First, a quick little note: all the food had some kind of preserving jelly applied to them, to allow them to sit out in the open for a few days without rotting and giving off a stench. That’s why they all looked so glossy and shiny, and why some of them (those that had too much jelly poured over them) looked somewhat plasticky and fake.
I just had to say a few words about this dish. I really liked it. A unique presentation of abalone slices in the form of a tart. A rather uncommon method of food presentation in Chinese cuisine.
A gold medal award winning 3-course meal.
A rather modern and yummy-looking presentation of a Chinese soup. I think the base was a clear double-boiled ginseng consommé, if I remember correctly. Yum!
This can probably be considered a quintessential Chinese dish - duck's feet. Yes, chicken claws and duck feet are considered delicacies, with the former being a much loved and highly popular dim sum dish. And this, I guess, is a new and perhaps "more classy" take on a classic delicacy.
One of my favorite dishes… roasted quails… with braised quail eggs. I love quail eggs, and cook with them very regularly. But quails I only really get to eat when I’m in Hong Kong.
And what’s a Chinese meal without some stir-fried vegetables, right? Ubiquitous, and yet always refreshing, appealing and tasty…
Finally, to end a meal on a sweet note…
There are a lot more Asian dessert pictures, but I’m too tired… So, this will have to be it for tonight. And tomorrow, there will be a "proper" post. So, until then...
G’nite!
Copyright © 2004 Renee Kho. All Rights Reserved.
Please contact me for permission to copy, publish, distribute or display any of the images or text contained in this article.
11:57 PM in FHA 2004 | Permalink | Comments (0) | TrackBack
Saturday, May 15, 2025
Crystal Jade La Mian Xiao Long Bao

Last Sunday, sort of by default, we ended up having Mother’s Day dinner at Crystal Jade La Mian Xiao Long Bao. We had left the choice of restaurant to my mum. And since Mum’s favorite cuisine is unquestionably Chinese food, the shortlist came down to her three “more favorite among the favorites” (if you know what I mean) restaurants – Ming Jiang, Peach Garden and Crystal Jade Shanghai. All three were only minutes from home, but Crystal Jade Shanghai was the nearest and a mere stone’s throw away. Since we had not made any reservations, and it was Mother’s Day when the throngs would surely be out in full force, and with the whole family in a casual mood and wanting something easy, simple, fuss-free and close to home, we decided on Crystal Jade Shanghai at Great World City.
The only problem was we had not been to Crystal Jade Shanghai at Great World City in at least 3-4 years. Even though my mum really liked the restaurant and we used to dine there with her on a very regular basis, of late, we had been taking her elsewhere, so she too had not visited the restaurant in a long time. And in our absence, Crystal Jade Shanghai had morphed into Crystal Jade La Mian Xiao Long Bao – technically at least. In reality, they still served the full “formal” Shanghai a la carte menu, but now also offered an additional more casual, mass-market menu of noodles and dumplings.
The change makes good business sense. A casual restaurant will inevitably have a wider-appeal, have a higher table-turnaround rate, do more covers, have more repeat and regular customers and simply be more profitable in every way. It is telling that out of this established restaurant group’s 23 restaurants in Singapore alone (not counting their bakeries and cake shops), 18 are casual eateries under the Crystal Jade Kitchen and Crystal Jade La Mian Xiao Long Bao brand-names.
We surmised that with the opening of the group’s flagship Shanghai restaurant, Hu Cui, in Ngee Ann City, it no longer made sense for them to keep this much smaller outlet as a formal Shanghai restaurant. And thus the renaming and rebranding exercise for the outlet.
Since all of us were dressed too casually (and felt too lazy) to trek down to Hu Cui, and since the Captain (i.e Maitre D) assured us that they were indeed still serving the full Shanghainese menu, we decided to eat there anyway.
I have to say the food there is still very good. For restaurant groups with a chain of outlets, it is never possible to achieve consistent tastes from outlet to outlet, even if the menus are all identical. (Unless of course, you are a hamburger fast food chain.) When it comes to food and cooking, the same recipe cooked by two different individuals will invariably produce two distinct dishes with different nuances of tastes, flavors and style. In this instance it appears that it is still a good team that is helming the kitchen at this outlet.
We ended up ordering a few dishes from the full menu and a few more from the casual menu. As usual, we ordered way too much food.

This was seabass in chilli sauce. It was very good. Lots and lots of diced onions gave the sauce a wonderful sweetness. It wasn’t very spicy, but there was just enough chilli heat to titillate the taste-buds and give the dish nice oomph. It was sort of like a much spicier and yet lighter-in-feel version of a regular sweet and sour sauce. Since we had skipped ordering rice altogether, the chilli level was just right for eating the dish on its own. We liked the gravy, and I think I would even try to recreate it at home to serve with fish and prawns.
The fish was very well done. The pieces of succulent, very fresh seabass seemed like they were very quickly flash deep-fried before being steamed (or perhaps vice versa). And this made them wonderfully moist and juicy with a melt-in-the-mouth texture.

Gong bao ji ding or diced chicken sautéed with dried red chillies and cashew nuts. This used to be one of my favorite chicken dishes. I haven’t had it in ages, so it was nice to revisit the dish. And I really liked this version. Again, the chilli heat was somewhat moderated, but the gravy was what really attracted me. It was slightly sweet, somewhat spicy, and yet savory and very flavorful. I almost single-handedly polished off most of the dish!
The cashew nuts were fresh and not over-cooked. Sometimes there is a tendency to deep fry them for too long, and they come out tasting over-cooked and rather hard. These were just nice. And I simply love cashew nuts!
[Just a little side note, if you want to cook with dried chillies at home, it’s good to blanch them very quickly in very hot oil (like what the restaurants do), and that lifts their color and flavors immensely. They are wonderful to cook with, giving dishes a more complex spicy note than with just fresh chillies alone.]

Yes, we ordered gan bian si ji dou or dried fried “four seasons” beans again. Our family does like this dish a lot. However, we weren’t overly enthusiastic about this version. It was good, just not terribly exciting. We still preferred the Silkroad and Min Jiang versions.

Tianjin cabbage. This was a very nice dish. It’s an incredibly simple dish. But therein lies its beauty. Just some Tianjin cabbage (which is so much sweeter and more tender than local cabbages) sautéed in superior stock with garlic. No embellishments. No strong seasonings. Just the unadulterated natural sweetness of the cabbage. Very nice!

From the noodles menu we ordered another of our family’s favorites – zha jiang mian or noodles with a bean paste minced meat sauce. Almost invariably, if this dish is on the menu in a restaurant we will check it out. ![]()
This was an interesting incarnation of the dish. It was the first time we had seen it served with such a generous helping of gravy. And thick, opaque, dark gravy at that, with a consistency almost reminiscent of the local lor mee! At first glance, it seemed a little like over-kill. Normally, we would baulk at having our la mian drowning in so much sauce. It just didn’t look like authentic zha jiang mian at all. Things didn’t look too promising…

But it tasted very good. The gravy was redolent with intense, well-balanced flavors that coated the noodles well. The meat was nicely lean and tender. As for the noodles themselves, my parents liked them, while I still preferred the texture of Silkroad’s home-made la mian. These noodles seemed like factory-made la mian rather than home-made. But no matter. The meat gravy more than made up for it. And we really didn’t mind that they had been so generous doling out the sauce.

We also tried the onion oil la mian or chong you la mian. In essence this is the China version of the East Malaysian kolo mee kosong. Just hand-pulled noodles tossed with some onion-infused oil and topped with some scallion and caramelized onion strips.
I love kolo mee kosong. And I love chong you mian. But because it is such a simple dish, it really does require excellent noodles to pull the whole thing together. The noodles make or break this dish. So, while this was very tasty, the good but less than top-quality noodles let it down a little bit. Still, we enjoyed the bowl of noodles, and slurped down every last strand.

And of course we couldn’t complete the meal without some dumplings. These were chives and pork dumplings – boiled rather than steamed dumplings. The skin, at first glance, looked a little on the thick side…

Yet, it was nicely soft with a very tender mouth-feel. The additional thickness of the dough was not felt at all in the eating. The meat filling was generous and very flavorful, with each dumpling releasing forth a tasty burst of fragrant broth as it was bitten into. Add the usual ginger and vinegar dip and it was a palate pleaser.
That was a lot of food for a rather small family! By the end of it, we were so full that there simply was no room left for dessert, much as I had wanted to order the fried egg-white balls filled with red bean paste.
It was an enjoyable meal. The food was good and tasty, albeit helped along by a little MSG. But it wasn’t too bad. I had cravings for water and sugar for a few hours after the meal, but I didn’t get a headache (yes, this is my automatic internal MSG gauge), so we weren’t doing too badly on the MSG scale. But then again, I am highly sensitive to MSG, probably a lot more so than most other people.
This was actually my first time eating at a Crystal Jade La Mian Xiao Long Bao outlet. For some reason, I had tended to stay away, preferring instead to stick to the full-fledged restaurants in the Crystal Jade Group. Perhaps the idea of such an extended chain of casual noodle eateries conjured up images of mass-produced, not very good versions of noodles and dumplings. But I have been proven wrong. At least at this outlet, the noodles and dumplings have proven to be well-above average. For a light and quick meal of noodles or for a casual meal of some Shanghai-style dishes, in a homely environment, I would return again.
Crystal Jade La Mian Xiao Long Bao
#03-30 Great World City
Singapore 237994
Tel: 6738 5595
Copyright © 2004 Renee Kho. All Rights Reserved.
Please contact me for permission to copy, publish, distribute or display any of the images or text contained in this article.
02:03 AM in Lion City Shiok-Eats: Chinese | Permalink | Comments (8) | TrackBack
Thursday, May 13, 2025
There’s A Slug In My Soup!
This week is turning into something of a “soup week” on shiokadelicious! In keeping with this incidental and accidental “theme”, I thought I would feature yet another soup today. I’ve talked about a quick cooking, chunky soup in a clear broth, and I’ve talked about a slowly simmered, chunky soup in a clear broth, so I thought I would feature a starch-thickened soup today. I dug this one out of the archives. It is not a soup we cook very often. The last time we cooked it was during Chinese New Year, back in February this year, and that was when these soup photos were taken.
First, a cautionary note. What I am about to talk about may come as a shock to many Western palates. So, if you are in any way squeamish about “exotic” food delicacies, this would be a good time to stop reading, and come back and visit tomorrow. Otherwise, read on, and take a peak into some delicacies that are much loved by not only the Chinese, but also by many other Asian culinary cultures.
So, what’s on the menu today? Sea cucumbers and fish bladders.
Sea cucumbers are also known as “beche-de-mer” in French or “namako” in Japanese (which is another culinary culture that highly prizes this delicacy). These creatures of the sea have been revered by Chinese cooks since ancient times. Like a lot of ingredients in Chinese culinary traditions, the sea cucumber is not seen as merely food to fill the stomach, but also as medicine – a disease preventive and a longevity tonic.
Such a link can be inferred from the Chinese name for the sea cucumber – hai shen. This translates literally into “sea ginseng”. (For the sub-species of sea cucumber that has bumpy, almost spiky protrusions, it goes by the moniker “fang chi shen” or “square/four-sided thorny ginseng”, in reference to its appearance.)
Traditional Chinese Medicine (TCM) holds that these sea slugs have great benefits in nourishing the blood and fortifying the “vital essence” (jing) and “energy” (qi) of the body. They are thus commonly used to treat such “diseases” as weakness, impotence, constipation and frequent urination!
And perhaps such beliefs and claims are not entirely groundless from Western scientific and medical viewpoints. Studies have shown that sea cucumbers do indeed contain saponin glycosides, which have similar structures to the active constituents of such well-known tonic herbs as ginseng and ganoderma.
Further, these sea creatures have been shown to be a rich source of polysaccharide condroiton sulfate, which is well-known for its ability to reduce arthritis pain. According to certain studies, as little as 3 grams per day of dried sea cucumber has been helpful in significantly reducing arthralgia. Its action is similar to that of glucosamine sulfate, which is useful for treating osteoarthritis. These study results put a medical “stamp of recognition”, if you will, on what older generations of Chinese have simply “known” and believed. My own grandmother used to always tell us to “eat more sea cucumbers” should anyone complain about achy joints or feeling weak and tired in the legs. On a simplistic level, it was simply believed that the gelatinous quality of these sea cucumbers would bolster and support the ligaments and soft connective tissues of the joints and limbs. But now, they seem to have the scientific evidence to support their beliefs.
Even in the US, there are such companies as Coastside Bio Resources (which I found by doing a quick Google on sea cucumbers) which specialize exclusively in these sea creatures and their supposed health benefits. This Maine-based company is the largest harvester of sea cucumbers in the country, and produces encapsulated dry sea cucumber products that are used as remedies for arthritis.
In addition to the above arthritic benefits, sulfated polysaccharides have also been shown to inhibit viruses, and there is even a Japanese patent on sea cucumber chondroitin sulfate for HIV therapy!
And if that is not enough, some studies have even indicated potential anti-cancer properties in both the saponin glycosides and polysaccharide condroiton sulfates of the sea cucumber.
But medicine aside, the sea cucumber is much loved by Chinese and Asian food lovers for its texture. And even on a nutritional basis, this sea creature seems to come up on top and is indeed an ideal tonic food. It is higher in protein (at 55%) than most other foods except egg whites (at 99%), and it is lower in fat than most foods (at less than 2%). Again, modern science seems to have stepped in, and dried or extracted sea cucumber has been produced in capsule or tablet form and is used as a nutritional supplement. The fully dried material is said to have a protein concentration as high as 83%.
Not bad for a humble sea slug, I say!
However, let’s talk about sea cucumbers as food.
After the sea cucumber is collected, the internal organs are removed, and the dirt and sand are washed out of the cavity. It is then air-dried to preserve it. Very often it is sold in this dried form.
However, it is also common for the sea cucumbers to be sold in “hydrated” (and expanded) form in the wet markets. Many housewives (my mum included) prefer to buy them in this soft, pliable form, as the work that is required to prepare the dried form for cooking is rather involved and can take several days!
According to my mum, the sea cucumbers, if bought in their hard, dried forms, need to be soaked and rehydrated, boiled, soaked again and then cooked again in order to get them nice and soft and highly palatable. If not prepped properly, even when cooked into a dish, they will still be rather hard and chewy, with a rather unappetizing taste and smell. This whole preparation process, if done properly, can take up to 4-5 days!
The process is much simplified when the “hydrated” version is bought from the wet market. It is sold soaked in water, and needs to be prepped as soon as it is bought. All that is required, once you get the sea cucumbers home, is to pop them into a pot of boiling water that has been “seasoned” with a big piece of ginger, some Chinese rice wine and some green onions. This is to rid the sea cucumbers of any “fishy” tastes and smells. As soon as the water returns to a boil, immediately turn off the heat. The key is not to cook the sea cucumbers - it’s pretty much just a quick blanch. Keep them soaking in the water in which they have been blanched until they have cooled completely. Drain well. Store them individually or in serving-size portions in freezer bags, and they will keep in the freezer, in this prepped state, for up to six months. Whenever you want to cook some, simply defrost and they are good to go.
Fish maw or fish air bladder. And in Chinese, yu piao.
This is essentially the stomach lining of large fishes, the main function of which is to regulate water and oxygen flow in the fish to help it ascend or descend in the water. And contrary to what is said in the second link above, there are three types – actually two types, with one having two sub-types – of dried fish maw that are commonly sold.
The most commonly available is one which has a very light, very airy and crispy texture, almost like a puffed up rice cracker, if that is a good analogy. Such as the one pictured above. In this category of fish maw there are two preparation methods. The most common (with perhaps 90-95% of fish maw sold being prepared with this method) is where the maw has been dried and then deep fried in oil until it puffs up and expands.
Less easy to find is fish maw that has been “sand fried” or in Cantonese “tsar pao”. I’m not too sure about the exact treatment procedure, but I would imagine that the dried fish maw is “roasted” in hot sand, again until it puffs up and is light and airy. The picture above is of a “tsar pao yu piu” which we bought in Hong Kong. Apparently, such “sand fried” fish maw can only be bought in Hong Kong and even then only in out-of-the-way, obscure little dried seafood shops. My mum used to have us track down some for her each time anyone of us traveled to Hong Kong on business or pleasure!
The textures of deep fried fish maw and “sand fried” fish maw are pretty much the same. The only difference is, of course, in the oiliness and the greasy feel of the maw when it is cooked into dishes. However, even with the deep fried maw, if prepped right, it is possible to have non-oily tasting dishes. But more on that a little later.
The second type of fish maw is one that is simply dried but not fried. And it is sold in thin, hard, crispy sheets like this…
The texture is somewhat different, but it is still used in the same way as the puffy, light, airy versions when it comes to using it as an ingredient for cooking.
To prepare fish maw for cooking is a very simple process. Simply soak in some water until they soften, cut them into thin slices, and they are good to go.
However, if using the deep fried versions rather than the “sand fried” versions, my mum usually first soaks them to soften, then “wrings” them out to remove the oil, soaks them again, and repeats the “wringing” one more time if necessary. This removes a lot of the oil in the deep fried maw and prevents the final cooked dish from being too oily. Sometimes (or maybe a lot of the time) dishes cooked with fish maw are very oily and greasy simply for this reason. A “problem” that a simple “wringing” step in the prepping process will eliminate fairly effectively.
Right, after talking at length about fish maw, I have a little confession to make. I don’t eat fish maw. I feel rather queasy about eating fish maw. I’d eat sea cucumbers, snails, scorpions, and even the sperm sac of a whale (which I have eaten, and I don’t think it was really a whale, just a very, very large fish of some kind), but I won’t eat fish maw. I have this thing about eating intestines, stomachs and other similar innards – be they be of a pig, cow, chicken (the intestines of which I’m told is a much-loved delicacy in Japan) or a fish.
Having said that, I’m told fish maw soup is absolutely delicious, and my family loves it. So here is the sea cucumber and fish maw soup my mum made during Chinese New Year earlier this year.
Both sea cucumbers and fish maws are rather bland tasting ingredients on their own, and take almost all their flavors from the surrounding ingredients and seasonings. They are used primarily for their textures.
So, how does one cook them in a soup?
Sea Cucumber and Fish Maw Soup
It is all quite simple actually, that this is not even a recipe.
The key to the soup is in using a superior chicken stock base. A simple chicken stock is preferred. That is, no vegetables or spices are used to make the stock – just chicken and water. This keeps the flavors very pure and “true”. And it is cooked to a deep, intense concentration. Sometimes my mum steams chicken breast meat and uses the juices that result – the pure “essence of chicken” – to make the soup. The natural sweetness and purity of the flavors are outstanding.
Cut some carrots and fresh young ginger into very fine strips. Cut the pre-prepped sea cucumbers into thin or chunky slices (according to personal preferences). Cut the fish maw into slices or chunks. Also have ready some thinly sliced Chinese mushrooms.
Put everything together into a pot of superior chicken stock and slowly simmer. Lightly season with salt or light soy sauce to taste. (Or, as we often do, don’t add any further seasonings at all, and just savor the pure, light, natural tastes and flavors of the soup and the seafood.) Bring the soup to a rolling boil, and add a little cornflour solution to thicken the soup. Allow it to come back to another rolling boil. Slowly dribble in some lightly beaten eggs and swirl to form elegant egg strands throughout the soup. Drop in some chopped Chinese parsley. Stir to mix. Remove from the heat and serve. Some black vinegar, or sometimes even a dash of brandy, can be added to the soup before eating.
Lots of chunky ingredients in a slightly thickened broth base. Pure, light flavors. A hearty and nutritious soup. A uniquely Chinese delicacy.
So, the next time you find a slug in your soup, it could be a good and healthy thing! ![]()
[By the way, if you are very squeamish about eating fish maw and sea cucumbers, a similar thick, chunky soup can be made with strips of abalone, tofu, fish cakes or even chicken or pork instead. ![]() ]
]
Copyright © 2004 Renee Kho. All Rights Reserved.
Please contact me for permission to copy, publish, distribute or display any of the images or text contained in this article.
11:57 PM in Home Cook: Soups | Permalink | Comments (15) | TrackBack
More Soup for Thought
Following yesterday’s post about Chinese home-style lotus root soup, I received an email which raised a few good points about the general topic of Chinese soups and their place in our culinary culture that I had missed while writing the post. I thought I would share some of the points raised in that email and also add a couple of other points that I missed yesterday.
In the email, L. raised a good point about the function of soup in a Chinese meal. As I mentioned in the previous post, in an informal family dining context, most of time, the soup is served together with all the other dishes. However, in more traditional Cantonese families, the daily double-boiled soup (lai tong) is very often the first course of the meal. It is seen as a prelude to the main meal, a means to warm the stomach and prepare the palate for the dishes ahead.
In a formal dining context, such as wedding banquets, the timing of the appearance of the soup is somewhat determined by the type of soup it is. The thicker, starchier soups, like shark’s fin soup, are almost always the second course in the meal, served after the hot, cold or hot-and-cold combination starter dish. If it is a clear double-boiled soup, this may come towards the middle of the meal, being anywhere between being the second to the fourth dish of the meal. It serves partly to cleanse the palate, and partly to rest and whet the appetite for the rest of the meal ahead. Rarely do (savory) soups appear at the end of a Chinese meal. Most formal banquets will end with the fish course, or, if there is a rice or noodle dish, the meal will finish with the starch course, which follows from the fish dish.
Having said that, it is however a very common, popular and ancient practice to end a Chinese meal, whether formal or casual, with a sweet soup (tong shui). These soups can be as simple as green mung beans or red beans slowly cooked with rock sugar, or they can be more elaborate concoctions such as soy bean curd skin with egg whites and gingko; white fungus with dried longans and dried red dates; or double-boiled birds’ nests with rock sugar.
In modern times, sweet soups are no longer just consumed at the end of dinner, but are also consumed as an “anytime of the day” dessert or sweet snack. Many popular sweet soups are available throughout the day at hawker stalls, such as the local favorite, cheng tng.
I think I was perhaps not very succinct in yesterday's post in my differentiation of the different types of Chinese soups. So, I thought I would elaborate a little further.
As I had mentioned in yesterday’s post, Chinese soups are almost all based on a clear consommé broth, with the main variation to this being soups that are thickened by starch.
I had also mentioned that a lot of Chinese soups are cooked for extended periods of time, and in some cases, double-boiled to extract the maximum nutritional goodness from the soup’s ingredients. L. writes in relation to this:
The Chinese view of soups is also distinguished by the fact that it is the liquid (and not the ingredients) that is usually desired, especially so in herbal preparations. The liquid is the medium in which all ingredients surrender all their essences; the ingredients that remain usually lack flavour.
While this is true of soups that are cooked (usually by the double-boiling method) for “tonic” or “body-building” purposes, it is not the case for all Chinese soups. I would perhaps say that there are largely two main types of soups in this respect – soups that are boiled specifically for just the liquid, such as herbal soups, pure chicken essence and other such like; and soups that are not consumed as “tonics”, and where the ingredients of the soup are consumed as an integral part of the taste experience.
Examples of soups where only the broth/consommé is consumed:
• Pure chicken essence
• Chicken ginseng soup
• Chinese herbal soups
Examples of soups where the ingredients are added to enhance the entire soup experience:
• Ye lai xiang flower soup
• Lotus root and lotus seed soup
• Sea cucumber soup
• Shark’s fin soup
• Black chicken soup (here, the black chicken itself is also considered highly nutritious)
• Winter melon and barley soup
• Watercress soup
• Peanut soup
• Sprouted soy beans soup
• Black bean soup
• Seaweed soup
• Pig’s intestines soup
• Bak kut teh (pork ribs “tea” soup)
Just to name a few.
Now, in this latter group of soups, there is a further differentiation in cooking styles. And as L. writes:
There is also a difference between "kwun" and "poh" soups (Cantonese)… both mean to boil, but for different lengths of time. Take for example, water cress soup - it can be done both ways. But one yields a soup with vegetables that still retain a crunch (poh) and the other, vegetables with the texture of baby food (kwun).
There are basically two types of cooking styles – soups that are cooked very quickly (eg the ye lai xiang flower soup I have already posted about), and soups that are slowly simmered (eg lotus root soup, winter melon soup and so on).
Are you confused yet? ![]()
It’s quite simple really. In a nutshell, Chinese soups can be viewed from (or categorized by) the following perspectives:
• There are two main types of soups: clear soups or starch-thickened soups.
• Within the clear soups, there is a further distinction between soups where only the liquids are consumed, and those where the chunky ingredients play an important part in the taste experience. (Almost all starch-thickened soups fall into the latter category).
• And within the category of soups where ingredients are central to the eating experience, there is a further separation of the soups according to the cooking method - between soups that are cooked very quickly, and soups that are slowly simmered. (For soups where only the clear broth or consommé is drunk, they are almost invariably cooked by the double-boiling or at least, the slow simmer methods).
Sweet soups (tong shui) are almost always clear (with some exceptions, like tau suan, a starchy variation of the mung bean sweet soup), and are always chock-full of ingredients. A lot of the time, they do require a slow cooking over an extended period of time.
And that’s the subject of Chinese soups condensed, filtered, reduced, cooked down into one simple soup bowl! ![]() We Chinese are a complicated bunch aren’t we?
We Chinese are a complicated bunch aren’t we?
Copyright © 2004 Renee Kho. All Rights Reserved.
Please contact me for permission to copy, publish, distribute or display any of the images or text contained in this article.
11:30 PM in Home Cook: Soups | Permalink | Comments (4) | TrackBack
Wednesday, May 12, 2025
Of Heaven and Earth
As I was typing yesterday’s post, I suddenly realized that in the 5½ months that I have been writing this blog that was the first time I’ve written about soups – any soups, but more specifically Chinese soups, and Chinese home-style soups at that. So, I thought I should remedy the imbalance and post about another soup that we make very regularly at home.
Chinese family meals usually consist of several meat/fish and vegetable dishes and very often, a soup. Chinese-style soups are very different from Western soups. Almost all Chinese soups are built with a clear consommé/broth as the base. Soups are hardly ever of the creamy variety. At the most, it may be a thicker, starchier soup, such as a Sichuan sour and spicy soup. And even then, it is still a clear soup that is thickened with starch.
Chinese soups also tend to be very chunky, with lots of different ingredients cooked in the consommé/broth base. Again, the soup ingredients are almost never pureed to form a creamy, thick soup. A lot of emphasis is placed on putting together a combination of ingredients that have contrasting yet complementary tastes, textures, aromas and colors. And very often, the “ying” and the “yang” of the ingredients are also taken into account when deciding which ingredients to use in which soup.
In Chinese culinary culture, soups are not seen merely as perhaps a form of “lubrication” during the eating of a meal, but are regarded as the best and ideal means of delivering intense and concentrated nutrition. In traditional Chinese medicine (TCM), soups are the vehicle for medicine delivery. Herbs are boiled into a soup and drunk. When one feels tired or stressed, the elderly will “prescribe” a bowl of wholesome double-boiled soup “tonic” as remedy. If recovering from an illness or even childbirth, soups form the mainstay of the diet and the chief means of restoring and replenishing the body’s vital strength. An expectant mother will have various "intensely nutritional" and "fortifying" soups as an integral part of her pregnancy diet. Before young children are started on solid food, they are fed soups, and then gradually, rice porridge with soup and so it goes.
Indeed, soups form a key and central part of Chinese dining. For many, it would be almost sacrilegious to eat a meal washed down with water, juice or any other drink. A soup is very often a “must” at the family dinner table. And for certain dialect groups, like the Cantonese, such a great emphasis is placed on soups that all soups must be patiently double-boiled for many hours before they can be served.
Today I thought I would talk about an ingredient that is so ubiquitous in this part of the world, and yet held in such high regard that it has divine or heavenly implications. The lotus plant.
This is a much loved plant, especially for the Chinese. It has other-worldly significance. The lotus blossom has spiritual connotations of divine enlightenment, in both Chinese myths and legends as well as in Buddhism. The Gods and Goddesses of Chinese folklore all sat or “rode” on lotus pads. The lotus flower also signifies harmony and unity of family and nation.
In a more earthly context, the lotus plant provides an incredible source of food and medicine. All parts of the plant are utilized. Nothing is wasted.
The fresh flower (lian hua) petals are sometimes steeped in warm milk and used as a drink to help calm the mind and rest the emotions. Some attribute to it the ability to enhance meditative powers.
Meanwhile, the dried flowers are sometimes used as flavoring in the cooking of certain dishes.
But perhaps more centrally, the lotus plant is widely cultivated for the collection of its seeds (lian zi) and roots (lian ou). The whole plant is harvested in late summer when the seeds have matured.
The seeds are retrieved from the flower pad which is exposed when the blossom fades.
And even after the seeds have been collected, this dried up flower stem (he geng) is not discarded. It can be cooked and eaten too! It is also sometimes used medicinally.
The seeds themselves are much loved for their versatility in the kitchen. They are sold both fresh, vacuum packed…
Or dried…
Both versions of the seeds are used in savory soups (like the one I will be talking about today) and sweet dessert soups (such as “ba bao zhou” or “Eight Treasures Porridge”). Lotus seeds are also used as an integral part of dozens of other dishes (for example, as stuffing in poultry).
The seeds (and the roots too) are also candied for eating directly, and are a highly popular Chinese New Year goodie. (One of my personal favorites in fact!). Even more commonly, the seeds are made into the well-known lotus seed paste (lian yong) which are used to fill steamed buns (paus or baos) and mooncakes (yue bing).
These seeds also have rather auspicious symbolisms, and this is reflected in some of the ways it is used as food. The sound of the name “lian zi” is very similar to the Chinese phrase for “abundant progeny or offspring”. And thus, at Chinese weddings, it is a must for the bridal couple to be served a “gui yen hong zhao cha” which is a sweet “tea” made from boiling long yen, hong zhao and lian zhi (dried longans, dried red dates, lotus seeds). It symbolizes the early arrival of many descendants, especially sons. For the same reasons, this sweet soup is also served during Chinese New Year, to usher in the new year on an auspicious and hopeful note!
Inside the seed, there is a green embryo that is quite bitter. This is usually removed before the seed is sold as a food product. However, even this bitter embryo (lian zhi xin or literally, "lotus seed heart") is not left to waste. It is used in Chinese medicine to dispel “heatiness” from the body. It is also used for its sedative and antispasmodic effects, and ability to help reduce blood pressure.
The rhizomes or roots are used as food extensively throughout most of Asia – not only in China, but Japan, Korea, Thailand, Vietnam and so on. They are often consumed as a vegetable, and usually cooked in soups, or sometimes sautéed or steamed. They are also used in salads, as well as in desserts such as lotus roots stuffed with sweet glutinous rice.
(In Singapore, the roots used to be sold in the wet markets still covered with a thick layer of black soil, in the exact state they were in as they came out of the ground. Nowadays, it is of course all a little more refined, and the soil is scraped off and the roots cleaned before being sold. The root in this photo is not the freshest looking of roots as it had been languishing at the back of our refrigerator forgotten and neglected, and had only just been rescued from obscurity, just before it was about to pass over to the other side. And so, we cooked it for dinner! We’re get to that a little later.)
Finally, even the lotus leaves (he ye) have their uses. They are used as a flavoring and a wrapper for rice preparations such as in the dim sum dish “lo mai kai” or glutinous rice with chicken. The dried leaves are also used in TCM as treatment for the accumulation of “damp heatiness” (she re) in the body. They have also become popular for lowering blood lipids and treating a fatty liver!
Now, who would have imagined that such a humble plant as the lotus would provide such a wide range of uses and benefits! Is it any wonder that this specie of plant-life is so adored by the Chinese and Asians in general? So, the next time you see a lotus, perhaps stop and appreciate its wondrousness and celebrate its versatility.
This is one of my family’s favorite soups – soup of lotus root and lotus seeds, with white fungus and Chinese wolfberry.
Lotus Root & Lotus Seed Soup
This is not really a recipe, as the soup is rather simple and straightforward. As with almost all Chinese soups, it just requires a rather lengthy cooking time.
• Wash and clean the lotus roots thoroughly. Cut them along the cross-section into fairly thin slices.
This is dried white fungus (bai mu er) or snow fungus (xue er). Also known as white tremella mushroom. It is another versatile ingredient that is often used in savory soups and dishes, as well as sweet dessert soups. It is believed to help improve appetite, enhance the complexion and aid growth in children. It is also said to be beneficial for the health of the lungs, stomach and digestive tract.
• Soak the dried white fungus in water for about 20 minutes to soften slightly. Drain well.
• Bring a pot of water to a rolling boil, and add the lotus root slices and white fungus. These two ingredients require the longest cooking time. Leave the soup to simmer for about 3 – 3½ hours or until the lotus root is almost tender. (We usually use a thermal cooking pot for soups, and the time required is slightly reduced to about 2 – 2½ hours.)
• Then, add the dried lotus seeds, red dates (hong zhao) and Chinese wolfberries (gou qui zi).
Dried red dates, while supposedly able to “nourish” the blood, are also a great way to add natural sweetness to soups.
Dried Chinese wolfberries are said to help improve eyesight. They are also commonly used to treat anaemia, chronic coughs and lower back pain. They can be added to green tea – maybe half a handful – for a great-tasting drink. They can also be made into a marmalade with fresh orange peel. But most often, they are used, much like red dates, to give the soup a natural sweetness.
• Together with the red dates, wolfberries and lotus seeds, we usually also add 1 or 2 pieces of whole chicken breast to give the soup more body and richness. We prefer breast meat as it is less fatty, but chicken bones or carcasses may also be used. The meat (or bones) are removed and discarded prior to serving the soup.
These ingredients are added half way through the total cooking time as red dates break down and dissolve almost completely into the soup if cooked for too long. They also impart a sourish aftertaste to the soup if overcooked. Similarly for the wolfberries. As for the lotus seeds, we want to have them very tender but still whole in the final soup, as they lend wonderful texture as well as visual appearance, and so we don’t want to over-cook them.
• After the addition of these ingredients, continue to let the soup simmer for another 1 to 1½ hours or more, until the lotus roots and seeds are very tender.
• We normally do not add any additional salt at all to the soup, preferring instead to have a soup that is very light and “pure” in its flavors, letting each individual ingredient and their natural sweetness and “true” flavors shine through. However, if desired, add a pinch of salt to taste.
• When serving the soup, ensure that each portion has a nice mix of each ingredient, so that there is a nice balance of flavors and textures.
The soup is chunky with a nice variation of textures and flavors. The smooth softness, with a slight crunchiness, of the snow fungus. The soft, dense “nuttiness” of the lotus seeds. The sweetness of the wolfberrries. And of course, the unique texture and taste of the lotus roots. (By the way, the best lotus roots should be tender with an almost powdery texture when cooked.)
Light but complex. Simple yet rich. Homely and fulfilling.
Soups… a labor of love.
Copyright © 2004 Renee Kho. All Rights Reserved.
Please contact me for permission to copy, publish, distribute or display any of the images or text contained in this article.
01:31 PM in Home Cook: Soups | Permalink | Comments (16) | TrackBack
Tuesday, May 11, 2025
Serenading Love; Teasing the Palate

The “ye lai xiang” flower. A bloom that has been made famous by the popular 1960s Chinese ballad of the same name. I think many a Chinese Romeo would have serenaded their loves with this song. Indeed, I’m sure my own parents can recall well this song! And even to this day, the song “ye lai xiang” is still making the rounds in karaoke lounges across Asia.
“Ye lai xiang” when literally translated, means “night comes, fragrance”. And it perfectly describes this humble, warm-climate, flora. In a non-bloomed state, the flower is an almost non-descript green, as seen in the picture above. However, come nightfall, it blossoms into small off-white/cream-colored flowers, with a scintillating and heady fragrance that literally has had poets and writers, through the ages, waxing lyrical over it. Women have been entranced by its aroma, and have indeed, since ancient times, used it to help enhance their own attractiveness and their appeal to the opposite sex. So much so that the flower (and its fragrance) has acquired a reputation for being able to put people under an amorous spell!
And it is not only the Chinese culture that holds the ye lai xiang (Telosma Cordata) in high esteem. The Aztecs, in ancient times, used it as a natural remedy for such things as inflammation and spasms. The Indians, in modern times, continue to use it as part of Ayurvedic medicine. The essential oils extracted from the flower are still highly-prized to this day as an aid for achieving a meditative state, opening the crown chakra, enhancing psychic abilities, promoting serenity and peace of mind and heart, and stimulating creativity. Such wondrous capabilities all attributed to one single humble bloom.
For the Chinese, the ye lai xiang is not only used for its fragrance, but also as a refreshing and light culinary ingredient.
We cook the ye lai xiang very regularly at home. Very often in a soup. Sometimes in a simple stir-fry.
Only the young flower, that has yet to bloom, is used in cooking.
First, each tiny bud has to be separated from its sepals (the small petal-like parts at the base of the flower). In the top left hand corner are the whole flower buds. In the bottom left corner are the discarded stems and sepals. And in the top right corner are the small, tender, young buds that will be cooked and eaten.

This is a rather time-consuming and labor-intensive process. But finally, it is done, and it is a nice cheery sight to see a bowl full of the young ye lai xiang flowers.
Ye Lai Xiang Soup with Egg


This is such a quick and easy soup. It doesn’t even qualify as a recipe. But I really do enjoy the lightness and freshness of a ye lai xiang soup.
• In a medium saucepan, bring some water (or vegetable stock) to a rolling boil. Add some finely julienned carrots, and let them cook until almost tender.
• Add the ye lai xiang flowers. (I usually allow for about one large bloom per diner). Allow them to cook for 2-3 minutes.
• Bring the soup back to a rolling boil, and if not using vegetable stock, add one bouillon cube. Stir to dissolve. Return the soup to a boil.
• Add lightly beaten eggs that have been lightly seasoned with a dash of light soy sauce, a pinch of sugar and a dash of pepper (again, I usually provide for one egg per diner). Either swirl gently through the soup to form wispy egg strands, or, as I sometimes prefer, allow the eggs to cook into large pieces, to make for a chunkier soup. To get smooth, silky egg strands, it is important to have the soup at a strong rolling boil before adding the egg, and almost immediately after adding the egg, turn off the heat, and swirl quickly but gently to let the strands form and cook in the residual heat.
• Season soup with salt to taste, if necessary. I personally prefer a lighter, less salty soup, and so usually find that if using a bouillon cube, that in itself more than sufficiently salts the soup, and no additional seasoning is required.
• Serve immediately.
Ye Lai Xiang Soup with Home-made Fishballs

Sometimes, when I want a “higher-protein”, but light lunch, I would make this ye lai xiang soup, but with the addition of fresh, home-made fish balls.
• Simply add the uncooked fishballs together with the ye lai xiang flowers, and cook the soup as per the above.
• If making the soup as a meal in itself, I sometimes pop in two eggs (or more) per person.
And it’s done. And it’s scrummy!
Stir-Fried Ye Lai Xiang

We have only recently started to sauté the ye lai xiang flowers. We had not realized that the flowers could be stir-fried to delicious results, until we saw it on television not too long ago. Can’t remember what program it was, but a noted Chinese chef was demonstrating his favorite way of cooking the ye lai xiang.
We have sort of adapted it a little, and this is our family’s version.
• In a hot wok with a little oil, sauté some finely julienned carrots, until nearly tender.
• Add some finely julienned fresh young ginger, finely chopped shallots and garlic. Sauté briefly.
• Add finely sliced Chinese mushrooms (or fresh shitakes), and sauté until tender.
• Put the ye lai xiang flowers into the pan. Give it a quick stir-fry, before adding just a little bit of hot water, to give it a light gravy, and season with a little light soy sauce, a dash of Chinese rice wine, a light sprinkle of pepper and a pinch of sugar. Sauté to mix well, and allow the gravy to come to a boil.
• Remove from the heat. The flowers should still have a refreshing light crunch to them.
Everything (the seasonings used, cooking time and method) is kept very light, to complement the delicate nature of the flower and its taste.

It’s great when served simply with steaming hot rice.
Ye lai xiang… a delicate beauty that is light on the palate; soothing to the mind; uplifting on the heart; and inspirational to the soul.
Copyright © 2004 Renee Kho. All Rights Reserved.
Please contact me for permission to copy, publish, distribute or display any of the images or text contained in this article.
06:35 PM in Home Cook: Soups, Home Cook: Vegetables | Permalink | Comments (20) | TrackBack
Sunday, May 09, 2025
A Divine (Un-Fallen) Beauty
Life’s funny like that, isn’t it? So often, we expect or hope that something will or will not happen, but the very exact opposite of what we want happens instead. And so it is with baking cakes. Usually, it is our fervent hope that the cake will come out beautifully even and smooth… no cracks or fissures… and no sinking or collapsing after it gets out of the oven. But sometimes, hope against hope, it does just that… it rises up and reveals a broad, wide jagged grin as it emerges from the oven. And at other times, as it cools from the heat of the oven, it sinks into a sullen, unhappy well of a depression.
Then, there are the times when we pray and wish that the cake would sink and fall. At yet, despite us willing it with all our might, it stays stubbornly smooth and taut… a shiny, glossy plane of rebellion against our wishes.
And so it was with the cake I baked for my mum in celebration of Mother’s Day.
From a list of options, she had chosen this one… “Fallen Chocolate Souffle Torte” from Alice Medrich’s Chocolate and the Art of the Low-Fat Desserts. It looks absolutely wonderful in the book. A fallen beauty, with the center of the cake “collapsed” into a light, flaky well of chocolate richness. I have to admit, I am something of a sucker for sunken cakes (those that are meant to be sunken, at least). There is just something about them that looks rather appealing to me. I think my mum feels the same. And thus her choice of cake for Mother’s Day.
This cake is described in the book as “a light but real chocolate torte – something rich, moist and chocolate… deep chocolate flavor, moist and dense, yet somehow light”. And that is precisely what the cake is. I can’t describe it better myself.
The torte is an almost flourless cake. There are just almonds and chocolate, topped with a dash of brandy. But unlike other flourless cakes which usually have tons of butter in them, this has no butter at all. Yep! No butter. And only two egg yolks. And the final result is an incredibly rich, dense, moist, very very chocolatey cake that is, at the same time, very light on the palate. A cake that doesn’t sit in the pit of your stomach like a lump of stone after the indulgence.
I really like this recipe. It’s a definite keeper.
I also like how easy and simple the procedure is. No double-boilers. No hassle. It takes all of 25 minutes or so to prep the batter before it is ready to go into the oven. And 30 minutes after that, a wonderful warm chocolate cake awaits.
Everything went really well in the making of the cake. The only hiccup was the oven. Of late, it has been blowing hot and cold on me. At times, it has been hotter than what it should have been. Other times, it has been cooler than what I had wanted it to be. But then again, it is eighteen years old after all, and probably close to retirement age I think.
Anyway, on this particular occasion, it seemed the oven was a tad too hot, and I think the surface of the cake was just a touch over-done, and thus rather crusty. Which meant that, contrary to what I had hoped and prayed for, the torte did not sink. I waited and I waited. I hoped and I hoped. But the surface of the cake remained stubbornly flat and smooth. No amount of will-power on my end was going to get the torte to fall and sink.
But no matter. For on every other score, the cake delivered.
It was rich, dense, moist and oh so chocolatey (have I said all this already?). And yet, there was also a certain fluffiness and softness to it. Divinely delicious. My mum loved it. She declared that this was how a “real” chocolate cake should be. It most certainly didn’t taste “low fat” that was for sure. We served it warm with a dollop of hazelnut gelato, and it was out of this world.
Chocolate Souffle Torte
¼ cup (1 oz.) blanched almonds
3 tablespoons all-purpose flour
3 oz bittersweet or semi-sweet chocolate * - chopped fine
½ cup unsweetened Dutch Process cocoa
1 cup sugar
½ cup boiling water
2 egg yolks
1 tablespoon brandy **
4 egg whites – at room temperature
scant ¼ teaspoon cream of tartar
* I used a 70% Extra Fine Dark Chocolate. But I think I would prefer to use perhaps a 40% Dark the next time around. I felt the chocolate balance fell just a tiny bit on the bitter side, although the family loved it just as it was, and felt I shouldn’t change it at all.
I’m even thinking that, on occasions, it may even be interesting to experiment with maybe a 1oz Milk/2oz 40% Dark Chocolate ratio.
** I think Amaretto would make a lovely alternative.
• Preheat oven to 190C or 375F.
• Line the bottom of a round 8” springform pan with parchment paper. Coat sides of pan with cooking spray.
• Grind almonds with the flour in a food processor until very fine.
• Combine finely chopped chocolate, cocoa powder and ¾ cup sugar in a large bowl. Pour in the boiling water, and whisk until smooth and the chocolate is completely melted.
• Whisk in the egg yolks and brandy. Set aside.
• Combine the egg whites and the tartar, and beat, with an electric mixer, on medium speed, until soft peaks form. Gradually sprinkle in the remaining ¼ cup sugar, and beat on high speed until the meringue is stiff but not dry.
• Whisk the flour and almonds mixture into the chocolate mixture.
• Fold ¼ of the whisked egg whites into the chocolate mixture to lighten it. Then, fold in the remainder of the egg whites.
• Pour batter into prepared pan and level the surface if necessary.
• In the lower third of the oven, bake for 30-35 minutes or until a wooden skewer inserted into the center of the cake comes out with just a few moist crumbs clinging to it.
• Cool pan on a wire rack. The torte will (should) sink like a soufflé. Once relatively cooled, carefully unmold cake.
Serving suggestions:
• With a light dusting of powdered sugar.
• With some light whipped cream.
• With vanilla or hazelnut gelato or ice cream.
• With frozen yogurt.
• Or, simply, just as it is.
Or… if you are looking for an ultimate “death by chocolate” sort of experience, if you haven’t had a chocolate and sugar fix for say, oh, maybe a year, and if your Doctor will not suffer a heart attack when you tell him… try this… have a slice of the cake with a (very generous) slather of Nutella as frosting. We tried it… and just one word to describe it: shiokadelicious!
And on that very sweet note, here’s wishing all Mums, Mums-in-Law, Grand-Mums, Great-Grand-Mums, and God-Mums too… a very Happy Mother’s Day!
Copyright © 2004 Renee Kho. All Rights Reserved.
Please contact me for permission to copy, publish, distribute or display any of the images or text contained in this article.
08:15 AM in Home Baker: Lighten Up! Cakes | Permalink | Comments (15) | TrackBack
All “A-Rice”!
Okay, folks! It’s that time of the month again! No, not that time of the month… This time of the month… blog burning time of the month.
Pim has put out the call… so, “rice” up everyone, grab your rice bowl and climb aboard… it’s time for another round-the-world food adventure.
Take-off date is Sunday 23 May 2025. But, before you rush off to pack your rice bowls, please check the full travel details…
So, let’s get ready for some “rice-ing” great fun!
Oh, and don’t forget to check back here on 23 May for my personal “rice-ing” adventure…
Happy “rice-ing” everyone!
Copyright © 2004 Renee Kho. All Rights Reserved.
Please contact me for permission to copy, publish, distribute or display any of the images or text contained in this article.
08:06 AM in Food and Drink | Permalink | Comments (2) | TrackBack
Friday, May 07, 2025
What’s That, Please?
I received an email today enquiring about this fruit (which also appears in the upper right hand corner of the navigational menu bar). What is that fruit? I was asked.
So, for others who may also be interested, this is the langsat fruit. It is an ultra-tropical fruit that is grown in Malaysia, Thailand and most of South East Asia.
Langsat is the Malay name for it. I don’t think it has an English name. It is seasonal, and usually appears roundabout the same times as the durian.
Split open the soft light-yellow skin and small segments of fruit are revealed. When ripe, the flesh is translucent, soft and juicy, with a small hard pip in the center. The taste, when ripe, is sweet with a light refreshing tanginess.
And if you are interested, here is more information about this uniquely South East Asian fruit.
Copyright © 2004 Renee Kho. All Rights Reserved.
Please contact me for permission to copy, publish, distribute or display any of the images or text contained in this article.
06:17 PM in Tastes of South East Asia | Permalink | Comments (16) | TrackBack
Having My Cake and Eating It Too
I’m sure you must have heard this before. Friends gather for a meal, and come dessert time, someone would say “oh, I’m not having dessert, I’m watching my diet”. And almost invariably, another would respond “order a carrot cake, that’s healthy”.
But oh, what misconceptions! Isn’t it funny how just because something has carrots in it, it is immediately perceived as being “healthy”? Most people baulk when they find out just how “unhealthy” a regular carrot cake really is. Almost all carrot cake recipes involve copious, and I mean copious, amounts of oil. At least 1½ cups of it. With some recipes using as much as 3½ cups! That’s more oil than in deep fried chicken! Then there is the cream cheese frosting to add to the fat count. Personally, I think one is better off ordering a chocolate cake, enjoying every mouthful of the indulgence, and probably be still taking in less fat than with a carrot cake!
Now, you’re probably starting to wonder where I am going with all this. No, this is not a “let’s bash carrot cake” post. Far from it. This is more about a re-discovery of carrot cake… in many ways.
You see…
…for some unfathomable reason, I’ve been thinking a lot about carrot cakes lately. (Yes, I should go get a life.) But seriously, questions about carrot cakes have been swimming in and out of my mind.
I mean…
• Why are carrot cakes not living up to their name? Why are they not “healthier”?
• Why do almost all carrot cake recipes use oil, and not butter? It means that the method for making the cake approximates rather closely to the method for making muffins (combine dry ingredients, combine wet ingredients, combine wet ingredients with dry ingredients), instead of the more standard “creaming method” for cakes. As a result, it produces a denser, more muffin-like texture in the cake, rather than a soft, fluffy, tender cake-like crumb.
• Why do a large majority of low-fat carrot cake recipes involve the use of a lot of canned pineapples? No doubt, this does significantly reduce the fat content and help keep the cake moist at the same time. But I personally have found that the nature of pineapple is such that its taste simply dominates the cake, which starts tasting like a pineapple cake rather than a carrot cake. Maybe I just have an over-sensitive tongue. But I don’t really want to be tasting pineapple in a carrot cake.
• And finally, why are there almost never any chocolate carrot cakes? I mean, why ever not? Now, this question has been bugging me since the last IMBB Cake Walk edition, when Clotilde made a chocolate and zucchini cake, and I remember thinking “how nice! something like a chocolate carrot cake”. Then, I realize that there isn’t really any “chocolate carrot cake”. At least not that I have seen. And that bothers me.
After having had all these issues mulling in my head for a few days, I couldn’t stand it anymore. I had to do something about it. I decided to go create a carrot cake that would address all these questions. And hey, even if the cake turned out a complete disaster, I would have at least settled my mind, and maybe then, these darn carrot cake thoughts would finally go away, and leave me alone! I mean, geez! What were they thinking? That I had nothing better to do than to think about them all day? These carrot cakes. Really!
And so that was what I did. I used a recipe I found off cookinglight.com as a basis to build my recipe with. I chucked out things, added things, substituted things and just mucked around with the recipe. By the time I was done, all that my recipe had in common with the original recipe was that both had sugar, eggs and flour in them! And oh, carrots too, of course.
Each of the niggling issues I have with carrot cakes is addressed:
• Part of the flour is substituted with toasted wheatgerm (how’s that for healthy? ![]() ).
).
• Butter, rather than oil is used. Plus, only a small amount is used – about 80g or just over 5 tablespoons.
• Instead of canned pineapples, very low fat plain yogurt is used. This should give the cake a very nice texture – moist and tender. The yogurt also helps with the leavening action.
• To make it a chocolate cake, Dutch process cocoa powder is added. Plus a tiny bit of instant coffee (or espresso) powder. This is not detectable in the final cake, and yet it is amazing how just a pinch of coffee really complements and enhances the taste notes of the cocoa. It enriches the cocoa flavors, rounding them out, making them more complex and rich. And yes, makes the cocoa taste more chocolatey.
• And finally, the “normal” creaming method, instead of the “muffin method”, is used to make the cake batter.
It all looks fine on paper. In theory, the recipe should work. Now, for the real test. Making the cake and seeing if I will get something edible at the end of it.
Renee’s Low-Fat “Healthy” Chocolate Carrot Cake
1¾ cup minus 2 tablespoons all-purpose flour
½ cup toasted wheatgerm
2 teaspoons baking powder
¼ teaspoon baking soda
½ teaspoon salt
½ teaspoon instant coffee or espresso powder
¼ cup Dutch process cocoa powder
80g unsalted butter, softened
½ cup granulated sugar
½ cup packed dark brown sugar
1 egg
2 egg whites
2 teaspoons pure vanilla extract
½ cup unsweetened applesauce *
¼ cup low fat or non-fat plain yogurt
2 cups finely shredded carrots
¼ cup chopped walnuts (optional)
* I usually buy jars of baby food applesauce. They usually have no additives and no sugar added. And I like their convenient, one-use packaging. It means I don’t end up with a large jar of ¾-unused applesauce sitting in the fridge.
On tangent to this, why is it that when a jar of baby food says 128ml on the label, which should, logically speaking, give me quite a few drops in excess of ½ cup of applesauce, does the jar actually contain quite a few drops less than ½ cup of applesauce? Hmmm… no matter. It did not affect the cake. But Heinz might want to look into recalibrating their scales. ![]()
• Preheat oven to 175C or 350F.
• Coat an 8x10 inch rectangular cake pan with cooking spray, and dust with flour.
• Measure out the flour by lightly spooning (instead of scooping) it into the measuring cups, and leveling with a knife.
• Combine the flour, baking powder, baking soda, salt, coffee powder and cocoa. Sift twice. Add wheatgerm, and stir to blend. Set aside.
• Combine the yogurt and applesauce. Set aside.
• Beat the butter in an electric mixer on medium speed until soft. Gradually add in both the dark brown and granulated sugars. Continue beating until soft and fluffy.
• Gradually add in the eggs and the vanilla extract. Beat to combine.
• Spoon a third of the flour mixture into the batter, and mix on low speed.
• Pour in half the applesauce/yogurt mixture, and combine on medium speed.
• Add half of the remaining flour mixture, and again mix on low speed.
• Put in the remaining yogurt mixture and beat on medium speed until combined.
• Finally, on low speed, mix in the rest of the flour.
• Fold in the carrots (and walnuts, if using).
• Pour batter into the prepared pan. Bake for 30-45 minutes, or until a wooden pick inserted in the center comes out clean.
• Let cool in pan for 10 minutes on wire racks before removing from pan.
• Best eaten within 2 days, or store in refrigerator for 4-5 days.
And now for the sixty four thousand dollar question… okay, more like the sixty four dollar question… how did it taste?
Well…
Drumroll…
It tasted pretty good, I thought. And most of the family agreed. It was richly chocolatey, with an almost fudgy feel. It was very moist with a fluffy crumb. As someone put it, it didn’t taste at all “healthy” or “low fat”.
It achieved what I set out to do – create a healthy cake that (hopefully) also tasted good. This cake was healthy. I mean, it had wheatgerm and carrots – with all that B complex vitamins and beta carotene. It was also very low fat. Granted, it was still a little high on the sugar. But hey, we weren’t doing too badly. The taste was good. The texture was not bad too.
The wheatgerm gave a rather nice “nutty” feel to the crumb, yet without tasting “rough” and without making the cake heavy or dense.
My only complaint was that the cake was a tad crumbly. Not sure why that was. Oh, by the way, the pictures show the cake made with cake flour. That was what I used in the actual making of the cake, and I suspect that probably partially contributed to the crumbly texture. So the recipe, as listed out above, has reverted to all-purpose plain flour. But still, could something else have also contributed to the slight crumbliness?
So, the recipe worked - basically. It was still a little rough around the edges perhaps, and still needed a little refining to make the cake texture more elegant. Taste-wise…
My mum’s complaint was that “it didn’t taste like carrot cake”. She likes carrot cake. And likes carrot cake to taste like, well, carrot cake – that is, to be able to see and taste the carrots. This version was too chocolatey for her. But that was why the rest of the family, who weren’t usually too keen on carrot cake, liked it – precisely because it didn’t taste like carrot cake!
And so there you have it. The split down the flavor preference line. If you like carrot cake as carrot cake, this is probably not the cake for you. If you don’t like carrot cake, but want a “healthy” yet tasty cake, you’ll probably like this cake. And if you’re like me, who likes both carrot cakes and chocolate cakes, but have always found the former to be way too rich and oily, then this cake is tantamount to having my cake and eating it. And a gal can’t really ask for more than that, now can she?
Copyright © 2004 Renee Kho. All Rights Reserved.
Please contact me for permission to copy, publish, distribute or display any of the images or text contained in this article.
06:08 PM in Home Baker: Lighten Up! Cakes | Permalink | Comments (6) | TrackBack
Thursday, May 06, 2025
Have Many Small Breaks – Not!

These are my newest “stop-inhale-savor life’s mini pleasure-moments” items – Kit Kat Kubes.
They are new in Singapore (launched a month or two ago), and I think fairly new in UK too (launched probably end of last year there).
I’ve always loved Kit Kat, ever since I was a kid, ever since the days when Kit Kat was still made by Rowntree, the independent company. Yes, remember that name? Ah! Rings a bell doesn’t it? Boy, that was a long time ago.
I remember in those days, in the 70s, imported chocolate was a luxury. What a treat it was to get a whole packet of Kit Kat. Each of the four chocolate-covered wafer fingers would be very slowly nibbled on, and each tiny bite was savored intently and blissfully.
Those were of course also the days when chocolate candy bars were actually chocolate candy bars. Those Kit Kats, imported directly from the UK, were sweet, rich and oh so chocolatey. Light, crispy wafers coated with luxuriant (“real”) milk chocolate. Oh what delights! What palate pleasers for my young taste-buds.
Then came globalization and the rise of the Asian dragons. And with economic and industrial development, also came the days when our supermarket shelves were filled only with Thailand-made Kit Kat bars. These, unfortunately, did not taste quite the same.
Up until very recently, once in a while, I would drive all the way out to Mustafa to stock up on US- or Australia-made Kit Kat. These were infinitely better than the supermarket versions, yet still not quite like the ones I had as a child. But now… now, I have Kit Kat Kubes… direct from the UK! Woo hoo!

These are good. Less sweet than the US version and richer than the Australian version. These Kubes do not hit the palate with a singular, dominant sugar note. It is a more rounded sweet chocolate note that leads, with a milky middle tone, and a sugary finish. The chocolatey-ness (yes, there is such a word – I just made it up) is fuller, has more body and with smoother notes. And oh, they are just pretty much like how I remembered Kit Kat to be from the foggy annals of my childhood memories.
The added bonus of these bite-sized morsels of sweet indulgence is that there is more chocolate with every bite. All four sides of each mouthful are now covered with chocolate, rather than just two (or three in the case of the two ends of each candy finger).
The tag line for these new Kit Kat Kubes is “have many small breaks”. That however is just near impossible. How is it possible to eat just one Kit Kat Kube? No, this is more like one long extended break of 16 slowly-savored mouthfuls of scrumptious, sweet pleasure.
Copyright © 2004 Renee Kho. All Rights Reserved.
Please contact me for permission to copy, publish, distribute or display any of the images or text contained in this article.
05:00 PM in In My Shopping Basket, Snack Attack! | Permalink | Comments (17) | TrackBack
Wednesday, May 05, 2025
Dinner in a Jiffy with C T O R P
Prawns sautéed with a sweet, sour, slightly spicy, very, very flavorful chilli tomato onion relish.
This is a dish that is so incredibly quick and easy to prepare, and yet packs a titillating taste punch. It goes great with steamed rice or noodles, or even pasta.
With this dish, dinner can be on the table within minutes.

Sautéed Prawns with Chilli Tomato Onion Relish
1 kg large prawns *
1 tablespoon light soy sauce
1 tablespoon sweet rice wine
pepper
¼ teaspoon sugar
2 large onions
10 scant heaping tablespoons tomato ketchup
5 - 7 tablespoons sweet chilli sauce **
½ - 1 tablespoon light soy sauce
½ - 1½ scant tablespoons sugar
3 - 5 tablespoons hot water ***
[The ingredient quantities are approximates, as I don’t usually measure out the ingredients, but simply use visual and taste gauges to determine how much of each ingredient to add. All the ingredients can very easily be adjusted to suit personal tastes – be it to have a stronger or weaker tangy tomato overtone; to have more chilli heat or less; to make it more or less sweet; or to make it more or less salty.]
* I prefer to use large prawns as I find that their firmer, crunchier and more compact texture works very well with the robust flavors of the onion relish. Also, they make for prettier presentation. However, any type and sized prawns would work for this dish.
** I use Lingham’s Sweet Chilli Sauce
*** Quantity of water added can be altered to adjust the consistency of the gravy, depending on whether the prawns are to be eaten with rice, or to be tossed with noodles or pasta.
• Wash, shell and de-vein the prawns. Keep the tails on for a nicer presentation. Pat the prawns dry, and refrigerate until needed. (I generally do not season prawns ahead of time, with the exception of maybe just a light dusting of pepper, as I find that the texture of prawns is adversely affected by most condiments, even salt or soy sauce, if left sitting in them for a period of time, and the prawns take on a rather unpleasant mushy bite when cooked. Seasoning the prawns immediately before they are cooked gives them a nice crunchy bite and texture.)
• Cut onions into thin strips.
• In a hot wok or pan, with a little bit of oil, sauté the onions until soft and translucent.
• Season the prawns with light soy sauce, rice wine, sugar and pepper. Add to the onions. Sauté until the prawns have changed color and are nearly cooked. (Tip: try “flipping” the prawns rather than “stir-frying”, as this helps keep the prawns’ flesh smooth and pretty looking.)
• Add the gravy ingredients – tomato ketchup, chilli sauce, light soy sauce, sugar and hot water. Mix well. Allow the gravy to come to a boil. Immediately remove from heat. Avoid over-cooking the prawns. Serve.

If made with a slightly less viscous gravy, these prawns offer a delectable option for topping noodles or pasta.
A very enjoyable, rich and rather intense combination of flavors – sweet, sour, spicy and salty. It’s all there. And it’s all ready within minutes.
Copyright © 2004 Renee Kho. All Rights Reserved.
Please contact me for permission to copy, publish, distribute or display any of the images or text contained in this article.
04:01 PM in Home Cook: Fish & Seafood | Permalink | Comments (5) | TrackBack
Tuesday, May 04, 2025
One of My Favorite Noodles – Yee Fu Mein

This is one of my perennial favorites when it comes to noodles. Hong Kong Yee Fu Mein. This noodle can probably be easily counted as one of the least healthy of Chinese noodles, and yet also probably one of the yummiest.
Yee fu mein (or yee mein for short) is a uniquely Hong Kong-style noodle. In essence, it is a thin wheat noodle that is deep fried during the manufacturing process. And it is sold cooked and shaped into hard crunchy “disks” like this…

I recently discovered this Singapore-made brand and found it to be pretty good – very authentic. One of the closest to the genuine Hong Kong version that I’ve seen. There are many brands of yee fu noodles on the market, and many of them are somewhat localized in style, appearance and texture – what I have dubbed “Singapore-style Yee Fu Mein”.
It is the deep frying step during the noodle-making process that gives yee fu mein its uniquely tasty flavor and texture. But this is also what gives it easily seven to ten times the amount of fat of regular noodles, be they la mian, egg noodles, wheat noodles or rice noodles! And yet, the scrumptious factor of yee mein is such that I would say it is all worth the indulgence, never mind the waistline. ![]()
Generally, the noodles are good to go almost straight out of the packet. They just need to be added into a rich stock or gravy, left to simmer and soften for about five minutes, and they are ready to be served.
However, when I cook the noodles at home, I first blanch them in a pot of boiling water for about 2-3 minutes or so, then drain well, before adding them to the gravy to simmer for another 2-3 minutes.

At least in this way, some of the surface oil from the deep frying manufacturing process is removed. It assuages my guilty conscience a little when I see that film of oil left behind in the blanching liquid.
(The noodles are not, in “real life”, such a deep yellow color as seen in the above picture. The camera picked up the yellow tones of the cooker hob’s downlight and turned everything yellow in the photo.)
Right, so what do you cook these noodles with? A key ingredient that almost never varies is superior stock or broth. This forms the basis of any good yee fu mein dish. Other than that, most restaurants sauté the noodles very simply, with just one or two other ingredients.
The most common accompaniment is “yellow or pale” garlic chives, known as “gau wong” in Cantonese and “jiu huang” in Mandarin. These are regular Chinese garlic chives that have been grown under cover, away from sunlight, and thus do not become green, but are instead a very pale greenish-yellow color. Gau wong is more highly prized than the regular green chives (gau choy or jiu cai or koo chye).
Another popular version is dried scallops (gan bei or conpoy or kampoi) yee fu mein. Also a classic preparation is yee fu noodles sautéed with what are known as golden mushrooms (jin zhen gu in Mandarin) to the Chinese and enoki mushrooms to the Japanese. Other than these, the noodles are also occasionally sautéed with crab meat or chicken.
The accompanying ingredients used in cooking yee mein can, fairly flexibly, within some fairly wide boundaries, be improvised and adapted to suit personal tastes. However, stronger tasting meats like beef or lamb, and other intensely flavored ingredients, are almost never used. The yee mein is already richly flavorful in of itself, unlike regular noodles which are bland and pick up all their flavors from surrounding ingredients. As such the supporting ingredients in a yee mein dish are generally kept as simple as possible.
Having said that, this particular version that I cooked recently was a rather mixed bag. I had originally intended to make a vegetarian version of the noodles, using just a mix of different mushrooms, but then decided to add some chicken. And when I realized that I had some char siew (BBQ pork) leftover from lunch, I decided to use that too, to top the noodles with. The final dish was perhaps thus not quite authentically yee mein in that sense. It was a home-style version, but still nevertheless a very delicious variation that was chock-full of ingredients.
The gravy was a combination of carrots, Chinese dried mushrooms and chicken…
The Gravy
• Julienne the carrots and thinly slice the mushrooms.
• Heat a small amount of oil in a wok or frying pan, and add the carrots. Sauté until the carrots are just about to soften. Add some minced garlic and finely chopped shallots. Briefly sauté until the shallots are soft, before adding the mushrooms. Season with some light soy sauce and pepper. Remove from the pan, and set aside.
• Re-using the same pan, again sauté some minced garlic and finely chopped shallots. Once these have softened, add the marinated chicken*. Stir-fry until the meat is cooked through.
* Cut chicken into thin strips and season with a little sesame oil, light soy sauce, oyster sauce, pepper and cornflour.
• Return the carrot/mushroom mixture to the pan, and mix with the chicken. Add about 1 ½ cups (for a 4 person serving of noodles) of superior chicken stock or broth.

(Again, yellow tones of the picture are due to camera effects.)
• Bring gravy to a boil and add the blanched and drained noodles. Allow to simmer for 2-3 minutes. The noodles will absorb most of the broth to give a final dish that has a very slight gravy to it. Taste and adjust seasonings accordingly – adding a little more light soy sauce, oyster sauce and pepper if necessary.
• Finally, if desired, sprinkle some chopped coriander and spring onions (scallions) over noodles. Turn off the heat, and toss noodles to allow the coriander and spring onions to wilt in the residual heat.

Char siew is most definitely an unconventional accompaniment to yee fu noodles. It’s not usually done – except of course in Renee’s kitchen! ![]()
No, I wasn’t trying to be creative or to push the boundaries of Chinese culinary culture. I had happened to have some char siew slices left over from lunch, and it seemed such a shame to let them go to waste. So, I simply decided to “refresh” them a little, and add them to the noodles.
The char siew slices were very quickly heated through in a frying pan, with some chopped scallions and a tiny bit (maybe about ½ tablespoon) of oyster sauce added to “enhance” the flavors a little. Just a quick sauté of less than a minute, and the BBQ pork slices were ready to be arranged on top of the plated noodles.
Unconventional it may have been, but still a rather tasty concoction, if I may say so.
Yee fu mein… a rich and intensely flavorful noodle experience.
Copyright © 2004 Renee Kho. All Rights Reserved.
Please contact me for permission to copy, publish, distribute or display any of the images or text contained in this article.
02:03 PM in Home Cook: Rice, Noodles etc | Permalink | Comments (10) | TrackBack
Monday, May 03, 2025
Fried Fish 101
One of the things I used to have a great fear of cooking was deep-fried fish, or pretty much deep-fried anything. I just wasn’t comfortable working with that much oil, at that high a temperature. I was always all timid and apprehensive when the time came to put the food into the oil. I was taught to “gently slide” the food into the hot oil, to prevent the oil from splattering and giving me a nasty burn. But almost inevitably I would do a hasty plonk simply because I would release the food item and withdraw my hand too soon, for fear of the big sizzle and splatter that would greet the food as it met the hot oil. By so doing, I ensured that the very thing I feared was created – a big sizzle and splatter. As a result, I hardly ever deep fried food. Of course, there were also the obvious health reasons for not consuming fried foods on a regular basis.
Chinese food, or for that matter Asian food, can involve a lot of deep fried dishes. Certainly a lot of the internationally popular Chinese dishes and food items are deep fried… sweet and sour pork/fish/prawns, deep fried chicken wings, crispy tofu, almost all eggplant dishes (in restaurants at least), crispy noodles, even certain so-called “stir-fried” vegetables, banana fritters, curry puffs, you tiao (dough sticks) and countless others.
One of the most basic and very well-loved food dish in a lot of Chinese (and Malay) homes is the simple fried fish – just a whole fish, deep fried, with no embellishments, garnishings, sauces or gravies. At the most, it is served with a simple accompaniment of dark soy sauce, chilli sauce or sambal belacan (fermented prawn paste fried with chilli). The dish is done using either larger fish like the pomfret (chang yu) or with small local fishes. In the latter case, the fish is deep fried to such a crispy texture that nearly the entire fish, including the bones and the head can be eaten. Oh! The pleasure of crunching into all the deep golden brown, crispy bits. Never mind the health subtractors of such a dish, it is still something that I look forward to indulging in every once in a while.
Asians rarely use an electric deep-fryer for deep frying foods. Almost all deep frying is done in the wok. It’s kept simple. The same wok is used to cook just about all the dishes that would appear on the dinner table.
Today I thought I would share with you a sort of “Fried Fish 101” that my mother gave me a while back, and which helped me finally overcome my fear of deep frying foods...
I like this method simply because it uses very little oil compared to “standard” deep frying, and yet still achieves beautiful color and texture in the fried foods.
Here’s a little pictorial sequence for deep frying a whole white pomfret (bai chang).

Using a cast iron or heavy steel (not non-stick) wok*, pour enough oil (about 1 to 1½ inches deep) to cover half or one side of the fish. This is much less than the usual 4-6 inches of oil that is normally used to deep fry fish.
There are several benefits to this. One, there is less wastage of oil. Of course, some people save the used oil and re-use it in the next round of deep frying. I personally don’t like to keep used oil as it tends to go rancid easily in our humid weather. Two, there is less chance of severe splattering when the food is placed in the oil. Three, it takes a much shorter time to heat the oil to the right temperature. Four, it is easier to control the temperature of the oil. Five, I just like the thought of the food swimming in a lot less oil in the process of getting to my table!
* A wok is actually very good for deep frying due to its rounded bottom, as less oil is needed to get the required depth of oil.

To test whether the oil is at the right temperature, simply place one or a pair of wooden chopsticks into the hot oil. If there are lots of tiny bubbles sizzling away around the chopsticks, the oil is ready. There is also the old stand-by method of dropping a tiny piece of food into the oil to test its readiness. I personally prefer this method, as I like my oil to stay pristinely clean before the main food goes in. ![]()
[I’ve just noticed the rather interesting pattern that has shown up in the above picture of the wok. In “real life” this wok is black, and yet in the photo it shows up golden with all that patterning. Interesting.]

De-scale, gut and clean the fish. (I regretfully don’t really know how to do the first two very well, as the fishmonger does it for me each time, and does a great job too).
Rub a liberal amount of salt around the insides of the cavity, and rinse well. This is a great way to rid all traces of “fishiness” from the gut cavity, which is one of the best and most delicious part of a fried fish… very crispy and crunchy. **
Meticulously pat the fish (including the insides) dry with a paper towel. We don’t want any moisture at all on the fish as it goes into the hot oil.
Liberally dust both sides of the fish, as well as the cavity, with pepper. (If the fish is to be served with dark soy sauce, there is no need to season it with salt, as the dark soy sauce will be salty enough. Otherwise, also sprinkle fish with salt to taste.)
** At this point the fish can be refrigerated or frozen until needed. Be sure to pat the fish dry before refrigerating or freezing, so that it keeps better.

Lightly coat fish with a thin layer of corn flour (or corn starch).

Gently slide fish into the hot oil. The oil should just cover the underside of the fish. (If deep frying the very small local fish, it would be fine to have the whole fish completely submerged in the oil.)
Leave the fish to fry. Resist all temptation to touch it, move it around, flip it over or to peek at its underside. This will ensure that the skin of the fish stays intact and smooth. If moved around too much or too early, the flesh will start to flake off. The result, while still edible, will be a less visually appealing fish.

Once the meat on the underside has been nicely sealed, and is a light golden brown color (after 5 minutes of so), flip the fish over – gently – to seal and brown the other side.
Let it fry until that side is a nice deep golden brown, before flipping the first side back down into the oil for another few more minutes to let it also come to a deep golden brown color.
Depending on the size and thickness of the fish, it can take anywhere from 5 to 8 minutes in total per side.

Ta-da! Golden brown perfection! (Oops! Except for that tiny little nick in the flesh that I made while transferring the fish from the wok onto the plate.)
Place a small metal rack onto a plate, and cover metal rack with paper towels. Drain the fish on the paper towels. I find that using a metal rack between the plate and the paper towels, rather than placing the paper towels directly onto the plate, really helps the texture of the fish. It allows a certain amount of air circulation and provides for better oil drainage at the same time, so the fish is not sitting in a soggy pool of greasy paper towels. This helps keep the skin nicely crispy and firm.

This is my favorite way of eating deep fried fish – with a very simple ginger, rice wine and sweet dark soy sauce dip. Lots of fresh young ginger, cut into fine strips, is quickly and very briefly sautéed in a dry wok or pan (no oil). A little sweet glutinous rice wine is added. Mixture is sautéed again quickly for another couple of minutes, and then removed from the heat. Lots of dark soy sauce – the thick type that is normally served with chicken rice – is added. A quick stir later, and the fried fish with ginger-dark soy sauce dip is ready to be served.
Delicious!
Happy deep-frying!
Copyright © 2004 Renee Kho. All Rights Reserved.
Please contact me for permission to copy, publish, distribute or display any of the images or text contained in this article.
01:13 PM in Home Cook: Fish & Seafood | Permalink | Comments (11) | TrackBack