« May 2004 | Main | July 2004 »
Tuesday, June 29, 2025
Most Un-Aussie-Like, If You Ask Me
Once touched, considered sold. That’s seems to be one of the new retail policies that has made an appearance in Singapore. I’ll bet that’s something new to many of us consumers, and probably new even to the many retail management gurus out there. Sure, we are all familiar with the “once broken, considered sold” rule; which, in many circumstances, is fair. But “once touched, considered sold”??
As many of you are already well aware, I have this thing for Arnott’s Chocolate Tim Tams. And after my last post on this subject, I received a very helpful tip-off to check out a small grocery shop that apparently sold all things Australian-made. What a wonderful piece of news! I was hoping that this shop could become my convenient source of hard-to-find Aussie bikkies (that’s biscuits to the rest of the English-speaking world ![]() ).
).
I was warned that the shop had odd opening hours. And sure enough… last week, I happened to be in the Tekka area during the mid-afternoon, and I thought I would pop by and take a look. It was 3.10pm; the shop was closed. Then on Sunday evening, after dinner, we decided to drive by and try our luck. Nope. Shop closed. Finally, after hearing Niki talk about the dark chocolate kahlua slice yesterday, I just had to give the shop one more try today. So, on our way home from dinner, we drove by again. It was open! Or, at least it appeared to be open.
Only half of the lights in the shop were on; the shop sat in gloomy semi-darkness. We couldn’t really be sure if it was open for business; it looked as if it was already closing up for the day. However, one side of the double-swing glass doors was wide-open. So I popped my head round, said a cheery “hello” and enquired: “are you open?”
An elderly Indian gentleman sat behind the cashier’s counter in the far corner of the shop, reading the newspapers. At the sound of my voice, he looked up and stared at me from over the rims of his reading glasses. I waited as he took his time to answer me. Then, in slow-motion, he removed his reading glasses, and intoned in a voice filled with annuie and maybe even a hint of annoyance that his quiet reading session had been interrupted: “yes? What do you want?” We cheerfully repeated: “we were wondering if you are still open? We would like to come in and take a look around.” He did not reply directly but gave a vague gesture with his hand, which we took to mean: “come in”.
To be very honest, the shelves (of which there were only two and a half rows running down the length of the small shop) were pitifully bare. There were more empty spaces than there were products on them. As we started to walk along the aisles, the elderly man had come over to join us, and proceeded to watch our every move like a hawk. Every few minutes or so, he would ask impatiently: “what are you looking for?” My friend replied helpfully that it was our first time there and we would like to browse a little bit first. He didn’t seem too happy with that answer.
We then of course made a “wrong” move. My friend picked up a packet of Mint Kit Kat, and wanting to see if indeed all the products were the Australian-made versions, flipped the packet over to read the manufacturer’s label. Bad move. Almost instantaneously came the reproach: “excuse me, ah, you all touch every product then everything become soft, and other customers complain and don’t want to buy anymore”. Feeling a little guilty, we hung on to the packet of Kit Kat, intending to buy the one we had “criminally” touched.
A few minutes later, I seemed to make another faux pas. I spotted the Kahlua Slice. It was the last lone packet sitting on the shelf. As was my habit, I checked for the “best before” or “expiry date”. This one had a best before date that was only 4 days away – 2 July 2004. I really didn’t want to buy something that close to its best before date, so I replaced the packet onto the shelf. My friend looked at me quizzically, and I said quietly (only between the two of us) that it was almost expiring. Well, the Indian man was not only hawk-eyed but eagle-eared too. He heard what I said, and immediately said very gruffly: “that is not the expiry date, it is the best before date. There is a world of difference between the two you know. Customers don’t know anything, and they always assume the two things are the same. Even after the best before date you can still eat the product.” I didn’t want to argue with the man; sure, maybe it would still be edible, but would it still be fresh-tasting?
As usual, being over-polite, and feeling rather bad at being told off, I picked up that last packet of Kahlua Slice again and decided to buy it anyway. And you would have thought that would have appeased the man. But no. Right up to after we had paid for our purchases and were headed out of the door, he was still going on and on about expiry dates and best before dates. He tried to “educate” us about how different manufacturers had different shelf lives for their products (errr… but of course); how different products had different best before dates (err… but of course again); how different packaging would give different shelf lives to different products (errr… but of course, yet again)… and on and on. He just wouldn’t let the subject go. Maybe he took our polite silence as timidness. But we weren't not going to dignify his behavior by rebutting him; nor were we going to lower ourselves to his level of ill-manners by getting into an argument with him. After all, it was his business and rice-bowl at stake, not ours.
We came home and I opened up the packet of Kahlua Slice…


The biscuit was bordering on going stale. It was almost going soft; with no delightfully crispy crunch to it at all. Sure, it was still edible. But it sure as hell did not taste fresh. The biscuit was sweet-tasting, but my buying experience of it left a distinctly sour taste in my mouth.
I can only imagine how knee-weakeningly good a fresh, crispy, crunchy Kahlua Slice will taste.
One would have thought that with a shop located in an out-of-the-main-shopping-area location, where the main populace is, in the majority, completely uninterested in buying expensive imported products, it is critical to the success of the shop to treat well the customers that do walk in. And given the location and odd opening hours, it is not really walk-in customers at that, but people who have made special effort to go to the shop. Wouldn’t it be common sense to treat the customers so well that they become your die-hard fans, and spread your name like wild-fire by word-of-mouth? And believe me, there are TONS of people in Singapore craving Aussie-made products; people who beg friends and relatives to buy stuff for them when they return from trips to Australia. The treatment we got tonight was most definitely not the way to go. Well, I suppose I am still giving the shop a word-of-mouth recommendation. But is it of the kind it would want?
There was hardly a wide range of products; what was there had but only a few numbers each on display; and a lot of them were covered with such a thick layer of dust they had obviously been sitting there unwanted and unbought for a very long time!
I’m sorry, but I think I would rather *die* of Tim Tam cravings than to patronize this shop again. An Aussiemart selling Aussie-made products but with a distinctly un-Aussie-like attitude.
Copyright © 2004 Renee Kho. All Rights Reserved.
Please contact me for permission to copy, publish, distribute or display any of the images or text contained in this article.
11:57 PM in In My Shopping Basket | Permalink | Comments (24) | TrackBack
Min Jiang

My family and I have been dining at Min Jiang since it first opened in the early 80s. In those days, each week without fail – sometimes even a couple of times a week – we would eat at the restaurant. And almost invariably we would order our firm favorites: zhang cha ya (tea-smoked duck), xiao long bao (steamed soup dumplings), guo tie (pan-fried pot-stickers), tian suan yu pian (sweet and sour fish slices), gan bian shi ji dou (dry-fried “four seasons” beans), gui hua chi (shark’s fin scrambled eggs), dou sha wo bing (pan-fried pancake filled with red bean paste) and several others. These were dishes the restaurant did well, and did well consistently (a rare feat in this City).
Throughout the last couple of decades, Min Jiang has remained firmly on our list of reliable options when it comes to good Chinese food in Singapore. It is one of those restaurants you don’t think much about, and yet when you need to come up with a place to eat well-cooked Chinese food, it invariably comes to mind.
I had always thought it had weathered the years well. In a town where restaurants could come and go in a blink of an eye, very often within a matter of months, Min Jiang had stood the test of time. Not once had its standard of food and service fallen. It had been nothing but consistent.
The décor remained unchanged in the 20 plus years, and indeed I think many of the service staff were there from day one and grew with the restaurant. The service was always very efficient, courteous and professional, even when they were at their busiest and bursting at the seams. The food was always good. You never had to worry about having a disappointing meal there. And the prices, while not cheap, were not likely to bust the bank either. We were quite happy for Min Jiang to remain as it was, unchanging, constant and reliable.
But as with all things in life, change inevitably comes. While its business had always been pretty consistent, the management at Min Jiang obviously felt that the restaurant was losing out on the young, urbane consumer base – that sector of society that had high disposable incomes but was attracted only to flashy, modern places, and not “old” classics like Min Jiang. Its regular customers may have remained fiercely loyal, but these were, in the main, of the middle-aged demographic or, the younger generation like me who grew up eating there with our families. The young professionals, however, were giving it a decidedly cold shoulder.
So, it moved – into the main hotel building of Goodwood Park Hotel, from the stand-alone side building it had occupied for over 20 years. The décor changed from a classic, elegant Chinese get-up to a modern, edgy one, replete with spot-lights, halogen down-lights, wooden flooring and paneling, back-lit marble walls, floor to ceiling mirrors and full height glass windows. It even became the very first Chinese restaurant in Singapore to offer al fresco dining, by the pool – another obvious attempt to attract the hip and trendy who favored sitting out in the hot, humid and sweltering weather.
I had not been to Min Jiang since their move, and so I figured my birthday was as good a time as any to give their new set-up a trial run. It also made for a nice change from the usual formal French or Italian dinners I normally got as birthday dinners.
When we arrived at 7.45pm, the place was buzzing. It had obviously been very successful in achieving its goal: almost all the tables were filled with professionals and executive-looking types. The mostly families clientele was gone.
I could not say I particular liked the new layout. The space was extremely narrow and long; with the partitions that segregated the service stations exaggerating this sense of tightness and length; which also resulted in some of the tables being placed in awkward corners. And maybe I’m just old-fashioned or too attached to the old place, but I preferred the spacious Chinese-style ambience more than this in-your-face modernism. The new edginess also seemed strangely at odds with the hotel’s own neo-classical, colonial-style building within which the restaurant now sat.
It also appeared that the large majority of the long-time staff members (the wonderfully knowledgeable and reliable Captains or Maitre ‘Ds and other wait staff) had been replaced by nubile and attractive young things. There was nary a familiar face that I could recognize. I guess, sadly, age and experience just didn’t hold up against youth and beauty in the management’s new bold marketing strategy. But at least the new staff was also very well-trained – on the whole. They were polite and even friendly, but they also pretty much ignored you the whole evening, unless they were bringing food to your table. Our plates were not changed a single time during the entire meal. At one point, one of our party had to do a DIY and went and got clean plates for us from the service station. Oh, how I missed the unobtrusive but ever observant older staff who changed the plates without fail after each course, or at the very least after two courses; who paced the meal just right for you; and who anticipated, a lot of the time, your needs.
As for the food? On the whole, it was still very good.

We started with the vegetarian guo tie (pot-stickers) as appetizers. I had always liked Min Jiang’s guo tie, which I felt were some of the best in town. Their version had all the characteristics of a good guo tie – thin and smooth skin that was soft and succulent at the top of the dumpling, and most importantly, was crispy and crunchy at the bottom. It sounds simple, but you would be surprised at how few places get it right. Sometimes the bottom would be under-cooked, without that incredibly tasty golden-brown crust; while at other places, the tops would be cooked to a crisp golden-brown too, along with the bottoms, making them fully pan-fried dumplings rather than pot-stickers, which in essence are dumplings that have been cooked by a combination of pan-frying and steaming, all in the same pan.

These vegetarian guo tie were good – incredibly tasty, with the most delectable golden, crispy bottom crust. The filling – a mixture of chopped xiao bai cai, Chinese mushrooms and mock ham – was generous, and very well flavored. One thing has to be said about Min Jiang’s food: the flavors are always incredibly well-tuned; no over-salting, no jarring notes, just a harmonious and finely balanced combination of tastes and aromas. I was glad this had remained unchanged. Another thing that had remained unchanged: no MSG! The one thing I wasn’t overly enthusiastic about with these guo tie was their slightly greasy mouth-feel – more oil than normal had been used to cook the dumplings.

Next up were the stir-fried fresh scallops in XO sauce. Another gorgeous tasting dish. The extra large scallops were super fresh – briny, succulent and juicy. Absolutely delectable! The home-made XO sauce (a spicy dried scallop-based sauce) was probably not as spicy as other versions, but again, bursting with intense yet well-balanced flavors. I thoroughly enjoyed this dish.

Even the accompanying steamed broccoli, so often neglected and treated as mere garnish, was beautifully tender with a nice crunch, rather than being hard and undercooked as was often the case. The only let-down of the dish – again the rather generous use of oil.

This was the birthday girl’s special request: stir-fried prawns with cashew nuts. This came plated sort of Western-style; and it was another thing about the new Min Jiang that didn’t sit too comfortably with me – this vague half-hearted attempt at serving up Chinese food Western style, and with only some of the dishes and not all. Anyway, this was another excellent dish on the whole.

The prawns were brimming with briny freshness and were gorgeously succulent and crunchy. I liked that they were naturally crunchy and not made crunchy from being soaked in some solution which turned normal prawns into super crunchy “glass prawns” (buo li xia) but which also leached every ounce of flavor from the crustaceans. These prawns were beautifully tasty and flavorful. And at almost S$3.00 per prawn, they had better be!
The cashews were divine. But then, I absolutely adore cashew nuts. These ones were very fresh and had been deep fried in oil that was also very fresh, so there was none of that rancid after-taste which often happened. These nuts were crunchy on the outside but nicely tender on the inside, and were the perfect foil for the prawns. The snow peas were wonderful too – flash fried to crispy yet tender perfection.
It must have been a new chef at the helm, and one that was consistently rather heavy-handed with the cooking oil. By this time it was starting to sit uncomfortably with us; the greasy mouth-feel of each dish was starting to be a little heavy-going.

The fish course came: steamed snow-fish (or cod fish) with crispy soybean crumbs. This was another well-put together dish, if not for the oiliness. The flavors were wonderful; pristinely fresh fish with a most more-ish and desirable crunchy, crispy deep-fried soybean crumb topping. Taste-wise it was magnificent. The pairing of textures and flavors were most inspired – the moist, juicy, succulent, buttery, melt-in-the-mouth texture of the snow-fish was perfectly complemented by the crisp crunch of the topping; the blandness of the fish provided the perfect canvas for the intense, rich savoriness of the soybeans. Every mouthful was a textural and taste delight.

[Sorry, lousy picture, I know.]
However, yet again, the over-generous use of oil, coupled with the naturally unctuous nature of the snow-fish tipped the balance into over-kill. After only two small pieces of fish each, we were all satiated, no matter how tasty the fish or how more-ish the topping.

And of course, a Chinese-style birthday meal would not be complete without noodles (a symbol of longevity), so we had fried yee fu mein. Instead of the crab-meat version listed on the menu, we requested for the classic vegetarian variant – yee noodles sautéed with jiu huang (yellow chives) and various mushrooms.
Min Jiang’s yee mein had always been a favorite of mine (and my family’s). It had been consistently on my list as one of the best ones in town. And it was still very good. The beautifully rich and intensely flavorful superior stock used to cook the noodles had always been the secret to its scrumptiousness. Yet, this time, it was again that cloying oiliness that let the dish down. When I had slurped up my small bowl of noodles, what was left sitting at the bottom of my (very small) bowl was a pool of at least three quarters of a tablespoon of oil!
Finally, we had my favorite Chinese dessert: wo bing (pan-fried Sichuan pancakes with a red bean paste filling). [Sorry, my camera battery had died on me by then, so pictures will have to wait until my next visit.] I adore wo bing, and Min Jiang’s version has always been one of my favorites; and it was still very good. But again, that oiliness!
Overall, it was a very good meal. Min Jiang had always been excellent in producing beautifully tasty dishes, and this had not changed. It had also remained judicious in the salt department. I was glad too that it had stuck strictly to its “no msg” code of practice. But whereas previously it had also been careful and well-balanced with the oil, it was now loading it on a little too heavily, to the point where it was felt quite obviously in all the dishes served. And that was a little disappointing, for all the dishes were so wonderfully flavorful and tasty otherwise.
The prices, as to be expected with any move or upgrade of premises, had gone up by between 15-25%, depending on the dish. That was not too bad I suppose, but coupled with portion sizes that had shrunk approximately 10-15%, that would make a meal at Min Jiang (unscientifically) about 25-40% dearer!
To be honest, I miss the old Min Jiang. I miss the familiarity and comfort of the old layout, and the seamless efficiency of the previous service and kitchen teams. I miss the consistency and reliability. I think certain things have been lost in the modernization, and it is a pity. No doubt, the firm and strong foundation of the restaurant’s 20 odd years of history is still there, and still sound. But there are also some obvious rough edges to smoothen out. To be fair, it has been opened at the new location for only about three months or so, and perhaps a little more time is needed to break the new teams in. I am still willing to go back and give it another try, but maybe only in several months time. Hopefully things will have settled down by then. For now, this restaurant still remains, albeit a little tentatively, on my list of “regular” good eating places.
Min Jiang Restaurant
Goodwood Park Hotel
22 Scotts Road
Singapore 228221
Tel: 6737 7411
Copyright © 2004 Renee Kho. All Rights Reserved.
Please contact me for permission to copy, publish, distribute or display any of the images or text contained in this article.
06:08 PM in Lion City Shiok-Eats: Chinese | Permalink | Comments (8) | TrackBack
Monday, June 28, 2025
Hmmm…
Hmmm… seems like my blog has become part of the menu – the reading menu that is – of the NUS (National University Singapore).
This is rather unexpected…
Interesting…
![]()
![]()
And oh, did you know that Amazon.com now sells all sorts of stuff; like cookware, bakeware, kitchen gadgets and even Kitchenaid? I didn’t. Okay, I am probably a real laggard about this (I haven’t been surfing Amazon in ages), but it’s amazing what they are selling on that site now. Amazing Amazon…
Just spent a good hour of precious time drooling over and dreaming about a new Kitchenaid and a Le Creuset Dutch Oven. Oh! These kitchen gadgets and toys are so wicked, I tell you! Well, they’ve gone on my wishlist (wishful dreaming has never hurt anyone I say). Besides, I always believe: you never know when you are going to get lucky ![]()
Wanna see my wishlists? (Yeah, plural, not singular. I’ve got two wishlists… one with amazon.com and one with amazon.co.uk. I would prefer it if they can link all the International sites together and make life easier, but there you have it; the things consumers have to do to distinguish between the UK editions and US editions of the books they want.)
Okay, I think that’s enough nonsense from me for one night… I’m off…
10:31 PM in Crumbs & Tidbits | Permalink | Comments (16) | TrackBack
Friday, June 25, 2025
Dark Rich Luscious Goddess

And so I made my own birthday cake for the very first time.
Among the six (yes, count them, six!) new cookbooks I received as birthday presents (no, I suppose it is not quite “normal” for a girl to grin with glee to receive cookbooks as birthday presents, but there you have it) was “How to be a Domestic Goddess” by Nigella Lawson. Now, up until very recently I could not have been described as a fan of hers. I had caught her shows a couple of times on TV, but I couldn’t say that they did very much for me (sorry, Nigella fans; but read on, there’s more). However, as I read more and more raves by other food bloggers about her recipes, my curiosity was suitably piqued. Hmmm… maybe she did have something interesting to offer after all. So, when I was asked which cookbooks I would like as presents, I did not hesitate to put “Domestic Goddess” on the wishlist.
I have to admit, it took me almost two-thirds of the book to get comfortable with her tone and writing style. But when I did, I started to enjoy her – the connection had been made.
While I won’t go into a full review of the book here, I am beginning to see the kind of appeal she has. Her recipes read easily; there is nothing complicated or overly involved. Instructions are pared down to the bare minimum and kept simple and streamlined; but maybe a little too streamlined sometimes, as I came to realize when I was making the cake. The book is targeted at getting those who are intimidated by the very idea of baking into the kitchen and baking… with ease, panache and a suitable touch of glamour. But unless you have a fair amount of baking experience, you would not know, for example, how long to beat the eggs or butter for, what textures to look out for, what to expect or even what to aim for – the instructions do not tell you. I do understand her point of genesis: underwhelm the complexity of baking; remove the mystery around it. For me, I felt at ease enough with her “zen” approach to instructions; I could rely on what I already knew and had experienced baking cakes in the past. However, I can only imagine a degree of befuddlement had I been a first-timer. But perhaps it all doesn’t really matter in the end; as I found out, her recipes seem to offer a large berth (much larger than in a lot of other recipes) for “inexperience” before the cakes tip over into the “disaster zone”. And one thing has to be said for a lot of her recipes: they are so sexy! Making them can be such a sensuous and sensual experience. No kidding!
As I read through the book, one cake caught my eye and held my heart transfixed with desire and longing: her Nutella cake. Oh good heavens! Could there be a better sounding cake than that? Actually, this was my second “encounter” with the cake; but I needed to be reminded of the first, which was when Niki mentioned the cake to me in Alberto’s comment box. Back then, I had made a mental note to bake the cake. I forgot. Now, serendipity delivered the recipe into my lap and made sure I had the cake for my birthday.
Once I spotted the cake, I knew that was going to be my birthday cake. Just as surely as I had known as a child which cake I wanted for my birthday, so I knew that for this birthday it had to be Nigella’s Nutella cake. All the exalted French and Belgian pastry chefs in Singapore could keep their delicately refined creations, I was going to have myself a rich, dense, luscious Nutella birthday cake, and that was that. And since my mum had long “retired” from birthday cake making, it fell on me to make the birthday cake myself.
I also decided that I was going to use Alice Medrich’s low-fat rich (contradiction intended) chocolate glaze/frosting instead of the ganache recipe provided by Nigella. I had been meaning to try out Alice’s frosting recipe again after a rather dismal attempt some months back; so what better time than this to try and tweak her recipe into something I could accept.
I have to say this Nutella cake recipe was the most fun I have come across in a long, long time. I mean, which recipe allows you the luxury, nay, the privilege of licking out a Nutella jar? C’mon. Something has to be said for that. That is like the most sensuous and sexy thing this side of baking! Indeed, there were many opportunities for bowl, spoon and jar licking throughout the recipe. And this is one recipe concoction where you would probably quite happily kill to protect your “bowl licking rights”. Oh what joy, what bliss! Such seductive enjoyment… and we’re only just talking about the making of the cake! We haven’t even gotten to the eating of the cake and… Never mind.
The recipe that appears below includes the amendments I made or feel I would want to make in the future. First, very briefly, here are some general points about the changes…
I used 25% less butter, simply because I had run out of butter (shows how much forward planning I did for this cake making session!). Still, the cake showed little ill-effects from this shortage. (And it was so rich that a little less butter was hardly missed.)
The eggs I was using were rather small, so I used 7 eggs instead of the 6 large ones stipulated in the recipe. Well, no, actually I used 7 egg yolks and 6 egg whites. Why? One of the yolks broke as I was separating the egg, and the white couldn’t be used anymore for the meringue. So, I stored the egg white, used the yolk, and was too lazy to break open another egg to even out the numbers. I figured one egg white less was hardly going to jeopardize the cake; and it didn’t.
This was the first time I used salt to whisk egg whites; my standard was normally either sugar or Cream of Tartar. And I had a little difficulty with this salting of the whites thing. My meringue came out rather foamy; not the glossy smooth whisked egg whites I was so used to doing and getting. I was worried. Perhaps at that point, it would have been better if I had been blessed with baking ignorance and didn’t have past experience to compare with. But I did. And I was concerned about using this foamy egg white. The recipe of course provided little help. It said nothing about what the whites should have looked like; it stated simply that they were supposed to be “stiff but not dry”. Well, mine were “stiff but not dry”, yet also foamy. Any input on this would be appreciated. Would you have any ideas whether the whites are supposed to be foamy when whisked with salt? Anyway, I think the next time round, I would much prefer to fall back on the Cream of Tartar option; besides, I like my whisked egg whites looking glossy, shiny and satiny smooth. And sexy. ![]()
The recipe didn’t call for the hazelnuts to be toasted; but I always toast my nuts when it comes to baking (or indeed cooking). I just feel the aromas and flavors are so much better, richer, fuller and more complex after a few minutes in the oven. Sure, it is a little more work, but hardly more than a few minutes extra, and well worth the effort, in my opinion. Of course, un-roasted nuts would work perfectly well too.
I also melted my chocolate in a double boiler; it’s a habit. And I’m quite a creature of habit when it comes to baking. I’m sure Nigella would probably frown on so much “fiddling”. But I personally don’t think it is at all difficult to fill a saucepan with a little water, pop a bowl that fits nicely over its opening onto it, drop in the broken-up pieces of chocolate, put everything on the stove, have the flame on the lowest setting, and leave it to melt. How difficult is that? It probably takes all of 2 minutes to get that together. Then walk away and do other stuff, and leave the chocolate to melt happily on its own. Come back in 5 minutes, stir the chocolate to make it smooth, turn off the flame, and just leave it there, right on the pot to cool until you are ready to use it. Now, that really isn’t so fiddly is it?
Other than that, this recipe is as easy as can be…
Nutella Cake
[adapted from “How to be a Domestic Goddess” by Nigella Lawson]

7 medium eggs – separated
¼ teaspoon Cream of Tartar
95g unsalted butter – softened
400g jar Nutella *
1 tablespoon water or hazelnut-flavored liqueur **
100g blanched hazelnuts – toasted and finely ground
100g dark chocolate – melted ***
* Yes, you read right; one ENTIRE 400g jar of Nutella. Is that chocolate bliss or what? It really isn’t that sinful in actual fact; there is no additional sugar in the recipe, and the final cake was not overly sweet at all, and I have a fairly low tolerance for cloyingly sweet stuff.
** I opted for water. I was actually tempted to use Amaretto, but felt it would be a little too strong, and I also wanted the hazelnut flavors to come through strongly.
*** I used Lindt Excellence 70% Dark Chocolate. I had intended to use Valhrona, and had even bought the chocolates, ready and waiting. Alas! Unfortunately, family members got to the chocolates before I got round to making the cake, and there were none left by the time I needed them. So, it was back to my standard dark chocolate fall-back.
• Line and grease a 23cm springform pan.
• Preheat the oven to 180C.
• In a medium bowl, whisk the egg whites and the Cream of Tartar until stiff but not dry.
• Put the butter and the Nutella into a separate bowl (pausing to lick the Nutella jar clean), and beat together. Add the water (or liqueur), and beat to combine. With the mixer running, add the yolks one at a time, letting each incorporate before adding the next.
• Beat in the ground hazelnuts.
• Fold in the cooled melted chocolate.
• Add a large dollop of the whisked egg whites, and mix well to lighten the chocolate mixture. Gently fold in the rest of the egg whites, a third at a time.
• Pour the batter into prepared cake pan; bake in the oven for 40 minutes or until the cake begins to come away at the sides. Let cool on a wire rack.
[Nigella advised, and I followed her advice, not to remove the bottom of the springform pan – that is, to leave the cake sitting on the pan’s bottom after the sides have been removed. According to her, the cake was too dense and moist to be shifted. Now, this was fine for me as I was only serving the cake to family and very close friends, and presentation wasn’t overly important. But if you want to make it into a presentable birthday cake, then I think you can tip the cake face down onto a wire rack, peel away the bottom, place a cardboard serving platter over the bottom of the cake, and then flip the cake right side up again, before proceeding with the frosting.]
The first time I made Alice Medrich’s chocolate frosting from her book “Chocolate and the Art of Low Fat Desserts”, I was rather disappointed. The frosting was bitter from too much cocoa powder, and the flavors lacked a certain smoothness and full-bodied depth. I wanted to try and tweak the recipe to see if something that I liked could be made out of it.
That first time I had been struck by the 1:1 ratio of cocoa to sugar listed in the recipe. Most unusual, I thought. Rarely have I seen a recipe that used a 1:1 ratio. Cocoa – even Dutch processed cocoa – is just too intensely flavored and too “edgy” for that. And I was proved right. So this time around, I reduced the cocoa by half. Correspondingly, I reduced the liquids by 40%.
I had to skip the vanilla extract this time too; I had run out. (Boy, was I organized for this cake baking session!)
I also ended up boiling the chocolate mixture for a lot longer than stipulated in the recipe. I had initially used only ¼ cup of cocoa, but after boiling the mixture for the requisite time, I found it to be overly liquid and also too sweet. So I added another ¼ cup cocoa, and boiled the mixture again until the additional cocoa had been incorporated. All in, the boiling time had probably been doubled. This did not make the frosting too thick to work with. What did make the frosting almost too thick to work with was me being caught up in a tele-conference during the time I left the cake and frosting to cool. By the time I came back into the kitchen, the frosting was a tad on the too cool side. It was still spreadable, and as you can see, I had no problems frosting the cake, but it would probably have been easier if it had been slightly less viscous. No matter.
This turned out to be a great frosting: dark, luscious, very chocolatey, with just the right balance of bitter-sweetness and richness. I thought it went rather well with the super-rich Nutella cake; the bitter-sweetness provided a wonderful counter-balance to the dense heaviness of the torte. To have topped the cake with a true ganache made with heavy cream and milk chocolate would probably have been a little bit of an over-kill on the richness and sweetness scale. This, I felt, was just nice.
I also think this recipe is great for use as a chocolate fudge topping over ice cream; to sandwich cookies with and all sorts of other things. Simply adjust the desired thickness of the frosting according to the use. And if a more pronounced bitter-sweet flavor is preferred, use ¾ cup cocoa and 70% dark chocolate instead.
Rich Chocolate Frosting
[based on recipe from Alice Medrich’s Chocolate and the Art of Low-Fat Desserts]
1 cup sugar
½ cup Dutch processed cocoa powder
¾ cup 1½% milk
1 teaspoon vanilla extract
2.5oz (70g) dark chocolate *
* I used a 55% dark chocolate.
• Place the sugar and cocoa powder in a heavy bottom saucepan.
• Using a wire whisk, combine with enough milk to form a smooth paste. Stir in the rest of the milk.
• Heat the mixture on a medium-low flame until it simmers and begins to boil. Stir constantly with a wooden spoon, scraping the sides and bottom of the saucepan.
• Allow to boil gently for about 3 minutes, stirring constantly to prevent burning.
• Remove from the heat, and let cool for 5 minutes.
• Add the chopped dark chocolate, and stir until melted.
• Pour the mixture through a fine strainer. Let cool before using.
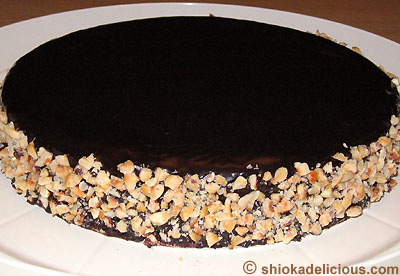
I kept the cake decoration simple. I wanted something homely and comforting. So, it was simply a generous layer of chocolate frosting all over the cake, with lots of chopped toasted hazelnuts adhered to the sides. It doesn’t look too bad, does it?
I deliberately kept the hazelnuts fairly chunky; much chunkier than would be normal for decorating a cake with, but I thought the texture would be a lot more interesting this way.
Okay, okay, enough already. Let’s get to the eating.

Well, just one word: divine! This cake was gorgeously rich, luscious… and yes, sexy. It was really more a dense torte than it was a cake. Yet, at the same time it didn’t have that uncomfortable heaviness that made you feel like you had a lump of rock sitting in the pit of your stomach after you had devoured the cake. And most importantly it wasn’t overly sweet. I was in fact pleasantly surprised at how “not overly sweet” it was; after all, a whole, entire jar of Nutella had gone into this baby.

Oh! I loved its rich, intense chocolatey flavors, with the heady aromas of the hazelnuts; and all lightly balanced out by the bitter-sweet frosting. This was a cake you ate slowly, savoring every mouthful. It was not something you shoved hungrily into your mouth. Every bite was a sensual and sensuous experience in of itself. If I had not felt like a Goddess whilst making the cake, I certainly began to feel like one whilst eating it!

For those of you in Singapore who were familiar with the now-defunct “Cakes by Jeremy”, this torte was somewhat similar to Jeremy’s famous chocolate cake: rich; dense; luscious; intensely flavorful; and outrageously chocolatey. Only more moist, not as cloyingly sweet and, in my opinion, so much better for the gorgeously fragrant hazelnut aromas.
As with all good things, you didn’t need a lot of it to be satiated. We quite happily got 16 servings (okay, so I had 2½ of those 16 servings, but that’s beside the point; it’s a birthday girl’s privilege after all, right? ![]() ) out of the 9” (23cm) cake; and if you worked that out, it was hardly a sinful indulgence. But oh, it was a happy one!
) out of the 9” (23cm) cake; and if you worked that out, it was hardly a sinful indulgence. But oh, it was a happy one!
[Note: I made the cake the day before it was served (who wants to be laboring in the kitchen on their birthday, right?) and kept it in the refrigerator. It was very good straight from the fridge, but even better when brought to room temperature.]
So, that was my birthday present to myself. I’m not sure I’m anywhere close to morphing into a Domestic Goddess by making this cake; but I do know that it certainly provided a rather sexy and sensuous highlight to my birthday gastronomic experience. Now, that is always a good thing, no?
P/S You guys sure are a “persuasive” ![]() bunch. Due to the “overwhelming” response and the flood of emails that was waiting for me this morning in my in-box, “grumbling”
bunch. Due to the “overwhelming” response and the flood of emails that was waiting for me this morning in my in-box, “grumbling” ![]() about me pulling my photo too quickly, and since it would be rather difficult for me to respond individually to each of those emails (I do apologize), I have decided instead to put my photo in the previous post back up for a short while more. After which I am really returning to anonymity.
about me pulling my photo too quickly, and since it would be rather difficult for me to respond individually to each of those emails (I do apologize), I have decided instead to put my photo in the previous post back up for a short while more. After which I am really returning to anonymity. ![]()
Copyright © 2004 Renee Kho. All Rights Reserved.
Please contact me for permission to copy, publish, distribute or display any of the images or text contained in this article.
05:00 PM in Home Baker: Cakes | Permalink | Comments (41) | TrackBack
Thursday, June 24, 2025
Of Birthdays Past

Today, as I turn another year older (and hopefully wiser, more grounded and centered too), a wave of nostalgia has washed over me.
For the past many years (too many to count on both hands and feet ![]() ), on each birthday, I get presented with an elegantly made cake from some 5-star hotel or renowned patisserie. These cakes are all very delicious, very refined, very elegant and, well, everything else that a “classy” cake should be. Yet, somehow, they seem to have lost their meaning and significance. I can buy and eat these cakes at any time during the year – which I do – and they are no longer special to birthdays.
), on each birthday, I get presented with an elegantly made cake from some 5-star hotel or renowned patisserie. These cakes are all very delicious, very refined, very elegant and, well, everything else that a “classy” cake should be. Yet, somehow, they seem to have lost their meaning and significance. I can buy and eat these cakes at any time during the year – which I do – and they are no longer special to birthdays.
And so my mind has been wandering back across time… to those years when each birthday cake was so terribly special and unique to me. The years when I always looked forward with great anticipation and excitement, months and months ahead of my birthday, to getting my birthday cake. The years when each cake was lovingly made by my mum, just for me. Yes, those were the years when each cake was unique to me; no one else would ever have that exact same birthday cake.
In this nostalgic frame of mind, I have been flipping through my old photo albums, looking at pictures of the birthday cakes of my childhood, and reliving some very beautiful memories. I would now like to invite you to take a walk with me, down this path of cake reminiscing…
My very first birthday cake was an elaborate affair: Humpty Dumpty celebrated my first milestone year with me. I should have been too young then to have any clear recollection of the cake. But I do. I remember it vividly. For some reason, I even have memories, albeit rather vague and foggy memories, about my mum having some incident with either a broken egg or an unsuccessful attempt in creating Humpty Dumpty. I remember hearing her discussing with my aunt how to put Humpty Dumpty back together again, quite literally. How was I to have known about such things at 12 months old? I do not know. But that is something that has stuck in my mind through all these decades. And strange as it may sound, I remember very clearly how happy I felt about my first birthday cake – as you can see from my wide 2-tooth grin in the top picture!

But there was only so much photo-taking and waiting to tuck into the cake that a one year old could handle. So, after a couple of minutes of patient smiling for the camera, I was ready for action. When were we going to cut the cake already? (Notice how the cake was deliberately kept at a very safe distance from me? ![]() )
)

Yet, when the time did come to cut the cake, was my attention on the cake? Nooooo… I was too busy eyeing the guys at my birthday party! What can I say? ![]()

My second birthday was a simpler affair; yet still filled with a lot of love and warmth. I had a heart shaped cake decorated with Smarties – my “most favoritest” ![]() candy at the time.
candy at the time.
See how demure I looked as I obediently kept my hands away from the cake, just as I was told to do? But what the camera did not subsequently record, and which my mum and aunts have recounted to me many times in the past, was that I honored that request for all of 30 seconds; just long enough for this shot to be taken. Then, before my parents or anyone else could remove me a safe distance from the cake, I had stuck not one finger, not even two fingers, but my entire hand… palm, fingers, the lot… into the cake. But really, what was a 2 year old to do in the face of so much yummy, soft white cream and colorful Smarties?
Here’s an interesting side note: notice how much like a boy I looked as a 2 year old? I think even my parents were a little worried back then. My favorite toys at that age, or so I have been told, were fire engines, aeroplanes, trucks and excavators! Fortunately, I outgrew my boyish phase, and have turned out to be quite the opposite! ![]()

My third birthday cake was one I remembered so very fondly for many, many years. It was another of my mum’s very dedicated and loving creations: a choo-choo train, replete with a box carriage filled with all sorts of wonderful sweets and candies. I had such vivid memories of the engine’s smiling face, the cotton wool smoke, and of feeling rather upset as all the other kids tried to steal the candy from the carriage!
Ah! The sight of all that food – all the “must-haves” for birthday parties of that time – brings back a flood of memories. Red-dyed hard boiled eggs, cubes of agar-agar, cocktail sausages on toothpicks, fried chicken wings, curry puffs… a table laden with abundant goodies.

My beloved late paternal grandmother, who loved and doted on me so dearly, helping me to do the honors.

By the time I was four, I was old enough to start making requests of my mother for the birthday cakes I wanted. And for some reason, I really wanted a cake in the shape of a house. It had to be a chocolate house, I specified. Oh yes, by that tender age, I had already developed a deep and abiding love for this dark ambrosia of the Gods; a love that has stayed with me to this day.
My clearest memory of this birthday cake? How patient and committed my mum was to giving me the cake I wanted. By then, I was old enough to be in the kitchen with my mum, watching and helping (or hindering, depending on how you look at it) her mix, bake and decorate the cake. And oh how she had to struggle with this cake. She had intended to create the roof of the house with butter cake, but that didn’t work. After spending a few hours trying this and that without success, we finally ended up with a roof made out of cardboard.
I remember how the roof was somewhat too heavy for the rest of the cake, and the house started to lilt a little. I also remember how there was much belly-aching laughter all round as I tried to cut through the very hard cardboard roof without success. The cake may not have been perfect looking, but it was perfect to me for the love that my mum had put into it. (Sorry, I don’t mean to sound so cheesy, but this cake does bring back some very special memories.)

It was sort of appropriate that for my fifth birthday I had a cake fashioned after the May Pole. I had watched fascinated as my mum so very carefully piped that intricate lattice design on to the top of the cake. And weren’t those sugar animals just the cutest?

This was a cake I picked out months before my birthday. My mum had a cookbook – the exact name of which I cannot now recall – which was filled with all manner of children birthday cakes; each recipe came with a glorious full color photo of the cake. I spent hours poring over the book; nearly every cake in there was one that I wanted! I think at the time I probably wished birthdays came once a month and not once a year, so that I could have all those cakes made for me!
After much internal struggle, I finally settled on the swimming pool design. And as had become ritual, my mum and I spent an afternoon in the kitchen decorating the cake together. We made green jello for the water, used pink dessicated coconut to pave the pathway and lined it with jelly sweets. Carefully we surrounded the cake with Cadbury’s milk chocolate fingers. What fun we had; each time we inadvertently broke one of those chocolate fingers, we simply popped them into our mouths.

Now, every girl has to have a Doll cake at some point. I mean, isn’t that some sort of ritualized tradition? And so I had mine on my seventh birthday.
I love my mum’s attention to detail. Look at the little rosette that my mum had piped onto the doll’s bodice. And that pert little lace hat. And oh, don’t you just love those two cute Bambis? That was my special request (at the time, I was going through my besotted-with-Bambi phase); and my mum never refused any of my birthday cake requests.

Another birthday tradition I think: every child seems to need a cake in the shape of a number. Mine came in the shape of an 8. Simple, yet lovingly made. It was very tasty too.

By the time I was nine, I seemed to have lost a lot of my interest in home-made birthday cakes. I guess at that age, such things seemed, well, passé. I wanted to be like my friends, whose mums never made them birthday cakes; theirs were always store-bought. I thought that was just the coolest. The follies of youth!
So for that year, my mum made me another number-shaped cake. That was the last of my home-made birthday cakes. It was around this time that we started the new tradition of buying ready-made cakes for birthdays. It was novel then. To buy a beautifully decorated cake from the cake shop was such an exciting process to me. I was taken to the cake shop and could gaze in wonderment at all the gorgeous cakes on display, and then pick out any design that I wanted.
So, we come full circle. Now, decades on, I have become jaded and uninspired by cakes made by the top pastry chefs of the land; I hunger for home-made simplicity. I long for cakes made with love and dedication. I hanker for a confection that is less refined, rustic almost; something that speaks to my heart.
I have thus, for the very first time in my life, made my own birthday cake. I have never ever given myself a birthday cake. And I like the feeling. I like the feeling a lot.
And here, I would like to pay a small tribute to my mum – for making each childhood birthday so incredibly special, for giving me so many precious birthday memories, and for inspiring my love for baking. While I may not have inherited her talent for cake decorating, I think I have definitely inherited her love of baking.

Thank you, mum!
On a final note, here’s something I would like to share with you. As I was going through the photo albums, I found this photo…

I was six months old, and it was my very first Christmas. Was I a chubby baby or what? Oh my! Look at that pram! What memories! So terribly English, no? My dad actually had that pram imported all the way from England, at a time when Mothercare was still unheard of in these parts. Heh. I even had on a dress with an Elizabethan collar to match the pram!
Okay, here’s something else: when I mentioned to friends that I was going to post my baby pictures, they threw me a challenge… Thus far, I have very consciously stayed rather anonymous online. Sure, my name is plastered all over this blog, but I have avoided putting up pictures of humans (have you noticed?). But my friends have been egging me and twisting my arm to post a picture of grown-up me.
So, after some “manhandling” from my beloved friends ![]() , I acquiesce and here it is (for a short time only): me, many Christmases on from that very first one, having a bit of a laugh posing in front of the camera…
, I acquiesce and here it is (for a short time only): me, many Christmases on from that very first one, having a bit of a laugh posing in front of the camera…
Copyright © 2004 Renee Kho. All Rights Reserved.
Please contact me for permission to copy, publish, distribute or display any of the images or text contained in this article.
02:30 PM in Tastes of Nostalgia | Permalink | Comments (51) | TrackBack
Wednesday, June 23, 2025
Eating the Traditional Un-traditionally

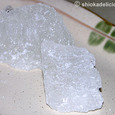
I had a sweet start to my Dumpling Festival yesterday, with this sweet dumpling served up for breakfast. This is probably the most traditional of glutinous rice dumplings; known as “jian shui zhong zhi” in Mandarin or “kee (or ki) chang” in Hokkien; and translated into English as “alkali water dumpling”.
That is its distinctive character; the dumpling is essentially just glutinous rice mixed with alkali water. The latter gives the dumpling a firmer, chewier texture compared to the other types of glutinous rice dumplings; it also gives the dumpling its characteristic yellow coloring. [Alkali water is very commonly added to many types of Chinese noodles. Most Southern Chinese style noodles have alkali in them, while Northern versions like the various la mian are usually alkali-free.]
I would say that jian shui zhong is probably the closest to the very first dumplings made those many centuries ago. It is a rice dumpling in the truest sense; devoid of any embellishment – no meat (a rare luxury in ancient times), no flavorings – and with just the alkali water added as a preservative and texture enhancer. Hundreds of years on, this plain, simple dumpling is still a favorite amongst many.

Jian shui zhongs are very small dumplings; usually no more than a third the size of the normal savory versions.
My feelings and thoughts about jian shui zhongs are very much tied in with my memories of both my late grandmothers. Every year, without fail, they would both make this dumpling for the Dumpling Festival. The whole family – aunts, uncles and cousins – loved these dumplings, eaten with a liberal coating of sugar. I however was more ambivalent about them; I found them tasteless and too chewy. The crunchy granules of sugar didn’t sit too well with me either. Yet, despite not having really enjoyed eating them, I still have incredibly fond memories of these dumplings, simply because they have long become associated, in my mind at least, with my grandmothers.
However, in recent years, I have come to like eating these jian shui zhongs. Two main reasons for this: well-made modern versions with sweet fillings like red bean paste and date paste; and the discovery of a distinctly non-traditional way of eating these traditional dumplings!
For breakfast yesterday, I had a store-bought red bean paste-filled one.
See the distinctive yellow coloring of the rice? This can range from a very light yellow to a darker yellow with brownish overtones, as in the case here.
Now, the traditional or classic way of eating jian shui zhong is to hold the whole dumpling in your hand and dip it into a small plate of caster sugar before taking each bite. I however have a very unconventional way of flavoring up my jian shui zhong, which will probably make the purists baulk and bring out the dumpling police! But what the heck, here goes anyways…
I like to eat the dumpling with each mouthful liberally smothered with either Nonya kaya or peanut butter. Absolutely delectable! The rich, flavorful and aromatic smoothness of the kaya and peanut butter is the perfect foil to the soft, dense, sticky, chewy blandness of the dumpling. Perfect!
Oh! Another thing that these jian shui zhongs are excellent for (and something which I think I’ve mentioned before elsewhere in this blog) is as a texture enhancer for sweet dessert soups (tong shui) such as red bean soup. Throwing in a small jian shui zhong, cut into small chunks, during the cooking process, and letting it dissolve fully into the soup, will give the red bean soup an especially smooth mouth-feel – a result of the glutinous rice and alkali water combination.
And so another Dumpling Festival has come and gone in the blink of an eye. But I now look forward eagerly to our next major festival, and my second most favorite after Chinese New Year – the Mooncake Festival. Only about three months away now… and then I will once again get to indulge in mooncakes. Yay!
Copyright © 2004 Renee Kho. All Rights Reserved.
Please contact me for permission to copy, publish, distribute or display any of the images or text contained in this article.
05:00 AM in Festivals: Sights & Tastes | Permalink | Comments (13) | TrackBack
Tuesday, June 22, 2025
For the Love of a Poet
Once upon a time, during the Warring States Period of Ancient China, there lived a great patriot and poet called Qu Yuan. It was a calm, ordinary day when he received news that his beloved country had fallen into enemy hands. Devastated and inconsolable, he threw himself into the river and drowned. The villagers, on learning of Qu Yuan’s suicide, rushed in their boats to try to save him. When they failed both to save him and to find his body, they became worried that his corpse would be eaten by the fish in the river. They thus came up with the ingenious idea of throwing packets of rice into the river to feed the fish, in the hope that the hungry creatures would not then feed on Qu Yuan’s body. Every villager also brought out their drums and gongs; and with great fervor, they beat upon them, creating a huge din, hoping to scare away the “river monsters” that they believed to be living in the waters. They were prepared to do anything to preserve the body of their beloved Qu Yuan.
And so it is that each year, on the 5th day of the 5th lunar month, Chinese all over the world pause to commemorate the death of Qu Yuan, who is considered to be the first great poet in Chinese history. On this day, dragon boat races are held in recollection of the villagers’ rescue attempts; drums and gongs are beaten during the races in the same way that the villagers had beaten on theirs during their sorties on the river; and rice dumplings are made and eaten by each family in remembrance of the packets of rice that were thrown into the river to preserve Qu Yuan’s body.
Over time, as society advanced and grew in prosperity, the plain rice dumplings evolved into elaborate affairs, filled with meat and various other ingredients. Each dialect group, and indeed every “Overseas Chinese” community dispersed across the globe, developed their own unique interpretation of the rice dumpling. Each family would also have their own cherished recipe for the “tastiest” dumpling. And so it is with mine.
Although rice dumplings are now readily available in the stores and can be eaten throughout the year and not just during Duan Wu Jie (or Dumpling Festival), they somehow take on added meaning and special significance during the festival. For my family, while we are quite content to buy ready-made rice dumplings during normal times, when it comes to the Dumpling Festival, something always seems amiss if we do not make our own. And no matter how many luxurious and scrumptious versions of rice dumplings I may have tasted, there is only one that I want for Dumpling Festival – a simple, unassuming dumpling filled with ground peanuts. For me, this dumpling defines the festival.
Both my grandmothers made these peanut dumplings; my aunts and my mum still makes them; and now I too am learning to make them. Rice dumplings filled with ground peanuts seem to be a peculiarity of the Brunei, Sarawak (Miri) and Sabah (K.K.) regions. I have never seen them sold in Singapore, or even Peninsular Malaysia. And they are the only variety that I yearn and long for each year when Dumpling Festival rolls around.
Usually, about two weeks before the festival, my mum and I will start to busy ourselves buying the ingredients, prepping them and making the dumplings. It is something I look forward to every year. It is hard work, but so much fun; and that indescribable feeling of satisfaction that comes from seeing the family enjoy the dumplings makes all the effort well worth the while.
This year, however, we were very late in getting started. And it wasn’t until this past weekend that we managed to make the dumplings; just two days before the festival itself!
The prepping work starts the day before the actual wrapping of the dumplings. And it is probably best to try and get as much of the preparations that can be done ahead of time done, ahead of time. It makes for a less frazzled, more relaxed experience when it comes to making the dumplings, a process which in itself can take up a full morning and afternoon, depending on how many dumplings are made.
Prepping the Ingredients
Bamboo Leaves
The dried bamboo leaves used to wrap the dumplings are sold in bundles, together with the hemp strings used to tie the dumplings. This is the traditional way to secure the dumplings. Nowadays, the factory-produced dumplings tend to come tied with multi-colored nylon rafia instead!
[We usually try, wherever possible, to buy the larger sized leaves, as this allows us to build bigger dumplings that can be filled more generously with all the scrumptious stuff!]
The night before, the leaves are submerged in a large tub of just-boiled hot water, and left to soak overnight. The next morning, each leaf is carefully washed and wiped clean. Then, they all go into a large stock-pot or any other pot that can hold them comfortably, and boiled in water for about 1 to 1½ hours, or until they are soft and pliable. This is an important step; if the leaves are not soft enough, they have a tendency to split when you are trying to wrap the dumplings, making it difficult to shape the dumpling and to keep the fillings from spilling out.
After they have been taken off the heat, leave the bamboo leaves soaking in the pot until just shortly before they are to be used. Then, drain them in a big colander. Do not dry the leaves. It is important that they still be slightly damp when used to wrap the dumplings.
Mushrooms
The day before, soak the dried Chinese mushrooms in water for about 10 minutes; drain and rinse well. Next, bring a pot of water to a rolling boil; lightly season the water with a little cooking oil and sugar, and add the mushrooms. Simmer on very low fire until tender (approximately 2 hours, depending on the size of the mushrooms).
Drain and de-stem the mushrooms. Cut smaller mushrooms into halves, and larger ones into threes.
Marinade them with some hoisin sauce, light soy sauce, sugar and pepper, and leave to macerate in the fridge overnight. This makes for gorgeously flavorful and succulent mushrooms!
Pork
Pork belly is the most commonly used cut of meat in rice dumplings. We, however, have a preference for using shoulder meat; we find it to be more flavorful than the belly. It is also less fatty, but with just the right amount of fat to produce melt-in-the-mouth tender meat and to give a nice lusciousness to the rice and other ingredients in the dumpling as it cooks down. We think it makes for a wonderful combination of smooth, sensual mouth-feel, rich flavor and melting tenderness. Still, either cut of meat works beautifully; use whatever makes you the most comfortable.
Clean the pork and remove the skin. Cut into medium sized chunks. [We find that it is best not to have the meat pieces too large, as these tend not to reach the right tenderness in the fairly short 1½ hours cooking time for the dumplings.]
Season the meat with some hoisin sauce, light soy sauce, sugar and pepper. And leave to marinade overnight in the fridge.
The next morning: in a little hot oil, sauté some minced garlic until soft and fragrant. Add the pork and quickly brown the pieces on all sides. As soon as the meat changes color, add a little dark soy sauce, and mix well. Remove the meat from the heat, drain and reserve the gravy. Set the meat aside to cool.
Ground Peanuts
These can be prepared the day before too, to make for less work on the day itself.
Take some skinless raw peanuts – the smaller varietal is better than the larger one – and roast in the oven until a light golden color. Allow to cool completely before blitzing them in the food processor.
How coarse or fine the peanuts should be really depends on personal preference. We sometimes make them slightly chunky; other times we have them ground fairly fine; and yet other times, we do two batches, and make dumplings with peanuts of different fineness!
[We use a lot of peanuts in the dumplings… usually about 700-800g for about 20 dumplings!]
Glutinous Rice
Rinse the glutinous rice, then soak for about 2½ hours; this can be done on the morning itself or the night before, whatever works best for you. Drain well.
In a little hot oil, sauté some minced garlic until fragrant. Add the rice, together with a pinch of salt, a little bit sugar, a dash of light soy sauce and the reserved gravy from the sautéed pork (above). Stir well so that each grain of rice is well coated with the oil and all the flavorings. Remove from the heat, and allow to cool.
[While the common practice is to leave the rice in dumplings plain and white, our family tends to prefer a little color in ours; and the pork gravy does a wonderful job of imbuing the rice not only with color but also wonderful rich flavors.]
Dried Scallops
Soak in hot water for about 10-15 minutes and drain well. Sauté very quickly in a little hot oil to release the flavors and aromas. Set aside to cool.
[As the scallops have to be shredded before being used in the dumplings, it is a lot more economical to buy the ones that come chopped or broken, rather than the more expensive whole ones.]
Dried Shrimps
Again, soak in some hot water for about 10-15 minutes, and drain well. In a little hot oil, sauté until nicely fragrant. Leave to cool. Coarsely chop and set aside.
The dried scallops and dried shrimps are optional; add them or leave them out as your palate dictates. You also don’t have to use both of them together; either on their own would add a nice nuance to the other dumpling ingredients. An alternative would be shredded dried cuttlefish (prepped in the same way) – my maternal grandmother loved using this in her dumplings, but I was never one for dried cuttlefish in mine. I always felt its flavors and aromas to be a little too aggressive and overpowering for the other ingredients.
Another ingredient that we usually use is Chinese chestnuts. This year, in our rush, we forgot to buy any, so we had to leave them out. [But as it turned out, the whole family actually preferred the dumplings without the chestnuts! The consensus was that without the chestnuts taking up precious space in the dumplings, there was room for more of the other delicious stuff like the meat and the mushrooms, which everyone agreed were way more flavorful and enjoyable than chestnuts. So I suspect the chestnuts have now come off the ingredients list permanently, at least for this family.]
Wrapping the Dumplings
Shaping the Leaves
This is going to sound a whole lot more complicated written out and explained in words than it really is; so don’t let the descriptions faze you. It is rather simple really; it just takes a little bit of practice to turn it into a smooth and quick process that produces perfectly shaped and uniformly sized dumplings each and every time.
The first goal is to create a cone-shaped receptacle with two bamboo leaves.
Taking two pieces of similar-sized bamboo leaves, line them up stem to stem. If one leaf is larger than the other, place the larger leaf under the smaller one. Holding the leaves horizontally, with the shiny sides facing you, have the bottom/outer leaf slightly offset from the top/inner one by about ½ inch or so; that is, you should see the outer leaf peeping out over the top edge of the inner leaf.
Looking along the length of the leaves from their stems, at just slightly past the halfway mark, make a small fold at the point where the top edge of the inner leaf meets the outer leaf. Twist both ends of the leaves, and bring them together, to create the conical shape. The tips of the leaves will be the slightly shorter end, and should be on the inside of the cone.
The key is to not have the fold (bottom right hand corner of picture) wider than ½ inch. The larger the fold, the smaller and shallower the cone, and thus the less stuff you can fit into the dumpling. Having said that, you also do not want the fold to be overly narrow, as that would increase the likelihood of the dumpling coming apart during the tying and cooking processes.
Adjust the leaves slightly if necessary, to get a snug fit of the outside leaf against the inside leaf – there should not be a gap between the two leaves. At this point, ideally, you should have in your hands, a tall, evenly shaped cone.
Now, for the fun part, the fillings…
Filling the Dumplings
The way my mother and I fill our dumplings is very different from the “standard” way of filling dumplings; it is catered to our family’s specific preferences when it comes to dumpling eating!
For a start, we tend to reverse the rice and filling ratios. Usually, dumplings have a rice-to-filling ratio of maybe 70:30 (or if you are lucky, 60:40). More often that not, it is rice that predominates, and the filling is, well, just a bonus. We, on the other hand, usually do a 30:70 rice-to-filling ratio. Or at least, my mother does. I personally tend to prefer slightly more rice in my versions of the dumpling, and thus go for a 40:60 ratio. We just feel that it makes more taste-sense to have more of the fillings than rice, since it is in the various ingredients that all the flavors can be found, and not in the rice. Of course, bottom-line considerations dictate that store-bought dumplings would rarely practice such a belief; and thus one of the joys of eating home-made dumplings.
Next, we like to do the “dumpling stopper” in our own little special way. The “dumpling stopper” (as we call it) is that small triangle of rice that is always found at the tip of the dumpling, where rice has been placed at the bottom of the leaf-cone to act as a “stopper” to prevent any potential “leakage”. And it is this triangle of plain, none to flavorful rice that is the family’s biggest gripe about eating store-bought dumplings. Very often, that uninteresting piece of rice is left abandoned and uneaten on the plate when all else has been devoured. So, for our home-made dumplings, we create a peanut-filled rice “stopper” instead.
Holding the leaves as you would an ice cream cone, drop a small amount of rice into the cone. Using the back of a spoon, spread the rice out onto the sides of the cone, creating a hollow, into which you put a little of the ground peanuts. Top with a little more rice, and level the surface. And there you have it; a “dumpling stopper” made of ground peanuts enveloped in a thin layer of rice. When cooked, the rice will be beautifully fragrant and tasty from the ground peanuts inside.
The final difference is in the way we layer the rice and various fillings. Most commonly, dumplings are made sort of sandwich style. You have rice on either end – in the tip and at the broad top end; and then you have the fillings all lumped together in the middle. We prefer to layer the rice and fillings alternately; this allows for an exquisite intermingling of flavors as the dumplings cook. The rice becomes filled with the rich tastes of the meat and mushrooms; and eating the dumpling becomes a pleasure, with each mouthful filled with a nice balance of all the different ingredients, instead of having a mouthful of just plain rice, or a mouthful of nothing but the fillings.
So, here is how it goes…
Over the rice “stopper”, sprinkle a thin layer of ground peanuts. Add 2 pieces of mushrooms, a small dollop of dried scallops or shrimps, and a nice chunk or two (depending on the size of your chunks) of meat. Follow this with a layer of rice. Next comes another piece of meat, a further piece of mushroom, and a little more dried scallops. Add a thin layer of rice, and finish off with a generous helping of ground peanuts.
And it should look something like this. Notice how my mum’s is always tall, slender and elegant, while mine…
…is somewhat more fat and squat! ![]()
Essentially, what this all means is that there really aren’t any “rules” or “this is the way it should be done” standards when it comes to how the dumplings are filled. Whatever makes your taste-buds swoon and sigh with pleasure is the “best way” that it should be done – for you. Feel free to experiment and play with the ingredients and just have fun layering and stuffing the dumplings.
There is only one small proviso. Avoid packing the ingredients too tightly into the cone; the rice needs a little space to expand as it cooks, otherwise you end up with very hard, undercooked and unpalatable rice. At the same time, we don’t want the ingredients to be too loosely assembled; there should not be gaping spaces – so use the rice as a “space-filler” in between the meats, mushrooms and other fillings.
Wrapping and Tying the Dumplings
Once filled, the dumplings are ready to be wrapped up and tied.
Holding the filled cone securely, fold down the extended ends of the leaves over the dumpling.
Using the same hand that is holding the dumpling, press down on both sides to form a triangular shape.
With the other hand, fold the excess leaves over onto the side to complete the pyramid shape. If necessary, snip off the pointed stems to neaten up the dumpling.
Taking a piece of hemp, wind it around the dumpling twice on the vertical axis. Make a double knot to secure.
[The key is to use your fingertips to keep the hemp snugly wound round the dumpling as you make the knot; the pyramidal shape of the dumpling does mean that the hemp is going to slip and slide and come loose if you don’t. At the same time, remember not to grip the dumpling! It’s a subconscious thing; we don’t realize we are doing it, but in our bid to keep the hemp secured around the dumpling, we tend to apply too much pressure. Not only does that result in misshapen dumplings but also a highly compacted one that will cook out rather hard and dry. The idea is to tie the dumplings fairly firmly but not tightly. It shouldn’t be too loose either, or we will end up with glutinous rice soup when the dumplings come apart as they are boiled! It sounds a little complicated; but all it really takes is just a little practice to get the hang of it.]
Then twine the hemp around the dumpling on the horizontal axis, and secure with a double knot.
[This is how both my mum and I do it; it ensures a very secure dumpling that will not come apart or have stuffing oozing out during the cooking process; we also don't get the deep indentation that is commonly seen where the string has been tied real tight, and where in that area, the rice doesn't cook as nicely as in the rest of the dumpling. Ours is probably not the most professional way of tying dumplings; the true expert would require only just that two times around the vertical axis with the hemp, and all sides of the dumpling would be secured. But hey, as long as the dumplings look nicely shaped and taste good, we are not going to quibble about an additional round or two with the hemp string!]
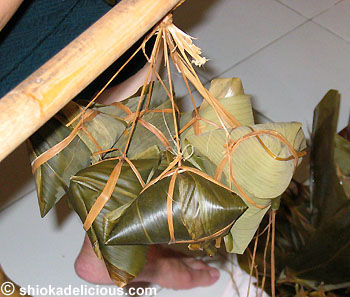
And so we work steadily, making 9-10 bushels of 10-12 dumplings each. It’s quite a sight to behold; we set up little “work stations” in the kitchen with bamboo poles stretched out across table and counter tops, from which we hang the knotted hemp. As the dumplings are tied on, we end up with a whole row of hanging green bushels. A rather delicious sight if you ask me!
Cooking the Dumplings
The dumplings are boiled in large pots of water. A little planning ahead will help make the cooking process a lot smoother and quicker.
Before you start making the dumplings, bring one (two is even better) large stock pot or the largest pot you have, filled half to two-thirds with water, to a boil. This will take awhile, so by the time your first few bushels of dumplings are done, the water will be ready too.
We use two pots - a large commercial-sized stock pot that we normally use to double-boil bird’s nests in, and a large pot that hawkers normally use to cook curries with - to cook the dumplings!
When the water comes to a rolling boil, add a little bit of salt (not too much, or the dumplings will be too salty). [We add about 2 teaspoons of salt into our large pot of water.]
When the dumplings are ready to be cooked, place them into the boiling water and simmer on low-medium flame for about 1½ to 1¾ hours, depending on the size of the dumplings. [Ours this time round took 1¾ hours and came out perfectly cooked.] The rice should be nicely soft with a little bite. It may take a little trial and error to get the timing right; too long and the rice is mushy, not long enough and it is hard and dry. But 1½ hours is a very good gauge; most of the time, any adjustments should usually be only 10-15 minutes on either side of that.
It is important to make sure all the dumplings are submerged in the water; any that are above the water line will not cook properly. Several bushels can go into one pot at the same time, as long as the dumplings are not too cramped up in the pot.
When the dumplings are cooked, remove from the pot and place on wire racks to drain and cool.
In the meantime, bring the water back to a boil, ready to receive the next batch of dumplings.
Eating the Dumplings
After a hard day’s work, it was time to sit back and enjoy the fruits of our labor.
We were very happy with the results of this year’s dumplings. The rice was beautifully soft and translucent, with just the right blend of fluffiness and sticky chewiness.
And oh, the pork! That bowled me over – melt-in-the-mouth tender and richly flavored. I would say it was probably the best meat we’ve made in dumplings for the last couple of years. I loved it!
The mushrooms were sensuously succulent, and the peanuts (my favorite part of the dumpling) offered a wonderful aromatic and fragrant finish. The seasonings were all very well-balanced and cohesive. Very nice!
[Sorry, a little messy, I know; I was chaffing at the bit to tuck into my dumpling!]
Just a little word on storing the dumplings: they can be stored in the refrigerator for about 3-5 days; or if frozen on the day they are made, they will keep in the freezer for several months. But I would say they are still best eaten within 3-4 weeks; I find the dumplings start to be a tad less flavorful if kept longer than that. For us, after the requisite gift-giving to relatives and family, the remaining dumplings are usually gone within a week or two!
To serve frozen dumplings: simply steam, straight from the freezer (without defrosting), for about 25-30 minutes.
And how do you tell if a dumpling is past its eat-by date? After it has been steamed, and when you cut or break open the rice, if you see thin, stretchy, clear strands (almost similar to spider cobwebs) stretching from the rice, then the dumpling is only fit for the dumpster… sorry.
My mum learnt to make rice dumplings as a young woman, watching and helping her mother each dumpling festival. She was the only daughter who picked up the skill; her two sisters were never interested enough. And I think it has been her quiet yet deep wish that I will in turn continue the tradition of making dumplings each and every Dumpling Festival. And so it is that I have, for the past couple of years, slowly learnt and practiced making them. It is true; dumpling making is a skill that is honed through years of loving dedication to a tradition that is centuries old. It is all about practice and experience. My dumplings may still be a little misshapen and not terribly elegant compared to my mum’s (and for each one I successful wrap, my mum makes two!), but hopefully by the time my own daughter (should I have one someday) is ready to learn the art of dumpling making, I will be ready to teach her and pass on the baton of tradition.
Wishing all Chinese a Happy Duan Wu Jie!
And happy dumpling eating!
Copyright © 2004 Renee Kho. All Rights Reserved.
Please contact me for permission to copy, publish, distribute or display any of the images or text contained in this article.
02:03 PM in Festivals: Sights & Tastes | Permalink | Comments (19) | TrackBack
Monday, June 21, 2025
Luffa’d Chick

Sorry, I meant chicken, of course. ![]()
A couple of months back, I posted about the different ways I like to cook the angled luffa gourd (also variously known as angled silk gourd, ridged gourd, Chinese okra or ketola). One of the variations that I wrote about was cooking it with chicken, but at the time I did not have a picture to show. Now I do.
In this particular instance, instead of using diced large onions, I opted for shallots; kept them whole and cooked them until they were beautifully translucent, soft and juicily sweet. I also added a couple of red chillies (seeded and cut into long pieces) for a dash of color. Otherwise, the preparation was as described in the previous post (you’ll need to scroll to the end).

And oh, usually, if cooking the angled luffa with either chicken or just onions alone, I prefer to cut the gourd into larger, chunkier pieces, rather than the thin, long strips used when sautéing it with eggs or with mushrooms and carrots. I find that the crispier texture of the larger pieces work better in the former two dishes, while the more tender bite of julienned gourd seems to blend better in the latter two versions; but that’s just my opinion. Feel free to work it as you best prefer.
This is still one of my favorite gourds; sweet, succulent and incredibly versatile.
[Update 22/06/04: I thought it might be useful to add a few tips on how to choose these angled luffa gourds; or at least how I've been taught to select these gourds.
• The skin should be a lively olivey green; avoid gourds that look dull and tired.
• The gourd should feel softly yielding and springy under light thumb pressure. Solid feeling gourds are usually older, and thus less tender.
• Try to pick gourds which have “sharper”, more pronounced ridges, or deeper and narrower “valleys”. These tend to be the young and tender gourds.]
Copyright © 2004 Renee Kho. All Rights Reserved.
Please contact me for permission to copy, publish, distribute or display any of the images or text contained in this article.
02:12 PM in Home Cook: Vegetables | Permalink | Comments (4) | TrackBack
Frenzied Frenzy
It has been a mad, mad weekend... a frenzied frenzy of cooking and baking, and back-breaking work in the kitchen. What have I been up to, you ask?
• Well, tomorrow is Duan Wu Jie, otherwise known as Dumpling Festival, or more popularly known to Westerners as Dragon Boat Festival. This is one of the five major Chinese festivals (the others being Dong Zhi or Winter Solstice, Spring Festival or Chinese New Year, Yuan Xiao or Lantern Festival, and Mooncake Festival); and one that my family celebrates every year without fail. Unfortunately, this year, we left the dumpling making to the very last minute. So, it was 1½ days of hard work making dumplings over the weekend! The post will be coming up tomorrow.
• On top of that, it was Father’s Day yesterday; I also had to squeeze in some baking amidst all that dumpling-wrapping. Unfortunately, the cake that I made for my dad turned out to be my first disappointment from Alice Medrich’s CALFD. ![]()
• After a day of frenetic dumpling-making and cake-baking, there was still the cooking of Father’s Day dinner to be fitted in, somehow. The family had opted not to join the Father’s Day throngs at the restaurants and eateries; we celebrated instead with several of my dad’s favorite home-cooked dishes.
• Then, this Thursday is a rather special day… special for me at least ![]() .
.
So, lots and lots of things to tell you about over the next few days…
01:13 PM in Food and Drink | Permalink | Comments (8) | TrackBack
Friday, June 18, 2025
Touched By A Stranger

Long-time readers of this blog will know that I have a thing for Tim Tams, and dark chocolate Tim Tams in particular. But these last few months have been difficult for me in the Tim Tam department. These little chocolate joys have been out of stock all over Singapore for months on end; not a single packet can be found at any of the supermarkets across the country. Why there has been this lengthy interruption to supply I do not know; what I do know is that it has left me with a severe case of Dark Chocolate Tim Tam cravings.
Before today, there had seemed little possibility of assuaging my raging longings, short of flying Down Under and packing a suitcase full of the chocolate indulgence to bring home with me. But this afternoon, as a result of the heartwarming friendliness and kindness of a “stranger”, I received not only a bagful of the dark chocolate Tim Tams, but also two packets of the new Tia Maria-flavored variety which has not even been launched in Singapore yet. I felt like I had struck the lottery! ![]()
Sometimes I am truly overwhelmed by the warm-heartedness, kindness and friendliness that are extended to me by the readers of this blog. And yes, today’s kind “stranger” is a regular reader of this blog. Until this afternoon, we had never met. In fact, until about three weeks ago, we had never communicated. Then we exchanged a couple of emails about a certain food item; she mentioned she was going to Australia and did I need to buy anything; in jest, I said I was craving Tim Tams but no, I really didn’t need anything. And yet, upon her return, I found an email in my in-box telling me she had helped me to buy some Tim Tams! I was flabbergasted; I was humbled and touched that she had thought of me, someone she didn’t even know, except through reading my blog. And yet, she was prepared to lug back a bagful of biscuits all the way from Australia for me. Thank you, IH! You made my day.
I would also like to take this opportunity to thank everyone who has, through this blog, touched me in so many precious ways. Thank you to all of you who have extended such warmth and friendliness to me… to all of you who regularly leave comments on the blog, and share so generously your feedback, as well as your cooking and food experiences and ideas, I thank you for making my blog journey such a fun, enjoyable and enlightening one. Your enthusiasm is contagious! It is you who have helped make this blog what it is. Thank you also to all of you who send me such heartwarming, kind, fun, chatty and informative emails. It is a joy every morning to read my mail. I may struggle a little bit sometimes in getting back to all of you on time; but please know that each email warms my heart, and reaffirms for me the wondrous kindness and love of humanity. I am so touched that you take the time to drop me a note, sometimes just to let me know that a recipe has gone well, or to share a disaster, or to let me know that you have discovered a food item that I have mentioned in a particular shop, or sometimes, simply just to say “hi”. I am truly humbled by your support, open-heartedness and warmth. Thank you for extending to me your friendship.
You know, for every nasty email I receive (and I have received quite a few of them, from people who felt the need to make unprovoked outbursts), I receive so many times more emails of the warm loving variety. And these I cherish and appreciate most sincerely. I haven’t really had a chance before, but today I would like to thank and acknowledge you. Thank you.

But what of the Tia Maria Tim Tams you ask. How are they? They are very good; lusciously rich with the aroma and flavor of Tia Maria. Coffee and chocolate are a natural, heaven-made match. These biscuits are also incredibly fresh. Just look at the gleaming glossiness of the chocolate coating. But you know what would have made these biscuits even better? A dark chocolate instead of a milk chocolate coating. Maybe I’m biased – I’m a huge dark chocolate fan after all – but the milk chocolate was just that tad bit too sugary sweet for me. However, I’m not complaining… after months of going without Tim Tams, I’m savoring every bite of my little bounty! ![]()

Copyright © 2004 Renee Kho. All Rights Reserved.
Please contact me for permission to copy, publish, distribute or display any of the images or text contained in this article.
11:57 AM in Snack Attack! | Permalink | Comments (25) | TrackBack
Thursday, June 17, 2025
Cheap and Good

Sitting on the fringe of one of Singapore’s many well-known food hubs is a rather unassuming, almost nondescript food stall. It takes up a small corner of a kopitiam (local coffeeshop), which itself is off to the side of the famous Alexandra Village Food Centre (or hawker centre). It is so humble looking that to this day, after years of patronizing the stall, I still cannot remember its name. I know where it is, I recognize the owners, but I can’t remember the name of the stall!
This small food stall sells but two items – the Teochew Soon Kueh and the Ang Ku Kueh (for more information about South East Asian kuehs, please refer to my previous post on kuehs); and it is well-known and highly regarded for both.
Soon Kueh is a classic Teochew steamed dumpling. Traditionally, a thin, smooth and translucent skin envelops a voluptuous filling of sautéed young bamboo shoots (“soon” in Chinese). The dumpling is then brushed with a little oil and steamed to soft, succulent perfection; a light sprinkling of toasted sesame seeds adds the finishing touch. However, for some unknown reason, in Singapore at least, the “traditional” version of Soon Kueh is taken as being one filled with sautéed mung guang (jicama or Chinese turnip), and the bamboo version is normally referred to as being a variant of this. Nevertheless, on the whole, “soon kueh” is the term used to refer to both flavor varieties.
There is also a further variant with a chives filling. In this incarnation, it is technically no longer a Soon Kueh, but a Koo Chye Kueh (“koo chye” - sometimes spelt “ku chye” - being the dialect term for chives).
This stall sells all three versions. I’ve only ever tasted their mung-guang and chives dumplings, since my body doesn’t take too well to the presence of bamboo shoots.

The Soon Kuehs from this stall are big – quite a lot larger than the standard ones sold at hawker centers. And they come stuffed chock-full with filling - shredded turnips sautéed with finely diced carrots and wood-ear fungus.
The ones we bought on this last visit were unfortunately a little under-flavored. And the turnips could have done with more time in the wok too… that elusive “wok-hei”, or rich, complex flavor that comes from using the right intensity of heat and cooking the food for the right amount of time, was sadly missing.
The skin (made from rice flour and tapioca flour), on the other hand, was as good as ever. So beautifully thin and translucent that the fillings could be seen through it; and yet strong enough that it didn’t break or tear when the dumpling was picked up with chopsticks. The true mark of well-made skin I say. The texture was pretty close to perfect too – soft, smooth and succulent, with just the right amount of bite. There was just the right degree of sticky chewiness, without any dough sticking to the back of your teeth as you bit into the dumpling.
The accompanying chilli sauce was very good too. I have always liked the home-made chilli sauce from this stall. It is not tongue-searingly hot. But spice heat alone does not a fine chilli sauce define, in my opinion. I’ve never been one to enjoy food or sauces that have but one dominating flavor note that overshadows all else. I prefer balance, and a holistically complex package of tastes and aromas. It is about richly layered flavors, finely tuned spice and ingredient combinations, fragrant aromas, and just as importantly, long and patient frying (cooking) of the chilli sauce – an often overlooked factor that is essential for delicious sauces.

The chives dumpling also came filled to the brim with stuffing. Look how beautifully and evenly thin the snow-white skin was. Gorgeous. The only let-down was again the filling. Chives absolutely require a good amount of cooking time; otherwise they retain this rather unappetizing green, grassy taste, and sometimes even with a hint of sappiness. Ideally, they should be sautéed to just the right amount of softness so that they are very tender and smooth on the palate. Perhaps it was a substitute cook that prepared the fillings that day; a cook that was inordinately light-handed with the flavorings. Even the finely diced dried shrimps that were added to the chives could do little to lift the filling.
Still, at just 50 cents (US$0.30) per piece one can hardly gripe too much. The Soon Kuehs at this stall are truly cheap. Similar sized ones, and not necessarily better tasting ones either, will normally go for S$1.00 to S$1.20! I think this stall has held their prices steady for years and years, and this fact has not gone un-noticed with their very large and loyal following.

My favorite from this stall however remains their Ang Ku Kueh, and more specifically, their Peanut Ang Ku Kueh.

Again, at just S$0.50 a piece, it is incredible value. Super generous fillings are the trademark of this stall, and it is true of their Ang Ku Kuehs too.
I like their peanut filling for several reasons. The peanuts are roasted just right – not too much, which gives the filling a slight “burnt” aroma, and not too little that the filling lacks fragrance… but just right. (And no, there is no Goldilocks in this story, sorry.) The peanuts are then ground to a very good consistency, not too coarse and chunky and not too fine, but just… right (hey, we’re getting good at this! ![]() ). The sweetness of the peanut filling is also finely tuned. And the biggest bonus for me personally is that you can’t see or taste the granules of sugar. I tend to find this to be a problem with many other versions of peanut ang ku kueh. Another common problem is an overly moist filling where the peanuts clump together into a soggy lump and become soft with nary a crunch to them. At this stall, although the filling can occasionally fall a touch on the dry side, but more often than not, it is very fragrant, aromatic and nicely crunchy.
). The sweetness of the peanut filling is also finely tuned. And the biggest bonus for me personally is that you can’t see or taste the granules of sugar. I tend to find this to be a problem with many other versions of peanut ang ku kueh. Another common problem is an overly moist filling where the peanuts clump together into a soggy lump and become soft with nary a crunch to them. At this stall, although the filling can occasionally fall a touch on the dry side, but more often than not, it is very fragrant, aromatic and nicely crunchy.
Not to be out-done, the skin is very well-made too. It is nicely soft, with the right amount of stickiness and chewiness. It is also not so thick that you get a whole chunk of glutinous rice flour dough with every bite, nor is it so thin that you feel like you are eating pure ground peanuts and nothing else.
All in all, just three words: good and cheap!

They also sell the Green Bean (Mung Bean) Paste Ang Ku Kueh – both sweet and savory. While the sweet version always has a red colored skin, like the peanut ang ku kueh, the savory one (pictured above) has a skin that is flavored, colored and flecked with a Chinese herb, the name of which I do not know. It lends a very subtle aromatic overtone to the skin, giving it a touch of the savory. In this form, the kueh is known as Aw Ku Kueh.

The generous bean paste filling is again very well made; with a soft and fluffy texture that doesn’t tip over into mushiness (unlike the one I wrote about previously). I’m not usually an aw ku kueh person. I much prefer the sweet one; but this savory version I will eat.
In recent years, they have added to their original repertoire of peanut, sweet and savory bean paste ang ku kuehs. Their range now includes “modern” flavors like yam and yes, even durian. I’ve never tried any of these “new” flavors, and am not inclined nor tempted to. I’m a classic kind of gal, you know… But given their generally high standards, I don’t think they will disappoint if you are so inclined towards those flavors.
I would say their kuehs are definitely among the better ones that I have tasted in our island state. They have remained steadfastly a specialist in these two types of kuehs, and it shows in the standards. And where value for money is concerned, they are pretty much unbeatable. This is one stall that has stayed on my “repeat list” for many years. I don’t visit it often; but whenever we happen to be in the vicinity, this stall is a must-stop.
[Update 19/06/04: a reader has very kindly emailed me the name of the stall: Poh Cheu]
Copyright © 2004 Renee Kho. All Rights Reserved.
Please contact me for permission to copy, publish, distribute or display any of the images or text contained in this article.
03:11 PM in Lion City Shiok-Eats: Fast Eats, Snack Attack!, Tastes of South East Asia | Permalink | Comments (15) | TrackBack
Wednesday, June 16, 2025
Old I May Be, But Tender and Sweet Am I
It is soup day again today, I’m afraid.
This is another “basic” soup that every family has a version of – old cucumber soup.
Yes, old cucumber. That’s what it is called in Chinese – lao huang gua. And that’s what it is.
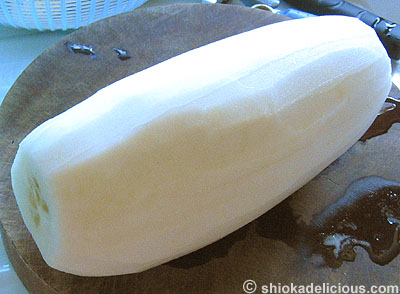
It is melon-like and large - on average, about 11-12 inches in length with a wide girth of, oh, maybe 5-6 inches. And unlike the green, crispy and crunchy young version, this has a soft gourd-like texture with a subtle sweet flavor.
(Sorry, the skin was already removed by the time it occurred to me to take some pictures. My apologies too for the rather unbecoming tint in the preceding picture as well as in the next 4 photos; I forgot to adjust the white balance setting.)
After the outer skin has been removed, cut the cucumber into wedges, and remove the seeds.
Next, cut the each piece into chunks, ready for cooking.
The other ingredients that are used to flavor and “enrich” the soup are red dates, pearl barley…
And corn…
Two ears of corn; husk removed and cut into halves.
Old Cucumber Soup
• Bring 3 soup bowls-ful of water to a boil, and pop in the old cucumber and corn. Let the liquids return to a boil before reducing the heat to low, and allowing the soup to simmer for about 1 to 1½ hours, or until the old cucumber is meltingly tender.
• About 30-40 minutes before the soup is ready, pour in the barley. [I usually avoid cooking the barley for an extended period of time, as this will produce a slightly “cloudy” soup with a thicker, somewhat “starchy-esque” consistency, reminiscent of a “barley water” drink (for those who are familiar with South East Asian drinks). The picture above actually shows the soup when the barley has been cooked for a long period of time; yes, I decided to put up pictures of how I don’t like to cook the soup! It is still perfectly drinkable and very tasty, but I just tend to prefer the soup to be clear and light in consistency. If you prefer a more viscous soup, add the barley at the beginning, together with the old cucumber and the corn.]
• 20 minutes before the soup is ready to be removed from the stove, add the dried red dates. [As mentioned in the previous post on Carrot Soup, it is best to cook the red dates for a short period of time. With extended cooking, the red dates will render the soup with a sour overtone.]
• Again, I don’t usually add any salt or other seasonings to the soup; preferring instead to simply let the delicate and subtle sweetness of the old cucumber, corn and red dates shine through. However, you may of course choose to season with salt to taste.
Note:
A variant of the soup can be made using chicken breast meat instead of corn to sweeten the soup and to give it body. Simply substitute the two ears of corn with one piece of bone-in, skinless chicken breast.
On a separate note, I have had several queries about the kind of pot I use to cook soups in. So, here it is…
This is what I use. It is a multi-layer insulated stainless steel thermal pot. However, most of the time, I no longer use the thermal plate which comes with the pot. I prefer to simply keep the pot on the electric element (it cannot be used on a gas flame) throughout the soup’s cooking process. And because of the way the pot is built (sorry, I don’t know the technical details), this speeds up the cooking time somewhat.
I understand that there is now a whole new generation of thermal pots on the market (my pot is 15 years old!), and these are great for cooking soups too – producing very flavorful results with nicely tender ingredients.
However, while a thermal pot is highly convenient in that you don’t have to stick around to watch the pot (literally speaking), any type of pot or saucepan with a lid can be used to cook soups. The only difference would perhaps be that some adjustments need to be made to the cooking times that I have stated in the recipes. So, fret not for a thermal pot if you are without. Soups cook well in just about anything!
Old cucumber soup… a wonderfully refreshing and nourishing soup. Old cucumber is said to be great for cooling and detoxifying the body’s system; barley is another natural cleansing and detoxifying ingredient; and red dates are said by the Chinese to be able to help build the blood and fortify the immune system.
Old cucumber soup… soup for both body and soul.
Copyright © 2004 Renee Kho. All Rights Reserved.
Please contact me for permission to copy, publish, distribute or display any of the images or text contained in this article.
05:54 PM in Home Cook: Soups | Permalink | Comments (17) | TrackBack
Tuesday, June 15, 2025
The Cheat & The Pretender

One of Sichuan’s (or Szechuan’s if you are still spelling it the old, non-hanyu-pinyin way) most famous dishes is Ma Po Tofu. Roughly translated, the name means “pockmarked grandmother beancurd”; apparently so named after the elderly woman who invented the dish. I was once told the “folklore” behind the dish by my mother, but have now since forgotten how the story goes. I think it has something to do with the unattractive appearance of the said elderly lady’s complexion, her outstanding culinary skills and talent, the visit of some high-ranking bureaucrat/official from the Imperial Capital, and his ecstatic reaction to her intensely flavorful tofu dish. To further add a sprinkling of fairy tale dust to the story, there is of course also the ironic play of metaphors… the word “pockmarked” being used to describe the delicate, smooth and soft texture and appearance of the tofu dish.
The elderly woman and her story may have long since been relegated to an obscure corner of epicurean trivia, but the dish she is said to have created lives on, and is now known and loved the world over.
For some reason, I have never ever made ma po tofu before. I do not know why. It is hardly a difficult dish to make. I guess it has just never occurred to me to make it. I cook tofu in a dozen different ways but never the ma po way. Until Lee Kum Kee came along and changed all that.
Recently, when I bought a new bottle of Lee Kum Kee’s oyster sauce, it came with a small complimentary sachet of… you guessed it, ma po tofu sauce attached to it. You see, Lee Kum Kee knew well the hearts of cooks like me. Under normal circumstances, it would not occur to me to buy a ready-prepared “ma po tofu sauce” to cook ma po tofu with, even if the thought of cooking ma po tofu had occurred to me in the first place. I would have more than likely tried to make the dish from scratch. But then where would big companies like Lee Kum Kee be if everyone made everything from scratch? So they enticed me with this little colorful packet that had a nice looking picture of ma po tofu on the front.
I turned the sachet over and read the label. Okay, I ‘fess up. I’m a huge label-reader. I read the labels of almost everything I buy. Seriously. So if you see a lady standing in the supermarket aisles reading food labels, that in great likelihood is me; come on over and say hi. I don’t like, and try to avoid as much as possible, eating foods that have too many “E numbers” and various other wonderful, chemically profound, artificial additives bringing up the rear of their ingredient listings. At the same time, I don’t like dissing every single company or whole categories of food items that are found on the supermarket shelves; dismissing them altogether in one breath, and branding them as the ultimate in sin and sinned creations, as some Singaporeans seem wont to do. I really don’t see the need to adopt a pompous, holier-than-thou, “I’m way above such products” approach to food. It’s just food. And besides, there are some decent, honest foods with integrity out there. I always feel that, in life, it is always much nicer (and also more beneficial) to constantly try to view the glass as half-full, rather than half-empty, or, as some Singaporeans would have you believe, three-quarters-empty or even completely empty!
I think it is about making personal choices about how we want to eat, but at the same time not condemning the rest of the world as being “below us” if they choose otherwise – be it out of ignorance or active choice. Education and awareness are the keys, and thus the world grows and evolves each and every day.
But I digress. Back to my ma po tofu sauce. The ingredient listing looked wholesome enough. So, hey why not? Let’s make ma po tofu for dinner.
That was how my “Cheat” Ma Po Tofu came about. I didn’t really make it. Lee Kum Kee did most of the work for me. But then a few days later, liking as we did the results of that Lee Kum Kee experiment, I made my own “Pretender” version of the dish.
“The Cheat” Ma Po Tofu

This particular version of ma po tofu probably does not really qualify on the authenticity index. I made several adjustments. I used diced chicken instead of the usual minced pork, and also added some additional seasonings of my own. All the same, it turned out very tasty, and it was so very simple to make too.
• Remove skin and all excess fat from some boneless chicken thigh meat, and cut into small cubes.
• Season the chicken with a little light soy sauce, sesame oil, sugar and cornflour. Set aside.
• Cut fresh tofu (not Silken Tofu) into cubes.
• In a little hot oil, sauté very briefly the tofu cubes. Remove from wok and drain well.
• In the same wok, sauté some chopped garlic and shallots until fragrant. Put in the chicken and sauté for a couple of minutes, until the color changes. Pour in the ready-made ma po tofu sauce, and add a little light soy sauce and oyster sauce to taste. Mix well.
• When the chicken is almost cooked through, return the tofu cubes to the wok and combine with the chicken gravy.
• Lastly, just before removing from the heat, sprinkle a handful of chopped cilantro (or parsley if you prefer), and stir to mix. Immediately turn off the fire and allow the cilantro to wilt in the residual heat.
The verdict on Lee Kum Kee’s ma po tofu sauce? I liked it. The family liked it. I would probably buy it again if I ever got the urge for a quick-and-easy, no-brainer ma po tofu dish. The flavors of the sauce were perhaps somewhat less spicy, with more mellow, rounded notes, than maybe an authentic Sichuan ma po tofu sauce. But it was highly flavorful and rather more-ish. And certainly the heat level can be very easily adjusted to suit personal tastes.
“The Pretender” Ma Po Tofu
That little outing with Lee Kum Kee had me wanting more spicy tofu. So, a few days later, I concocted my own version. Again, it was not in the authentic, classic ma po tofu style. I had not bothered to go look up a cookbook to see what exactly went into a “true-blue” ma po tofu. I decided to just go with the mood of the moment, and simply throw together whatever ingredients I had at hand, and see if I could come up with something in the spirit of ma po.
I used pork this time around. But thinly sliced tenderloin instead of minced meat.

• Thinly slice the pork tenderloin, and season with some light soy sauce, sugar and cornflour. Set aside.
• Cut the fresh tofu (not Silken Tofu) into cubes.
• In a little hot oil, sauté very briefly (approximately two minutes or so) the tofu cubes. Remove from wok and drain well.
• In the same wok, sauté some chopped garlic and shallots until fragrant. Put in the pork and sauté for a couple of minutes, until the color changes. Add 1 rounded heaping tablespoon chilli paste (I used my home-made version, but a store-bought one would be just fine), 2-3 rounded teaspoons tau cheong or bean paste (in place of the spicy hot bean paste that would normally be used in ma po tofu but which I had run out of), 2 rounded teaspoons hoisin sauce and light soy sauce to taste.
• When the pork is half-done, return the tofu to the wok. Stir to mix well.
• Add some hot water (less than ½ cup) to make some gravy. Let it come to a boil.
• Once the gravy is at a rolling boil, add a little cornflour solution to thicken the gravy. Allow the liquids to return to a boil. Add some chopped cilantro (or parsley if preferred), and immediately turn off the heat. Mix well to allow the cilantro to wilt in the residual heat.
It was very good, if I may say so myself. Nicely spicy, without being tongue-numbingly so. It was punchy and yet smooth and elegant. I certainly think the addition of a little hot bean paste would be a wonderful thing. At the same time, I would not remove the hoisin sauce the next time around either, even if it was not a “traditional” ingredient of ma po tofu. I liked the additional nuance of flavor that it added. And personally, I was quite happy not having any Sichuan peppercorns in the dish. I actually much preferred it without the mala flavor. But that of course immediately made the dish inauthentic. So, feel free to add the peppercorns if your spice preference lies in that direction.
The cheat or the pretender? Which do I prefer? I like both actually. Each for a different mood I say. So why choose? ![]()
Copyright © 2004 Renee Kho. All Rights Reserved.
Please contact me for permission to copy, publish, distribute or display any of the images or text contained in this article.
04:37 PM in Home Cook: Soy | Permalink | Comments (17) | TrackBack
Monday, June 14, 2025
This Ain’t No Rabbit Food
Carrot soup. This is probably the most basic of all soups in a Chinese home-cook’s repertoire. It is the first soup that one learns to cook. And it is also the soup that one never really stops making. No matter how sophisticated a family’s palate becomes, no matter how much skills and experience the chef accumulates, this is a soup that gets returned to time and time again. It is light and refreshing. It is familiar and comforting. It is easy, fuss-free, fool-proof and tasty all at the same time. What more can be asked of a soup? Indeed.
As is the case with almost all Chinese (and Asian) soups, this is a light, clear broth that has been gently and naturally sweetened with carrots and the other ingredients.
I have two versions of this soup that I make alternately, depending on my mood. One uses chicken as the foundation of the broth, and the other is a purely vegetarian alternative.
Carrot and Onion Soup
(serves 4 approximately)
1 piece bone-in chicken breast, skinned
4 carrots, cut into chunks
2 big onions*, cut into large cubes
3 soup bowls water**
* Sweet onions, such as Spanish onions, would be absolutely lovely in the soup. Unfortunately, those are hard to find in Singapore, so I usually use the regular yellow onions, and they still come out wonderfully sweet and tender, after the fairly long cooking time.
** This is the way I normally measure out my water when I cook soup! As such I do not know the metric equivalent. Sorry.
There are just two steps to the cooking process:
• Bring the water to a boil.
• Add the rest of the ingredients. Allow the water to come back to a boil. Simmer on low flame for about 2 hours or so, or until the carrots are at the desired tenderness.
That’s it!
I don’t even add any salt. The family enjoys the soup as is. Just the natural sweetness from the chicken, carrots and onions. But of course, if you prefer, the soup may be salted to taste.
Carrot and Corn Soup
(serves 4 approximately)
This version uses corn and red dates to sweeten the soup and give it body.
2 ears of corn, skinned and cut into halves
4 carrots
1 handful of dried red dates
3 soup bowls water
• Bring water to a boil.
• Add the carrots and corn. Allow water to return to a boil, reduce heat to low, and leave to simmer until carrots are tender.
• Twenty minutes before the soup is ready, add the red dates. [These should always go in just before the end of the cooking period. Adding the red dates too early, and letting them cook for too long will give the soup a sourish tinge.]
And there you have it – carrot soup, Chinese-style. This soup is a wonderful palate refresher – a beautifully light, clear broth, with a wonderful natural sweetness. Healthy yet tasty. And so ridiculously easy to cook.
Even a rabbit would approve! ![]()
Copyright © 2004 Renee Kho. All Rights Reserved.
Please contact me for permission to copy, publish, distribute or display any of the images or text contained in this article.
05:00 PM in Home Cook: Soups | Permalink | Comments (8) | TrackBack
Friday, June 11, 2025
From the End of the Snout to the Tip of the Tail, and Everything In Between

The Chinese, as with many other cultures from the French to the Mexicans, eat just about every part of the pig. Nothing is spared or wasted. From the end of the snout to the tip of the tail, and everything in between… each part of the pig provides for unique tastes, textures and flavors, all of which can be made use of and turned into culinary splendors and delicate delicacies. Of course, historically, it was probably more out of necessity and economy that the entire animal was eaten. Nowadays, it has become almost a gastronomic luxury to indulge in such “exotic” epicurean creations.
For the Chinese, every part of the pig is a taste delight. In the Shanghainese tradition, the ears are cured, then thinly sliced and served as a crunchy cold appetizer. Braised pig’s tongue requires a labor of love to prepare, but the delectable end-result makes it worth the while. The brain is delicious when sautéed with egg. And coagulated pig’s blood adds oomph to many a dish. Double-boiled pig’s heart soup is said to calm a frightened or scared child. Meanwhile, spicy and peppery intestines soup is a well-loved comfort food. Trotters (or knuckles) braised in black vinegar bring many to their knees with sighs of delight. And pig’s tail peanut soup? That is an age-old classic.
Having said all that, I must be very “un-Chinese”, as I do not eat most of that stuff. I was probably more adventurous as a kid. One of my favorite dishes back then was pig’s brain fried with eggs, a sort of brain omelet if you will. I guess I would still eat that now, if pigs’ brains were readily available and if I was not so wary about cholesterol and other health risks. But I have never been one for offal or other innards. I watch with a mixture of horror and spellbound fascination as family and friends happily tuck into intestines soup or kuay chap (braised mixed offal).
Probably the only organ I eat is the liver. And even then, only if it is cooked in certain ways. One of the ways that I like is to cook it with a lot of Chinese glutinous rice wine, in the style of the traditional confinement wine soup.
You see, for Chinese women, the time of pregnancy and the one month after delivery (the confinement month) are times when their families will place great emphasis on them eating the “right” foods, to build up the body in preparation for delivery and to nurture the unborn child, and to restore and replenish the body following delivery respectively. A very common dish would be chicken cooked with sweet glutinous rice wine and ginger, or pork liver cooked with sweet glutinous rice wine and ginger.
Wine during pregnancy, you ask?? Yes, Chinese glutinous rice wine is very low in alcohol content to begin with, and only a little bit is used. The alcohol is also completely cooked off, leaving only the fortifying benefits of the wine and its sweet flavors. The Chinese believe glutinous rice wine to be warming for the body and a tonic that builds the blood and restores strength and vitality. Ginger is a common accompaniment as it is said to rid the body of wind, and again to warm and build the blood. (However, after delivery, the consumption of such foods is usually allowed only on the first day or two following the birth, before lactation starts. After that, other foods are used to supply intense nutrition to the nursing mother, and wine and ginger are generally avoided.)
Pig’s liver. In the past, or at least up until my mum’s generation, expectant mums ate copious amounts of pork liver. Anaemia is a common problem for most Asian women during pregnancy. And in those days, it was believed that the natural way was the best. So women eschewed iron supplements or vitamin B shots for lots and lots of pig liver! My mum still tells me stories of how, in those days, pig liver was so precious that it had to be reserved, otherwise you just didn’t get any. And if you tried to reserve some everyday with your butcher, you would most likely get a telling off from him – “why do you need to eat liver everyday? Can’t you eat something else? Other people also want to eat liver, you know?” And prices were astronomical. Sometimes even more expensive than the pork meat itself! Nowadays, the reverse is true. Women turn their noses up at liver, citing it as awful tasting, unappetizing, inconvenient, unhealthy and what have you. Iron supplements and jabs are the easy, instant, on-demand way to go. And now, if you go to the wet market, and ask for $1.00 worth of liver, the butcher almost begs you to take the whole lot, and gives you an entire bag full of liver! Ah! How times have changed!
So it was that a few weeks ago my mum returned home from the wet market with a big bag full of pig’s liver. I was somewhat aghast. Why on earth did you buy so much liver? I gasped. She explained that she had a sudden desire to eat liver, and had in fact asked the butcher for $1.00 worth, thinking she would probably get just one small piece of liver for that price. Instead, the butcher grabbed a few big handfuls of pig’s liver and put them into a bag for her. My mum had insisted she didn’t want so much. The butcher said: “never mind, I give you free… all for $1.00”. On top of that he even threw in some chicken liver, chicken heart and other innards! My mum kept telling our butcher she didn’t want all that stuff, but the butcher insisted on giving them to her anyway!
My mum and I looked at each other, and burst out laughing. What were we going to do with so much liver and other organs?! Liver didn’t keep well at all, and had to be eaten on the day of purchase. So it was decided, the family was getting nothing but liver for dinner! ![]() We cooked them the way the family liked them best… in a lot glutinous rice wine.
We cooked them the way the family liked them best… in a lot glutinous rice wine.
There are actually two variants to this dish. One is a “dry” version, with hardly any soup. This is the one that is usually cooked for expectant women, as it uses less wine. The other is a soup version (as seen in the top main photo). This is the one that many families, including my own, prefer for everyday consumption or for so-called “pleasure eating”. I will give the recipe for the latter, and then talk about the slight changes to be made to get the former.
Pig’s Liver Cooked in Sweet Glutinous Rice Wine, with Egg and Wood-Ear Fungus
Prepping the Various Ingredients
The different ingredients need to be prepared separately before the “soup” is assembled.

For the wood-ear fungus:
• Boil the dried fungus in a pot of water until they are at the desired texture and tenderness (personal preferences will vary) – usually about 20 minutes or so. Drain and rinse under running water. Set aside.
For the fried eggs:
• Eggs are optional, but my family likes to have eggs in our version. And we like them over-easy, with yolks still runny. We usually provide for one or two eggs for each diner, depending on how substantial we want the meal to be.

Okay, I know, I’m messy. I should have laid the eggs out in a single layer, but I was lazy, and piled them one on top of the other, and some of the yolks broke. Still tasty, just messy. I’m usually a fairly tidy cook (truly), but I have my moments! ![]()
For the chicken liver:

• If using chicken liver, or if you get foisted with a whole bundle of chicken livers by your butcher… wash and clean the livers, then boil them in a pot of water until they are just slightly undercooked. (They will finish cooking in the soup.)
For the pork liver:
• Wash and clean the liver, and slice as thinly as possible. The pieces should be fairly large, yet very thin. We want to have as large a surface area as possible so that the liver will cook very quickly. There is nothing worse tasting than over-cooked liver. Believe me.
The pork liver can be prepared ahead of time up to this point. The rest of the steps should be carried out only just before cooking the liver.

• Just before the liver is to be cooked, sprinkle a tiny bit of sugar over the liver, and then coat with cornflour. The cornflour helps to give the liver a smooth texture. Of course, as my mum always says, you have to start with good-quality, very fresh liver in the first place. No amount of flour is going to make less than high-quality liver smooth.
• Bring a pot of water to a strong rolling boil. Blanch the liver very quickly in the boiling water. As soon as the liver changes color, remove from the heat and drain.

• Rinse the blanched liver under running water, to wash away the flour. Drain well.
Now the liver has been prepped, and is ready to be cooked with the wine.
Cooking the Glutinous Rice Wine Soup

• In a hot wok, with a little bit of oil, fry lots of julienned young ginger until fragrant.

• Pour in about ½ bottle (not sure how much that is – maybe about 2 - 2½ cups?) of sweet glutinous rice wine. Bring to a boil. Reduce the heat to low.
• Add the fungus.

• … and the livers. Stir on low heat until the livers are just cooked through. Be careful not to over-cook the livers.
• Add a dash of light soy sauce, and if desired, pepper to taste.

• Once the livers are cooked, add the eggs, and stir gently to mix with the wine mixture. Remove from the heat and serve immediately. Cold cooked liver doesn’t taste very good.
The "Dry" Version
• Sauté the ginger strips in a tiny bit of oil until fragrant.
• Add the livers to the wok, and fry very briefly. Add light soy sauce and pepper to taste.
• Pour in about ½ to 1 cup of sweet glutinous rice wine (this will give a tiny bit of "gravy"). Continue to sauté the livers.
• When the livers are almost cooked, add the fungus. Stir to mix.
• Finally add the eggs. Mix and remove from the heat.
Notes
• The amount of alcohol in the dish can be controlled by the length of the cooking time. If allowed to cook for 7-10 minutes (as in the above two cases) or more, almost all the alcohol would have evaporated off, and only the subtle sweetness of the glutinous rice wine will be left flavoring the dish. We generally prefer it this way. The wine is seen as more a sort of flavoring and fortifying ingredient, rather than as an addition of alcohol to the dish. However, if a stronger alcohol content (and taste) is preferred, simply adjust the cooking method slightly, and add the wine a little later, so that it doesn’t get cooked for longer than 5 minutes.
• We would not usually use both chicken and pork livers in the same dish. That is a bit of a liver over-kill. This particular instance was an exception.
• This recipe can also be used to cook a chicken version ("ji jiu" or literally "chicken wine") - a version that is probably more familiar to many people, and that my family eats on a more regular basis. So instead of using liver, use bite-sized chunks of boneless chicken thigh meat. Again, the meat is cooked with wood-ear fungus and fried eggs.
• A further variation to this that we also make is adding mee sua (thin white noodles) to the ji jiu (chicken in glutinous rice wine) to make ji jiu mian sian. This I like a lot! Very nice indeed!
Until that night, I had not had liver in glutinous rice wine for years! So, it was a nice treat to re-visit the dish. However, tasty as it was, the meal also reminded me, very clearly, why I could never be on Atkins. By the next day I didn’t want anything to do with protein or any food item that came from animals. I was wanting my noodles, pastas, sweet potatoes and rice. Oh yes, you can take the carbs out of my life, but you can’t take the carb-lover out of me!
Copyright © 2004 Renee Kho. All Rights Reserved.
Please contact me for permission to copy, publish, distribute or display any of the images or text contained in this article.
02:03 PM in Home Cook: Poultry & Meats | Permalink | Comments (14) | TrackBack
Wednesday, June 09, 2025
Wind-Dried, Slowly Braised

Following from yesterday’s post on braised pork and radish, here’s another slow-cooked dish that is also quintessential Chinese comfort food – braised wind-dried or preserved vegetables served with pork.
Two types of vegetables can be used in this braised dish. Either wind-dried vegetables (cai gan in Mandarin or choy kon in Cantonese, literally translated as “vegetables dried”) or preserved vegetables.
Many varieties of vegetables can be found in wind-dried versions, like xiao bai cai (this is the one we use most frequently at home) and various vegetables that are indigenous to certain provinces of China. Similarly, there are many different varieties of preserved vegetables. A very commonly used one is mei cai (in Mandarin) or mui choy (in Cantonese).
Every dialect group has their own version of braised dried/preserved vegetables, and each family also has their own variation. The basis of the dish remains the same – dried/preserved vegetables that are patiently and lovingly cooked for a long period of time. However, the type of dried/preserved vegetables used and the seasonings and flavorings added may vary a little, from family to family.
So here is my family’s version, using wind-dried xiao bai cai…
Braised cai gan (dried vegetable) is usually served with pork. Most often this would be braised pork belly. But it can also be served with braised pork. For my family, because we tend to prefer leaner cuts of meat, this would be how we would normally serve braised cai gan. We would sometimes also serve the vegetables topped with just a simple stir-fried dark soy sauce pork instead, as shown in the picture above.
Like in the restaurants, we like to cook the meat (even if it is braised meat) and dried vegetables separately. Given the very lengthy cooking time for the dried vegetables, cooking the meat together with it would result in very tasty and sweet vegetables, but rather bland and unappetizing meat, as all the flavors would have leached out from the meat.
Braised Wind-Dried Vegetable
• Wash the wind-dried vegetables well to remove sand particles. Soak in water until softened.
• Drain the vegetables, and dice finely.
• Finely slice some pre-prepped Chinese dried mushrooms (optional).
• Sauté some minced garlic in a little hot oil. Add the dried vegetables and Chinese mushrooms, and fry briefly. Add some light soy sauce, tiny dash of dark soy sauce, a little bit sugar and about 1½ to 2 cups chicken (or pork) broth/stock. [There should be enough liquid to ensure that the vegetables do not dry up during the cooking process, and that there is a small amount of gravy left at the end. The seasonings can also be adjusted to personal tastes.]
• Transfer mixture to a slow-cooker (crock pot), and leave to simmer for about 6-7 hours or until the vegetables are at the desired tenderness. [My family tends to like our braised dried vegetables very, very tender - near melt-in-the-mouth texture - with just the lightest hint of bite. Others may prefer vegetables with a crunchier mouth-feel, and the cooking time should be adjusted accordingly.]
Notes
• The same recipe can be used for braising preserved vegetables like mei cai.
• However, while wind-dried vegetables are free from any added flavors and thus take their flavors solely from the seasonings added during the cooking process, preserved vegetables on the other hand already have inherent tastes, and the seasonings need to be adjusted accordingly. Some preserved vegetables are salty and some are sweet. And the level of sweetness or saltiness can vary from vegetable type to vegetable type, as well as from batch to batch.
• Braised dried/preserved vegetables are a wonderful accompaniment to plain rice congee or porridge, but are equally good with steamed rice.
• This dish can quite happily be served on its own, or topped with pork – most often with braised pork belly, or braised pork, or sometimes, in the case of our family, with stir-fried pork tenderloin…
Stir-Fried Dark Soy Sauce Pork Tenderloin
• Slice the pork tenderloin as thinly as possible.
• Season with some light soy sauce, tiny bit of sugar, dash of sesame oil and sprinkle of corn flour.
• In a hot wok, sauté some minced garlic. Add the pork, and very quickly toss to brown the meat. As the pork is sliced so thinly it cooks very quickly indeed. As soon as the meat has changed color, add approximately 1 tablespoon dark soy sauce, 1 tablespoon oyster sauce, 1 tablespoon light soy sauce, 1 tablespoon Chinese rice wine and about 1 scant teaspoon sugar. [Seasonings can be adjusted to suit personal preferences.]
• Finally, combine a little cornstarch/cornflour with a little water (just enough to give a little bit of gravy), and pour over the pork. This will help thicken the gravy and give the meat a nice sheen at the same time.
• As soon as the gravy comes to a boil, and the pork is cooked through, immediately remove from the heat.
Notes
• As the pork is very lean, it is important to avoid over-cooking the meat to keep it very tender and moist.
• This dish, served on its own, is a sure-fire hit with kids – they simply love the combination of the pork and gravy with rice.
• The same recipe can be used with minced pork or diced chicken.
This is turning out to be quite a “bonus recipe” week, isn’t it? I think that’s one of the beauties of home-cooking… you need just a few basic recipes to create many different dishes. With the 4 recipes from today and yesterday, so many different permutations and variations can be created… braised dried vegetables with rice congee… braised preserved vegetables with braised pork belly… braised pork meat made into lor mee (noodles with braised gravy)… braised pork belly with mantou (steamed buns)… braised radish with steamed rice… stir-fried dark soy sauce pork tenderloin in a hamburger bun… stir-fried dark soy sauce minced pork over mee sua noodles… and the list goes on and on. Quite wonderful, isn’t it? And fun too… to play around with the recipes like that.
Happy cooking and experimenting!
Copyright © 2004 Renee Kho. All Rights Reserved.
Please contact me for permission to copy, publish, distribute or display any of the images or text contained in this article.
11:21 PM in Home Cook: Poultry & Meats, Home Cook: Vegetables | Permalink | Comments (5) | TrackBack
Tuesday, June 08, 2025
Slowly Does It

One of my favorite cooking methods, especially for meats, is slow-cooking – be it the slow-oven roasting of things such as ribs, or the braising of meats and/or vegetables. In my book, slow-cooking is one of the best ways, if not the best way, to intensify flavors and bring out the rich complexity of the different ingredients. In slow-cooking, the different aromas and tastes all have time to meld and harmonize. And for meats, slow-cooking produces some of the most tender and tasty meats possible. Of course, not all foods are amenable to slow-cooking. A lot of ingredients fare best when very lightly cooked, or in some cases, not cooked at all and simply eaten raw.
For the Chinese, the favorite (or at least the most common) slow-cooking method would probably be braising. Braised dishes are an integral part of the repertoire of any Chinese home-cook. It is also the cooking process by which, in many ways, the competence of a professional Chinese chef is defined. We Chinese braise just about everything – from pork to goose, from tofu to noodles even! Braised dishes are robust, hearty and yet with a touch of refinement. They are food with a lot of “honesty” and “heart”. And I like that in food.
One of the best-loved braised dishes would probably be braised pork (lor bak). Every dialect group will have their own versions. Indeed, every family will have their own unique recipe for this most humble of dishes. The dish pictured above may not look very appealing in appearance – all dark and brooding in looks it may be, but this is quintessential Chinese comfort food. In fact, it would be true to say that a lot of Chinese comfort food has dark soy sauce as a key ingredient! There is just something about dishes cooked with dark soy sauce that seems to hit the spot for many, many Chinese. Think tau yu bak (dark soy sauce pork). Think plain thick dark soy sauce drizzled over plain chicken rice. What could be better? It speaks to us on a sub-conscious emotional level.
This is one of my family’s favorite braised dishes – braised pork with Chinese radish. Different cuts of pork can be used, from pork belly to pork muscle from the leg of the pig, as is the case here. This was my first time using this cut of meat. It had come well-recommended by the butcher, and it had looked so amazingly fresh that day, so I thought it would be interesting to try and see how well it cooked in a braised dish. It was a pretty lean cut of meat, and I was a little concerned that it would turn out rather dry and tough. As it turned out, it was nicely tender, and juicy too. So now I’ve added this cut of meat to my repertoire of meat cuts that I would use in my cooking.
Braised Pork and Radish

1 medium or large white radish
1 large piece pork ** (approximately 1 kg)
minced garlic
5 cloves whole garlic, skinned
3 tablespoons dark soy sauce
3 tablespoons light soy sauce
4-5 teaspoons sugar ***
3-4 tablespoons sweet Chinese glutinous rice wine
1½ to 2 cups chicken or pork stock
* Quantities are based on estimations, and should be adjusted according to the amount of radish and pork used, as well as personal preferences.
** If using pork belly, please see recipe below.
*** Some people prefer to use a piece of rock sugar instead, and that works equally well.
• Peel radish and cut into fairly large chunks.
• Wash and clean the pork, keeping it in one large, whole piece.
• Heat a little oil in a wok or deep pot, and sauté the whole cloves of garlic until fragrant. Add the whole piece of pork, and allow it to brown on all sides. Remove from wok, and set aside.
• If necessary, heat a little more oil in the wok. Sauté the minced garlic until fragrant. Add the radish and sauté for a couple of minutes.
• Return the pork to the wok. Add all the seasonings as well as the stock.
• Cover wok, and leave to gently simmer on a very slow fire for about 2 to 3 hours, or until the meat and radish are very tender. Cooking times will vary depending on the cut of pork used. For very long-cooking cuts of meat, it may be desirable to add the radish only after the meat has been cooking for about ½ to 1 hour, so that the radish doesn’t get cooked for too long and turn mushy.
• Once the pork and radish are at the desired tenderness, turn off the heat. Leave to rest for about 10 minutes. Then, removing the pork from the wok, cut it into slightly chunky pieces. Return the pork pieces to the radish mixture. Mix well.
• If a slightly thicker gravy is preferred, simply bring the gravy to a rolling boil, add a little cornstarch (cornflour) solution, mix well, allow the gravy to return to a boil and then turn off the heat immediately.
Notes:
• The same dish can be done with just radish, using maybe a vegetable stock, for a vegetarian option. The seasonings should be adjusted accordingly, as radish does not require as much flavoring as meat. I personally use only about 1 tablespoon dark soy sauce, 1 tablespoon light soy sauce, 1 teaspoon sugar, and skip the wine altogether.
• Similarly, a version with just pork can also be done. Such a lor bak (Hokkien for braised pork) dish is very versatile and can be served with other Chinese comfort food, such has braised wind-dried vegetables (men cai gan in Mandarin), braised preserved vegetables (such as men mei cai) – recipes for which will be coming up tomorrow – or even used to make noodle dishes such as lor mee.
Braised Pork Belly
The braising of pork belly requires a slightly different treatment, as this cut of meat can sometimes have a rather overt porky, even gamey taste, which is very unappetizing. Therefore, the prepping of the pork belly before it is cooked is very important. And the following prepping steps can be used in any recipe that requires pork belly.
Prepping the Pork Belly
• Bring a large pot of water to a strong rolling boil. This is very important – that the water be at a strong rolling boil. It is also important to fill the pot with a generous amount of water.
• Place the cleaned and washed piece of pork belly into the boiling water, skin side down. Almost immediately after the meat has gone in, turn off the fire, and then remove the pork from the pot. It is essentially just a very quick boiling-water-dip to blanch and seal the surfaces of the pork belly, and the meat will still be completely raw.
• Using the sharp edge of a knife, scrape the skin’s surface. Rinse well under running water. Repeat this process if necessary. The porkiness usually stems from the skin, so doing this should remove any porky taste from the meat.
Cooking the Pork Belly
• Once the pork belly has been prepped, it can be cooked in the same way as the braised pork above. Just be sure that when adding the pork belly to the hot oil, place it skin side down first.
• For pork belly, I also usually like to use a little more garlic than I would if using other cuts of meat. 8 to 10 whole cloves of garlic would not be overpowering at all.
• There is also an alternative method that can be used for braising pork belly (or even other cuts of pork)… After the meat has been browned in the hot oil, remove the pork and garlic from the wok. Add all the gravy ingredients (dark soy sauce, light soy sauce, glutinous rice wine and sugar). Stir on low heat until the sugar has melted. Return the pork and the garlic to the wok, and stir to mix well. Add the stock, cover and leave to simmer until the pork is cooked and tender.
• Again, as with the braised pork above, if a thicker gravy is desired, add a little cornflour solution to the gravy at the end.
And there you have it, a small little bonus for today: 4-recipes-in-1…
Braised pork belly… braised pork… braised white radish… braised pork with white radish…
Meat that is melt-in-the-mouth tender, radish that is sweet, soft and succulent, and gravy that is absolutely delectable when drizzled over steaming hot rice. Chinese comfort food. Chinese braised comfort food. Ahhhh…
Copyright © 2004 Renee Kho. All Rights Reserved.
Please contact me for permission to copy, publish, distribute or display any of the images or text contained in this article.
04:28 PM in Home Cook: Poultry & Meats, Home Cook: Vegetables | Permalink | Comments (12) | TrackBack
Monday, June 07, 2025
Fruity Natural Tenderizer

It has been quite a while since I last posted a recipe, for the simple reason that I haven’t been doing much cooking (or baking) lately. We have been eating out an awful lot. But I thought it would be a nice idea to make this week a sort of a “pork week” on shiokadelicious. I’ve dug out, from the archives, a few pork dishes which are “regulars” on our dinner table, and which for some reason or other I’ve never bothered to post about. Until now. These are simple, casual, honest home-style dishes. A couple of them, which will be posted over the next few days, can be considered Chinese “comfort food” – every family will have their own version of these dishes. They evoke strong feelings of familiarity and affection, and quite simply bring a sigh of pleasure and satisfaction to the lips after they have been enjoyed.
Today’s dish is so incredibly easy and quick to make that I can’t really call it a recipe. It is one of those dishes which I call “ingredient user-uppers” – dishes that turn an otherwise “useless” or discarded food item into something that is tasty and nutritious. This particular dish has wonderfully light, fruity flavors and is a very healthy, naturally low fat dish.
What do you do when you have a dud in your kitchen? A papaya dud, that is. Every once in a while we bring home papayas from the market that look beautifully ripe and sweet on the outside. But alas, when we cut them open, they are hard, colorless and just plain bland. Not a hint of sweetness or even a hint of papaya aromas. The flesh is pale, hard and devoid of any juice at all. These are the fruits that are picked way too early, when they are still very raw, and they have merely turned yellow and ripe-looking on the outside from being stored in warm warehouses. They are simply not edible or palatable.
However, I loathe wasting food. I really try not to throw any food away, if at all possible. So even when the papayas are so unfit to be eaten as fresh fruits, I can’t bring myself to simply chuck them out. So what then? I suppose one could try to make Thai-style papaya salads from them. But these are so tasteless they simply won’t work very well in salads, which are best when made with raw, green papayas that have a wonderful crunch and a light tartness to them. These duds are, to all intents of purposes, “ripe”, and yet are simply inedible.
So, the easiest and tastiest way is to cook with them, in a savory dish. I like to cook them with pork, but I think they could work with beef too. Once sautéed, the papayas are completely transformed. The pale, insipid flesh turns a rich, vibrant, jeweled red color. From being tasteless, it becomes beautifully sweet, juicy and tender. And quite simply, very delicious.
By virtue of its natural enzymatic activity, papaya is also a wonderful meat tenderizer. When cooked with meat, it lends an amazing sweetness and tenderness to the meat, which in turn, by its savory flavors, brings out the most incredible sweetness and juiciness in the otherwise useless fruit. It is a most wondrous and harmonious partnership.
I usually use pork tenderloin in this dish, simply because that’s my favorite cut of pork. I like it for its leanness and tenderness. But other cuts of pork would work too. Just be sure to make adjustments to the cooking times and the timing of adding the pork to the papaya. A cut of meat that requires a longer cooking time can afford to be cooked with the papaya for almost the entire, if not the entire, cooking period.
Because pork tenderloin doesn’t require a lengthy cooking time, and because it will also become too tender, to the point of being unpalatably mushy, if cooked with the papaya for too long, I usually brown the meat first and add them to the papaya towards the end to let them finish cooking.
• Slice pork into very thin slices, and season with some light soy sauce, tiny bit of sugar, dash of sesame oil and sprinkle of corn flour.
• Sauté some chopped garlic in a little hot oil, until nicely fragrant. Add the pork and sauté very quickly. Once the color changes, season with ½ teaspoon of dark soy sauce. Toss to mix, and remove from heat. Set aside.
• Cut papaya into fairly thin slices.
• Again sauté a little chopped garlic. Add the papaya and sauté for a few minutes. Add seasonings of approximately 2 tablespoons light soy sauce, 1 scant teaspoon sugar, together with about ½ cup of hot water. (This would be for one small papaya.) Mix well, cover pan, and leave the papaya to simmer, on low heat, until almost at the desired tenderness. (I actually like to get the papaya fairly soft, as I find that usually at that point, the flavors are beautifully intensified).
• Uncover the pan. Add the pork, and sauté until it is completely cooked through, and the flavors have melded with those of the papaya.
• If using a cut of meat that requires a longer cooking time, you can brown the meat, then proceed to add the papaya straight into the meat, and cook until both are tender.
That’s it. Simple, light, refreshing, colorful, vibrant fruity goodness.
Copyright © 2004 Renee Kho. All Rights Reserved.
Please contact me for permission to copy, publish, distribute or display any of the images or text contained in this article.
05:36 PM in Home Cook: Poultry & Meats | Permalink | Comments (9) | TrackBack
Thursday, June 03, 2025
Kueh Kueh, Kuih Kuih

Shortly after I posted my article on Chinese steamed buns (paus or baos) back in March, I received an email asking if I would do a “photo listing” of the various Nonya kuehs that are commonly eaten in South East Asia. At the time, I said I would try, but it could take a little time. While I like Nonya kuehs, I do not buy or eat them on a regular basis, so there is usually little opportunity to, urm, get up-close-and-personal with them kuehs.
J, if you are reading this… no, I have not forgotten your request. It has been more a matter of working out the photographic logistics. But, as with so many things in life, serendipity has a way of working all things out in time.
A few weekends back, several girlfriends came over for afternoon tea. I was supposed to have baked a cake, but didn’t manage to get round to it. So two of my girlfriends offered to buy some cakes and confectionery to bring over instead. They coordinated among themselves as to who was to buy what. However, at the last minute, for whatever reasons, both couldn’t get what they had planned, and each made a spur-of-the-moment decision to buy something else instead, assuming all the while that the other person was still going ahead with the original purchases. But, as coincidences would have it, the “something else” that the both of them ended up getting turned out to be Nonya kuehs! Talk about resonance! Fortunately, the kuehs were from two different shops, and while there were some overlaps in choices, there was also a significant variety. One thing for sure though, we had a lot of Nonya kuehs to eat that day!
As we sat on the carpet around the living room coffee table eating the kuehs, I suddenly remembered the email and the request. A little yelp from me, a short explanation, and a quick dash to grab the camera later, our afternoon tea session turned into an impromptu photo session, featuring Nonya kuehs as the super-models! It was a hilarious event, filled with giggles and tummy-aching guffaws. The girls were busy either lining the kuehs up for their turn in the spotlight, or “doctoring” some of the half-eaten candidates, hoping to spiff them up a little bit and to make them at least somewhat photogenic.
I think we had more fun playing with the food than we did eating them! And here then, finally, is a fairly comprehensive, though by no means exhaustive, guide to various South East Asian kuehs.
So, what is a kueh?
First, maybe we should try to define the word “kueh” (or “kuih” as spelt in Malaysia). This is actually a very hard word to translate accurately into English, simply because it represents a category of food that doesn’t really exist in Western gastronomy. There is no single, simple, succinct English equivalent to this word.
This Malay word, “kueh”, is a fairly all-encompassing term that is given to many manners of small food items, usually (but not always) sweet creations, including cakes, cookies, pudding-like desserts and even confectionery. In many senses, it can also be used to describe pastries. However, having said that, it is important to keep in mind that the Asian concept of “cakes” and “pastries” is quite different from that of the Western one. Cakes are more often than not steamed rather than baked, and can have a very different texture from what is understood as “cake” in the Western sense. And pastries are not of the flour-combined-with-solidified-fat variety, but instead can again be steamed, baked or even deep fried, and again have very different textures from the Western short or puff pastries.
So, kueh is often sweet, but can be savory at times; it can be baked, steamed, cooked over a charcoal fire or even deep-fried; it can be of pudding-like softness or it can be firm; it can be a “cake”, a cookie, a “pudding” or many other variations of sweet “desserts”; or it can also be small savory snacks.
Kuehs are not confined to a certain meal or a certain time of day, for example as a dessert or as a tea-time food. They are eaten throughout the day. They are eaten at breakfast, as snacks, for dessert, at supper, or just whenever the fancy strikes. They are also a most important and integral part of hospitality during festive occasions, like Hari Raya (the Malay New Year) and Chinese New Year (for the Peranakans).
Now that I’ve made such an erudite, clear, concise and non-meandering explanation of the word “kueh” ![]() … Now that you know precisely what a kueh is
… Now that you know precisely what a kueh is ![]() , let’s paint the kueh landscape in broad strokes.
, let’s paint the kueh landscape in broad strokes.
Painting the kueh landscape
There are several general parameters for kuehs that can perhaps give a better understanding of this food concept.
In almost all kuehs, the key and most common players in the flavoring department are coconut milk (thick or thin), grated coconut (plain or sweetened), pandan (screwpine) leaves and gula melaka (palm sugar). Various permutations and combinations of these main aromatics form the basis of almost all variety of kuehs.
While those are the more noticeable “public faces” of kuehs, shall we say, their foundations are built on a group of starches – rice flour, glutinous rice flour, glutinous rice and tapioca. Two other common ingredients are tapioca flour and green bean (mung bean) flour (sometimes called "green pea flour" in certain recipes). However, their roles are less that of “building blocks”, and more that of what I call “texture regulators”. They play a most important part in giving kuehs their distinctive soft, almost pudding-like, yet firm texture. You will also notice that wheat flour is rarely used in South East Asian “cakes and pastries”.
[At this point, it might be worth pointing out that there can be many different versions of recipes for any given kueh. Precise recipes for kuehs can be hard to come by, and the recipes that are out there can vary in the amounts of ingredients used or even what is used. The reason for this is that, in the past, the making of traditional cakes was almost exclusively the domain of elderly grandmothers, aunts and other women-folk, for whom the only (and best) method for cooking was by “agak agak” (approximation). They instinctively took a handful of this and a cupful of that and mixed it all together without any need for weighing scales or recipes. Everything was judged by the look and feel of the food – the thickness of the batter, how it feels to the touch and so on. Each family would have their own traditions, and the recipes were passed from generation to generation by word of mouth. So, it may take some personal experimenting to find recipes that suit you and your tastes.]
Now, back to the painting…
Kuehs come in all shapes, colors, textures and designs. They can be filled kuehs, wrapped kuehs, coated kuehs, sliced kuehs or layered kuehs.
And finally, as mentioned earlier, most kuehs are steamed, with a smaller proportion being boiled or baked. On other occasions, they are deep-fried, and sometimes they are even cooked over a charcoal fire and/or grilled!
Nonya or Malay
The above basics apply to both Nonya (Peranakan or Straits Chinese) and Malay (and/or Indonesian) kuehs. In fact, the distinguishing line between the two is vague and indistinct, with large areas of overlap. There are more commonalities than there are differences.
Let’s put it another way. Both Nonya and Malay kuehs come from the same family, the same genetic pool, so to speak. The historic Peranakans, especially those in Malacca and Singapore, took heavy influences from Indonesia and its Malay culinary and cultural heritage. This means that, when it comes to kueh, there are many that are identical to both cultures, with maybe only a change of name.
It is like family members who are identical twins, but each has their own name. Then there are the fraternal twins – they look very similar but may have slight distinguishing marks in their physical appearance and somewhat different shades to their personalities. Finally, there are the siblings who are completely different from each other, and each lives in their own house with little intermingling. And yet, everybody exists and lives together as one complex, diverse and interesting family. So it is with kuehs.
With the passage of time, the lines of distinction between the two groups of kuehs have been fudged even more. Few South East Asians will be able to tell you precisely which kuehs are exclusively Nonya and which are exclusively Malay or Indonesian. The term “Nonya kueh” is probably more commonly used in Singapore, and “Malay kueh” perhaps more common in Malaysia, but both terms essentially refer to the same group of foods.
Now that I’ve confused you sufficiently, lets move on to the kuehs proper, and I’ll try to point out the cultural nuances as much as possible as we go along. How’s that?
Here’s how it’s going to break down… I figured the easiest way would be to first break it down by cooking methods (steamed, baked etc), which then breaks down by the main type of starch used (rice flour, glutinous rice flour etc), and finally the various ways of presentation and the flavorings used.
[A small editorial note before we begin. The word “cake” is used here to refer to these Nonya/Malay kuehs, and does not carry the same meaning as when used in relation to Western cakes.]
STEAMED KUEHS
Rice Flour
Let’s look at the layered steamed rice flour-based cakes first.

Kueh Talam is a familiar Nonya kueh to many. The two layers are made with slightly different ingredients and different flavorings. This gives a nice contrast and balance of two different textures and tastes. The thicker green layer is made from rice flour mixed with some tapioca flour, green bean flour and alkali water*. Pandan leaves provide the color and the fragrance. In some cases (as in this case, as pictured) a little coconut milk is also added to give a richer, denser consistency to the batter. The thinner white layer is simply rice flour with a little green bean flour mixed with coconut milk. The green layer is first steamed, before the white batter is poured on top and the cake returned to the steamer.
* Alkali water gives a springy texture to the cake, and can be left out if unavailable.

Talam Hidjau uses the same basis but with a different flavor combination. Here, gula melaka (palm sugar) takes centerstage and forms the main layer, with the secondary layer being flavored with pandan.

This is perhaps one of the best-known and most endearing of the kuehs – the multi-colored layered cake. It is so well-loved that it has been adopted by the Malay, Nonya and even the South East Asian Chinese cultures. For the Malays and Nonyas, it is called “Kueh Lapis Sagu” (layered cake), and for the Chinese, it is “jiu chen gao” in Mandarin or “gao chang gou” in Cantonese, which literally translates as “nine levels cake”. And indeed, the cake always has nine layers.

Almost every child in South East Asia would have grown up eating this favorite snack. And most people, myself included, will tell stories of how, as kids, the only way to eat this cake is to carefully peel off each thin layer by thin sticky, soft, chewy layer, before popping it into the mouth. Now, even that has an art-form to it. The thin layer can be held up from one end, dangled over your upturned face, and slowly lowered into your wide-open and waiting mouth. Or the layer can be rolled into a tight bundle before being popped into the mouth. Or heck, just shove the piece in any old how. But always count and make sure you get your nine-layers worth of kueh!
The cake itself is made mainly from rice flour with a little bit of tapioca flour mixed in. Thick coconut milk provides richness of flavor. The cooking of the cake requires great patience, dedication, skill and accuracy. The cake is cooked painstakingly one 2mm layer by one 2mm layer. Only after the previous layer has been steamed and set, can more batter be poured on to form the next layer. There can be no rushing and trying to pour in too much batter at any one time. The layers should all be uniformly thin, and 2mm is thin! It requires good eye judgment and fairly precise hand work.

This is a variation on the theme. It is both a layered and a coated kueh. A 7-layers cake cut into small slices and coated with grated coconut.

Grated coconut is a recurring theme in kuehs. It is a favorite as both a topping and as a filling. Here, in the case of Kueh Kosui, it is used to coat the palm sugar rice cakes. This kueh is probably more of the Nonya tradition than of the Malay.
A rice flour and tapioca flour mixture is combined with some palm sugar syrup, before being steamed. It is interesting that the traditional shape of Kueh Kosui is actually a bowl-shape. It used to be that the batter was poured into mini individual shallow cups or bowls and steamed. The cooked cake would then have a small mound of grated coconut placed on it. Nowadays it seems more common (and probably easier) to steam one large cake, cut it into smaller pieces and toss them in grated coconut so that the entire piece is coated.

And to round out the rice flour-based group of kuehs, a wrapped kueh – the Nagasari. This is very much an Indonesian/Malay kueh. It is a simple pudding-like concoction of rice flour with a little bit of tapioca flour mixed with lots of thin coconut milk and flavored with pandan leaves. Slices of fresh banana are added before the batter is wrapped into small individual parcels and steamed. The traditional (and in my opinion, the proper) wrapper is banana leaves. However, the bottom line seems to dictate that modern confectionery shops make these wrapped in plastic! It’s never the same.

The Nagasari is a popular kueh. It has a soft yet firm custard-like texture. A sort of pudding I guess. And bananas and coconut milk always make an easy and highly compatible pairing.
Glutinous Rice Flour
When it comes to the glutinous rice flour-based kuehs, a lot of them are of the filled variety.

This is probably my personal all-time favorite kueh – the Ang Ku Kueh to the Chinese and Kueh Ku to the Nonyas.
The history of this kueh can generate much debate. Some would have it that it was of Peranakan origins, and later adopted by the Chinese community. While others maintain that it had its roots in Chinese culture, which had a strong influence on the development of the Peranakan society. (For a brief background on the Peranakans, see my previous post on the Nonya Rice Dumpling). Whatever its “true” heritage is, this kueh is much loved by both the Peranakans and the Chinese. In fact, for the latter, Ang Ku Kueh is one of the “must-have” key components (another being the red-dyed hard boiled eggs) of the gift boxes that are sent out to relatives and friends on the First Full Moon celebration of a new-born child.

The dough is made from glutinous rice flour and coconut milk, and colored auspiciously with red food color. Some recipes add a little mashed sweet potato to the dough mixture to give it added softness and smoothness. The kueh is traditionally filled with either green/mung bean paste or ground peanuts. “Modern” innovations have created fillings such as yam and even durian. However, I personally still prefer the traditional versions, with peanuts being the hands-down favorite for me (and the ones from the Alexandra Village stall being particular well-made, in my opinion). These ones we had that day were unfortunately not too good. The bean paste was too mushy and “wet”.
Once small circles of dough have been rolled out, a small dollop of filling is placed in the center and the dough is wrapped around it to form a ball. The kueh is then pressed into a wooden ku kueh mould with carved out designs. A sharp tap on the table top releases the kueh from the mould. The nicely shaped kueh is then placed on a small piece of banana leaf, liberally brushed with cooking oil to prevent the surface from becoming sticky and then steamed.
A well-made Ang Ku Kueh should have a thin layer of soft, sticky, slightly chewy dough surrounding a generous portion of filling. The embossed design on the top of the kueh should also be distinct and clearly etched.

This kueh is called Bugis. Until that afternoon tea session, I had never had it before. I understand that it is an Indonesian kueh.

It is essentially a soft, slightly sticky and chewy dough of glutinous rice flour, coconut milk and pandan juice wrapped around a very tasty filling of sweetened grated coconuts, and topped with a luxurious drizzle of rich, thick coconut cream. Very nice!
Glutinous Rice
Very often, instead of glutinous rice ground into flour, the rice itself is used to make many types of delicious kuehs.

This is one of the most popular kuehs in this category, and is my dad’s absolute favorite. This layered and sliced cake is actually not an easy to kueh to make well.
Both the Malay/Indonesian and Nonya cultures lay claim to this cake, with each community giving it a different name. It is Kueh Salat to the Nonyas and Serimuka to the Malays.
The rice layer is basically glutinous rice cooked with a lot of coconut milk. The rice is first steamed with pandan leaves until partially cooked. It is then mixed with thin coconut milk and steamed again. Thick coconut milk is then added, and the rice is steamed a third time until fully cooked.
The pandan custard topping is eggs and sugared cooked with thick coconut milk that has been flavored with pandan, and then thickened with a little flour and cornflour. The custard is poured over the cooked rice layer and the cake is steamed.
A well-made Kueh Salat will have a rice layer that is not hard or too compacted. It should be soft and somewhat chewy, and without too overpowering a coconut flavor. The custard should be smooth and fine textured, with a nice thick density. It should be soft and pudding-like, yet firm enough to be sliced.

This is simply another Nonya variation of the above Kueh Salat. Black glutinous rice (pulot hitam) is used instead of white, and the custard layer is flavored with gula melaka (palm sugar) instead of pandan.

Yet another variation on a classical Nonya glutinous rice kueh. This is sort of a hybrid of the well-known Nonya kueh, the Pulut Tekan, which is an indigo and white marbled rice cake served with Nonya kaya (pandan flavored coconut jam). In this case the kaya is cooked into a firm custard and topped onto the marbled rice to form a sliced and layered kueh.
The characteristic indigo marbling is obtained from using the deep indigo-colored juice of the bunga telang (butterfly or kordofan or pea flower; L. clitoria ternatae). The petals of the flowers are pounded in a mortar and pestle, and then squeezed to extract the juice. No water is added.
The Nonyas are known to be particularly fond of using the bunga telang to color many of their dishes, including rice dumplings (zhang or zhong zhi).

Here is another Nonya delicacy that uses the same flower juice extract. This time, it is a wrapped kueh – the Pulut Inti.
A similar coconut milk-infused glutinous rice base is used. But it is then topped with a generous mound of sweetened grated coconut mixture. It is from this grated coconut mixture, called Inti, that the kueh takes its name. The mixture is simply grated coconut cooked with some palm sugar syrup and flavored very lightly with pandan leaves.
Again, traditionally, these pyramid-shaped kuehs are wrapped in banana leaves. Modern factory operations however eschew these for the more practical, but definitely non-aromatic plastic sheets.
Tapioca
Tapioca is a very useful tuber in Malay and Peranakan cooking, and is used in both savory and sweet dishes.
Let’s start with the layered kuehs.

Tapioca layered cake or Kueh Talam Ubi. The main layer is made up of grated tapioca and tapioca starch which is mixed with palm sugar syrup and then steamed. The thinner top layer is coconut milk that has been slightly thickened with flour and rice flour.
The hard work lies in the prepping of the tapioca tubers. These have to be first grated, and then squeezed through a muslin cloth. This is to rid the tubers of any bitter juices. The squeezed grated tapioca is used in the recipe, together with the starch, which is the residue obtained by leaving the juice to stand and then discarding the liquid on top.

This kueh has a very nice contrast of textures and flavors. The dense, slightly “rough” bite of the tapioca layer with its caramel notes, balanced by the silky smooth, soft, rich, very creamy and thick coconut layer.

And this is Ms Carrot-Top. No, I’m kidding. This is Getuk Ubi. It is a layered kueh with a base of tapioca steamed with slightly sweetened coconut milk, and topped with a thick, generous layer of sweetened grated coconut that has been colored a very bright and cheery orange! This is among one of my well-liked tapioca options.

Yet another variation on the theme. Instead of a layered cake, this is simply a sliced cake topped with grated coconut. The tapioca in this case is flavored with both palm sugar and coconut milk.

The small bits of tapioca make for an interesting, slightly chunky texture.

And the ubiquitous tapioca representative in the kueh world – the Ongol Ubi. When you mention tapioca kuehs to many South East Asians, this is probably the first that comes to mind.
This is slightly different from the other tapioca kuehs mentioned above. The texture is very smooth. And glutinous rice flour is added to give the cake a very soft texture. As soon as it has been steamed, each small piece of kueh is rolled and coated very generously with grated coconut.
BOILED KUEHS
As you will have noticed, the vast majority of kuehs are steamed. However, there are some that are boiled instead…

…such as the highly popular filled glutinous rice flour kueh – the Onde-Onde (sometimes spelt “ondeh-ondeh”). This one probably has more Nonya genes than Malay genes. ![]()
Grated coconut and palm sugar are the key flavoring ingredients, with pandan playing a very important supporting role. The dough is a simple mixture of glutinous rice flour, some tapioca flour, pandan juice and water. To make the small rounds of filled kueh: with hands well-greased with cooking oil, take a small piece of dough and shape it into a ball. Make a well in the center and fill it with grated palm sugar. Wrap the dough around the filling, making sure the entire ball is well sealed and smooth to prevent leakage during the cooking process.
The filled balls of dough are dropped into a pot of simmering water. They are ready when they float to the surface. Once drained, they are tossed in grated coconut to coat evenly.

The pleasure in eating Onde-Onde lies in the sensation of the filling as it hits your tongue. Pop the whole kueh into your mouth. Bite down. And feel the squirt of rich, sweet, caramel-y palm sugar syrup hit your palate. As the kueh is chewed, the syrup coats and melds with the dough to create a soft, slightly springy, sweet experience, with an added crunch and aromatic fragrance from the grated coconut. Simple pleasures, exquisite enjoyment.
BAKED KUEHS

This is a distinctly Indonesian cake, Harum Manis.
We had a debate raging as to whether this cake was originally a steamed version, which had since evolved into a baked version. Some of us felt that this was a variation of the steamed caramel cake – a batter of sugar, butter, evaporated milk, egg and flour that is poured into individual cups and steamed to produce a soft fluffy, brown, caramel-y cake. Others were sure that both were very different creatures and were not connected.

Whatever it is, this is a sweet caramel cake that has been baked with a few slices of bananas.
CHARCOAL COOKED
Before the use of ovens became common in South East Asia, a lot of cooking was done on charcoal fires, and this included the making of sweet desserts and cakes.
I vacillated between putting the next two cakes in this category or under the “baked” category. Originally, they were cooked over a charcoal fire. Nowadays of course, they are always baked in the oven. For me, tradition won out this time round.

Tapioca tubers are also used to make a “baked” version of tapioca kueh. And in this incarnation, it is called Bengka Ubi.
This is a simple concoction. The tubers are grated and the starch extracted by the method described earlier. These are combined with sugar, coconut milk and egg and then “baked”. It’s that simple.

This is another “baked” then sliced cake. It is a cake claimed by both the Malays/Indonesians and the Peranakans, and is famous for its unique honeycomb texture, and thus its name… Bengka Ambon in Malay and Honeycomb Cake in English.

It is a notoriously difficult cake to make. The batter is simple enough, the tricky part is in getting the honeycomb effect. One would be lucky to get half a honeycomb effect, and to get a full honeycomb effect, like the beautifully made one that we had takes quite a bit of skill and probably experience too.
The batter is a simple mixture of sago flour, eggs and coconut milk, flavored lightly with pandan leaves. Some more traditional recipes seem to call for the additional use of yeast in the dough, but other recipes leave this out. Having never made this cake myself, I am not sure which would be the best way to go.
In the olden days, the batter was poured into heavy brass “kueh bolu” (a type of spongey Nonya cake) moulds and cooked over a charcoal fire. These moulds create small individual, near-bitesized cakes. In modern times, the batter is poured into a large round cake pan, baked in the oven and then cut into wedges.

This is an Indonesian durian cake – Durian Pukis. Again, small individual serving-sized moulds are used to shape the cakes. Cooking over charcoal fire produces a nicely crusty, deep golden brown bottom half, with a light, soft, sponge-like top.

Inside, one finds a little surprise… a chunk of pure durian pulp. Definitely not a cake for those who do not like durian! The cake itself has a light, airy yet slightly springy texture. But my favorite bits are the crusty edges!

Another well-known Malay and Nonya kueh… Kueh Dadar. This is pandan-flavored coconut crepe filled with sweetened grated coconut.

Flour, eggs, thin coconut milk and a little pandan juice form the basis of the crepe batter. These pancakes have a softer texture than normal crepes. Traditionally, they are cooked on a large metal plate heated over a charcoal fire. Now, of course they are simply done on the stove.
The standard gula melaka sweetened grated coconut (inti) is used as the filling.
This particular version that we had was quite a disappointment. There were way too many layers of crepe, upsetting the coconut to pancake proportions too much. Ideally, it should just be a thin layer of crepe encasing a very generous amount of the very fragrant, slightly crispy and wonderfully sweet coconut filling.
GRILLED & SAVORY
When it comes to cooking over a charcoal fire, naturally, it is not just sweet kuehs, but also savory ones, that are made this way.
This is a favorite of many, many people…

Lempur Udang. The roots of this kueh lie probably more in Malay and Indonesian cultures.
It is simply glutinous rice, filled with delectable dried shrimp, wrapped in banana leaves, and grilled over a charcoal fire. It is simple. It is absolutely delicious. And it doesn’t get much better than this. I have wonderful memories of childhood picnics at the beach, where bags and bags of these cylindrical shaped lempur udang would be bought, and with straw mats placed on the sand, we would all sit and eat these incredibly addictive morsels of food, while chatting and swapping stories.
The banana leaves impart beautiful aromas to the rice, and the slight charring that usually happens just adds to the heavenly fragrance of the coconut milk-infused glutinous rice.

Inside, the dried shrimp mixture is savory, spicy and a bit sweet all at the same time. It is a finely balanced combination of flavors, and it is completely more-ish. I have never known a time when just one piece, or make that two or three pieces are enough.
While the ones that we had that day did not come close to the home-made ones sold at make-shift road-side stalls in Brunei that I remember so well and which are, in my opinion, some of the best I’ve ever tasted (fragrant, aromatic and spicy), lempur udang is definitely my favorite savory Malay snack, and I never miss out on an opportunity to eat some!
So, these are just some of the more common, easily available and very popular South East Asian kuehs. There are many more that are not shown here. Unfortunately, many varieties of kuehs have been lost to posterity due to their labor-intensive and highly involved methods of preparation. As the older generations passed away, they took with them the unwritten, often well-guarded family recipes. In the modern age, women are not inclined to spend hours, much less days, in the kitchen steaming up wondrous kuehs. We have come to rely on factory-made, mass-produced versions which are undoubtedly not quite the same as those that are home-made, by hand.
The world of kuehs is a colorful, multi-textural, highly flavorful one. It is one that many people, including South East Asians themselves, have not really explored. If we will only step inside, it can open up a whole new sensory and cultural experience for us.
Finally, I would like to say a word of gratitude to those who have contributed valuable information that has made this article possible:
• My mum – for being a constant source of incredible nuggets of food information!
• My group of fun-loving, food-loving friends – for happily and patiently letting me take the photos of their tea spread while their tummies rumbled, and for enthusiastically volunteering many useful [as well as unuseful(?!) and just downright wacky] information about kuehs.
• Mrs Leong Yee Soo – for her invaluable cookbook, “Singaporean Cooking”. This was my very first cookbook, a gift from my mum when I was 12 years old! (Yes, I was started on my cookbook collecting habit at a very young age!) And it is a cookbook that I still have to this day.
Copyright © 2004 Renee Kho. All Rights Reserved.
Please contact me for permission to copy, publish, distribute or display any of the images or text contained in this article.
06:53 PM in Tastes of South East Asia | Permalink | Comments (44) | TrackBack
Wednesday, June 02, 2025
New York! New York! In Melbourne

05:00 PM in Crumbs & Tidbits | Permalink | Comments (20) | TrackBack
Tuesday, June 01, 2025
Golden Tropical Thirst Quencher

While we are on the subject of heat-busting foods, here’s a delicious one. This is the loquat fruit, or better known to me by its Chinese name, pipa, so named after the Chinese lute whose shape the fruit is said to resemble.
Some other names that it is known by are biwa in Japanese, nispero or nispero japones in Spanish, nespola giapponese in Italian, bibassier or néflier du Japon in French, wollmispel or japanische mispel in German and Japanese medlar or Japanese plum in English.
Although its name in many of its guises seems to have a Japanese connection, the loquat is actually indigenous to southeastern China. It was introduced to Japan over 1000 years ago, and has been in cultivation there ever since. And as Japan has emerged as a major producer, the fruit has come to be associated with Japan rather than China (in a very similar way that the kiwi fruit, although originally from China, and known in historic times to the Chinese as the “monkey fruit”, has become associated almost exclusively with New Zealand).
Nowadays, loquat trees can be found, in small quantities, all over the world, from India to South America, from Australia and New Zealand to the Middle East, and from Europe to the United States. However, in the “Western” world, namely South America, the US and parts of Europe, the tree is perhaps more commonly grown as an ornamental or garden tree, for its small, attractive and fragrant white flowers, rather than for its fruits.

The loquat is from the pome family – the same family as the plum, apple and pear. Yet, to me, its taste is more akin to that of the kumquat. It is very juicy with a sweetness that is counterbalanced by a sharp, almost tart, tang. Depending on the fruit, I’ve sometimes experienced an initial taste of sweetness followed by a scintillating tanginess, and at other times, it is the soury, slightly acidic notes that hit the palate first, followed by a smooth, gentle sweetness. The fruit is undeniably refreshing. As a family member once put it, it’s a little like eating rather than drinking lemonade, fresh off the fruit – only much sweeter, with rounder, smoother, less edgy zesty flavors compared to the lemon. I think it would be a great candidate for making a cool, uplifting sorbet with!
Apparently there are over 800 varieties of loquats in Asia! And depending on the type, its outer color can range from yellow to orange to apricot or peach, and the inside flesh can be orange, yellow or white.
Most of the loquats available in Singapore are from Taiwan (mainly) or China. The season is very short, lasting at the most 3-4 weeks each year. We usually see the first fruits in the markets and supermarkets probably around mid-April, or sometimes the second week of April, and by the first or second week of May, they are pretty much gone. I had my last loquat about two weeks ago, and I haven’t seen them again in the markets. The fruit also neither travels nor keeps too well, and thus needs to be consumed within a short time of purchase.

Underneath the thin, softly downy skin, is a fairly thin layer of juice-filled flesh. The core makes up the bulk of the fruit, and is filled with several very large, extremely glossy (oh so pretty) brown seeds. Although only four big seeds can be seen in the photo, underneath those there are another 2-3 medium sized seeds.
The texture of the flesh is a little hard to describe. It has the firm yet soft bite of a half-ripe persimmon (Sharon fruit), and yet with the crisp juiciness of a Chinese cantaloupe. Its flavors have the refreshing tanginess of the kumquat, but with plummy overtones, and a layer of floral notes similar to that of apricots. A beautifully complex little fruit.
As with a lot of food, the loquat also has medicinal value in Chinese epicurean traditions. When eaten fresh, or made into a “tea” or even wine, or sometimes included in herbal preparations, it is said to help with coughs, asthma and other respiratory problems. It is also held to be a superb remedy for thirst and dehydration, and a wonderful source of vitamins A and C. This small, juicy fruit is deemed to be able to help cool the body’s systems. And so is a perfect heat quencher during the current hot weather.
Unfortunately, that will have to wait another year…
Even though loquat season has come and gone, a brand new season of one of my most favorite golden, juicy, thirst quenching fruits has just begun. After what seems like a longer than usual break, it is finally back. I’ve seen the first fruits in the markets and supermarkets. And I’ve already begun indulging heartily, much to my taste-buds great satisfaction.

I’m talking about the golden kiwi. I love both types of kiwi fruits – the green and the golden. But I love the golden one more. I like its stronger bouquet and fragrance. Its sweetness doesn’t have a tart edge to it, unlike that of the green variety. It is quite simply a wonderful thirst quencher.
The only down side… this season’s fruits are mighty expensive! S$0.85 (US$0.50) per fruit! That’s more than 20% increase over the previous average price of $0.70! Not good. Especially when it is quite easy for me to down several fruits in one sitting!
Maybe it’s because it is the beginning of the season. Or at least I hope that is the reason.
I do so love golden kiwis…
Copyright © 2004 Renee Kho. All Rights Reserved.
Please contact me for permission to copy, publish, distribute or display any of the images or text contained in this article.
06:17 PM in Other Shiok-Eats | Permalink | Comments (8) | TrackBack