Tuesday, October 19, 2025
Stepping Out of My Cake Comfort Zone
I subscribe to the philosophy that one should always embrace Life to the fullest - - live with a passion, do and experience new and unfamiliar things; step outside your comfort zones. But recently, I’ve also learnt that this sometimes comes with a caveat - - or at least, where my cake comfort zone is concerned.
Here’s an announcement : up until a week ago, I have never ever used cake-mix before. You know, those colorful boxes of powdery stuff that line the supermarket shelves. It may be shocking, but it’s true - - it has simply never occurred to me to buy or use ready-mixes, be they muffin mixes, cake mixes or brownie mixes. I guess maybe it’s because I grew up watching my mum make everything from scratch - - no shortcuts. When I was very young, she even took wedding cake orders, and made elaborate, multi-tiered creations completely from scratch. Thus, it has never crossed my mind that there is any other way of making cakes.
Then, as with all things in life, there always comes a time when you are challenged - - pushed even - - to do what you have never done before; to go where you have never gone. And so, Betty Crocker’s cake-mix presented itself into my life.
The meeting was not by design - - at least, not by my design. It just happened. The elderly mother of one of my mum’s friends bought a box of Betty Crocker’s cake-mix from the supermarket, thinking there was a ready-made, ready-to-be-eaten cake inside. It was only after she got home that her daughter told her it was a cake-mix and the cake had to be baked first. And given that the daughter (my mum’s friend) was completely non-culinarily inclined, and had never baked anything before, she didn’t feel up to making the cake for her mother. That was where I came in. She knew I baked (from all the previous times my mum distributed my various baking endeavors to her friends), so she passed the cake-mix to my mum, and said simply that it was for me. Now, she never requested for me to make the cake for her, but courtesy alone required that I make the cake and “return” at least half of it to her (and her mother).
I remember well my first encounter with Ms Crocker’s mix. It was lying on the kitchen table when I walked into the kitchen. My eyes widened in astonishment. I picked up the box, turned it over and then back again, all the while gazing at it as if I had never seen a box of cake-mix in my life. With eyes round as saucers, I looked over at my mother - - I simply could not imagine she would have gone out of her way to buy a box of cake-mix. She told me the story, and suggested I find some time to make the cake. I suggested in turn that I would be happy to make a cake from scratch for her friend’s mother - - the elderly lady was obviously longing for some cake. My mum felt the old lady would probably be happier if she knew the cake was made from the cake-mix she bought.
And so, the seeds of my first cake-mix experience were sown.
I have to admit, I was apprehensive. For starters, I really didn’t like the look of those two words - - “artificially flavored” - - prominently emblazoned on the front of the box. Hmmm… Not my two favorite words in the English language, especially when it came to food.
I felt really uncomfortable. The overwhelming temptation was to cheat, and not use the cake-mix, and to make the cake from scratch. I swear, my palms were damp, my breathing had quickened. I was not at ease.
I knew that it was silly, but I really, really didn’t like those two words. Okay. So, I took a deep breath, and thought : this was like learning to swim - - you simply jumped in at the deep end and… swam. Nothing to it. As long as you didn’t think too much about it.
By now you must be thinking : what was the big deal? It was just making a cake from ready-prepared cake-mix. Nothing to it. But as with all steps (no matter how small) outside our comfort zones - - any comfort zone - - it felt, well, highly uncomfortable.
I can’t tell you how much I struggled with keeping to the instructions on the box. I was almost horrified that I was “ordered” to dump everything - - dry flour mix, eggs, fat, liquids - - into the mixer bowl all at the same time. My mind was screaming out : please, please, I want to add things in batches; I want to do things as I have always done them… cream the butter, add the eggs, and then only put in the liquids and flour in alternating batches. This was too much for me - - it was asking me to go against the grain of everything I had known and was comfortable with.
So I made a few concessions. I appeased my trembling sub-conscious by tweaking the “recipe” a little bit - - using butter instead of oil, and substituting two-fifths of the water called for with 1.5% milk.
After I had placed the cake into the oven, I realized what I truly didn’t like about my cake-mix experience. It was a neither-here-nor-there experience. It was, well, a little bit like a “quickie” in the bedroom (or any other location that pleases you, of course). But you know what I mean. Not terribly satisfying. Where was the foreplay? Oops! Sorry, I think this blog is supposed to carry a “G” rating. Ahem! So… where were we?
Oh yes, the cake-mix… Yes, I thought the entire experience was a little like being in no-man’s land. It was definitely not as quick, easy and simple as buying a ready-made cake from a cake shop or bakery, where you didn’t have to do any work at all, and got to enjoy a delicious piece of cake with minimal effort. Here, I still had to lug out the electric mixer, and there were almost as many things to wash as there normally would have been if I had made a cake from scratch. So, in terms of ease and amount of energy that had to be expended, it was not significantly easier than if I had not used the cake-mix.
And whilst the level of “work” involved was not significantly less, the satisfaction of baking a cake was vastly diminished. There just wasn’t that deep sense of fulfillment I usually got from touching, measuring out and mixing the flour, butter and eggs. The inner joy of creation was missing. And wasn’t that the whole point (or at least a large part of it) of baking?
I felt a little cheated of a cake-baking experience. And the worst part of it all - - there wasn’t even any cake-baking-in-the-oven aromas wafting from the oven throughout the time that the cake was in there! I guess artificial vanilla just didn’t come close to the real thing.
The urge to “set things right” was too great. I caved in. I decided to turn this plain-Jane cake into something a little bit more elaborate, albeit into a cake that seemed to think it was a pie - - an impromptu Boston Cream Pie. I had been meaning to make a Boston Cream Pie for the longest time. So what better time than now?
A quick flip through Rose Levy Beranbaum’s The Cake Bible revealed - - rather surprisingly - - no recipes for a pastry cream. So I ended up using a low-fat version adapted from a recipe in Steven Raichlen’s High-Flavor, Low-Fat Desserts, for the filling. And for the chocolate glaze on top, I decided to use Alice Medrich’s low-fat one again (the same one that I had used previously for my birthday cake). Only this time, I was too lazy to go look up the recipe again, and made it from memory. That wasn’t such a great idea as it turned out.
Anyway, this was the final cake…
Crunch time came when “our” half of the cake was served up as dessert after dinner.
I have to say, I don’t think I have ever seen such an instantaneous mass display of nose-scrunching and brow-creasing, followed by a simultaneous bout of “corners-of-the-mouth turning down” and “facial muscles stretching into strange expressions”, from the family!
My exacting panel of food critics was quick off the mark. Right off the bat, they pronounced that the flavors of the cake tasted “fake” and “weird”. The texture was also described as “really not very nice” - - and that was the most polite comment. And I had to concur. While the cake looked and felt somewhat dry and crumbly, it had this awful stick-to-the-back-of-your-teeth texture that everyone complained about. I guess this was what she meant when Betty Crocker hollered from the front of the cake mix box : “super moist”. But a truly moist cake didn’t have this stick-to-the-back-of-your-teeth mouth-feel to it. Moist didn’t (and shouldn’t) equal “damp”.
The “problem” was further compounded by the use of pastry cream - - which by its very nature was soft, luscious and creamy - - as the filling. It just made the whole cake experience too “wet” and sticky and messy.
There followed a quirky conversation with my mother. She commented that the pastry cream recipe was lousy and wrong. I said I actually liked the texture and the flavor of the cream (although I would probably fine-tune the overall taste a little bit more the next time I made it). I think my mum had a “misconceived” notion of what the filling was going to be like.
Earlier in the day, when she asked me what filling I was going to use in the cake, at that split moment I was suddenly stumped to think of the Mandarin translation for “pastry cream”. So, I said the next closest thing that came into my head : “custard”. And I think my mum’s concept of custard was very different from my concept of pastry cream. She was expecting a firmer custard-esque filling (a la our local kaya or pandan custards). I was making a soft, luscious pastry cream filling. So, in her mind, my filling was a complete failure - - it wasn’t a firm custard. At the dinner table, I tried to explain that it was a pastry cream. I still couldn’t come up with the Mandarin term for it, and so I simply said “pastry cream” in English. It didn’t mean much to her. I elaborated that it was the stuff that was often used as the filling in fresh fruit tarts. Her rejoinder then was that pastry cream wasn’t suitable as a cake filling. But I was of the opinion that pastry cream was great as cake filling - - but only in the right type of cake, such as roulades or in between layers of sponge or genoise, which had a dryer, flufflier and softer texture. It was not the pastry cream that was wrong, it was that this particular cake was wrong for the pastry cream. The stick-to-the-back-of-your-teeth (can you tell how much we don’t like this feeling?) texture just didn’t make a good pairing with the soft pastry cream.
As the discourse continued, I realized that I would probably be making another Boston Cream Pie in the future - - a ‘real’ Boston Cream Pie - - just so my mum could experience it.
To compound the entire wet, messy, sticky cake experience, my chocolate glaze was not as thickened as it should have been - - I shouldn’t have been lazy and should have gone and double-checked the recipe. So, all in all, it was just a gooey, sticky mess of a cake-eating session.
Now that I have had time to recover emotionally and psychologically from that cake-mix experience, what are my thoughts?
Well, I think if I had never made a cake prior to this experience, there would have been a chance that I would have ended up emotionally scarred for life, and may have had to spend countless hours in cake-therapy to help me get over the traumatic event. ![]() But seriously though, I think I am beginning to understand why some people have a fear of baking, or making a cake. I mean, if using a cake-mix - - supposedly a sort of “cake-making for dummies” - - can produce such unappetizing results, the thought that must go through the mind is that it will be way too difficult to even think of producing something delicious with a full-fledged, supposedly more complicated, recipe. But oh how wrong that line of thought is or can be. I personally think it is “easier” and infinitely more rewarding and deeply satisfying to play with a recipe and create something from scratch. Then again, I’m probably weird.
But seriously though, I think I am beginning to understand why some people have a fear of baking, or making a cake. I mean, if using a cake-mix - - supposedly a sort of “cake-making for dummies” - - can produce such unappetizing results, the thought that must go through the mind is that it will be way too difficult to even think of producing something delicious with a full-fledged, supposedly more complicated, recipe. But oh how wrong that line of thought is or can be. I personally think it is “easier” and infinitely more rewarding and deeply satisfying to play with a recipe and create something from scratch. Then again, I’m probably weird.
When all’s said and done, I have to say I’m not in any great hurry to repeat this cake-mix baking- and taste-experience. While I’m still all for the philosophy of running with the wind, living dangerously and embracing new and unexplored experiences in life, when it comes to cakes though, I’m scurrying right back to my pre-cake-mix comfort zone, and I’m staying there, thank you very much.
I’m planning (more like hoping to find the time) to bake another cake this weekend… a “real” cake… made from scratch… with “real” ingredients…
Copyright © 2004 Renee Kho. All Rights Reserved.
Please contact me for permission to copy, publish, distribute or display any of the images or text contained in this article.
05:00 PM in Home Baker: Cakes | Permalink | Comments (19) | TrackBack
Friday, June 25, 2025
Dark Rich Luscious Goddess

And so I made my own birthday cake for the very first time.
Among the six (yes, count them, six!) new cookbooks I received as birthday presents (no, I suppose it is not quite “normal” for a girl to grin with glee to receive cookbooks as birthday presents, but there you have it) was “How to be a Domestic Goddess” by Nigella Lawson. Now, up until very recently I could not have been described as a fan of hers. I had caught her shows a couple of times on TV, but I couldn’t say that they did very much for me (sorry, Nigella fans; but read on, there’s more). However, as I read more and more raves by other food bloggers about her recipes, my curiosity was suitably piqued. Hmmm… maybe she did have something interesting to offer after all. So, when I was asked which cookbooks I would like as presents, I did not hesitate to put “Domestic Goddess” on the wishlist.
I have to admit, it took me almost two-thirds of the book to get comfortable with her tone and writing style. But when I did, I started to enjoy her – the connection had been made.
While I won’t go into a full review of the book here, I am beginning to see the kind of appeal she has. Her recipes read easily; there is nothing complicated or overly involved. Instructions are pared down to the bare minimum and kept simple and streamlined; but maybe a little too streamlined sometimes, as I came to realize when I was making the cake. The book is targeted at getting those who are intimidated by the very idea of baking into the kitchen and baking… with ease, panache and a suitable touch of glamour. But unless you have a fair amount of baking experience, you would not know, for example, how long to beat the eggs or butter for, what textures to look out for, what to expect or even what to aim for – the instructions do not tell you. I do understand her point of genesis: underwhelm the complexity of baking; remove the mystery around it. For me, I felt at ease enough with her “zen” approach to instructions; I could rely on what I already knew and had experienced baking cakes in the past. However, I can only imagine a degree of befuddlement had I been a first-timer. But perhaps it all doesn’t really matter in the end; as I found out, her recipes seem to offer a large berth (much larger than in a lot of other recipes) for “inexperience” before the cakes tip over into the “disaster zone”. And one thing has to be said for a lot of her recipes: they are so sexy! Making them can be such a sensuous and sensual experience. No kidding!
As I read through the book, one cake caught my eye and held my heart transfixed with desire and longing: her Nutella cake. Oh good heavens! Could there be a better sounding cake than that? Actually, this was my second “encounter” with the cake; but I needed to be reminded of the first, which was when Niki mentioned the cake to me in Alberto’s comment box. Back then, I had made a mental note to bake the cake. I forgot. Now, serendipity delivered the recipe into my lap and made sure I had the cake for my birthday.
Once I spotted the cake, I knew that was going to be my birthday cake. Just as surely as I had known as a child which cake I wanted for my birthday, so I knew that for this birthday it had to be Nigella’s Nutella cake. All the exalted French and Belgian pastry chefs in Singapore could keep their delicately refined creations, I was going to have myself a rich, dense, luscious Nutella birthday cake, and that was that. And since my mum had long “retired” from birthday cake making, it fell on me to make the birthday cake myself.
I also decided that I was going to use Alice Medrich’s low-fat rich (contradiction intended) chocolate glaze/frosting instead of the ganache recipe provided by Nigella. I had been meaning to try out Alice’s frosting recipe again after a rather dismal attempt some months back; so what better time than this to try and tweak her recipe into something I could accept.
I have to say this Nutella cake recipe was the most fun I have come across in a long, long time. I mean, which recipe allows you the luxury, nay, the privilege of licking out a Nutella jar? C’mon. Something has to be said for that. That is like the most sensuous and sexy thing this side of baking! Indeed, there were many opportunities for bowl, spoon and jar licking throughout the recipe. And this is one recipe concoction where you would probably quite happily kill to protect your “bowl licking rights”. Oh what joy, what bliss! Such seductive enjoyment… and we’re only just talking about the making of the cake! We haven’t even gotten to the eating of the cake and… Never mind.
The recipe that appears below includes the amendments I made or feel I would want to make in the future. First, very briefly, here are some general points about the changes…
I used 25% less butter, simply because I had run out of butter (shows how much forward planning I did for this cake making session!). Still, the cake showed little ill-effects from this shortage. (And it was so rich that a little less butter was hardly missed.)
The eggs I was using were rather small, so I used 7 eggs instead of the 6 large ones stipulated in the recipe. Well, no, actually I used 7 egg yolks and 6 egg whites. Why? One of the yolks broke as I was separating the egg, and the white couldn’t be used anymore for the meringue. So, I stored the egg white, used the yolk, and was too lazy to break open another egg to even out the numbers. I figured one egg white less was hardly going to jeopardize the cake; and it didn’t.
This was the first time I used salt to whisk egg whites; my standard was normally either sugar or Cream of Tartar. And I had a little difficulty with this salting of the whites thing. My meringue came out rather foamy; not the glossy smooth whisked egg whites I was so used to doing and getting. I was worried. Perhaps at that point, it would have been better if I had been blessed with baking ignorance and didn’t have past experience to compare with. But I did. And I was concerned about using this foamy egg white. The recipe of course provided little help. It said nothing about what the whites should have looked like; it stated simply that they were supposed to be “stiff but not dry”. Well, mine were “stiff but not dry”, yet also foamy. Any input on this would be appreciated. Would you have any ideas whether the whites are supposed to be foamy when whisked with salt? Anyway, I think the next time round, I would much prefer to fall back on the Cream of Tartar option; besides, I like my whisked egg whites looking glossy, shiny and satiny smooth. And sexy. ![]()
The recipe didn’t call for the hazelnuts to be toasted; but I always toast my nuts when it comes to baking (or indeed cooking). I just feel the aromas and flavors are so much better, richer, fuller and more complex after a few minutes in the oven. Sure, it is a little more work, but hardly more than a few minutes extra, and well worth the effort, in my opinion. Of course, un-roasted nuts would work perfectly well too.
I also melted my chocolate in a double boiler; it’s a habit. And I’m quite a creature of habit when it comes to baking. I’m sure Nigella would probably frown on so much “fiddling”. But I personally don’t think it is at all difficult to fill a saucepan with a little water, pop a bowl that fits nicely over its opening onto it, drop in the broken-up pieces of chocolate, put everything on the stove, have the flame on the lowest setting, and leave it to melt. How difficult is that? It probably takes all of 2 minutes to get that together. Then walk away and do other stuff, and leave the chocolate to melt happily on its own. Come back in 5 minutes, stir the chocolate to make it smooth, turn off the flame, and just leave it there, right on the pot to cool until you are ready to use it. Now, that really isn’t so fiddly is it?
Other than that, this recipe is as easy as can be…
Nutella Cake
[adapted from “How to be a Domestic Goddess” by Nigella Lawson]

7 medium eggs – separated
¼ teaspoon Cream of Tartar
95g unsalted butter – softened
400g jar Nutella *
1 tablespoon water or hazelnut-flavored liqueur **
100g blanched hazelnuts – toasted and finely ground
100g dark chocolate – melted ***
* Yes, you read right; one ENTIRE 400g jar of Nutella. Is that chocolate bliss or what? It really isn’t that sinful in actual fact; there is no additional sugar in the recipe, and the final cake was not overly sweet at all, and I have a fairly low tolerance for cloyingly sweet stuff.
** I opted for water. I was actually tempted to use Amaretto, but felt it would be a little too strong, and I also wanted the hazelnut flavors to come through strongly.
*** I used Lindt Excellence 70% Dark Chocolate. I had intended to use Valhrona, and had even bought the chocolates, ready and waiting. Alas! Unfortunately, family members got to the chocolates before I got round to making the cake, and there were none left by the time I needed them. So, it was back to my standard dark chocolate fall-back.
• Line and grease a 23cm springform pan.
• Preheat the oven to 180C.
• In a medium bowl, whisk the egg whites and the Cream of Tartar until stiff but not dry.
• Put the butter and the Nutella into a separate bowl (pausing to lick the Nutella jar clean), and beat together. Add the water (or liqueur), and beat to combine. With the mixer running, add the yolks one at a time, letting each incorporate before adding the next.
• Beat in the ground hazelnuts.
• Fold in the cooled melted chocolate.
• Add a large dollop of the whisked egg whites, and mix well to lighten the chocolate mixture. Gently fold in the rest of the egg whites, a third at a time.
• Pour the batter into prepared cake pan; bake in the oven for 40 minutes or until the cake begins to come away at the sides. Let cool on a wire rack.
[Nigella advised, and I followed her advice, not to remove the bottom of the springform pan – that is, to leave the cake sitting on the pan’s bottom after the sides have been removed. According to her, the cake was too dense and moist to be shifted. Now, this was fine for me as I was only serving the cake to family and very close friends, and presentation wasn’t overly important. But if you want to make it into a presentable birthday cake, then I think you can tip the cake face down onto a wire rack, peel away the bottom, place a cardboard serving platter over the bottom of the cake, and then flip the cake right side up again, before proceeding with the frosting.]
The first time I made Alice Medrich’s chocolate frosting from her book “Chocolate and the Art of Low Fat Desserts”, I was rather disappointed. The frosting was bitter from too much cocoa powder, and the flavors lacked a certain smoothness and full-bodied depth. I wanted to try and tweak the recipe to see if something that I liked could be made out of it.
That first time I had been struck by the 1:1 ratio of cocoa to sugar listed in the recipe. Most unusual, I thought. Rarely have I seen a recipe that used a 1:1 ratio. Cocoa – even Dutch processed cocoa – is just too intensely flavored and too “edgy” for that. And I was proved right. So this time around, I reduced the cocoa by half. Correspondingly, I reduced the liquids by 40%.
I had to skip the vanilla extract this time too; I had run out. (Boy, was I organized for this cake baking session!)
I also ended up boiling the chocolate mixture for a lot longer than stipulated in the recipe. I had initially used only ¼ cup of cocoa, but after boiling the mixture for the requisite time, I found it to be overly liquid and also too sweet. So I added another ¼ cup cocoa, and boiled the mixture again until the additional cocoa had been incorporated. All in, the boiling time had probably been doubled. This did not make the frosting too thick to work with. What did make the frosting almost too thick to work with was me being caught up in a tele-conference during the time I left the cake and frosting to cool. By the time I came back into the kitchen, the frosting was a tad on the too cool side. It was still spreadable, and as you can see, I had no problems frosting the cake, but it would probably have been easier if it had been slightly less viscous. No matter.
This turned out to be a great frosting: dark, luscious, very chocolatey, with just the right balance of bitter-sweetness and richness. I thought it went rather well with the super-rich Nutella cake; the bitter-sweetness provided a wonderful counter-balance to the dense heaviness of the torte. To have topped the cake with a true ganache made with heavy cream and milk chocolate would probably have been a little bit of an over-kill on the richness and sweetness scale. This, I felt, was just nice.
I also think this recipe is great for use as a chocolate fudge topping over ice cream; to sandwich cookies with and all sorts of other things. Simply adjust the desired thickness of the frosting according to the use. And if a more pronounced bitter-sweet flavor is preferred, use ¾ cup cocoa and 70% dark chocolate instead.
Rich Chocolate Frosting
[based on recipe from Alice Medrich’s Chocolate and the Art of Low-Fat Desserts]
1 cup sugar
½ cup Dutch processed cocoa powder
¾ cup 1½% milk
1 teaspoon vanilla extract
2.5oz (70g) dark chocolate *
* I used a 55% dark chocolate.
• Place the sugar and cocoa powder in a heavy bottom saucepan.
• Using a wire whisk, combine with enough milk to form a smooth paste. Stir in the rest of the milk.
• Heat the mixture on a medium-low flame until it simmers and begins to boil. Stir constantly with a wooden spoon, scraping the sides and bottom of the saucepan.
• Allow to boil gently for about 3 minutes, stirring constantly to prevent burning.
• Remove from the heat, and let cool for 5 minutes.
• Add the chopped dark chocolate, and stir until melted.
• Pour the mixture through a fine strainer. Let cool before using.
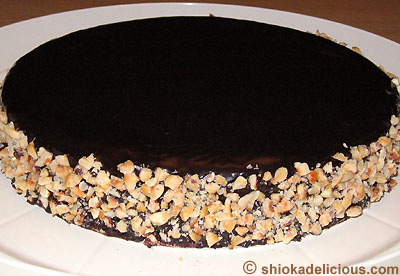
I kept the cake decoration simple. I wanted something homely and comforting. So, it was simply a generous layer of chocolate frosting all over the cake, with lots of chopped toasted hazelnuts adhered to the sides. It doesn’t look too bad, does it?
I deliberately kept the hazelnuts fairly chunky; much chunkier than would be normal for decorating a cake with, but I thought the texture would be a lot more interesting this way.
Okay, okay, enough already. Let’s get to the eating.

Well, just one word: divine! This cake was gorgeously rich, luscious… and yes, sexy. It was really more a dense torte than it was a cake. Yet, at the same time it didn’t have that uncomfortable heaviness that made you feel like you had a lump of rock sitting in the pit of your stomach after you had devoured the cake. And most importantly it wasn’t overly sweet. I was in fact pleasantly surprised at how “not overly sweet” it was; after all, a whole, entire jar of Nutella had gone into this baby.

Oh! I loved its rich, intense chocolatey flavors, with the heady aromas of the hazelnuts; and all lightly balanced out by the bitter-sweet frosting. This was a cake you ate slowly, savoring every mouthful. It was not something you shoved hungrily into your mouth. Every bite was a sensual and sensuous experience in of itself. If I had not felt like a Goddess whilst making the cake, I certainly began to feel like one whilst eating it!

For those of you in Singapore who were familiar with the now-defunct “Cakes by Jeremy”, this torte was somewhat similar to Jeremy’s famous chocolate cake: rich; dense; luscious; intensely flavorful; and outrageously chocolatey. Only more moist, not as cloyingly sweet and, in my opinion, so much better for the gorgeously fragrant hazelnut aromas.
As with all good things, you didn’t need a lot of it to be satiated. We quite happily got 16 servings (okay, so I had 2½ of those 16 servings, but that’s beside the point; it’s a birthday girl’s privilege after all, right? ![]() ) out of the 9” (23cm) cake; and if you worked that out, it was hardly a sinful indulgence. But oh, it was a happy one!
) out of the 9” (23cm) cake; and if you worked that out, it was hardly a sinful indulgence. But oh, it was a happy one!
[Note: I made the cake the day before it was served (who wants to be laboring in the kitchen on their birthday, right?) and kept it in the refrigerator. It was very good straight from the fridge, but even better when brought to room temperature.]
So, that was my birthday present to myself. I’m not sure I’m anywhere close to morphing into a Domestic Goddess by making this cake; but I do know that it certainly provided a rather sexy and sensuous highlight to my birthday gastronomic experience. Now, that is always a good thing, no?
P/S You guys sure are a “persuasive” ![]() bunch. Due to the “overwhelming” response and the flood of emails that was waiting for me this morning in my in-box, “grumbling”
bunch. Due to the “overwhelming” response and the flood of emails that was waiting for me this morning in my in-box, “grumbling” ![]() about me pulling my photo too quickly, and since it would be rather difficult for me to respond individually to each of those emails (I do apologize), I have decided instead to put my photo in the previous post back up for a short while more. After which I am really returning to anonymity.
about me pulling my photo too quickly, and since it would be rather difficult for me to respond individually to each of those emails (I do apologize), I have decided instead to put my photo in the previous post back up for a short while more. After which I am really returning to anonymity. ![]()
Copyright © 2004 Renee Kho. All Rights Reserved.
Please contact me for permission to copy, publish, distribute or display any of the images or text contained in this article.
05:00 PM in Home Baker: Cakes | Permalink | Comments (41) | TrackBack
Thursday, April 29, 2025
Ah! There Art Few That Art As Sweet And Crunchy As Thee, My Streusel

The week before last was one of frenzied (even manic) baking activity. I was like a home-baker on steroids. There I was, baking like there was no tomorrow. Within seven days, I made some oatmeal-raisin cookies, some raisin-cinnamon scones, a chocolate marble cake, a savory ham-onion-cheese-filled bread loaf and a sweet raisin-tangerine-almond-filled loaf (my first successful bread caper! yay!), a durian fudge cake, and finally, this… an almond streusel cake.
I found the recipe for this cake – or at least, the inspiration for this cake – while surfing around the Net looking for a recipe that would help me use up half a carton of buttermilk that was sitting in the fridge. Yes, I seem to be in a constant and continuous “have you in my life, have you not in my life” vicious circle with buttermilk. I would buy a carton of the stuff for a recipe I want to make. Use a tiny bit. And the rest would sit in the fridge. It would approach expiration date. I would hastily look for something to bake or cook that would use it up. But more often than not, very soon after “clearing” the buttermilk from the fridge, I would then find something else that I really want to make and that requires buttermilk. And so I buy a carton of the stuff. Use a tiny bit… Sigh! And so it goes…
But I love buttermilk. Especially for baking. It gives the baked item an incredibly light, fluffy and tender crumb and texture. And it allows this to be achieved with a lot less fat in the recipe than normal. It’s great for cooking too. When used for things like “oven-fried chicken” it makes the meat wonderfully moist, tender and succulent.
This recipe is adapted from one that I came across on cookinglight.com. The original is an “apple streusel cake with almonds”. My family is split 80:20 when it comes to apples in baked goods. 80% doesn’t like the taste of baked apples – at all. 20% does. And naturally, being the democratic family that we are ![]() , the majority has the greater voice and the deciding vote. So, no apples in baked goods.
, the majority has the greater voice and the deciding vote. So, no apples in baked goods.
I decided to use just the streusel part, but doubling the amount, and also to make some modifications in the cake part of the recipe, to turn it into an almond streusel cake.
I had initially thought, erroneously as it turned out, that the cake would still be “low fat”. Well, not quite. It is definitely a “healthier” less-fat version of a regular streusel cake, just not “low fat” like the original apple version.
“Healthier” it may be but it tastes (and smells) so very good. Even while it was still baking in the oven, my father, who was out working in the garden, wandered into the kitchen, attracted by the glorious aromas, and wanted to know what was cooking, and whether he could have some. The other members of the family also wafted into the kitchen at various times during the baking process, demanding to know what was baking, where their share was and why it was taking so long! It smelt that good!

Almond Streusel Cake
Streusel:
4 tablespoons all-purpose flour
4 tablespoons brown sugar
2 tablespoons butter
5 tablespoons sliced almonds
Cake:
¾ cup granulated sugar
¼ cup (2 oz) “light” cream cheese, softened *
¼ cup (4 tablespoons/2 oz) butter, softened
2 tablespoons amaretto (almond-flavored liqueur)
1 ½ teaspoons pure vanilla extract
1 large egg
1 ¼ cup all-purpose flour **
½ teaspoon baking powder
¼ teaspoon baking soda
¼ teaspoon salt
¾ cup low-fat buttermilk
* I used “50%-less-fat cream cheese”.
** The original recipe used plain flour. I substituted cake flour instead when I made the cake, as I wanted a very soft and fluffy cake texture. And indeed it was. But perhaps almost a tiny bit too soft and fluffy – if such a thing was possible. So, I would recommend going back to using just plain flour.
• Preheat oven to 175C or 350F.
• Prepare the streusel: combine the flour and brown sugar in a medium bowl. Cut in the butter with a pastry blender or two knives, until the mixture resembles coarse meal. (I personally find it much easier and quicker to do it with the finger tips, provided you don’t have overly warm hands and fingers that would melt the butter and cause the mixture to get too wet and soggy.) Stir in the almonds. (I leave this step to the last, just before the streusel is about to be sprinkled onto the batter, to prevent the almonds from sitting in the moist butter environment for too long and going soft, and thus crisping up a little less beautifully.)
• Prepare the cake: measure out flour using the “swirl-lightly spoon-level” method. Combine it with the baking powder, baking soda and salt. Sift twice. Set aside.
• Combine granulated sugar, cream cheese and butter, and beat together with an electric mixer on medium speed until smooth.
• Add the amaretto, vanilla extract and the egg. Beat well.
• Add flour mixture to egg/butter mixture alternately with buttermilk, beginning and ending with the flour mixture. Beat to combine.
• Pour batter into an 8-inch round or square cake pan, coated with cooking spray. Sharply tap pan once on counter to remove air bubbles.
• Sprinkle streusel evenly over the surface of the cake batter.
• Bake for 40-45 minutes, or until a wooden skewer inserted into the center comes out clean. Cool in pan for 10 minutes on a wire rack. Remove from pan. Cool for a further few minutes on wire rack, if possible. But most probably not. Cut, serve and savor. Best eaten while still warm.

The cake tasted wonderful! Needless to say, as with all streusel toppings, this one was beautifully crispy and crunchy, with the added fragrance and crunch of the almonds.

The cake was very, very soft and fluffy, with a very tender and refined crumb.
This baked item is best eaten warm from the oven. It doesn’t keep very well, especially in our humid tropical weather. The streusel goes soft by the next day. Although popping it into the toaster oven will help crisp it back up somewhat. But then again, with the way this cake smells and tastes, it is not likely that it will last very long after it comes out of the oven.
For me, this recipe is a keeper. It’s terribly simple, quick and easy. It tastes very, very good. And… is fairly “healthy” as far as streusel-topped items go.

A cousin who happened to pop by that early evening to see my brother, upon tasting the cake, asked: “wow, where did you buy this?” For a home-baker, that was high compliment indeed, if I may say so myself. ![]()
Copyright © 2004 Renee Kho. All Rights Reserved.
Please contact me for permission to copy, publish, distribute or display any of the images or text contained in this article.
02:30 PM in Home Baker: Cakes | Permalink | Comments (19) | TrackBack
Sunday, April 18, 2025
Is My Blog Burning? – Durian Fudge Cake

My first instinct was to bake a chocolate cake, as it would combine two of my great food loves – chocolate and cake. However, I decided I wanted to try a recipe that I had never used before, and make a type of cake that I had never baked before. And if it could also be something uniquely South East Asian, then, well, that would be um… icing on the cake (pun absolutely intended, of course). The perfect candidate presented itself in the form of a durian cake.
Durian. This King of Fruits does not leave much room for ambivalence. You either love it or you loathe it. Rarely, is the reaction to it a shrug-of-the-shoulder indifference. And for the majority of South East Asians, theirs is a passionate and rapturous love affair with this highly aromatic (or pungent, depending on which side of the fence you are on) fruit. There is just something thoroughly thrilling about splitting open that hard, tough, sharp spiky husk and revealing glorious, smooth, glossy, satiny seeds of soft, creamy flesh. Ah! To smell that unique aroma, to savor that intense, rich flavor! Eating durian is quite a sensual and sensuous experience… the incredible sensation of the luscious creaminess hitting your palate, and exploding into a myriad of complex tastes and fragrances.
Coming a very close second to the love for eating the fruit fresh off the seed, is the eating of the fruit in all its many other guises – in cream puffs, cakes, tarts, pancakes, crepes, muffins and even roti prata (Indian pan-fried flaky, crispy bread dough). Singaporeans expend much energy in verbal debates as to where the best durian cream puffs and durian cakes can be found.
I have received numerous requests for a recipe for durian mousse cake (the current most popular form of durian cake). I don’t have one, unfortunately. However, as I did a little research for this event, I stumbled upon a little treasure.
Tucked away in my mother’s “treasury of recipes” is a hand-written recipe for a “Durian Fudge Cake”. Now, this little nearly-30-years-old hard-cover notebook of my mother’s is not just any ordinary notepad filled with hand-noted recipes. Only “tried-and-tested” recipes that my mum deems tasty enough and “worthy” enough are included in this exclusive collection. Admittedly, the notebook’s “database”, so to speak, doesn’t get “refreshed” very often, so some of the recipes may have been improved upon and replaced by more favored versions over the years. But more often than not, the recipes in this little notebook have withstood the test of time, and many have remained tasty favorites.
This particular durian cake recipe is more than 20 years old! My mum learnt the recipe at a cake baking class she attended way back when. At that time, the in-vogue method for making durian cakes was the “fudge cake” approach, just as nowadays almost all durian cakes are “mousse cakes”. She made it a couple of times subsequent to that baking class, and had tweaked and refined the recipe (as evidenced by the penciled-in notations in the margin). But for the last 18 years or so, this recipe has not had another outing. A-ha, what better opportunity than now, I thought. Besides, it sounds interesting. Something different. And it would be nice to re-visit an “old-style” durian cake. A mousse cake is just getting a little too run-of-the-mill.
As it turned out, my path to this Durian Fudge Cake was a long and winding one.
As I read the recipe, I became a little worried about the execution. The recipe, being as old as it was, quite obviously needed some adjustments, substitutions and modifications. Unfortunately, given my extremely limited knowledge of the technical theory behind and the principles of cake making, this was akin to shooting in the dark. What were the purposes of certain ingredients, what was the effect I was supposed to be aiming for, how else could I achieve those results and on and on. Doubts plagued my mind. But I was determined to make a go at it.
I ended up making some fairly significant adjustments throughout the recipe. Thankfully, the end result did not embarrass me, but the road to getting there had me, at various points, close to despair. I will list below the quantities and methods I actually used, as well as notes on what was substituted or changed.
A Brief Overview
The cake used is a very light sponge cake which does not contain any butter at all. Initially I thought that it might have been an error in my mum’s transcription, but it isn’t. The cake is intended to be incredibly light and fluffy in texture, to balance out the richness of the durian “fudge”. Given the lack of fats in the cake recipe, the type of flour used becomes all the more important. The original recipe calls for a mixture of “Optima flour” and Softasilk flour. I assume the former is something that existed 20 years ago. I have not seen it on supermarket shelves or at the baking supplies specialty shop. Softasilk I have seen at certain baking supplies stores, but I was not inclined to drive out to one just to get a flour that I was going to use but only a tiny portion of. So, I decided to use one type of flour only – something that is called “Top Flour” in this part of the world (not sure if it goes by the same name elsewhere). It is lighter, softer, more refined and has even less gluten and flour protein than cake flour. I figured this should work well enough if I helped it along by sifting the flour twice. At the worst, there would only be a slight difference in the texture and crumb of the sponge cake. I decided I could live with a denser crumb if it came to that.
The filling is not really a fudge in the true sense of the word. It is more like a very rich, soft yet somewhat firm, creamy filling with a fudgy, yet slightly custardy feel. (For those familiar with South East Asian food, it is sort of similar to the green-colored top half of the Nonya kueh salat, or slightly similar to the filling of a kaya cake, only not as firm).
The original ingredient list for the filling is quite a shocker. It calls for… get this, approximately 36 fluid ounces (that’s 4 ½ cups!) of coconut milk!! And this is intended for a not very large 10” cake! My arteries constrict and feel all clogged up just at the mere thought! This recipe quite obviously harks from a time when saturated fats and cholesterol perhaps did not mean too much. So, to save my heart from seizing up in horror, I lightened the recipe by partially substituting with 2% fresh milk, with no noticeable adverse effect on the aroma, taste and texture of the filling.
I also decided to make only half a recipe. Given the numerous changes and substitutions that I was making and the many unknowns I was grappling with, this felt to be the safer and less wasteful way to go. So, the quantities that were actually used are for a half recipe, while the quantities listed as being from the original recipe are for a full recipe.
I will mention the other changes as we go along. Right, on to the baking of this durian cake then…
The Durian Pulp
First off, the durians. I of course have to be difficult and try to make a cake using a fruit that is still in pre-season. The mid-year durian season usually starts proper only in mid-May or thereabouts. Sure, durians are now available throughout the year, even during traditionally off-season periods. But the fruits found during those times are definitely less intensely aromatic, flavorful and sweet. Still, I was undeterred. Off to Geylang I went, and returned with two large red plastic bagsful of suitably ripe durians. These fruits were not bad. Although definitely not at peak-quality, they were at the same time definitely not what we call in Chinese “potato-durians” – durians that are as bland as potatoes. They were still sweet enough, aromatic enough and flavorful enough. Only thing missing was that overtone of bitterness, but that’s my personal preference, and that type of durian probably wouldn’t work too well in a cake anyway.
So, how many durians does it take to make one small durian cake? This many…

No, I’m exaggerating. But I probably did use around 2-3 medium fruits worth of durian pulp in what turned out to be a small 8x4 inches cake. I think that works out to a fair bit of durian per square inch of cake!
The first task is to break open the tough husk of each fruit and extract the seeds of durian flesh. There are some important things to note while carrying out this stage of the cake-making operations. Firstly, do not be fooled by family members who enthusiastically volunteer to help you open up the durians and extract the fleshy seeds. More often than not they have an ulterior motive for getting close to the fruits. Should you fail to prevent this first point from happening, point two is very important: stand watch like a beady-eyed hawk as said family members huddle around gleefully and set upon the fruits with gusto, wielding knives and pieces of cloth. A momentary diversion of attention on your part can result in more durian seeds disappearing down open mouths than there are seeds appearing in the large bowl that you have placed next to the said enthusiastically helpful family members. Step three, be extremely wary of phrases like: this one is too mushy to be used; this one is too fibrous; this one is way too firm to be used. Under no circumstances are you to be taken in by such mutterings. They are but mere smokescreens, and are actually urgent indications of imminent danger to the safety of the precious durian seeds. Step four, as soon as all seeds have been removed from the spiky husks, as quickly as possible, remove bowl of durian seeds from the chaotic scene of discarded shells. Any delays in this crucial step of the operations will again render you with less than the desired quantity of durian pulp.
With the seeds securely in your possession, it is now necessary to separate the creamy pulp from the large hard pip in the center of each seed. This can be very easily done by using a spoon and scraping the flesh off the pips. At this point, events will feel like deja-vu. Enthusiastically helpful family members immediately re-appear like magic, making tempting offers of help. As before, assistance may be accepted at your own risk. Vigilance, however, is required if the quantity of shed pulp is to remotely match the number of discarded bald pips.
Should you manage to successfully negotiate the previous two stages of durian pulp extraction, and still manage to get sufficient quantities of target commodity, you are on the home stretch. Give yourself a pat on the back.
Just as quickly as they have appeared, all signs of help disappear just as magically. As the real work is about to begin, you are once again left on your own in the kitchen to work peacefully on the cake.
So now for the weighing of the bounty and the process of “refining” the pulp.
Once seeded, the durian pulp needs to be weighed into three different quantities, with each being used in a different way…
• approximately 4oz / 115g for the sponge cake
• approximately 9oz / 255g for the fudge filling
• approximately 3oz / 85g for the fresh cream topping
The original recipe calls for 5oz / 140g for the cake and 10oz / 280g for the filling. This is for a full portion of the recipe. Even though I was making only a half recipe, I still used nearly the full amount of durian pulp. Why? The fruit I was working with was not, as mentioned earlier, at peak-flavor. So, to maintain the intensity and richness of aroma and taste, I decided to use more pulp. Also, family members are durian fanatics! The more pulp the better is their credo. (The fresh cream topping was my own last-minute addition to the recipe, and I simply guesstimated an amount of durian pulp that I thought would be sufficient for my purposes.)
Even with the amount of pulp used, the durian aroma and flavor in the finished cake were not overwhelming – at least not for us anyway. I think the recipe allows a fair bit of leeway and flexibility in adjusting the amount of pulp either way – more pulp, or less pulp – according to personal preferences, without any adverse effect on the final cake results.
To prepare the pulp for the cake: take the 4oz / 115g of durian pulp and mix it with 1fl oz / 30ml of coconut milk (not coconut cream). I use canned coconut milk, although my mum would probably use nothing less than freshly squeezed coconut milk. But I’m a girl that is all for ease and convenience. So, canned coconut milk it is. I like the Ayam Brand simply because it has no further additives at all, and is pure coconut milk.
Mix the durian pulp and coconut milk together to get a chunky paste. Next, mash this paste through a fine mesh strainer. As the resulting smooth, creamy pulp puree accumulates on the underside of the sieve, scrape it off with a spoon. We now have a bowl of very beautiful, satiny smooth, glossy durian cream…

To prepare the pulp for the fresh cream frosting: again mash the fresh durian pulp through a fine wire mesh strainer. I didn’t add any coconut milk for this – I used just the pure durian flesh. Refrigerate the prepared durian cream until it is needed.
To prepare the pulp for the fudge filling: take the 9oz / 255g of durian pulp and combine it with approximately 1 fl oz / 30ml of fresh (2%) milk. This is just to lighten the density of the pure durian pulp slightly to a chunky paste, thus making it easier to mix into the cooked coconut milk custard later.
The original recipe calls for this durian pulp to also be sieved through a fine mesh strainer. However, as the family likes to have chunks of real fruit pulp in their durian cake, I decided to just leave the pulp in for the fudge filling. For a more refined, smoother-textured filling, simply repeat the straining step as for the cake and fresh cream frosting above.
The Sponge Cake
3 egg yolks
3oz / 85g Top Flour
¼ teaspoon baking soda
4oz / 115g durian pulp creamed with 1oz / 30ml of coconut milk (from above)
3 egg whites
2½ oz / 70g sugar
¼ teaspoon cream of tartar
• Combine the flour and baking soda, and sift twice.
• Add the yolks to the flour, and whisk together with a manual balloon whisk.
• Next, add in the durian cream, and mix well.
• In an electric mixer, whisk together the egg whites, sugar and cream of tartar. Whisk for 1 minute on medium speed, followed by approximately 3-4 minutes on high speed or until the egg whites have formed smooth, glossy, stiff (but not dry) peaks.
• Gently fold a small batch of the whisked egg whites into the durian mixture, to lighten the mixture, followed by the rest of the whites in small batches.
• Transfer batter into an 8” square cake tin, lined with parchment paper.
• Bake at 155C or 300F for about 30-35 minutes or until a skewer inserted into the center of the cake comes out clean.
[Original full-portion recipe: 5 egg yolks, 3oz Optima flour, 3oz Softasilk flour, ½ teaspoon baking soda, 5oz durian pulp creamed with 2 fl oz coconut milk, 5 egg whites, 5oz sugar, ½ teaspoon cream of tartar.
Cake is baked in a 10” round cake tin at 155C for 50 minutes to 1 hour.
Note: given the larger quantity of egg whites, whisking time for the meringue would also be longer than that indicated above.]
Making the cake was a traumatic experience for me. I was close to pulling my hair out in distress. My mum had scribbled in her notebook “whisk together yolks, flour and durian cream until the mixture is like a smooth runny cream”. Now, when I combined these ingredients together, what I got was a very thick, very sticky, gooey, gummy mixture – sort of like very sticky play-doh or sticky super glue! It was as far away from being a “smooth runny cream” as the moon is from the earth! I panicked a little. Maybe I read the recipe wrong. I went back to check. Nope. That was what it said. Oh dear, maybe I shouldn’t have used almost the full quantity of durian cream in a half portion of the recipe, I thought. Maybe that was the problem. I was supposed to get a “runny cream”?!?! It just was not possible. That was like attempting to get melted Mozzarella to be of the consistency of thick cream or something. Still, valiantly, I added a couple of tablespoons more of coconut milk, hoping to lighten the texture somewhat. It did lighten… barely. It was still a sticky, gooey glob. Sigh! I didn’t want to mix it anymore as I was worried about overmixing and overworking the gluten and flour proteins. In the back of my mind, I was ever aware that this was supposed to be a very light and fluffy sponge cake with a very tender crumb. It didn’t help that at that point I also realized I had only sifted the flour once, and not twice as I had intended to.
I contemplated starting over, thinking I had spoilt the batter beyond resurrection. But, me being me, I refused to say die. I thought: okay, if I was going to end up wasting the batter, I guess there was no harm in risking wasting the egg whites too. Since they were all whisked and ready to go, I folded them into the batter. Oh, the batter looked okay. Maybe there was hope yet. I was still worried that I had overworked the batter, and the cake was going to come out dense and heavy. But I wasn’t going to know for sure until after I had baked it. So, with fingers crossed, I popped it into the oven.
At this point I already knew that I would potentially have at least one problem to deal with after the cake was baked. I had run out of parchment paper, so I couldn’t line the cake pan. I buttered and floured it instead, but I knew that there would be a high chance of the cake sticking, and given its supposedly light and tender crumb, it would be a devil to get out of the pan without the cake breaking. And if it didn’t stick, there was a chance the cake would have developed a thicker crust than desired, owing to the floured and not lined cake tin. That would not be good news either. Oh well, I was going to have to deal with it if and when it happened.
Another point: I wanted my cake to be rectangular rather than round, simply because I thought it made for a nicer presentation. I was initially going to use a loaf tin, but due to some last minute logistical reason, I ended up having to use an 8” square cake tin instead. The original recipe used a 10” round cake tin for a full recipe. So, an 8” tin for half a recipe was going to give a rather shallow cake. That was another cause of anxiety and concern. But as it turned out, that actually worked in my favor at the end. When it came to filling and frosting the cake, I only had to cut the cake in half and then split each half horizontally once only, instead of having to cut it horizontally three times, like I would have had to if I had used the loaf tin, to get my four layers of cake. Anyway, I’m skipping ahead of myself here.
The cake was done in just under 35 minutes. It looked fine – just a tad uneven on the top surface, but that was going to be frosted over anyway. And then… it had happened. The bottom of the cake was stuck to the cake tin. And it was made worse by my ignorance of a great cake tip which my mum rather belatedly offered me when she happened to saunter into the kitchen. I had run a knife around the sides of the cake pan, hoping to loosen the cake from the edges so that I could tip it out. But because the bottom was stuck, the top edges of the cake, now freed from the sides of the cake pan, started to shrink a little as the cake cooled. So, I ended up with sloping sides on the cake, which had to be trimmed off later.
So, I learnt something new. If the cake is stuck in the pan, leave it! Do not even try to free the sides. Leave the sides “stuck” to the pan, as this keeps the cake “stretched” out as it cools.
After the cake cooled, I cut it down the middle, splitting it into half while it was still in the cake tin. This made it easier for me to manoeuvre it and remove it from the tin, which I managed to do successfully, but not without leaving the entire bottom crust behind. But that suited me just fine! The crust had come off so evenly, it left a smooth, flat, soft underside to the cake – just perfect for filling and frosting the cake. I couldn’t have done it better myself if I had attempted to trim the cake. Even I had to grin when I saw how tidily, neatly and completely the bottom crust had been separated from the rest of the cake. And, best of all, not only did the cake not break or split, its texture was nicely soft and fluffy and the crumb was tender and nicely refined (safe for an occasional tiny hole or two left by a bubble). It was all just the way it was supposed to be. Ah! The angels of baking must have been watching over me. I couldn’t believe it. The cake turned out as it was supposed to despite all that I had put it through!
It looked and smelt good!
The Durian Fudge Filling
Mixture A
4oz / 115g sugar
½ packet agar-agar powder (white color or plain)
8oz / 240ml 2% fresh milk*
8oz / 240ml coconut milk
[Original full-portion recipe: 8oz / 230g sugar; 1 packet agar-agar powder; 32 fl oz / 950ml coconut milk]
* I substituted half the required amount of coconut milk with 2% fresh milk. I was happy with the final taste of the filling in the cake – I felt there was sufficient coconut richness and creaminess. However, if a stronger coconut flavor is desired, use a higher ratio of coconut milk to fresh milk. On the other hand, I would not recommend going below half the original amount of coconut milk, as this would probably change the consistency of the filling and dilute the flavors too much. Another option would be to substitute part of the coconut milk with full cream milk instead of 2% milk.
Mixture B
1 fl oz / 30ml 2% fresh milk
1 tablespoon green bean powder (or mung bean powder)**
½ tablespoon custard powder***
½ tablespoon cornflour (or cornstarch)
[Original full-portion recipe: 2 fl oz / 60ml coconut milk; 2 tablespoons green bean powder; 1 tablespoon custard powder; 1 tablespoon cornflour]
** Green bean powder, sometimes called mung bean powder, is very commonly used in Asian, especially Nonya, desserts. It helps give the dessert a nice soft, custardy but somewhat firm texture that holds its shape. Its thickening effect is different from that of other standard starch thickeners like cornflour (cornstarch), arrowroot, tapioca starch and so on. I am not sure what an equivalent substitution for it would be. But it should be available in most Asian – Chinese, Thai, Vietnamese, Korean, Japanese – grocery stores (for those outside Asia). Alternatively, you may grind your own from dried mung beans. In Asia, mung bean powder sometimes comes in different colors like green etc, so be sure to use either the white (neutral) or yellow colored ones only for this recipe.
*** The custard powder enhances the yellow color of the durian, and thus gives a richer hue to the filling. It will not turn the filling a ghastly bright yellow. However, if desired, it can be easily substituted with cornflour, as custard powder is largely made up of cornflour/cornstarch. Simply use 2 tablespoons of cornflour instead of 1 tablespoon each of cornflour and custard powder in the full recipe.
Mixture C
9oz / 255g durian pulp mixed with 1 fl oz / 30ml fresh milk (see “to prepare the pulp for the fudge filling” above)
• In a large saucepan, combine mixture A. Cook over a medium heat until the agar-agar powder is dissolved, and the mixture is just about coming to a boil. As soon as it starts to come to a low boil, reduce the heat to a simmer.
• Dissolve together mixture B. Slowly add this to mixture A, a spoonful at a time. Stir continuously to prevent lumps from forming. Allow the coconut milk custard mixture to cook until it is a thick fudgy smooth paste.
• At the first signs of the mixture coming to a boil again, add the durian pulp (mixture C). Mix well.
• Immediately remove from heat, and allow the filling to cool before using.
This “fudge” filling is based on the traditional Nonya pengat, a thick, rich, creamy sweet dessert porridge-cum-pudding. It is essentially a fruit or several fruits (or sometimes root vegetables) that are cooked down with lots of coconut milk (santan), palm sugar (gula melaka) and sugar. Common versions are pengat pisang (bananas cooked with coconut milk, sugar and palm sugar), pengat nangka (using jackfruit) and pengat ubi kayu (using chunks of tapioca, yam and sweet potatoes). These are usually served and eaten on their own, like a sweet dessert porridge. Pengat durian is often served as a thick, creamy paste over sweet glutinous rice. Or is sometimes spooned over the popular shaved ice dessert “ice kacang”.
In the instance of this cake, the pengat durian is used as a basis to create the “fudge” filling. As the consistency and texture of pengat durian is very much like a thick, creamy paste, it is too “liquid” and not particularly suited for use as a cake filling. It is thus thickened and firmed up with a combination of agar-agar (a seaweed derived substance that is similar to gelatin, and which is sometimes referred to as vegetarian gelatin) and a mixture of three starches (green bean powder, custard powder and cornstarch).
I think the agar-agar and the starches need to be used in combination. I contemplated using only one or the other, but I don’t think that would work, or at least not work as well, as each has a different effect on the texture and consistency of the filling. Cooked agar-agar gives a firm texture that holds its shape well, while the starches help make the mixture soft, creamy and fudgy, and give its appearance a slight sheen. It is possible, if an even softer, more fudgy consistency is desired, to experiment with reducing very slightly the amount of agar-agar and/or starches indicated in the above recipe.
Heat control during the cooking process of the fudge filling is important. At one point my flame was too big, and I had difficulty keeping the mixture lump-free.
As the filling cools, a layer of “skin” will form on the surface, but nothing a quick stir prior to using it won’t solve. I know, a lot of recipes will probably tell you, in such instances to cover the filling with plastic wrap, directly onto the custard, to prevent this “skin” from forming on the top. I personally am usually not keen to do such, simply because of the potential implications (albeit unproven) of possible chemical reactions of the polyethylene with heat. It’s just a personal thing, so if you have no such qualms, then yes, a piece of cling wrap will prevent the problem of a “lumpy” custard surface.
Cake Assembly
Okay, we are almost there. Are you still with me? Well, finally, I was ready to put the cake together. This part scared me. Until that point, I had never, in my life, filled, frosted or decorated a cake before. I had always stuck to those recipes that produced cakes that were complete in themselves as they came out of the oven. At most, I would pour a glaze over the cake. That I could manage. But carefully dividing a cake into slim layers, filling it, frosting it and decorating it? Aiks! Don’t you need to go to pastry school or something to learn how to do all that fancy stuff?
Well, I decided that since I had come this far, I would just have to finish it.
• Divide the cake using a serrated cake knife. First, cut the 8x8 inches square cake into half, that is, into two 4x8 inches pieces. Next, half each piece horizontally to produce two fairly slim layers from each piece. This will give four pieces of cake in total.
[In my case, I had already cut the cake into half while trying to remove it from the cake tin. So, I nervously split the two half pieces into two layers each. Thankfully without much incident. I only had to watch out for the tendency of the knife to start dipping or rising as I moved along the cake, making the layer either thicker or thinner in some parts.]
• Trim the cake. Ideally, for an elegant-looking end result, the sides, bottom and top crusts of the cake should all be trimmed off, so that there will be no brown “skin” layers visible in the cross-section of the final assembled cake.
[Luckily for me, the cake tin took care of the bottom crust for me when I removed the stuck cake from the tin. I just didn’t feel confident enough to do the top crust, and I wasn’t prepared to risk it. After coming all this way, the last thing I wanted was to mess up at this point. So, I left it in. As you can see from the pictures, a thin brown line of crust is visible in the cake’s cross-section. Not very pretty (or professional looking), presentation wise. Oh well. And to trim the sides, I stacked all four pieces of cake together before trimming, to get perfectly even and lined-up edges.]
• Remove the top three layers of the trimmed cake, leaving the bottom piece on the cake decorating turntable, ready to receive the first layer of filling. Be sure to remember the direction and order of the three layers that were moved, so that they can stack back on nicely and neatly. It is highly unlikely that all four sides of each layer would have been trimmed equally, so rotating the direction of subsequent layers could mean an unevenly stacked cake later, and more trimming would then need to be done. I personally think it would be a lot harder to trim the cake once the layers of filling have gone in, as it would then be necessary to worry about not letting the filling ooze out while trying to slice through seven layers of cake and filling, and not applying uneven pressure and causing the filling to move and create uneven layers, and on and on.
• Drop dollops of the filling onto the cake, and spread it evenly using a metal spatula. Any filling that overflows the edges of the cake can just be leveled out into the sides of the cake, as a layer of filling will also be applied to the sides of the cake later.
• Place second layer of cake on top of the filling. Repeat process with each piece of cake, and finishing with a cake layer on top.
• Using the metal spatula, apply a thin layer of the filling to all four sides of the assembled cake, to smoothen and even out the sides.
The Durian Fresh Cream Frosting
When I got to this point, I realized I had no idea what I should do next. I knew I had to decorate the cake. But what with? Not the filling, that was for sure. Its consistency was way too thick for that. So, I improvised at the last minute and mixed some pure durian puree into some light whipped cream.
I had to use the ready-whipped cream that comes in canisters. The type we use to make home-made iced lattes with. I had not planned ahead, and did not have whipping cream at home. It would have been best to use freshly whipped cream, but there you go, life is not perfect.
The only problem with using these types of ready-whipped cream was that they deflated and became flat once I folded in the durian puree. Still, they managed to do a fairly acceptable job of covering the cake.
So, to the top and four sides of the cake I applied a layer of the durian fresh cream. Now, I wish I could claim that the ripple effect in the cream frosting was intentional. But it wasn’t. I simply didn’t have the frosting skills to create a perfectly smooth, flawless, mirror-like cover on the cake. So I figured it was better to have many “wrinkles” instead of just one or two odd-placed ones! ![]()
Cake Decoration
I was stuck again. What next? Durian cakes are difficult things to decorate. The dominating nature of the flavors and aromas of durian does not lend itself to harmonious partnerships with other ingredients that may normally be used for cake garnishing… like chocolate or maybe even nuts. I’m not even too keen on the idea of grated coconut for example on a durian cake. It just feels like too many different tastes happening at the same time. That’s why even the durian cakes sold in cake shops and hotels are usually just decorated with more durian cream, or as in the case of the famous Goodwood Park Hotel version, simply topped with cubes of durian sponge cake and sprinkled with confectioners’ sugar.
Well, my biggest obstacle was my utter lack of piping skills. Like I said, I had never frosted or decorated a cake before. Now, I’m not usually a person to run from a challenge. In fact, more often than not, I relish the thrill of trying out something I don’t think I can do. However, by this time, I had been working on this cake for HOURS. (And you probably feel like you have been reading this for hours! If you are still with me that is.) It had taken me half a day to get to that point, and I was starting to feel a little tired of the cake. Enough already! I didn’t want to continue fiddling with it. I just wanted the cake finished! I had started in the early afternoon, and it was almost time for dinner preparations to begin!
I stared at the bald-looking cake for several minutes. Walked out into the garden. Snipped off two orchids and a stalk of Heliconia (or Bird of Paradise). Made silent apologies to the flowers for sacrificing them for the sake of beautifying a cake. I figured these flowers were in keeping with the exotic Asian theme. ![]() While this particular orchid was not our national flower, the Vanda Miss Joaquim, it was still representative of Singapore I thought. And I just love Heliconias.
While this particular orchid was not our national flower, the Vanda Miss Joaquim, it was still representative of Singapore I thought. And I just love Heliconias.
So, here it is… finally…


Admittedly, this is not the most professional looking of cakes. But, I think it is not too bad for a first attempt at filling and frosting a cake, if I may say so myself. ![]() Besides, as they say, the test is in the eating, no? And this cake tastes pretty good, or so the family says.
Besides, as they say, the test is in the eating, no? And this cake tastes pretty good, or so the family says.
This morning, my mum and I were sitting at the kitchen table analyzing and dissecting the cake. We agree wholeheartedly that the cake tastes much better overnight or as is the case now, two days after it was made. The flavors have melded together more. And the texture and consistency of the durian fudge filling have also settled and relaxed, and are much nicer than on the first day.
We both really like the texture of the sponge cake. (Now I know why this cake recipe is in my mum’s little treasured notebook). Unlike a lot of or even most cakes which turn hard, rather dry and not very palatable once refrigerated, this sponge cake remains soft and fluffy even when eaten cold, straight from the refrigerator. It is thus perfect for the durian cake, or any other cake which has to be kept refrigerated. I really like this sponge cake, and can think of many other things I can use it for.
The durian flavor of the cake is very subtle – just a hint, a background note, which nicely ties the cake in with the durian filling, without tipping the balance of flavors in the assembled cake into overkill.
The rich, fudgy, custardy filling provides an excellent counterbalance to the lightness of the sponge layers. And after the cake has been sitting in the fridge for a day or so, the filling softens up slightly, becoming somewhat more custardy without being mushy. Very nice, in our opinion. We like it a lot.
We also like very much the feel of the occasional small chunks of durian pulp interspersed throughout the filling.
[On a side note, this filling can be very easily adapted and made suitable for filling choux pastry to form durian cream puffs (I have also received numerous requests and queries about how to make this). Or as a filling for durian tarts. Another option is to make a pure pengat durian (without the agar-agar and starches), and use it over sweet glutinous rice cooked in coconut milk, or over ice kacang (shaved ice dessert).]
Probably the most important factor in this cake is the quality of the durian. This can really make or break the cake. Top quality durian will make this cake out of this world. This cake that I made tastes good, but it would have been magnificent had I had top quality durian at my disposal.
The amount of work involved in this cake probably doesn’t qualify it as a “make every month” kind of cake. It is also probably more economical to buy the very readily available, ready-made durian cakes. But nothing beats a home-made cake, where copious amounts of durian can be used, and where one can choose to use the best ingredients available.
I think this recipe is a keeper. I like the sponge cake. I like the filling and its potential for versatility. This is something that would be nice to make for a special treat.
All in, this cake was a very, very long process. It was fun. It was frustrating – at times. It was exhilarating. It was tiring. But most of all it was a tasty affair. Still, I’m glad it’s all over. It has been quite an experience.
And since you are still here reading this, I thank you for your patience and for taking the time to hear out my long and convoluted durian cake story!
Copyright © 2004 Renee Kho. All Rights Reserved.
Please contact me for permission to copy, publish, distribute or display any of the images or text contained in this article.
12:38 PM in Home Baker: Cakes | Permalink | Comments (25) | TrackBack
Thursday, December 04, 2025
Of Drunken Fruits and Pitted “Skin”

I had made up my mind that I would start my Christmas baking today – by hook or by crook. I had even arranged my schedule to try to ensure I could have an afternoon of leisurely indulgence in the kitchen. Alas! It was not to be… murphy’s law proves itself once more… And so, as it is said: “the best laid plans of mice and men…”
As I prepared to make my fruitcake, so it was that 2 clients and a supplier decided that my life was just a little too stress-free today, and thought they would help “spice it up” a little for me! The hazards of working from home! And the stress definitely came through in my poor fruit cake. I think I unconsciously (or was it consciously ![]() ) took my frustration out on the eggs!
) took my frustration out on the eggs! ![]()
I was way too vigorous in wielding the whisk and so the cake baked out with dozens of small “pits” on the surface, from the bubbles baking through to the top! Not a pretty sight at all.
I had also probably “over-dosed” the raisins on the brandy! Yesterday, I had searched around in the liquor cabinet and found a bottle of Courvoisier Cognac. Now, I don’t drink hard liquor at all. So, I’m the last person to know the value or quality of such things. I was just thinking: “oh, cognac… that’s brandy, right?… that’ll work…” And proceeded to pour a good half bottle into the raisins to soak them overnight in preparation for the baking today!! That definitely did not make someone too happy! It was like: “hey, that’s my bottle of Courvoisier Cognac!” Uh-oh… And now I know… cognac is pretty expensive stuff… and by the end of today’s baking, I had used up a good ¾ of a bottle of the cognac on just one (rather unsuccessful, I might add) fruitcake… oops! ![]()
The near ½ bottle to soak the raisins together with another ½ cup of cognac that I poured into the batter plus more brushed onto the cake, ensured that the final cake result turned out to be fairly heady stuff! Haha… kids could potentially get drunk on this cake! LoL! Might have to put an age 18 warning on the cake!
The results were not what I was looking for – aesthetically at least. Taste-wise, it was pretty good. Yeah, we decided not to let the cake sit and “feed” it anymore (besides, it was already probably way “over-fed” in the alcohol department), and so we had some for dessert at dinner tonight.
Well, it was my first attempt at this recipe… so I can be forgiven right? But I think the next time I try this again, I’ll have to go get some (cheaper?) brandy.
Here’s the original recipe which my mum got off an aunt, with some notations of my observations.
(don’t ask me why it’s called “boiled fruit cake”, I haven’t a clue)
Favorite Boiled Fruit Cake
500g raisins
brandy
½ c. mixed peel
250g butter
1 c. brown sugar, firmly packed
½ c. brandy
5 eggs
1 ¾ c. plain flour
½ tsp bicarbonate of soda
1) Rinse the raisins twice with hot water, and drain well. Soak in brandy for one full day and night. Drain well.
[note: I think one day & night is a little too long – probably 4-6 hours would be sufficient]
2) Melt the butter and sugar together on a low heat. Once melted, add the brandy-soaked raisins and the mixed peel. Stir and heat through. Then add the ½ cup of brandy to the butter mixture and allow to simmer for a short while. Remove from heat and set aside to cool slightly.
3) Line an 8” square cake pan with two layers of greaseproof paper on the bottom and sides of the cake tin. Spray the lining with cooking spray.
4) In a large bowl, lightly beat the eggs.
5) Add the dried fruit and butter mixture to the eggs and mix well.
6) Add the flour and baking soda to the batter and mix well.
7) Pour batter into prepared cake pan and cover with aluminium foil.
8) Bake at 160C for 20 minutes. Reduce heat to 150C and bake for another 1 hour. Remove the foil covering, and bake for another 30 minutes (at 150C). Brush the cake with more brandy, and return to oven and bake another 10 minutes.
9) Switch off the oven, and brush more brandy on to the still hot cake. Leave cake in oven to cool.
10) Once completely cool, remove from cake pan and store. It would be best to brush some brandy on the cake once every 3-4 days for 1-2 weeks before eating. Cake will keep for up to 3 months.
Copyright © 2003 Renee Kho. All rights reserved.
Please contact me for permission to copy, distribute or display any of the images and text contained in this article.
02:03 AM in Home Baker: Cakes | Permalink | Comments (5) | TrackBack