« February 2004 | Main | April 2004 »
Wednesday, March 31, 2025
A Spicy Nonya Lady Dressed in Green

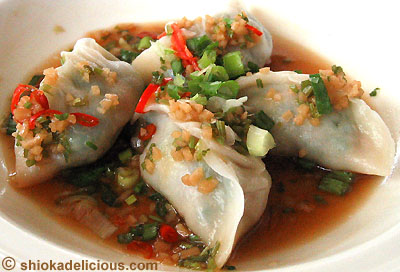
I bought this Nonya zhong zhi (glutinous rice dumpling) one day last week, with the intention of having it for lunch. Unfortunately, things got so busy that day, I didn’t even have time to stop to eat. And so the dumpling was left sitting in the refrigerator for almost a full week. I finally decided to rescue it before it descended into gastronomic oblivion and crossed over into the next realm. I steamed it for dinner the other night. Fortunately it was still within its natural lifespan, and still tasted very good.*
[*Here's how to tell whether a dumpling is still edible: there should be no cobweb-like glistening strands as the dumpling is cut open with a fork. Thin, transparent strands stretching out from the rice on the inside of the dumpling indicates the dumpling is ready to be dumped.]
To me, the Nonya zhong zhi encapsulates very succinctly in one compact food item the meaning of “Peranakan”.
The Peranakan social group is unique to South East Asia, and more specifically to Singapore and Malaysia. This community evolved some two to three hundred years ago when Chinese traders came South to conduct their trade through and around the geographically strategic Straits of Malacca, and established business ties with the locals in Peninsula Malaya, including Singapore. With time, these Chinese traders settled in the Straits Settlements of Malacca and Singapore and married local Malay women. Out of these cross-cultural relationships and marriages was born a unique culture that was a blend of Chinese and Malay customs, with a dash of the English way of life.
The descendants of these original Chinese-Malay cross-cultural unions, together with their unique culture, came to be called Peranakans. The word “peranakan” in the Malay language meant “locally born”. To the Westerners, they were more commonly known as “Straits-born Chinese” or simply “Straits Chinese”.
Male Peranakans were known as Baba and the females Nonya. The latter was also the term used to describe Peranakan cuisine and fashion.
Everything about the rich heritage of the Peranakans was unique – the way they dress, the language, the food and the cultural traditions and practices.
The traditional Nyonyas and Babas did not speak Chinese, or any other Chinese dialects. They spoke a language of their own, a form of patois Malay, sometimes also called “Baba Malay” – a melodious version of Malay mixed with a good smattering of the Chinese Hokkien dialect and colloquial Malay words.
When the British colonized Malaysia and Singapore, the Peranakans were among the first group of locals to adopt the English language. They began to view themselves as superior to the other Chinese, who couldn't speak English. During the colonial era, many Straits Born Chinese regarded themselves as "Queen's subjects". And it was during this period, that certain elements of English culture and practices were assimilated into the Peranakan culture.
Yet, despite the adoption of various elements from different cultures into their daily life, the Peranakans, at the same time, clung fiercely to their Chinese identity in some aspects. They celebrated festivals like the Chinese New Year and Mooncake Festival on a large scale. The older generations continued to observe Chinese religious beliefs and rituals.
The flow of history also led to a change in the cultural emphasis of the Peranakans. At the turn of the century, as more Chinese immigrants flooded in and rooted themselves in the Malayan Peninsula, the Peranakans began to assimilate into the Chinese culture and thus diluted the rich heritage established by the early Peranakans. Among which were the language and beliefs. Baba Malay rapidly lost out to the Chinese dialects. The Hokkien dialect quickly became the adopted language of the new generations. The Malay component was diluted to such an extent that modern day Peranakans are chiefly Chinese in look and identity.
However, having said this, despite a more dilute Nonya culture in day-to-day living, the modern Peranakans still observe their traditional heritage on special occasions such as Chinese New Year, weddings and birthdays, with many of their practices quite different from traditional Chinese customs.
But perhaps the most profound Peranakan legacy and contribution to South East Asian culture is their food. Nonya cuisine is arguably the original “fusion food”. It is an exotic art of fusing the distinctive traditions, herbs and spices, and culinary skills of the Chinese and Malay. An amalgamation of the best of these two rich and colorful epicurean cultures. Nonya food is a synthesis of all four tastes - a tantalizing blend of spicy, tangy, salty and sweet flavors.
I think South East Asia’s culinary landscape would be decidedly poorer if not for Nonya food. In fact, the culinary culture of the Peranakans has become so accepted and assimilated into mainstream Singaporean and Malaysian food culture, many young Singaporeans and Malaysians do not regard, or even realize that many of their most popular foods are “Nonya” or “Peranakan” in origin. Instead, these beloved dishes are seen simply as being “Malaysian” or “Singaporean” foods. Some examples would be dishes like laksa, mee siam, popiah, otak-otak, sambal hae bee, and the list goes on.
In fact, each time I have written about or described a dish as being Peranakan or Nonya in origin, I would receive emails and comments querying the description. The roots of many of the most well-known South East Asian dishes did originate from Peranakan kitchens, but through the years Chinese, Indian and/or Malay influences have been added to them. Indeed, the cross-influencing has not been one-way. Similarly, some Peranakan recipes have evolved to take on broader South East Asian characteristics, reflecting the wider social fabric of Chinese, Indian, Malay and Eurasian elements. These “evolved” versions exists side-by-side with the original authentic versions, and all are beloved by food-loving Singaporeans and Malaysians, thus sometimes making it rather difficult to distinguish “authentic” from “interpreted” versions of any particular dish.
Which brings me back (after a rather lengthy detour – I do apologize, I get carried away sometimes) to my Nonya zhong zhi. In my humble opinion, I think this food item showcases very simply and eloquently the meaning of Peranakan or Nonya cuisine, which in essence is the fusion of Chinese and Malay culinary traditions.
Here we have the combining of the traditional Chinese glutinous rice dumpling with the Malay sambal hae bee (dried shrimps fried with sambal chilli). It’s simple, it’s tasty, it’s Peranakan.
The Chinese rice dumpling (zhong zhi) is another one of those Chinese food items that is designed to be eaten efficiently and conveniently, without the need for plates or cutlery. The rice and meat are wrapped and cooked together in special bamboo leaves (juk yip in Cantonese).
Once ready, the dumpling is simply unwrapped…

And it is ready to be eaten. It is interesting that the unique wrapping procedure of the dumpling, when done right, always ensures that when the dumpling is unwrapped, the rice pyramid sits conveniently and strategically in the middle, with the long strips of bamboo leaves stretching out almost equally on either side. This is important for the eating of the dumpling.

To eat the dumpling, simply hold onto the bamboo leaves on either side of the rice. It is prudent to position your hands on the leaves as close as possible to the rice. This helps the pyramid of rice maintain its balance on the rather narrow leaves, and not topple over onto the floor as you try to bite into it!
Lift the dumpling to your mouth, and take a nice big mouthful of the dumpling. Slowly savor the beautiful marriage of the soft, smooth glutinous rice with the spicy, slightly sweet sambal hae bee and its nicely contrasting meaty bite and texture. Bliss.

This particular dumpling was chock-full of minced sambal hae bee (dried shrimps in sambal chilli). There was also some finely diced pork in the mixture, for added sweetness and richness of flavor.

When the dumpling has been eaten, simply throw the bamboo leaves away, and you are done. No washing up to do.
Traditionally, rice dumplings were only eaten on Duan Wu Jie (the Dumpling Festival). But nowadays, dumplings are sold and eaten year round. This suits me just fine, especially as this year the Dumpling Festival will be happening rather later in the year than normal – towards the end of June (in fact, just 2 days before my birthday ![]() ). Why? Because we have a “double spring” this year. We are currently in the second “second lunar month” of the year. Yes, the lunar calendar has two “second month” this year. And thus the various festivals that happen from the third lunar month onwards have been pushed back this year.
). Why? Because we have a “double spring” this year. We are currently in the second “second lunar month” of the year. Yes, the lunar calendar has two “second month” this year. And thus the various festivals that happen from the third lunar month onwards have been pushed back this year.
Just a little bit of interesting trivial there for you. ![]()
Happy rice dumpling-ing!
[note: being a non-Peranakan myself, the above information on the Peranakans and the Nonya culture was written based on my outsider’s understanding and appreciation of the people and their culture. If there have been any inadvertent errors, I apologize in advance. Please do drop me a line and let me know.]
Copyright © 2004 Renee Kho. All Rights Reserved.
Please contact me for permission to copy, publish, distribute or display any of the images or text contained in this article.
02:57 PM in Other Shiok-Eats, Tastes of South East Asia | Permalink | Comments (27) | TrackBack
Tuesday, March 30, 2025
Here, Digest This!

This is another one of my “look what I found!” posts. A few weeks ago, or maybe it was over a month ago, I don’t really remember, while I was in Marks & Spencers doing my regular stock-up of their cookies, I chanced upon this new offering. Or at least new in Singapore.
Organic digestive biscuits.
I used to always wonder about the name. Digestive biscuits. Are they supposed to help with digestion? It would seem obvious would it not? Digestive biscuits for digestion. It is afterall a rather literal and functional name for a biscuit. Hardly a name that has been given because it sounds pretty or makes the item-so-named appear more attractive and appetizing. But I could never quite understand how a baked cookie could possibly help the digestive process.
Then, some years ago, I was told this story (the authenticity of which I have not verified). The digestive biscuit was invented in the UK in the early 1800s (by whom I do not now recall), as a means of getting fiber into the diets of the masses. Apparently, at the time, fresh fruits and vegetables were not abundantly available, and what was available was too expensive and thus out of the reach of the working or common class. And I suppose the lack of fruits and vegetables in the diet led to a distinct um… shall we just say “lack of activity” in the bowel department. It supposedly became a serious enough issue to warrant national attention and government intervention. A cheap and efficient way was needed to get more fiber into the guts, and to get things moving along ![]() . It also had to be more stable and amenable to storing than fresh fruits and vegetables. And there you have it. The birth of the humble digestive biscuit. This dry, somewhat crumbly, grain-heavy baked disk was loaded with “yummy” stuff like wholemeal flour, wheat and oats. It didn’t sound terribly appetizing, but it did its job, and for some reason it even became popular, and the rest as they say is um… a flush down the water closet.
. It also had to be more stable and amenable to storing than fresh fruits and vegetables. And there you have it. The birth of the humble digestive biscuit. This dry, somewhat crumbly, grain-heavy baked disk was loaded with “yummy” stuff like wholemeal flour, wheat and oats. It didn’t sound terribly appetizing, but it did its job, and for some reason it even became popular, and the rest as they say is um… a flush down the water closet. ![]()
Two centuries on, the digestive biscuit is still around and thriving. I think it is a very English thing. This “digestive biscuit and tea” idea. I remember in school, it was always digestives with milk. Much like the Americans have their “oreo with milk” culture I guess. I supposed the milk and the dunking of the digestive into it made the biscuit go down easier. It was also the biscuit of choice in many (perhaps almost all) of the older English recipes for cheesecake crusts, pie crusts or even crumble toppings.
However, as society grew more affluent, people simply decided that there were tastier things to eat than digestive biscuits. So, the biscuit brigade struck back by putting chocolate on the digestives. To sweeten the deal, literally and figuratively. And thus garnered for themselves a whole new generation of digestives-lovers.
I’m highly addicted to M&S;’ (that’s Marks & Spencers, if you are wondering) RF chocolate digestives (I don’t like other brands for some reason).

I consume copious amounts of the stuff on a near-daily basis. It’s almost scary how much of this stuff I scoff, even though I know all about the high sugar levels and trans fatty acids blah blah blah. I just love the stuff.
But I digress… back to my little organic find.
Of course, when I saw these organic digestives, I had to pick up a pack. I immediately felt healthier and (ahem) more virtuous. ![]()


I like these. They are thinner and denser than regular digestives. Crunchier too, in my opinion. And definitely very healthy tasting, if you know what I mean. They are most likely not to the taste of everyone. However, for some reason, I’m quite partial to them. They are slightly dry and very grain-heavy. But, perhaps because the grains are organic, they have a much nicer, richer, more complex nutty flavor and aroma. As a result, the bite and texture of this version are also different from the regular digestives. I would say these organic digestives have certain similarities to oat cakes (biscuits) perhaps.
I think they would work great as a base for toppings like cream cheese, cottage cheese or ricotta with a dollop of fruit preserves – sort of like instant mini cheesecakes. I’ve also been meaning to (but have not gotten round to) melting some dark chocolate and dipping these into that for some home-made chocolate digestives. Another thought that also keeps playing in my mind in relation to these organic digestives… imagine… a layer of rich, sweet, caramel-y dulce de leche together with a layer of melted rich, bitter dark chocolate spread over the biscuit. Mmmmm…
Or, if you are as lazy as me, just dunk them in cold slightly sweetened soy milk – an Eastern update on the traditional way of eating digestives. ![]()
I would rank these organic digestives almost up there with my all-time favorite M&S; cookie… the RF chocolate digestives. Yes, I’m eating these healthier organic digestives, but I’m also still stuffing myself with the chocolate versions. And hey, my life is that much “richer” with two digestive loves instead of one!
Now, if you’ll excuse me, I think it is time for my next digestive biscuit fix…
Copyright © 2004 Renee Kho. All Rights Reserved.
Please contact me for permission to copy, publish, distribute or display any of the images or text contained in this article.
11:03 AM in In My Shopping Basket, Snack Attack! | Permalink | Comments (14) | TrackBack
Monday, March 29, 2025
Summer Pavilion

I took my mum out for lunch on Saturday. It had been a while since we last had a mother-daughter “date”, so it was nice. We decided on a light dim sum lunch at Summer Pavilion in the Ritz Carlton.
If you are looking for classy, elegant and refined Cantonese cooking, and budget is no objective, Summer Pavilion is among the top choices in town. Over the years, its food has remained consistently good and its service is always impeccable.
The restaurant is well-appointed. Housed in a glass pavilion that is offset from the main hotel building, it looks out on one side into a lovely cobbled courtyard fringed with flowering shrubs and bamboo plants, and on the other side it overlooks a tranquil feature pond with gently flowing waters. On this visit, we were seated next to the courtyard. It was very pleasant to be able to enjoy the bright sunshine and watch the rustling leaves, while staying in air-conditioned comfort, away from the stifling heat and humidity.
The ambience inside the restaurant is equally lovely – spacious, elegant and mellow, it is very different from the usual noisy hustle and bustle of a Chinese restaurant. It speaks of quiet yet casual refinement. A perfect place for intimate conversation, while tucking into sumptuous culinary creations.
I suppose the food at Summer Pavilion can best be described as modern Cantonese. Modern in the sense that the Chef is not afraid to use ingredients that are unconventional to Chinese cuisine, such as goose liver. Yet, the cooking style is most definitely Cantonese. Flavors are light, with the emphasis on using the freshest and best ingredients available, and letting the natural flavors and textures of the ingredients take center stage. The food is restrained, elegant and refined.
The dim sum menu offers a decent selection. And on weekends and public holidays, the regular dim sum menu is supplemented by an adjunct menu of more involved dishes, served in small dim sum sized portions.
At Summer Pavilion, one will not find the usual dim sum items like har kow (steamed prawn dumplings), siew mai (steamed meat and prawn dumplings) or wu kok (deep fried yam dumplings). No, it doesn’t serve any of the ubiquitous dim sum offerings that are rolled out at every other Chinese restaurant. It sets itself apart with its distinct offerings.
Given that there were only the two of us, and both of us wanting to eat light, it was a hard task to narrow down the choices. There were so many options which tempted us. As we perused the menu, and mulled over what we wanted to eat, our palates were nicely occupied with sipping Tie Guan Yin (literally translated as “Iron Goddess of Mercy”) tea and munching on the amuse bouche of deep fried yam crisps.

These were wafer-thin, translucent shavings of yam that have been deep fried. It was crispy with no greasy feel on either the fingers or the palate. I really liked the very pretty effect of the root vegetable’s natural purple patterning.
We finally settled on just six options, out of the many whose descriptions tantalized our imagination.
The first was “steamed scallop dumplings with asparagus and Lin Zhi Mushrooms in XO sauce”.

This was exquisite. The skin was so thin and translucent we could see the ingredients inside with their different colors and textures. And yet it was supple enough that it didn’t break when the dumpling was lifted with the chopsticks. It was satiny smooth with a beautiful glossy sheen. The texture was gorgeous – soft yet not mushy, meltingly tender with just enough bite. I was bowled over by the skin. The skin of this dumpling alone spoke volumes about the skills and talent of the Chef.
Each dumpling came prettily served on a scallop shell.

Inside, it was chock-full of ingredients. Small cubes of well-marinated, super fresh, very tasty scallops mixed with diced fresh vegetables. The woody earthy flavors of the mushrooms melded nicely with the light fresh taste of the scallops, while some chopped coriander added the right amount of aroma. It was a very finely tuned balance of flavors, with the XO sauce providing just enough piquancy to the dumpling. This was a perfect start to the meal.
“Poached chicken dumplings with mushrooms, chives and preserved vegetable in a hot and sour sauce”.
This was also competently executed. The skin of the dumpling was of a thicker and firmer variety than the earlier dish, and also very well made. Smooth and soft, yet supple with nice bite and very good mouth-feel. There were no chewy edges like those quite often found on other dumplings.

Coming as it did after the scintillating scallop dumplings, the filling of these chicken dumplings didn’t excite us as much as that of the previous dish. It was quite flavorful but the combination of ingredients was rather unbalanced, with the chives taking on a more central role than the chicken. The chives were of a chunkier size and texture than were usual for dumplings, and with only a few small dices of meat interspersed among the greenery, the taste of the chives came across too dominantly. I don’t think I saw or tasted any mushrooms or preserved vegetables.
However, the tasty sauce lifted the performance of the dumpling and saved the day. It was nicely tangy and piquant with no jarring notes. The flavors were very delicately balanced and did not overwhelm the dumplings. The minced garlic, chopped spring onions, chopped shallots and slivers of red chilli lent beautiful color, texture and flavor to the sauce.

The menu called this “steamed vegetarian rice rolls with assorted mushrooms”. It is essentially mushroom cheong fun. Again here, it was the gorgeous rice flour skin that stole show. It was silky smooth, soft and meltingly tender. The mushroom filling was very generous and delicious. Dried Chinese mushrooms and fresh shitakes were cooked in a tasty soy sauce-based gravy, before being wrapped in the thin sheets of dough.

Instead of the simple sesame oil and soy sauce dressing that is usually poured over cheong fun, here the rice rolls were served with a flavorful broth-like sauce.

This was one of the dishes from the supplementary weekend dim sum menu – “braised beef brisket with turnip”. Classic Cantonese-style simmered ngau lam.
This was another winner. We really enjoyed this dish. The slow-cooking process produced a meat and gravy that were richly and intensely flavored. The beef was very, very tender, with an almost melt-in-the-mouth texture, and yet retained its meaty texture and had enough bite. There was a generous amount of tendons – the best part of the dish, and what this dish is all about. These were so exquisitely tender they literally melted in the mouth. Gorgeous soft gelatinous texture. This is the way an excellent ngau lam should feel and taste, in our opinion. Sublime.
The chunks of white radish or turnip were equally tender and flavorful. And we liked the pieces of soft, cooked-down ginger. The whole dish was superbly balanced. Instead of the robust or rustic feel that braised ngau lam usually have, this version had a rather refined, elegant, smooth edge to its taste. Sublime, again.

The menu listed but only a handful of the more common dim sum items that are regularly found on dim sum menus, and this was one of them. Yet, even their version of char siew (BBQ pork) pau came with a twist. This was described on the menu as “steamed BBQ pork buns with preserved vegetable and onion”. The preserved vegetable in this case referred to “mei cai” in Mandarin or "mui choy" in Cantonese, which technically speaking is actually more a wind-dried vegetable (dried xiao bai cai) than a preserved vegetable. That aside, this was an interesting variant of the standard version.
I liked half of the pau. The dough half. It was a Hong Kong (or Cantonese) style dough, and it was beautifully made – soft, fluffy, with a very tender and smooth crumb.

I was somewhat less enthusiastic about the filling. I liked the fact that the pork was cooked Hong Kong style, without color additives, but with just sugar, light soy sauce, perhaps a dash of dark soy sauce and either zhu hou jiang or the Chef’s own proprietary concoction. I liked the tenderness of the pork. I liked the addition of dried vegetable and onions, which made for a pleasant change in the taste and mouth-feel of the meat filling. I really liked the color and texture of the gravy. But I found the filling as a whole a tad too sweet. I suspect this could be due to a sweet, rather than salty, variety of mui choy being used. I would also have preferred more generosity when it came to filling the paus. The picture belies the scantiness of the filling. Still, because I was enjoying the fluffy bun so much, the rest didn’t seem to matter too much.
Finally, we rounded off the meal with one of my favorite dim sum items…

Baked mini egg tarts. I love dan ta. But only the ones with the Hong Kong-style puff pastry crust. I’m usually not too keen on the local shortcrust pastry version.
That day the tarts were made rather unevenly. Some had crusts that were thicker than normal. Usually, a thick crust disrupts the overall taste of the tart too much. However, because the pastry in this instance was so well made, it didn’t really matter. Unlike the usual oily crusts, this was beautifully free of any greasy feel. It also had a superb soft, tender flaky texture. And the best part about the crust, and by which I generally assess a successful egg tart, was the perfectly done bottom layer of pastry…

The crust at the bottom of the tart was wonderfully thin, without a layer of soggy, undercooked pastry that is so common. It was evenly crispy and golden brown throughout. Very nice.
The egg custard filling was nicely smooth and less sweet than the usual versions. In fact, I would have preferred it a tad sweeter. I think a sweeter custard would have balanced out the crust a lot better.
And it is in the little elegant touches that Summer Pavilion excels. I liked the small egg crepe “mat” upon which the egg tarts sat. I also liked the use of small fresh edible flowers as garnish and plate decoration. Simple touches they may be but they lifted a very common dim sum item onto a whole new level.
Overall, it was a delicious and satisfying lunch. The food was great. The company even better. Quite a perfect Saturday lunch.
As always, the service was impeccable. One of the best you can find in a Chinese restaurant here. The staff were attentive and watchful, but never obtrusive, moving quietly and gracefully to meet and often to pre-empt our every need.
On a side note, the deep fried dim sum dishes at Summer Pavilion are also very good – gorgeous to look at and scrumptious to eat. There are some interesting options on the menu such as the deep fried goose liver rolls. The deep fried lobster roll wrapped in rice vermicelli is a beauty and is highly popular.
As both my mother and myself had decided to eat light that day, we had to forego (with some difficulty) all the mouth-watering deep fried creations. Those will have to wait for our next visit.
Outside of dim sum, the rest of the food at Summer Palace are also consistently excellent. Most of the dishes are executed with a deft and sure hand, with great class, elegance and refinement. Given the high-end nature of the prices, and the delicate portion sizes, this is not the place for hearty Chinese feasting. Rather it is about the celebration of Chinese cuisine at its finest and most elegant. It is about Cantonese fine-dining.
Summer Pavilion
The Ritz-Carlton Millenia Singapore
7 Raffles Avenue
Singapore 039799
Tel: 6337 8888
Copyright © 2004 Renee Kho. All Rights Reserved.
Please contact me for permission to copy, publish, distribute or display any of the images or text contained in this article.
10:13 AM in Lion City Shiok-Eats: Chinese | Permalink | Comments (19) | TrackBack
Saturday, March 27, 2025
Skeletons in My Bread Cupboard

Since my recently renewed infatuation with kaya started, I have been imbibing large quantities of bread. Not bread bread, as in crusty loaves and aromatic rolls, but regular sliced bread with various spreads and toppings. Initially I was just looking for an excuse to eat my kaya, but it then evolved into wanting to re-live childhood memories of the different ways I used to eat my bread.
Bread and the eating of bread are such emotional things. Both are so often tied in to memories of the tastes and smells of childhood. During my current bread-consuming spree, I have been re-visiting many of the old, sometimes long forgotten, flavor combinations that were once so loved. A number of these have now re-joined those all-time favorites that never left my life. Some of these bread-eating habits are quirky, others may sound icky and yet others still probably seem downright weird. And yet, each one is tasty, and most bring back a flood of pleasant memories and emotions.
Care for a little tour of my bread “closet” to see what flavorful “skeletons” we can unearth?
Let’s start with my current spread-of-the-month, kaya.
One cannot talk about kaya without talking about the fabled South East Asian (Singaporean and Malaysian, to be exact) institution of kaya toast. We are passionate about kaya toast. Many would pay modern-day exorbitant (some would say extortionate) prices for what amounts to merely two pieces of light fluffy nothingness of bread, sandwiching a slab of butter and a dollop of kaya. It is almost like a collective consciousness. It is not written or set down in any cookbook or culinary rule book, and yet just about everyone knows the exacting criteria that must be fulfilled for a toast to qualify as “good” kaya toast.
Long before McD’s Big Breakfast hit our shores, there was the Oriental fast-food kaya-toast-and-runny-eggs breakfast. In the old days, for just a few cents, one would get a cup of thick, piquant local coffee, a piece of kaya toast and two half-boiled eggs. The coffee was served in a rustic heavy-set porcelain cup which sat atop a porcelain saucer with edges that curved up slightly. This was important. The saucer was key to eating the eggs.
Many of the kopitiams (traditional Chinese coffee shops) had a highly “automated” and synchronized system of cooking these eggs. Timing was of the essence. The eggs could not be overcooked or undercooked. Both whites and yolk should be runny, but the whites should not have transparent bits. It required the cook to find that very fine split-second border-line between transparent and opaque whites.
How was this done? Some kopitiams came up with an ingenious “machine” which pretty much automated the cooking process. This "machine" was simple, easy to operate, and hardly ever broke down. It was simply rows and rows of “hanging tins”. Tin cans which once contained canned food were recycled and given a second life. Small holes were punched in the bottom of the can, and the cans were strung with string and hung along wooden poles. Each morning, during the peak breakfast rush, raw fresh eggs were systematically placed in each can, which was then filled with boiling hot water. As the eggs cooked, the water dripped out of the holes in the bottom of the can. Once the water had run dry (within mere minutes), the eggs were done to perfection – runny yolk and whites, with no transparent bits. The key was in getting the number and size of the holes in the bottom of the cans right. Thereafter, it was on auto-pilot. Ingenious. Efficient. Successful. Fast-food kopitiam style.
As each egg was cooked, removed from the can and served, another egg would be put into the can, and so the process continued. The cook would simply work systematically up and down the row of cans, putting in raw eggs, topping up the boiling water, and removing the cooked eggs. It was akin to a rhythmic culinary dance.
To eat the eggs… first, the cup containing the coffee was removed from its saucer. The half-boiled eggs were cracked and their still very runny insides poured into the now-empty saucer. A dash of light (or dark) soy sauce was added and the eggs stirred with the teaspoon, to create a not-very-visually-appealing brown liquid. The saucer containing the liquid eggs was then carefully brought to the lips and the eggs were “drunk”. That was the way – the only way – that these traditional half-boiled eggs should be eaten! With eggs consumed, it was time to enjoy the kaya toast.
The kaya toast is actually more of a sandwich than a toast – a kaya and butter toasted sandwich. For an authentic, original version of kaya toast, the traditional kopitiam bread has to be used (see top photo). This traditional bread has its roots in the Hainanese kopitiams of old. Tall, slim loaves with a characteristic rounded top, they are cut into ½ inch thick slices. All the crust – top, bottom and sides – are always removed to give narrow, elongated 7” by 3” slices. These are pieces of cloud-like fluffiness and softness, which almost dissolves with each bite.
Two slices of the bread are grilled over smoldering charcoal until nicely golden brown and crispy on the outside, but still cottony soft and fluffy on the inside. Some kopitiams make the kaya sandwich using two full thick slices of toasted bread, others split one piece of toasted bread in half along the cross-section to give two super-thin, very crispy slices of toast. A slab – and I mean a slab, none of that dainty cholesterol-phobic nonsense, but a thick macho slab – of cold butter is sliced and placed on one piece of toast. The other piece of toast is liberally slathered with kaya. The two pieces of bread are then slapped together to form the sandwich.
And there you have it – kaya toast. That is why the Malaysian name for this sandwich is “roti kahwin” (kahwin being either “marriage” or “to marry”). Two slices of toast are “married together” with kaya and butter.
As the sandwich is being brought to the waiting customer, the butter has time to start melting in the heat of the toasted bread. So, as one bites into the sandwich one gets a mouthful of half-melted butter as well as still slightly cold, somewhat hard butter, all complemented by oozing kaya. It is actually quite a symphonic display of textures… cold firm butter, warm melted butter, smooth dripping kaya, crispy crunchy toast, soft fluffy melt-in-the-mouth bread. It may sound messy, icky even, but the varied and contrasting textures, flavors and levels of richness of all the different components come together majestically for a thoroughly enjoyable taste sensation.
The sandwich is so simple, but one only has to watch the enjoyment, joy and utter pleasure on the faces of people eating roti kahwin to realize that this is one food that is almost purely about emotions and nostalgia. Singaporeans nowadays are willing to pay rather exorbitant prices to recapture the spirit and experience of the traditional kopitiam half-boiled eggs and kaya toast breakfast.
I like kaya toast. But on my terms. Which means none of that defiant devil-may-care slab of butter stuff for me. Sorry. I prefer the flavors of the kaya to be the dominant notes in the sandwich, rather than be overwhelmed by the intense richness of biting into a chunk of half-melted butter. So, I like my butter spread onto the toast, followed by a generous layer of kaya. In fact, I like mine as an open sandwich, with only one piece of toast. It increases the kaya to bread ratio. Perfect.
During the initial throes of my infatuation with my new-found Hainanese kaya love, I was looking for all sorts of excuses and ways to eat the kaya. One day I decided to top the kaya with pork floss.
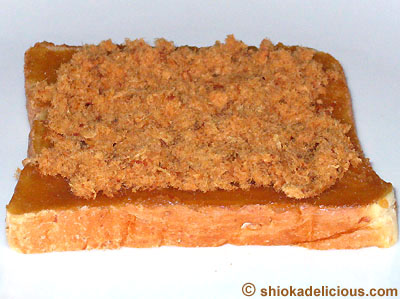
That is hardly ground-breaking, frontier-busting stuff, I know. We have been eating pork floss sandwiches for decades – long before floss buns became hip, happenin’ and yuppie-fied. Personally, I’ve always eaten my pork floss sandwich with butter. This was the first time I tried it with kaya. And I much prefer it with kaya – Hainanese kaya that is. (I think the pandan flavor of Nonya kaya may potentially interfere with the overall taste balance). The sweetness of the kaya is a lovely foil for the saltiness of the floss. The coconut aroma adds an interesting complexity to the overall flavor balance that isn’t there with just butter. And it sure beats the oily, greasy mayo-based commercial floss buns anytime, in my humble opinion. Kaya-floss toast has garnered a permanent seat on my “favorite toasts” list.
How else do I like my kaya and toast? Here’s one from my childhood. Kaya and cheese. It sounds gross. But it doesn’t taste anyway near weird. It actually works very well and tastes good. Again it goes back to the contrast and balancing of sweet with savory. It’s the juxtaposition of the creamy richness of the kaya with the soft gooeyness of the cheese. But, for the authentic taste experience though, it has to be a slice of processed cheese – the type that looks plasticky and comes individually wrapped in what else but more plastic. I’m serious. I think it works best with this type of cheese. None of the gourmet or “real” cheeses for this sandwich. Sorry.
Another long-time love… kaya and peanut butter. I guess one could call this the South East Asian version of peanut butter and jelly sandwich. It is still peanut butter with jam – only it is coconut jam and not fruit jam. Now, this one is really good.
Then again, I’m a peanut butter fiend, so anything with peanut butter in it is really good in my books. This is the gal who, as a teenager, would regularly, for tea, eat peanut butter straight out of the jar, by the spoonfuls! I was particular about my peanut butter. It had to be super chunky – not just chunky, but super chunky – when eating it out of the jar. But it had to be creamy when spread on toast or bread. Hey, a teenager is entitled to her idiosyncrasies, surely.
My all-time favorite peanut butter sandwich combination, to this day, is peanut butter with Nutella. Oh! Bliss! Divine gastronomic bliss! Forget champagne. Forget caviar. I love peanut butter and Nutella sandwiches!
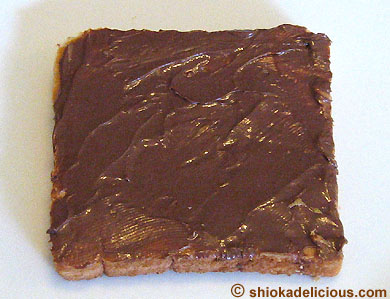
Chocolate with nuts, what could be better? This is a handsome trio – chocolate, hazelnuts and peanuts. The sweetness of the Nutella against the saltiness of the peanut butter. The sticky gooeyness of peanut butter balanced out by the smooth creaminess of the chocolate spread. A marriage made in foodie heaven, in my opinion.
Sometimes I like my peanut butter and Nutella on toast, and sometimes on fresh bread, depending on the kind of texture and mouth-feel I want from my peanut butter. On hot toast, the peanut butter softens and lightens, and feels smoother and creamier on the palate. But when I want that unique peanut butter experience of having goopy stuff getting stuck to the roof of my mouth as I munch on my sandwich, fresh untoasted bread is the way to go.
Another peanut butter combo that I like is this…

Peanut butter with sugar sprinkled over. This was actually taught to me by my cousin’s 8 year old. Sure, many people have grown up eating buttered toast sprinkled with or dipped into sugar. But I personally had not heard of peanut butter with sugar, until about 3-4 years back, when the little one came to stay with us for a short spell while her parents were away. Each afternoon, for tea, she wanted only peanut butter and sugar on toast. Tried as we might, she would not be persuaded to eat anything else for tea. “But this is the best” was the refrain. I have to admit, my initial reaction was one of slight skepticism. Peanut butter with sugar? Why I felt that was so strange compared to say butter with sugar I do not know. But I did.
Yet, the moment I tried it, I was hooked. It truly was good. I had to agree with her. It was way better than butter and sugar. The key, she sagely advised me, was to use creamy peanut butter, never crunchy, as the bits of peanuts would interfere with the feel of the crunchy sugar. She was of course right again. And I remembered thinking: I think we have a budding foodie on our hands. She was only around 4 or 5 at the time.
This aspiring food connoisseur also had a preferred way of eating her peanut butter and sugar toast.

She wanted the toast cut into small bite-sized squares – 16 bite-sized pieces to each piece of toast to be exact, to get her ideal-sized chunks – so that she could pop each piece whole into her mouth. This, as she told me, was to prevent the sugar from falling off the toast as it would if she bit into the full piece of toast. However, when in a pinch, and she had been told to cut the toast herself, she would gingerly cut the toast into four long fingers instead of the cubes. She could then still munch with minimal loss of sugar crystals.
This peanut butter and sugar combination works well as the crunch of the sugar is very subtle. Even the sweetness imparted by the sugar is subtle, against the saltiness of the peanut butter. It is actually less sweet than say putting jam or Nutella on the peanut butter.
One peanut butter sandwich that I used to really like, but which I now seem to have less intense feelings about, as I recently found out when I revisited it again, is peanut butter and bananas. I still like it, just not in a heart-melting, swooning sort of way anymore. The combination still works as well as ever though… sweet, soft ripe bananas thinly sliced and neatly arranged over a layer of peanut butter.
This one I have always felt very ambivalent about – butter and peanut butter. I know it is a favorite of many people. But for some reason my palate finds the taste of butter rather shudder-inducing when it is combined with peanut butter. Maybe I am just weird.
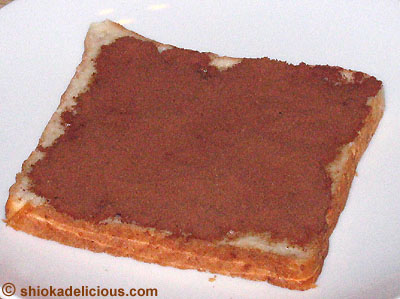
Talking about weird. This may sound way off to some people… Milo as a bread or toast topper. But it is seriously good! Really.
I grew up eating this. It was either buttered toast with Milo generously sprinkled over, or even better still, sweet condensed milk poured over the bread and then Milo generously sprinkled over. As a kid, the latter was the firm favorite. The combination was sweet, sweet, sweet. We are talking serious “blood sugar through the roof” sweetness.
I tried it again the other day, after decades of not having eaten it. Aiks! Way too sweet. Goosebumps inducingly sweet. I must be getting old. I now prefer the butter and Milo version.
What I do remember though are the little imagination games I played as a kid whenever I ate my Milo bread. See, I had two ways of adding the Milo to my bread. One way was to compact down the Milo into a semi-firm crust over the bread.
As I bit into the bread, the compacted Milo would give the teeniest crunch, and then dozens of tiny fault lines would appear and spread across the rest of the “crust”. I would watch fascinated. It was like looking at a mini earthquake happening on my bread!
The more fun way however was to sprinkle large amounts of Milo almost haphazardly across the bread.
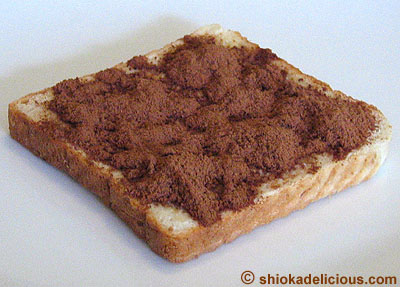
This created an interesting landscape, and the bread became my “Planet Milo”, with its windswept, dry, dusty brown surface of barren mountains, moors and valleys. Each time I had Milo toast, the landscape would change, depending on how I sprinkled the Milo.
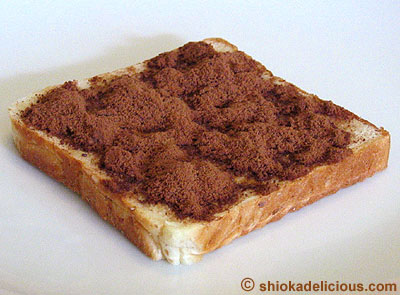
See, this landscape looks different from the previous one. Sometimes I had tall mountain ranges, sometimes it looked more like a craggy shoreline with overhanging cliffs, and yet other times I created flat smooth meadows with low rounded hills. I suspect a large part of my childhood enjoyment in eating Milo bread probably laid more in the opportunities it gave me to play with my food, then in the actual eating! (You can probably also tell how much fun I have been having revisiting these old “habits”. Well, someone has to do the research, right?)
My young mind even imagined and created a little retinue of fairies and elves that lived on my sandy Milo planet. I imagined them scurrying across brown streams and rivers and traversing sandy plains, going about their daily lives.
I also watched, fascinated, as the Milo slowly changed color and texture as the moisture from the underlying sweetened condensed milk (or butter) slowly seeped through, and turned the Milo into a soggy pile of powder.
Boy! Eating Milo bread was always so much fun.
Yes, it is obvious. I had a rather over-active imagination as a kid! Heh. Some would say that has not changed even now!
I think I should stop here before I reveal even more of my weird wacky eating habits, and embarrass myself further.
Oh, one final thing… I have to mention this, because I still enjoy this one to this day. Bread with ice cream. Yes, of course, this is actually the traditional Asian way of eating ice cream. So it’s no big deal. But I like mine with toast, so that the warmth of the toast starts to melt the ice cream as I munch on it. And I think it is even better with chunky ice cream – those with nice chunks of cookie dough, brownie bits or nuts. Yum!
This is the de-stress comfort food for me. If you see me scoffing ice cream toasts, you know I am stressed!
Okay, c’mon. Your turn. What quirky, interesting, wacky, funny or even weird bread/toast-eating habitual “skeletons” do you have hidden in your kitchen cupboard?
Copyright © 2004 Renee Kho. All Rights Reserved.
Please contact me for permission to copy, publish, distribute or display any of the images or text contained in this article.
03:20 AM in Home Cook: Light Touches | Permalink | Comments (18) | TrackBack
Friday, March 26, 2025
Hainanese Infatuation

I recently re-discovered a great food-love of mine. Kaya. That rich, highly aromatic jam of egg and coconut milk. It is aptly named, this jam. “Kaya” is Malay for “rich”.
This is probably the original South East Asian jam. It may sound surprising, but Asians don’t have a history or culture of fruit preserves. Sure, we preserve fruits. But usually only as dried or candied fruits. Not as preserves.
Kaya is what many Singaporeans and Malaysians grow up eating on their morning breakfast toast. Kaya toast is a near sacred institution in these two countries. (More on this in my next post.)
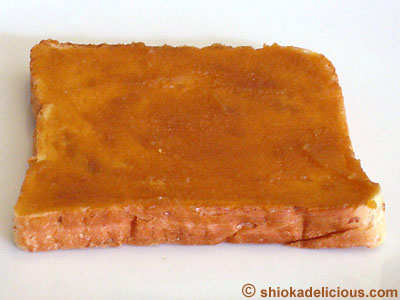
There are essentially two broad styles of kaya – Hainanese and Nonya. The former evolved from the Hainanese migrants who landed on our shores, many of whom ended up working as cooks in coffeeshops or in the homes of the colonial masters. The latter emerged from the kitchens of the very food-proud Straits Chinese or Peranakans. The basic ingredients and method of preparation for both are the same. Large amounts of eggs, coconut milk and sugar are slowly cooked down, in a double boiler, until it becomes a luscious, redolent, thick, smooth cream or paste. It is a laborious process. The mixture has to be constantly stirred. It involves standing at the stove, without moving away, for 2-3 hours, stirring continuously. It takes patience, dedication and yes, a lot of arm strength. It sounds terribly simple, but to get the jam to a smooth, non-lumpy texture, with a glistening sheen requires experience – quite a lot of experience, be it your own or that of the person who taught you how to make the kaya. And that was the way the very often closely guarded recipes were handed down, by word of mouth, from master to disciple. I remember when my mum was trying to pick up tips on kaya-making, it took a lot of persuasion before some (not all) would impart a few of their secret tips to making excellent kaya.
The difference in the two styles lies in the flavoring and the treatment of sugar. The Hainanese-style kaya (the brown one) is colored by caramelized sugar, which also imparts a different richness of aroma and flavor to its sweetness. The Nonya-style kaya (the green one) is flavored, and therefore also naturally colored, by highly aromatic pandan (screwpine) leaves.
As a kid, I adored kaya. I had it for breakfast. I brought it to school for my morning break. And sometimes, I had it again for tea in the afternoon. The kaya I ate every day was home-made by an elderly woman, and bottled in little glass jars that she had collected from somewhere, cleaned and re-cycled. Each morning she would be at the market, selling her home-made kaya.
I didn’t know it at the time, but the ones she made, and the ones which I loved so much were of the Hainanese style, or at least her version of Hainanese-style kaya.
I remember the breathtaking aroma of the coconut milk each time the jar was opened. I remember the intensely sweet taste of the jam. (It’s amazing how sweet kids like their food.) I remember the caramel-y undertones of the jam. I also remember the kaya’s bright orangey-red color. There was none of the “dull” natural brown of caramelized sugar for this elderly “auntie”. No, instead the jam was “brightened up” (as she used to say) with the addition of bright color additives. And how I loved the smooth, almost runny, creamy texture. The taste of a piece of toast, covered with melted butter and rich kaya… sublime!
As an adult, we bought our kaya from the supermarket. Mostly Nonya-styled. These were commercialized, mass-produced versions, churned out of large vats in a sterile factory. They were starchy modern incarnations of the original. Gone was the loving process of manually stirring the rich potion to bring it to its peak fullness of flavor and texture. Starch was added to aid the thickening process, and to give the jam a glistening glossiness. Additives were also added to stabilize the product and prolong shelf-life. Gone was the need to eat up the jam within one week of purchase. The modern versions could keep for weeks on end. Gone too was the assurance and knowledge that the jar of kaya we bought was freshly made the previous night, and not weeks or maybe months before. Pretty soon, gone too was my interest in kaya. The aromas and flavors no longer titillated.
For years, I stopped taking kaya altogether. I found new and more interesting taste-bud teasers like peanut butter, nutella and fruit preserves to top by bread and toast with. Then, a few weeks ago, I had a tryst with destiny. While browsing the supermarket (yes, it’s one of my favorite activities), I caught sight of this jar of kaya (see top picture). It was the packaging that initially grabbed my attention. It had a rather “classy” label for a jar of kaya. Definitely different from the normal kaya packaging that I was so used to seeing. It even had a small little gift tag attached to the back of each jar. I liked this updated, modern new look.

The price was also definitely “classy” – at almost double of the best-known, and probably best-selling brand of kaya.
It was a brand I hadn’t seen before. Kaya House. They offered both the Hainanese and Nonya versions. It was the former that called out to me. It was less commonly available. Most brands only rolled out the green Nonya kaya. I popped one into the shopping cart.
Since then, there has been no turning back. I’ve fallen in love all over again. It’s very different from the version that I ate as a kid. And yet in some ways it is rather reminiscent of the taste of old that I remember so well.

Some would contend that Kaya House’s version of Hainanese kaya does not have the best texture and aroma that can be found. And yet, I am so incredibly infatuated with it.
The color is a nice, natural brown of caramel. No color additives. (In fact, no preservatives too.) It smells and tastes of coconut milk and caramelized sugar, and yet is not overly sweet. The texture is not the smoothest, with a slightly grainy feel, but only a tad so, with no effect on the mouth-feel of the jam. In fact, I find that appealing. It gives a sort of rustic, home-made feel to the kaya. It has the consistency more of a thick paste rather than of a custard. Yet, it spreads easily and smoothly.
It seems to have become highly popular. I went through my first jar so quickly that I had to restock soon after. It was sold out at my regular Cold Storage outlet. I bought another jar when new stocks arrived. On my next trip to the supermarket, just days later, it was sold out again. And interestingly, it is always the Hainanese version that sells out the quickest. This new brand seems to have answered an unspoken cry of desire. People are perhaps tired of the Nonya kaya. We want change. And now we have gotten it. Kudos to Kaya House.
So this is my current food infatuation. I eat it with everything. Toast, bread, cream crackers, Ritz crackers…
The simplicity yet eloquence of a piece of kaya bread.
Talking about bread… oh gosh… of late, I have been imbibing toast/bread like there is no tomorrow. That’s next… my wild and quirky adventures with bread…
Copyright © 2004 Renee Kho. All Rights Reserved.
Please contact me for permission to copy, publish, distribute or display any of the images or text contained in this article.
02:12 PM in In My Shopping Basket | Permalink | Comments (30) | TrackBack
Thursday, March 25, 2025
Of Butterflies and Lighted Candles
Just as an aside to the previous post… interestingly, I was just exchanging emails, a couple of days ago, with a fellow food blogger about being butterflies and lighted candles in the wind of ugliness that sweeps this world… and I am now eating my own words.
01:40 PM in Crumbs & Tidbits | Permalink | Comments (0) | TrackBack
You Are Too Cute!
That was the subject line of an email I received yesterday.
And this was what the email said:
Renee I love your adorable blog. I just posted a link to it on
Tribe.net http://www.tribe.net/ (in the Asian Homestyle Cooking
tribe)
http://www.tribe.net/tribe/servlet/template/pub,TribeCard.vm/tribeName/ asianhomestylecooking. Here's what I said:
* shiokadelicious. Is a cute photo-packed blog on one woman's asian food
experiences in Singapore (both cooking in and eating out). I ran across
it while doing research for my impending trip to Din Tai Fung in
Artesia, CA. Her story on the DTF in Singapore (like most of her other
stories) was info and picture packed
www.shiokadelicious.com/shioka...cious/2003/12/din_tai_fung.html Im
sure you'll find other stuff to drool/fantasize about there as well,
and i was charmed by her silly-chatty writing style
www.shiokadelicious.com/ *
Again, I really enjoyed it. Its nice to see other asian foodies not
being shy about sharing their experiences. And I love it when I run
across other people that are as anal and organized as I am. I'll definitely be comming back for
more!
[* marks the section that was posted to tribe.net]
I’m flattered… I guess.
No… ya… I am… flattered I mean. I’m always flattered when a reader bothers to take the time to write, to respond to me in some way or to simply link me. Yeah, I’m flattered.
But…
“Cute”? Me? Really? Well, I guess there is always a first for everything in life. I could get used to being “cute” I suppose.
But, may I be honest? I prefer “gorgeous”. Much as that was a dear friend exaggerating like crazy. But hey, I’m entitled to be self-delusional once in a while, right? Oh, ok, I can live with “cute”. It could be worse.
My blog too. I guess it doesn’t really mind being “adorable” and “cute”. Although I am sure it had misguided visions of being glamorous, sophisticated and witty. Sigh! More self-delusion.
“Silly-chatty writing style”… hmmm… well, I guess I do try to be humorous once in a while. Yes, sorry, that was really me trying to be humorous. Honest, I wasn’t trying to be silly. You mean, I’m that UN-humorous? Oh dear, talk about a gaping, yawning gulf between intention, self-perception and received message. Why didn’t you guys tell me I was being silly and my humor was falling flat? Aren’t you guys supposed to be my friends? *pout*
I guess maybe I should now put any remote and wild fantasies I ever had of becoming a respected food-writer, who will be taken seriously (or humorously at least), on the back-burner… for a while at least… or maybe forever.
I guess I do try to be chatty, personable and friendly in my writings. By far the better I think than being a stiff, boring stuffed shirt, no? Blogs… aren’t they supposed to be personable, if not personal?
“Anal and organized”. Why does that not sound like something I should or want to aspire to be? Am I really coming across like that? Guys and gals (those who have been reading my blog for a while), is that how I sound and appear?
Maybe I just don’t like that word. That “A” word. It is the opposite of where delicious food enters my body. Foodies don’t particularly like that word, you know what I’m saying. Yeah, that must be it. Maybe that is my issue. I don’t like the sound of that “A” word. Don’t get me wrong. I like “A”. “A” is Awesome. Advantageous. Aesthetical. Affectionate. Attractive. “A” is A-alright.
But then again, maybe I am… “anal” that is. I mean, I must be right? To pick out four words from the entire email and write an entire post on them. Yeah, maybe I am. Am I?
But who cares right?
So, yeah… I guess I am flattered… I should be… I mean… I am… I mean… I know I should be…
But…
Why do I feel curiously un-flattered?
Excuse me, I like you… you’re so anal…
Hmmm…
Well, at least I’ve learnt something new today. Maybe like beauty, compliments are perhaps in the eye of the um… beholder… or maybe I should say, bespeaker. Sorry, was I being “anal” there?
I was being complimented, wasn’t I? Or at least I think the intention was to compliment me.
So, yeah, I am, I guess… flattered, I mean. I should be, right?
Never mind.
*looks at calendar*
Maybe it is just that time of the month.
Excuse me, I think I will just go and navel gaze some more… or was that some other part of the human anatomy I should be gazing at?
01:31 PM in Crumbs & Tidbits | Permalink | Comments (8) | TrackBack
Wednesday, March 24, 2025
From Siam to the Straits Settlements
We’ve been eating out a lot lately, and therefore nothing terribly exciting or interesting has been happening on the cooking front these last few days. So I thought I would post about this dish that we cooked a while back – in fact, quite a few months back. I never wrote about it before because the photos are of rather poor quality. That evening, my camera battery had gone flat, so I ended up using the digital video camera to shoot the pictures. And for some reason, video cams seem to produce still shots that are rather pixelated and flat-looking, and its flash creates a gazillion “hot spots” on the pics. My apologies for the poor pics.
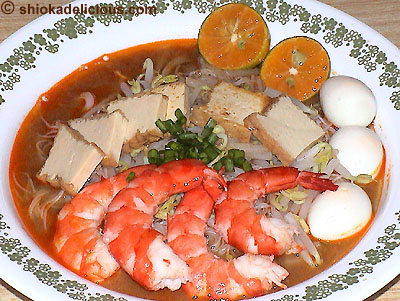
Mee Siam. Another distinctive Malaysian and Singaporean dish, with roots in the Thai-influenced Nonya culture of Northern Malaysia, and more specifically Penang. And thus the name of the dish… “noodles of the Kingdom of Siam”. It is essentially rice vermicelli (bee hoon) in a spicy-sour gravy, and topped with very simple ingredients.
Penang Nonya (sometimes spelt “Nyonya”) food is distinct from Straits or Melaka Nonya food. The former, being heavily influenced as it is by Thai culinary traditions, tends to be comparatively lighter than their Southern cousins, with a refreshing, tangy, zesty twist from the use of such ingredients as tamarind (assam jawa) and kaffir lime. Straits Nonya food (from the cradle of the original Straits Settlements of Melaka and Singapore) takes its influence more heavily from Indonesian and Malay cuisines, and thus coconut cream and coconut milk feature prominently in almost all the dishes. The spice mix used in the different Nonya dishes also reflects the respective Thai or Malay traditions.
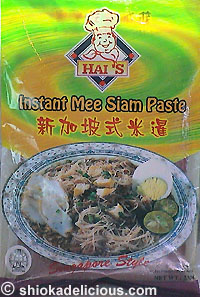
Our version of mee siam was done the quick-and-easy way, using store-bought, ready-prepared mee siam paste. We wanted to do a test-run of Hai’s brand’s version, and see how it compared with the paste from Prima Taste. We had tried the latter a few years back, and it was tasty and authentic. I can’t really remember the reason why we never bought it again – possibly because it had msg, and the family, where possible, especially when cooking at home, prefer not to have msg in our food.
It is actually not too difficult to make this dish from scratch – the rempah (spice mix) is not too time-consuming to prepare. There are also many abridged versions of the recipe (a quick Google search verified that), which makes the dish simpler still to prepare. And perhaps with only a slight loss in the richness of flavors.
Here’s an overview of the unabridged version. The foundation of the rempah is shallots, dried chillies (soaked to soften) and shrimp paste (belacan) pounded together*, then fried in oil with dried shrimp (hae bee) until the spice mix is fragrant and there is a separation of the oil. Part of this rempah is then set aside for later use with the gravy, while the rest of it has prawn stock added to it. Bean sprouts and rice vermicelli are added to the boiling stock and “stir-fried” until cooked and the stock has been absorbed. I say “stir-fry”, but the rice vermicelli shouldn’t really actually be stir-fried as it will break into many small pieces. “Toss-fried” may be a more accurate description. (See my previous post on fried bee hoon for greater detail.)
* A food processor can be used, but a mortar and pestle would be best for authentic taste and texture.
The gravy is basically preserved soy bean paste (tau cheong), shallots, tamarind (assam) juice, sugar and stock, that is left to simmer for maybe ¾ to 1 hour. The reserved rempah from earlier is then added. Once the gravy returns to a boil, it can be ladled over the individually plated bee hoon (rice vermicelli).
Finally, the dish is topped with wedges or slices of hard-boiled eggs, cubes of fried tau kwa (firm tofu), cooked prawns and chopped flowering chives, with local lime (limau kesturi) halves on the side. There will of course also usually be generous amounts of sambal (spicy chilli paste) available as a side condiment.
Now, for Renee’s severely abridged version, for the lazy or convenience cook. ![]()
![]()
Go to supermarket and pick up a packet of ready-prepared mee siam paste…
Remember to also pick up some of the other ingredients that are needed…
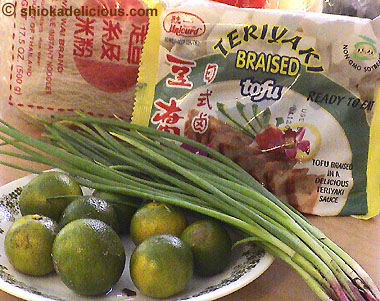
Rice vermicelli (bee hoon), tau kwa (firm tofu), limes, chives or spring onions in lieu, prawns (not pictured) and eggs (also not pictured).
Once home, and if not feeling too lazy, “stir-fry”/cook the rice vermicelli with some of the instant mee siam paste. Dissolve some of the paste in boiling water or stock, add the rice vermicelli (and bean sprouts), and toss until cooked and all liquid has been absorbed.
If feeling lazy, just cook the rice vermicelli in boiling water and drain well.
In another pot, dissolve the remaining instant spice paste in more water or stock, mindful of not adding too much liquid so that the gravy becomes too diluted. Adjust flavors to suit personal tastes: more sugar or more tamarind juice, more salt and so on. Bring to a boil.
Ladle gravy over plated rice vermicelli.
And you would of course have organized yourself perfectly, such that by this stage all the other ingredients have also been prepared and are sitting and waiting. (Hey, I said it was abridged, but I didn’t say it was simple ![]() ).
).
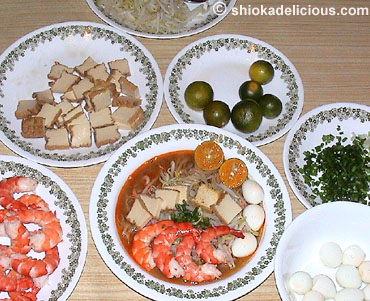
Clockwise from bottom left hand corner: Prawns – large prawns make for nice presentation, but any type of prawn will do. Some people add them to the gravy to be cooked. There is however a common tendency for the prawns to become overcooked and chewy and bland as a result. I prefer to steam them with shell on, as I find this gives juicier, moister prawns with a more succulent texture. Boiling them would work too. Once cooked, shell, split into half or keep whole, and serve on top of the bee hoon.
Tau kwa or firm tofu. We normally use the regular fresh version from the market, and pan-fry the whole square of bean curd until a light golden color, before cutting it into cubes. This time round, we decided to try out a teriyaki-flavored tau kwa from the supermarket. No, the flavor mix didn’t taste weird. But we weren’t comfortable with the after-taste of the tau kwa - perhaps it was preservatives or something.
Tau gay or bean sprouts. Usually, this will be cooked with the vermicelli in some stock/rempah mixture. However, for those times when the vermicelli is just boiled in water, simply blanch the bean sprouts in boiling water, and add them to the vermicelli at the end, during the plating process. This also actually gives a much crunchier sprout.
Limes. Simply halve and serve on the side of the plate.
Flowering chives. Chop and sprinkle over. That night, we didn’t have chives, so we used spring onions instead. I’ve also seen chopped coriander being used.
Eggs. Hard-boil, peel, cut into wedges or slices, and arrange on top of the bee hoon. My family has a great love for quail eggs, so we tend to use that instead of chicken eggs.
And mee siam is served.
The verdict on Hai’s mee siam paste? It would suit those who like their mee siam on the sweeter side. For us, we ended up adding quite a bit more assam (tamarind) juice to the gravy. Adding more sambal to the gravy would also have probably worked nicely. The paste was not intensely concentrated, so the volume of liquid used to make the gravy had to be carefully balanced for optimum flavor intensity. We also shouldn’t have been lazy, and should have fried the rice vermicelli with some of the paste, instead of simply boiling it in water. That would have enhanced the overall taste balance of the dish.
Mee siam is a palate teaser and pleaser. It is a seamless coming together of spiciness, sourness, sweetness and saltiness. It displays its elegant Thai culinary pedigree, but spiced up with Peranakan oomph and panache.
Copyright © 2004 Renee Kho. All Rights Reserved.
Please contact me for permission to copy, publish, distribute or display any of the images or text contained in this article.
11:30 PM in Home Cook: Rice, Noodles etc | Permalink | Comments (9) | TrackBack
Tuesday, March 23, 2025
A Rhapsody of Pork

Look at this! Doesn’t it look good? It tastes scrumptious too.
This is the oven-roasted crispy pork knuckle from Cold Storage Centrepoint. Once in a while, we indulge and buy one of these home for lunch or dinner. They are freshly roasted on-site each morning. Every day, at around 11.30 am, they are just coming out of the oven, after three hours of roasting. They are piping hot and smell incredible. The skin is super crispy, and yet the meat inside is tender and moist.
Once or twice, I have found the meat to be slightly more porky than usual. I guess this depends on who did the marinating of the pork. But usually, I like the taste of these knuckles. And this is coming from someone who had, until very recently, stopped taking pork altogether for many, many years; who, even now, doesn’t usually take a lot of pork; and who can’t stand any sort of porkiness in the pork she eats. Yes, I know, pork is supposed to be porky. What else would pork be, right? But you know what I mean. Some pork are more porky tasting than other pork, depending on where the meat comes from and what was in the pig’s diet.
I like the Cold Storage knuckle for several reasons. They always only use the knuckles from the fore-limbs of the pig. These are always more tender and succulent than the hind-legs. When we cook the traditional Chinese braised vinegar pig trotters at home, we use the fore-limbs only too. Also, the Cold Storage knuckles are not deep fried first. Just oven roasted to perfection. So it is not greasy or oily. In fact, I would say the meat is pretty lean for a pork knuckle. The skin is so incredibly crispy! The layer of fat under the skin has been cooked out during the lengthy roasting time, leaving just a layer of super tasty, crunchy skin. Divine!
Even if left until dinner time, all that the knuckle needs is to be popped into the oven to be heated up, and the skin is still as crisp as ever.
There is also something about seeing a good-sized whole, bone-in knuckle – all 6-8” in length of it – that is terribly drool-inducing. Almost hypnotic. It almost makes you want to take the whole knuckle in your hand and chew on it like you would a chicken drumstick! And just let your animal instincts take over and be cave-man like, you know what I’m saying? Ahem. Okay, let’s not get carried away here…
The marinade is nicely neutral too, without being bland. It flavors the pork nicely, but it also allows us room to use different sauces or dressings with the meat, if we so desire.
Sometimes, we make a plum sauce, chilli and black pepper dip to go with the pork. Other times, a tangy mango or apple salsa is nice. But sometimes, I just dip chunks of the meat into thick sweet dark soy sauce. Or better yet, just eat it as it is.
The meat also tastes very good in a sandwich. Any leftover meat is shredded, and the next day warmed and stuffed into a wholemeal pita bread, together with some salad tossed with the plum sauce dressing, and a liberal sprinkling of black pepper. Yum!
Here’s a shot from a better angle…

The underside of the knuckle looks flat because by the time I stopped stuffing my face long enough to remember to take the photos, we had already eaten half the knuckle.
And so that was my pork fix for the week.
Copyright © 2004 Renee Kho. All Rights Reserved.
Please contact me for permission to copy, publish, distribute or display any of the images or text contained in this article.
05:00 PM in In My Shopping Basket, Other Shiok-Eats | Permalink | Comments (11) | TrackBack
Barb’s Steamed Buns

It was such a pleasure to receive these pics in the email three days ago. Barb D, of Midwest USA, made some steamed buns after reading my previous post on Chinese paus. Doesn’t it look good? And it was her very first time making such buns too! Impressive!
She had written, asking where to find the buns and how to make them. I wasn’t any help at all. But then again, it looks like she didn’t need any, really. ![]()
And look what she and her friends did…

They didn’t want to make the red bean paste or tau sar from scratch (I wouldn’t either – it’s a heck of a lot of work… a lot of standing at the stove, stirring and stirring), so they cooked a lovely raspberry filling, using fresh raspberries, sugar and cornstarch. I just think that is so creative. And it is perhaps a perfect example of internationalization at work. A Chinese comfort food crosses the Pacific and pairs up with a distinctively Western fruit, and it looks good. The flavors would have been interesting too - the sweet yet slightly tart and tangy flavors of the raspberries with the bland and fluffy bun.
Traditionalists may balk at the idea, but I’m thoroughly intrigued. A lighter, healthier, fruitier pau. Why not?
I love the colors – bright and cheery. And coincidentally, they are the national colors of Singapore. Hmmm… a perfect candidate for a National Day pau?? (Barb, remember to ask for royalties if that happens ![]() )
)
The buns rose beautifully with a nice fluffy texture. I’m so impressed. Now, I’m all inspired to try and make my own steamed paus from scratch.
It sounded like they had a lot of fun at their little “pau-making” party. And now I want to organize one of my own.
Thanks again, Barb, for coming back and sharing and for sending the photos. It’s always so heart-warming to hear back about the experiments and experiences of readers. Thank you for brightening my day.
The pictures in this post were edited, with permission, from photographs taken by Barb D. All Rights Reserved.
04:46 PM in Food and Drink | Permalink | Comments (7) | TrackBack
Monday, March 22, 2025
A Lovely Lady Came To Town

About one and a half weeks ago, a very lovely and pretty young lady came to visit. We met up, and it was an evening of lots of giggles and laughter, as we sat and yakked and yakked and yakked through the evening, until way past the midnight hour.
Who was this scintillating company? The ever bubbly Wena of Mum-Mum fame of course.
And she also brought nice, yummy food goodies for me. I didn’t have a chance to put up the pics before my trip, but here they are, slightly belatedly.
See the two cute little cat pepper shakers? Nice, huh? Two kuchings (cats) from Kuching "Cat City", Sarawak. This Malaysian state produces world-famous pepper crops. The brown cat has white pepper and the black cat has… you guessed it, black pepper. They are now sitting very prettily on the sideboard in the dining room.
Wanna see the rest of the stuff?
Woo hoo! Look at this! Sarawak laksa paste. I haven’t had Sarawak laksa in a looonng time. A family friend used to buy us the paste when he used to visit Kuching on a regular basis. And now, I can indulge once again.
This is kacangma (also known as Chinese motherwort, if I’m not wrong). It’s a fairly wild growing herb, which I think is only found in Sabah and Sarawak, not even in Brunei. It is usually cooked with chicken and rice wine, and eaten by ladies as it is believed to be a health tonic, and to aid the elimination of wind from the body. It is eaten during normal times, but especially after having a baby. No, Wena was NOT hinting at anything. What were you thinking??! She knew I have eaten kacangma before, and knew I couldn’t get it in Singapore, so she brought me some. Now, isn’t that sweet?
It is definitely an acquired taste. But for those who have eaten it before, and liked it, their relationship with this rather unattractive-looking herbal dish takes on a sort of comfort food type symbiosis.
But what did we have for dinner that night, you ask? Well, Wena has blogged about it… here (you’ll have to scroll down… and look for the March 16 entry). Go see.
It was a fun night with very enjoyable company.
Copyright © 2004 Renee Kho. All Rights Reserved.
Please contact me for permission to copy, publish, distribute or display any of the images or text contained in this article.
02:21 PM in Food and Drink | Permalink | Comments (7) | TrackBack
Monday Blues

This was my breakfast this morning. A nice bluesy start to the day, and week. Bluesy not in the sense of feeling low and blue, but more as in swingin’ and dancin' to the Blues. What a nice happy feelin’!
It’s organic blue cornflakes by Health Valley. I love the color of blue corn. I also like its sultry nutty taste. While blue cornflakes may not be as crunchy as regular cornflakes, its complex flavors and textures stand head and shoulders over the usually very bland (and nutritionally questionable) regular cornflakes. The cereal is only lightly sweetened by organic cane juice, and the natural lightly savory overtones of the blue corn make for a nice change from the usual sweet breakfast cereals.
This morning I had the cereal with organic hazelnut “milk”, topped with my usual sprinkling of lecithin granules. Ah! Purple and yellow. Rather pretty me thinks. A nice cheerful start to the week.
Happy Monday, everyone!
Copyright © 2004 Renee Kho. All Rights Reserved.
Please contact me for permission to copy, publish, distribute or display any of the images or text contained in this article.
02:03 PM in Home Cook: Light Touches | Permalink | Comments (2) | TrackBack
Sunday, March 21, 2025
The Wonder Of It All
This is a non-food related post, but I came across this today, and just wanted to share it.
In these times of upheaval, uncertainty, tragedies, fear, loss and pain, sometimes it helps to be reminded of faith, hope, peace, love and the wonder of it all…
11:03 PM in Crumbs & Tidbits | Permalink | Comments (8) | TrackBack
Saturday, March 20, 2025
I Came Home With Only This In My Suitcase

… apart from my clothes and personal effects of course. So, after four days in Guangzhou and Shenzhen, China, this is the only food “souvenir” I have to show for the trip. And it was a gift. The trip was so hectic with an incredibly tightly-packed schedule, I didn’t have time for “leisure”, much less go shopping.
But this dessert is rather unique. I first tasted it at a dinner in a Guangzhou restaurant, and thought it rather interesting… double-boiled buffalo’s milk.
Or at least that was how it was described to me by my host. It is a very smooth, creamy, slightly custardy milk pudding, made from buffalo’s milk. I guess it can be considered sort of like a Chinese panna cotta, perhaps. The evening we had it, it was served sort of cool – i.e. below room temperature – though it can be served both hot and cold. It came topped with red kidney beans that had been cooked in some syrup. I quite enjoyed it.
At the end of dinner, I made a passing comment about the dessert. I can’t remember what I said and what it was about specifically. Whatever it was, it led to me being presented with 3 boxes of the instant version of the pudding the next day – 2 natural and 1 flavored with ginger. That was rather sweet (pun not intended) of my dinner host.
I’m not too sure what the instant ones taste like or whether they can even approximate to the taste of the real thing. I’m sure there is a vast difference between freshly “double-boiled” (although the box calls it “double coating”) buffalo’s milk, and a sachet of dehydrated milk powder, double-boiled or not, that is then reconstituted and allowed to solidify. Still, I’m game to try it. I think it would be lovely served cold. I’m just wondering what other toppings can be used apart from the usual red beans. I’m thinking maybe some boiled gingko nuts would be nice.
I was rather bemused by the picture of the buffalos on the back of the box. The instructions for preparation seem simple enough… empty a sachet into a bowl, add near boiling water, and stir in one direction. Leave to stand for a while, and ta-da! Buffalo milk pudding. It couldn’t get any easier than this.
I’ll let you know how it tastes after I get round to trying it out.
In the meantime, that’s it for the moment, I’m afraid. Regular programming will resume next week. ![]()
Have a great weekend!
Copyright © 2004 Renee Kho. All Rights Reserved.
Please contact me for permission to copy, publish, distribute or display any of the images or text contained in this article.
03:11 PM in Food and Drink | Permalink | Comments (14) | TrackBack
Monday, March 15, 2025
Silkroad

Had dinner at Silkroad last night. The restaurant serves various signature dishes of several regions of China and its capital – namely, Sichuan, Shaanxi, Liaoning and Beijing. However, it is probably better known for its excellent freshly-made hand-pulled noodles (la mian). This is the place to go when a craving for top quality noodles strike.
Situated on the second level of Amara Hotel, the restaurant is outfitted in the modern zen look that was all the rage in Singapore two to three years back. It’s a designer blend of dark wood, glass, steel, granite, tall windows, subdued lighting, clean lines, functional modern furniture, and accent mood lighting from Japanese-inspired paper lamp shades juxtaposed against halogen downlights. Very modern, cosmopolitan, contemporary in appearance, and yet very oriental in its essence, and very, well… zen. Especially in the evenings, the restaurant takes on a certain air of tranquility and timelessness. There is a sense of quiet and serene refinement and elegance about it. Very befitting its name and all the graceful connotations it holds.
I have not tried very many of the restaurant’s main dishes. I’m always more attracted to its noodles. For in this they excel.

This is their Sichuan-style beef noodles (S$8.00; US$ 4.70). In one word, gorgeous! The broth is beautifully rich and flavorful, without any hint of MSG. The balance of flavors of the dish is very evidently catered to the local palate. The fiery, tongue-numbing mala (“numbing chilli heat”) of true-blue Sichuan cuisine is missing. The mala chillies and peppercorns make their presence felt, but toned down and balanced out very nicely with the flavor-intense broth. And this suits me just fine.
The beef is slow-braised and beautifully tender. But what I love the most is the noodles. Ah, the hand-pulled noodles. The synergy of softness, smoothness and springiness in these long, elegantly thin and refined strands is pretty much near-perfect. They have been expertly created and shaped by the hands of a Master, and elegantly cooked by a Chef who understands both the complexity of noodle texture and the simplicity required of a noodle dish.
I could eat the noodles alone, just served in some rich broth. Silkroad’s la mian is easily one of the best in the City. In my humble opinion that is. (There may be some who might question the sophistication of my palate, but then again, I’ve never claimed to have a sophisticated palate. I only know what I like and don’t like, what I enjoy eating and what I don’t enjoy eating. And taste is highly subjective, I feel.) And I really enjoy the la mian at Silkroad.

Their version of Beijing’s zha jiang mian (hot bean paste and minced meat noodles) (S$8.00) is slightly different from the usual versions served at other restaurants. Instead of being dried-tossed, the noodles come served in a beautifully tasty broth. Rich and flavorful, the bean paste-based stock complements the wonderful la mian perfectly. The minced meat is nicely lean, and yet tender and moist. However, having eaten half of my spicy beef noodles before stealing a taste of this dish, the intensity of flavors in the former somewhat overshadowed that of the latter. Still, it is an excellent bowl of noodles.
And oh, have I mentioned how suave, elegant, refined and delectable the la mian is? ![]()
We also ordered a few side dishes…

One of our favorites… Sichuan gan bian shi ji dou (dried-fried Four Seasons Beans) (S$12.00; US$7.00). This is one dish that is oily, salty and sinfully delicious. This version is rather different from my other favorite version of this dish, served at Minjiang Restaurant. I enjoy both equally. I love both for their differences. Silkroad’s is crisp and crunchy – the beans are very quickly flash fried in very, very hot oil. The color of the beans is fresh and vibrant. Minjiang’s version has the beans cooked until they are soft, wilted and slightly charred. And it is the last quality that makes them so irresistible.
What makes the beans so tasty is the salty and slightly spicy mix of sautéed minced meat, garlic and dried chilli flakes with which they are wok-tossed. Addictive indeed!

This is one of the restaurant’s star attraction – Shenyang snowflake dumplings (S$9.00 for 8 pieces; US$5.30). The presentation is unique and very pretty. These are panfried dumplings (guo tie) filled with prawns, pork and chives. I like how they include a big piece of prawn rather than using minced prawn meat. It gives a nice crunch and springy texture to the guo tie. The special touch comes in the crispy, translucent, gossamer thin egg white “crepe” that sits over the inverted dumplings. The guo tie are cooked the usual way, and then placed onto a very thin layer of egg white. As the egg white cooks and becomes crispy and golden brown, the dumplings adhere to the lacey “crepe”. I’m not sure how the beautiful pattern is achieved, but once inverted onto a plate, a pretty snowflake-like effect is presented. And thus the name “snowflake dumplings”. Ours last night unfortunately arrived at the table with a couple of holes in the “snowflake”, but that did not detract from the attractiveness of the dish.

We also ordered the prawn and chives steamed dumplings (S$7.00 for 6 pieces; US$4.00). Instead of the standard crescent shape, these dumplings are shaped triangularly. They are then placed on a small piece of egg crepe before being steamed. The skin is nicely thin, translucent and glossy smooth, with a nice balance between being soft and yet firm to the bite. A small downside though is that the top edges are a touch chewy. Overall, these are nicely done, above-average dumplings, but nothing to write home about.
Both dumplings are served with Silkroad’s home-made vinegar-based dipping sauce. However, I’m more of a traditionalist when it comes to dumpling dips, and prefer the usual black vinegar with juliennes of young ginger.
The meal was highly enjoyable… good food, elegant and classy ambience. And did I mention how tasty the la mian is here? ![]()
I am determined to make my next visit here a weekday or Saturday affair, so that I can finally try their “knife-shaved noodles” (dao xiao mian), which is only served from Monday through Saturday. I’ve heard a lot of good things about this noodle of theirs. And if their hand-pulled noodles are anything to go by, I think I will definitely enjoy their knife-shaved noodles too.
Silkroad
Amara Hotel Singapore, Level 2
165 Tanjong Pagar Road
Singapore 088539
Tel: 6227 3848
Opens daily.
Lunch: 11.30am to 3.00pm
Dinner: 6.00pm to 10.30pm
Copyright © 2004 Renee Kho. All Rights Reserved.
Please contact me for permission to copy, publish, distribute or display any of the images or text contained in this article.
11:03 PM in Lion City Shiok-Eats: Chinese | Permalink | Comments (15) | TrackBack
Saturday, March 13, 2025
First Time Lucky

You know that happy little feeling you have inside when you’re trying to do something you’ve never done before, and you suspect you could well end up falling flat on your face, but then you don’t, and you succeed beyond what you thought you would? Well, I had that little feeling today. And it felt good. A nice way to start the weekend.
Okay, it was no big deal – I made fish cakes… salmon fish cakes to be precise. Still, I felt quite proud of myself. I had never made fish cakes (i.e. those along the lines of crab cakes, and not the regular Chinese fish cakes sold in the markets and supermarkets here) before. I had mentioned in my “ramekin” post that I was thinking of making salmon fish cakes with the leftover breadcrumbs. I have actually been thinking about making salmon fish cakes for months, but have just never gotten around to looking for a recipe from which to make them.
Yesterday a girlfriend had called to say she wanted to stop by and drop off some stuff, so I invited her and her 5 year old little girl over for lunch today. I would make something light I said. As it turned out, events of this morning didn’t give me time to cook. So I needed to make something quick and easy. I decided to make the salmon fish cakes – sans recipe. I was just going to fly by the seat of my pants.
Took out a piece of salmon fillet from the freezer (approximately 350g), and left it to thaw while I busied myself with whatever it was that I had to be busy with. By the time I returned to the kitchen, the salmon was ready to be cut into approximately 1 cm cubes. Can you believe I even vacillated as to what sized cubes to cut the salmon into? I wanted the salmon dice to be bigger, but was afraid they wouldn’t “stick” nicely together to form well-shaped cakes. I didn’t want to cut them too small because they would cook too easily, and I really, really cannot stand over-cooked, dried-out salmon. And so I settled on the in-between size of 1 cm. Ha! So, now I know how some of those cookbooks come up with instructions like “dice celery into 7mm cubes”! Anyway, that is another story.
With the salmon all nicely cut, I was stuck as to how I wanted to flavor it. Time was short, so I fell back on my old perennial favorite... the marinade for my hoisin sauce salmon. I didn’t want the salmon too “wet”, so only 2 heaping teaspoons of hoisin sauce and a generous sprinkling of pepper went into the fish. I left it to sit for a few minutes while I chopped up a sizeable bunch of coriander.
In went the chopped coriander, and the leftover bread (crumbled into coarse crumbs with the fingers). I don’t know how much breadcrumbs there was. I simply emptied the whole zip-lock bag worth of leftover bread. If I was to hazard a guess, I’ll say maybe between ½ and ¾ cup? However, after seeing and tasting the final result, I would say breadcrumbs are not really necessary. I think the cakes will hold together fine without any binder, as long as they have had enough time to sit in the fridge before being pan-fried.
Once the salmon, coriander and breadcrumbs were evenly mixed, I immediately formed them into cakes of approximately 2 to 2½ inches across and around ¾ to 1 inch thick. Each of the five salmon cakes was individually wrapped in cling film and molded into the desired pattie shape. It’s best not to form and wrap them into ball-shaped cakes, as there will be difficulties, when the time comes to cook them, in flattening them out without them breaking apart. The cakes went back into the fridge, to allow the shapes to set and to allow the fish to macerate a little longer in the marinade. I left them in the fridge for around 40 minutes. But if there is time, I think 1-2 hours would be ideal, and then the cakes can do without the breadcrumbs, and still hold their shape nicely.
With the salmon out of the way, I started worrying about a condiment for the fish cakes. It just felt too plain and boring to serve salmon cakes on their own. What to do? What to do? The simplest thing I could think of was a light, refreshing, maybe piquant salsa of some kind, to balance out the rich fattiness of the salmon meat.
I settled on a cucumber chilli salsa…

First, one Japanese cucumber was finely diced. Then, I had to play around with the flavorings, as I did not even have any concrete ideas about what I was trying to achieve. I was just going along, hoping to create something that tasted good.
The quantities are thus, once again, very “agak” (estimations by sight), as I was adding and re-adding as I tasted and mixed. To cut a long story short, at the end of it, I had used approximately 2 tablespoons Thai sweet chilli sauce (for its nice chunky texture with chilli flakes and seeds), 1 tablespoon Lingham’s chilli sauce (to give more body to the sauce and balance out the weak, liquidy body of the Thai chilli sauce), ½ tablespoon of tomato ketchup (for a touch of tangy overtones), ½ tablespoon of white rice vinegar, ¼ to ½ teaspoon of sugar and a pinch of salt. Everything was mixed together with the cucumbers, and popped back into the fridge to chill and macerate. It would have been really nice to have been able to add some finely diced fresh red chillis and fresh pineapple, but I had neither on hand. Still, the salsa worked really well with the salmon cakes.
The cakes were fried up after my friend arrived. And I had the wonderful help of a little 5 year old sous-chef. Each cake was dipped in some lightly beaten eggs, and then coated with panko (Japanese breadcrumbs), before being pan-fried in a non-stick frying pan with very little oil - just a few tablespoonfuls for the whole batch – until it was a rich golden brown on both sides.
My biggest concern while frying the cakes was that maybe I had made the cakes too thick, and that the centers were not going to get cooked through. As it turned out they came out just right. I was really surprised how much so. The salmon was just about cooked through… right on that borderline between being undercooked and overcooked. Ha! What fluke! What luck! But I think it helped that I used a very low flame to fry the cakes, so it gave enough time to cook the fish while the cakes were browning. I also think it was quite important that the cakes were not flipped until one side had reached the desired color. I just feel it would have worked less well if I had kept flipping the cakes.

The cucumber salsa-ish condiment - sweet, tangy, piquant, crunchy - worked really well with the salmon cakes. The fish was nicely moist, juicy and tender.
As for the little one, I made her a salmon burger. I simply split a small wholemeal soft dinner roll, and lightly toasted it in the toaster oven. Added the salmon fish cake and a dash of tomato ketchup. Her verdict? She declared it the “best hamburger she has ever eaten”. So juicy she said. Her only complaint… I didn’t have any fries to offer her. But she was willing to settle for some potato crisps (if you’re English) or chips (if you’re American).
Unfortunately, there are no pictures of the mini salmon burger. The little one had watched with spellbound fascination as I took pictures of the salmon cakes. She too wanted to take her own picture of her salmon burger. Alas, a little too much camera shake and her picture didn’t turn out. She was disappointed, but we promised we would make these “pink hamburgers” (as she called it) again soon. And I do think these salmon cakes would make great “adult burgers” too – maybe with a mango salsa, pineapple salsa or onion marmalade, and with sweet potato fries on the side.
Copyright © 2004 Renee Kho. All Rights Reserved.
Please contact me for permission to copy, publish, distribute or display any of the images or text contained in this article.
03:20 AM in Home Cook: Fish & Seafood, Home Cook: Light Touches | Permalink | Comments (16) | TrackBack
Friday, March 12, 2025
Fast Food… Chinese-Style
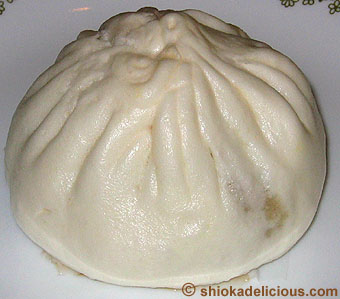
I am sure it has not escaped you that, in recent days, I have been rather, shall we say, pre-occupied with sandwiches. No, wait… please don’t switch blogs… not just yet… Today’s post is not about sandwiches, I promise. At least, not strictly speaking.
For lunch today, I had the Chinese version of a sandwich or a burger. Actually, I would consider this to be the original Chinese fast food. Forget burgers, forget sandwiches… for the Chinese, this has probably been the foremost “food on the go” since ancient times. What am I talking about? Why, the humble steamed bun… pau… bao, or whatever you may wish to call it, of course.
If I may say so myself, the pau is actually more convenient than the hamburger. Like its American counterpart, it consists usually of meat sandwiched within some bread. Only in our case, the bread fully envelops the meat, and thus eliminates the risk of the meat slipping out from the sides as you bite into the bun. I am sure almost all of us has experienced this at least once… you are in a rush, perhaps lunching as you drive or lunching at your work desk… you bite heartily into your hamburger… plop!… the meat pattie, ketchup, mayo, salad and whatever else was between the two halves of the bun slips without warning, messily, chaotically onto your lap, your keyboard… and there goes your favorite outfit… This doesn’t happen with a pau.
Plus, making the pau is a convenient one step process. The meat is steamed together with the bread – no hassle, no grease. And it is always served piping hot, straight from the steamer.
Much as I like burgers, and I really do, if I am given a choice, I would usually go for the pau. It is tasty and filling. It is cheap and convenient. For half the price of a burger, one can get a big chunk of juicy, moist and succulent meat enveloped by a layer of soft, tender steamed dough. It is a meal in itself.
My love for the steamed bun stems from childhood…
One of my most vivid food memories from my early childhood is the eating of a huge (I was much smaller then) meat pau for lunch. I was probably about 3-4 years old. And sometimes, when I got off the school bus at noon, mum would be waiting for me at the foot of our block of apartments, and together hand-in-hand we would stroll across the street to the neighbourhood pau shop and buy two “big paus” (da bao). We would then stroll home, and sit together, happily munching on our paus. Of course, childhood memories are often filtered through rose-tinted emotional lenses, but I do remember the wonderful warm feeling of just me and mum, sitting at the dining table, enjoying an incredibly simple lunch of a steamed meat bun. And so, for the unprincely sum of around S$0.60 to S$1.00 (if I recall correctly, I think each bun, in those days, was around S$0.30 to S$0.50), both our tummies were warmed and filled. The food may have been humble, but I felt like a princess.
I remember the bun was so big, it was almost a third the size of my face! And I had trouble biting fully into it. I would take small nibbles, working inwards from the edges… savoring in turn the soft, fluffy, warm white bun, then the steaming hot, salty, juicy, very flavorful meat. And through it all, there was always a sense of anticipation… waiting for my favorite part of the pau. I would slowly bite and munch until I hit the jackpot… that small wedge of hard-boiled egg hidden somewhere within that huge chunk of meat. And a grin would light up my face. And usually, mums being mums, my mum would pass me her wedge of egg too. Wow, double jackpot! I really felt like a princess.
So today, I want to pay tribute to the pau or bao. These are some of my favorite paus and pau shops…
Paus come either as savory or sweet. The most common savory fillings would be meat – pork, chicken or BBQ pork (char siew). There are also, of course, vegetarian vegetable buns too. And the sweet paus traditionally come filled with red bean paste (tau sar) or lotus seed paste (lian yong). Nowadays, there are new-fangled sweet fillings like pandan, corn, yam and even durian!
Let’s talk about the meat baos first. Most common are the da baos (literally, “big pau”) and char siew (BBQ pork) paus.
The da bao is called big pau, well, simply because it is big. Yes, the Chinese can be very literal sometimes! The da bao is approximately double the volume of a standard char siew pau…
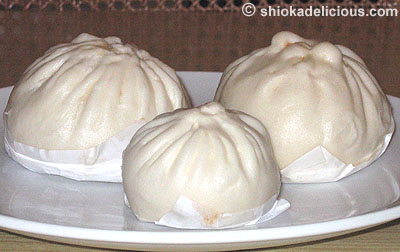
Inside the da bao is usually either pork or chicken.
You know that neighbourhood pau shop my mum and I would buy our da baos from, way back when I was a little girl? That was Kong Guan. It has of course now grown from that tiny pau shop in Eng Kong Gardens into a listed company churning out hundreds of thousands of steamed buns every year. It still produces the da bao, but sad to say, while we still love some of its other paus, its version of da bao no longer ranks among our favorites.
As of today (why today? you’ll find out later), this one ranks as our sole favorite da bao…
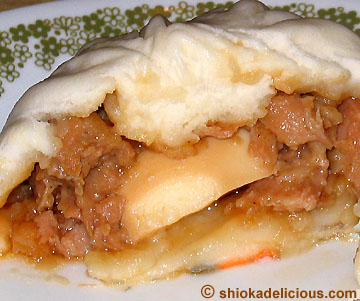
This is Teck Kee Tanglin Pau’s chicken da bao. The bun is very generously filled with flakes of chicken meat. It is very lean, with hardly any skin or fat – just the way I like it. And yet, the meat is incredibly moist, succulent and tender. Rich, flavorful juices ooze out of the meat with every bite. The filling is neither under-flavored nor overly salty. The meat is well-marinated and cooked just right. And of course, they still include that all-important wedge of hard boiled egg. At S$1.40 (US$0.80), it is an incredibly affordable meal.
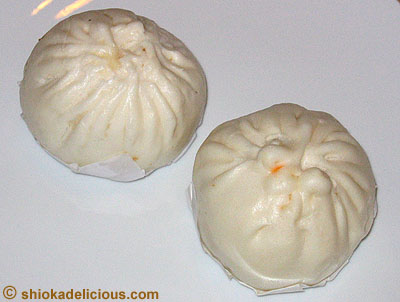
These are the da baos from Tiong Bahru Bao Shop, another of our regular bao stops. My mum bought these for our lunch today – one chicken da bao and one pork da bao. This was what prompted my spurt of nostalgia and inspired this post. I suddenly remembered all those times, as a little girl, when my mum bought two da baos for our lunches. Unfortunately, today’s lunch was a tad disappointing…
But first, how do you tell the chicken from the pork? The one with the orange dot is the pork da bao (above).
This is the chicken da bao…
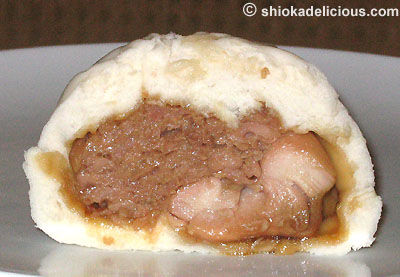
When I cut open my chicken da bao today, I was in for a little surprise. It looked completely different from the last time I had Tiong Bahru da bao, and from all the previous times I have had their chicken da bao.
Previously, the filling was one entire piece of chicken thigh meat, beautifully marinated in dark soy sauce. It was juicy, tender, succulent, flavorful and just very tasty. And of course, you knew it was the "real thing"… one whole piece of chicken thigh… not a mass of minced meat. A piece of chicken cooked whole invariably has a completely different bite and texture from that of minced meat. That was what I liked about the Tiong Bahru chicken da bao. It was different from all the rest. And so it had ranked securely, together with Teck Kee’s chicken da bao as my two favorite big paus. Depending on the texture I was hankering after, I would alternate between the two.
Today, my chicken big pau came with just one small (oh, okay, medium) sized chunk of chicken, and the rest was minced chicken (or at least it tasted like chicken) meat. Hmmm…
It still tasted pretty good – lean meat that was flavorful, juicy and succulent. But it just wasn’t the same. If I had wanted minced meat, I would have gone for Teck Kee’s version with chunks of meat, which even comes with the egg. Tiong Bahru has never included the egg in their chicken da bao, but I was willing to forego that for the texture of their whole piece of chicken thigh.
Now, their chicken da bao looks rather similar to their pork da bao…
My mum had the pork da bao today (on the left). Her only comment was: “they have changed the recipe”. And that said it all. Plus, there was no egg.
However, Tiong Bahru Bao’s char siew pau (BBQ pork bun) still ranks as our all-time favorite char siew pau. My mum has, on various occasions, declared it “the best char siew pau in Singapore”.
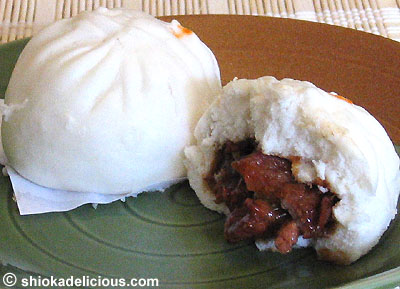
I too have to admit it is truly very, very good. Unlike a lot of the other char siew paus, this one is almost exclusively lean meat. (Although admittedly, there are some people who like their char siew paus with 50-70% fat instead of lean meat). Even though the meat is so lean, it is incredibly moist and tender. And here the char siew meat is cooked Hong Kong style – marinated in dark soy sauce and sugar. When cooked, the sugar caramelizes given an absolutely gorgeous flavor and color. Nicely sweet, salty and flavorful all at the same time. There is none of the usual red coloring in this meat filling – just natural flavors. I keep repeating myself, but the meat is so juicy, moist, very tender and succulent. Sublime!
So far, all the above paus have what I call “local skin” (I don’t know the technical name for it). The dough, although light and soft, is fairly dense and somewhat compact. This compares with what I call “Hong Kong dough”, which is fluffy…
This is admittedly not the best fluffy char siew pau that one can find. I bought it the other day whilst in Chinatown meeting a client. I was feeling hungry and bought it on my way home. I didn’t even look at the shop’s name from where I bought it. I passed by, saw it and bought it. There are better made versions, but it makes for good comparison of the different dough types. I like the the “Hong Kong dough” slightly more than I do the “local dough”. The former is usually only found in Cantonese restaurants that serve dim sum. On the whole, Singapore paus have the “local dough”.
However, regardless of the type of dough used, the bun should be soft, light and tender. And very importantly, the dough should not stick to the back of your teeth when you bite into it! That is a good gauge of how well made the dough is!
This Chinatown char siew pau has the normal bright red-colored meat filling…

You will notice that a lot of char siew paus have a mish-mash of styles – Hong Kong-style char siew with a local dough, and local-style char siew with Hong Kong-style dough!
As for vegetable paus, I like the version made by an elderly lady at Farrer Road Market. She hand-makes only a limited number each day, and they sell out fast. I haven’t had them in a very long time, so I’m not sure whether she is still making them, or has retired, like she has mentioned she was planning to do.
Now, for the steamed buns with the sweet fillings.
My favorite is the red bean paste (tau sar) bun…
Our favorite remains Kong Guan’s version. The filling is generous, and more importantly the tau sar (red bean paste) does not ooze rivets of oil which can leave an over-rich, over-satiated feeling. The bean paste is smooth and not overly sweet. Nice!
On a little side note, Chinese tau sar paus use a dark (almost black) smooth red bean paste, very different from Japanese red bean paste buns where the bean paste is a reddish brown, and usually has pieces of red bean interspersed throughout the paste.
To tell a tau sar pau (red bean paste bun) from a lian yong bao (lotus seed paste bun), again look for the little orange dot. Tau sar comes without the dot, and lian yong with.
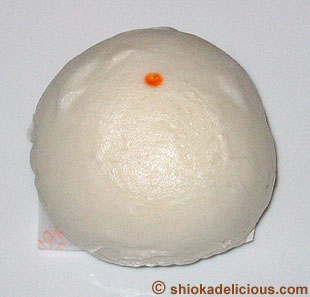
My mum also highly favors Kong Guan’s lian yong bao, because, she says, it is made with pure lian yong – i.e. lotus seed paste made purely from lotus seeds. A lot of the lian yong used in various Chinese buns, pastries and dim sum usually have either tapioca or sweet potato starch mixed into the paste, to add bulk and to enhance texture. Pure lian yong is a lot more costly.
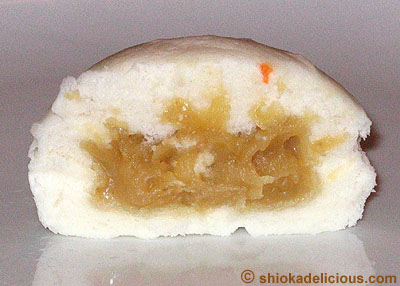
Pure lian yong has a purer, lighter yellow color, compared to the duller and darker color of regular lian yong. I personally don’t have preferences either way. I enjoy pure lian yong. But I also like the darker lian yong, especially in a bun that comes with a whole or half a salted egg yolk. Beautiful partnering of sweet and salty I say.
For Kong Guan paus, very often we buy them in the frozen family packs. In this instance, I will without hesitation say the frozen version is as good as their freshly made paus. And it is so convenient. We almost always have a pack or two sitting in the freezer. Anytime anyone feels like a snack or a light tea, simply pop one of the frozen paus into a bowl, which in turn goes onto a metal rack set into a small saucepan filled with an inch or two of water. Just steam the pau from the frozen state, no need to thaw. And within 12 minutes or so, you are ready to bite into a piping hot, soft, fluffy pau that taste freshly made.
There are literally hundreds of both big and small pau producers on our tiny island. I have not tried them all. But amongst those that I have tried, which number quite a few, time and again, I have returned to my favorites... Tiong Bahru Bao, Teck Kee Tanglin Pau and Kong Guan. I do not claim that they are the tastiest in the land, and would love to discover other wonderful, shiok pau eats. So, all recommendations are welcomed.
And the next time you feel like a hamburger… how about a da bao instead?
Copyright © 2004 Renee Kho. All Rights Reserved.
Please contact me for permission to copy, publish, distribute or display any of the images or text contained in this article.
03:38 AM in Tastes of South East Asia | Permalink | Comments (25) | TrackBack
Thursday, March 11, 2025
Croque Renee

More sandwiches I’m afraid. Yes, I’m still going through my little sandwich-craving phase, so please bear with me.
For lunch today, I made my all-time favorite sandwich…
When I visited Lourdes, France many years ago, it was off-season. This meant that for a small French town like Lourdes, which caters almost exclusively to tourists and Catholic pilgrims, just about everything was shut down. Only a tiny handful of shops, cafes and bistros were open. Hardly any restaurants were open. And the cafes and bistros that were opened served severely streamlined menus. It was wintry and cold, and there were only limited fresh items on offer. So, for the few days that I was there, I practically subsisted on soups and either Croque Monsieurs or Croque Madames. Yet, I was one happy camper. In fact, I couldn’t get enough of these deliciously crunchy (and thus its name: croque), warm, slightly gooey, grilled sandwiches. And I was quite contented to live on this fairly one dimensional diet for those few days.
Oh how I loved these crispy and heart-warming sandwiches! Even after copious amounts of ham and cheese, or ham, cheese and egg toasted sandwiches, the adoration did not fade. And, a decade on, these sandwiches still remain one of my firm favorites, if not my favorite.
Whenever I want a light meal or am just craving a sandwich (like today), almost inevitably this is what I would make for myself. Of course, my version has evolved to incorporate a couple of elements that I like, and so I guess it can’t really accurately be called a croque monsieur or a croque madame. Perhaps it should then be called (with tongue firmly in cheek) Croque Renee? ![]()
My memories of the croque monsieurs and croque madames that I enjoyed in France have now been clouded by my experiences of the various other versions of these simple yet delicious sandwiches that I have tasted over the years, in various bistros, in different countries. If I recall correctly, in France, a croque monsieur is a simple cheese and ham sandwich either heated under a broiler or sautéed in a little butter. While a croque madame is simply a croque monsieur topped with a fried egg (usually sunny-side-up).
Here’s a great little "how-to" cartoon on how to make a croque monsieur.
However, I have tasted versions that were dipped in egg before being sautéed in butter, then topped with another egg, and this was in turn topped with either mornay or béchamel sauce! Yikes! Only in America, I guess.
Anyway, here is my version…
• Fry an egg in a tiny bit of butter. Rather than sunny-side-up, I prefer it over-easy with a suitably runny yolk. (I find it quite hard to eat a fried egg with a hard yolk, but that’s just me.) Set aside.
• Take two slices of lightmeal (i.e. more grain than white, but finer textured than wholegrain – don’t you just love these marketers?) and very lightly butter on one side.
• Flip the bread over, and spread or squeeze a liberal amount of honey mustard on the unbuttered sides of both pieces of bread.
• On one piece of bread, on top of the mustard, goes a big slice (folded or cut in half) of either smoked or roasted turkey breast (my preferred meat, but I do sometimes use various types of ham).
• Next, on goes a slice of cheese - usually Swiss, Emmental or Cheddar; or if I’m looking for a suitably stretchy and gooey experience, Mozzarella; or basically whatever cheese is in the fridge, even the processed kind, fresh out of their individual plastic pockets.
• If I’m feeling more liberal with my waistline, I use two pieces of cheese, on either side of the turkey breast deli slice.
• Slide this piece of bread (with the turkey and cheese toppings), butter side down, onto a non-stick frying pan that has been heating up on a low flame. I prefer to do the transfer from plate to pan at this stage, without the egg, to minimize the risk of injury to my precious runny yolk! Also, it minimizes the time the egg spends on the heat, so the yolk won’t get overcooked.
• As this piece of bread becomes nicely toasted and golden brown, carefully slide the egg onto the sandwich. Top with the remaining piece of bread, mustard side down.
• [For me, the egg always goes inside the sandwich, rather than the traditional croque madame style of going on top of the finished sandwich – purely for a practical reason. I’m a firm believer in the “sandwiches must be eaten with the fingers” school of thought. I mean, seriously, sandwiches are finger foods, and just taste so much better, in my opinion, when eaten with the hands. It just doesn’t feel quite right eating a sandwich with a knife and fork. And I haven’t been able to figure out the logistics of eating, by hand, a sandwich that has an egg, complete with a runny yolk, right where my fingers are supposed to go to hold the sandwich.]
• As gently as possible, flip the sandwich over to toast the other piece of bread. As soon as that too is golden brown, and the cheese is nicely melted, remove from the heat immediately.
• Cut sandwich in half diagonally. Watch lovely thick golden egg yolk ooze out and intermingle with gooey melted cheese. Sink teeth into sandwich. Close eyes and allow taste buds to savor each and every flavor and texture as they explode in the mouth.
This sandwich has just about everything I love in a sandwich. It is warm (give me a warm sandwich over a cold sandwich anytime). It is crispy. It is cheesy. It has egg in it. It has mustard in it. It has enough of the “goo” factor…
It is a piece of sandwich heaven in under 10 minutes.
Copyright © 2004 Renee Kho. All Rights Reserved.
Please contact me for permission to copy, publish, distribute or display any of the images or text contained in this article.
02:12 AM in Home Cook: Sandwiched! | Permalink | Comments (16) | TrackBack
Tuesday, March 09, 2025
Edible Ramekins
The tartines did it. All this tartine-ing that has been going on of late… it’s gotten me suddenly hooked on sandwiches. I mean, I do normally eat sandwiches fairly regularly. My “regularly” being maybe once or twice a week, at least where sandwiches are concerned. Simply because that’s about how frequently the urge to eat a sandwich strikes me! But yesterday, all I could think about was having a sandwich. And as I was staring at the big crusty rye and potato roll that was sitting in the bread box, wondering what sort of sandwich I wanted to make for my lunch, the idea struck me… I knew exactly what I was going to make, or at least attempt to make!
When Clotilde made her first tantalizing post about oeuf cocotte back in December, I was very inspired and tempted to try out and experiment with my own versions of oeuf cocottes. But alas, I was stopped by one reason… I do not own a single ramekin. (Sorry, Clotilde!) But it is true. Incredible though that may be. And so, I put off making an oeuf cocotte until I could go get myself some lovely, pretty ramekins. Well, the weeks turned into months, and still no ramekins.
Until yesterday.
Yesterday afternoon, as I stared at my rye and potato roll, I suddenly saw a ramekin! That’s it! I would use the roll as a sort of ramekin. Afterall, bread rolls are regularly used as soup bowls are they not? So why not a ramekin? And hey, it’s even edible… one less thing to wash up! A girl couldn’t ask for more!
In fact, I made not one, but two “cocotte-in-a-roll”. Heh! We’ve all had, I’m sure, “chicken in a biscuit” (oh! how I used to love those), so now I present, erm… “chicken in a roll”?! (Cocotte in French being “a cute word for a hen”, according to Clotilde).
I ended up using both the rye and potato roll as well as a small wholemeal soft dinner roll. Why the latter? Well, I really wanted to use quail’s eggs, which I adore, in my oeuf cocotte, but they would be “lost” in the much larger rye and potato roll. I also didn’t want to put in multiple quail’s eggs, as I preferred the cleaner appearance of just one egg yolk peeking out from the roll. And the only smaller roll I had was the soft dinner roll. I was a little concerned as to whether it was too soft to hold the liquids in, but it worked just fine.
• The tops of both rolls were cut off, and the centers scooped out, leaving just enough shell to form a sturdy “ramekin”. The crusty roll was obviously sturdier and I could remove pretty much almost all the insides, leaving more space to fill up with the delectable fillers. I was more conservative in scooping out the soft wholemeal roll. (The crumbs were reserved for the salmon cakes that I’m planning to make.)
• Dijon mustard was spread all around the insides of the rye roll, with careful attention given to make sure all surfaces were nicely covered. (I love mustard, but this can be easily substituted for other spreads, even horseradish or something). I spread the wholemeal roll with butter – just to see the difference in tastes.
• Next, the fillers. A large onion, cut into strips, was sautéed in about one tablespoon of butter until soft, before some sliced fresh shitakes were added. When the mushrooms were nicely tender and fragrant (a few minutes later), in went the strips of ham. Any flavor and type of ham would work, but I think thinly sliced ham might work somewhat better than thick sliced ones in terms of balance of texture. Salt and pepper were added to taste and the pan was deglazed with a little wine (white or even Chinese rice wine would work).
• The filling was placed inside the prepared rolls, followed by some grated French Emmental cheese.
• Finally, an egg was broken into a bowl, and then carefully slid into the roll. Here, a minor “accident” occurred. I had put a little too much filling and cheese into the rye roll. Room was a little short for the egg, and so some of the egg white spilt out and slid down the sides of the roll, and created a small mess. Oh well. At least the bread roll got an unintended egg white wash, which is not a bad thing.
• Similarly, a small quail’s egg was slid into the wholemeal roll.
• Onto a baking sheet went both rolls, and into a pre-heated oven – approximately 160C. At this point, I wish I could tell you a fairly accurate time that the rolls were in the oven for, but I can’t, simply because I didn’t look at the clock nor used a timer. I simply popped the rolls in, kept an eye on them and just took them out when the egg whites were set and the yolks still runny. Unfortunately, this is normally how I cook, unless I was planning to write the recipe down or something. Heh. I almost didn’t remember the temperature at which I set the oven – I just turned the knob until it felt instinctively right for heating a bread roll and cooking an egg at the same time. I think it was round about a “6” on my oven knob, so that makes it round about 160C. And I think the wholemeal roll was in there for approximately 5-9 minutes, I’m guessing. While the larger rye roll was probably in the oven for maybe between 15-19 minutes. Sorry, I wish I could give better indications than that.
The temperature worked very well I thought. It was low enough that the bread didn’t burn (which was one of my concerns), and gave enough time for the eggs to cook nicely, without the yolks turning hard before the whites had time to set.
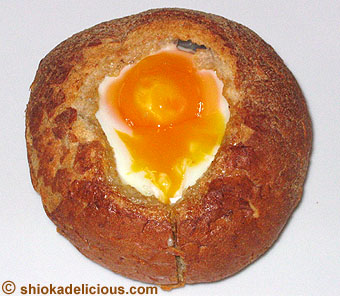
It felt so good to see the runny yolk starting to ooze out as I cut into the potato and rye roll cocotte. And of course, I had to stop to take a picture! ![]() I just love eggs with runny yolks, don’t you? The whites were opague and largely firm, with some areas that were still slightly soft and “jiggly” – just the way I like them! The bread was very crispy and crunchy with only the top edges of the “opening” being a little dried out.
I just love eggs with runny yolks, don’t you? The whites were opague and largely firm, with some areas that were still slightly soft and “jiggly” – just the way I like them! The bread was very crispy and crunchy with only the top edges of the “opening” being a little dried out.

It does look a little messy with the runny yolk running ![]() (what else would runny yolks do?) everywhere. But it tasted really good.
(what else would runny yolks do?) everywhere. But it tasted really good.
The small wholemeal soft roll came out just as well...
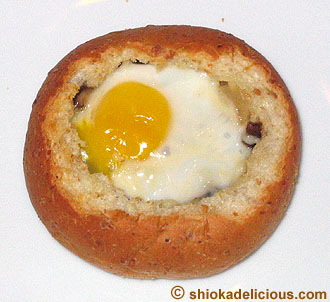
The bread was crispy on the outside but still soft on the inside. I had accidentally punctured the yolk a little bit whilst transferring the egg from bowl to roll, but otherwise, it looked pretty good. My only complaints… firstly, because the roll was rather small, there wasn’t much filling; secondly, the quail’s egg was so tiny that, whilst eating the sandwich, I had wished for it to have been a little more eggy. (And if aesthetics matter, the lighter yellow of the quail’s egg yolk was slightly less visually appealing than that of the regular egg).
So, a larger roll that can accommodate more filling seems to work better. Plus, much as I love the idea of quail’s eggs, chicken eggs seem to work better, unless multiple quail’s eggs are put into the roll. And oh, the mustard works better than just plain butter.
Some Other Notes:
• I think some crème fraiche or sour cream would have been a very delicious addition.
• Crispy bacon strips instead of ham would also have worked wondrously.
• I really wished I had some chopped fresh cilantro/coriander to add into the fillings. That would have added a really nice fragrant layer of flavor to the sandwich.
• Using Chinese style seasonings in the filling would have been very interesting… fish sauce, hoisin sauce or oyster sauce…
• The next time around, I would also probably prefer to go with a sharp cheddar or some other more strongly flavored cheese. The emmental, which was the only thing I had in the fridge, didn’t seem to have strong enough flavors, and didn’t add much to the sandwich flavor-wise, other than the soft texture of melted cheese.
• It would also be interesting to experiment with softer cheeses like brie, camembert or boursin too.
• I would also probably adjust the fillings-to-cheese ratio the next time around. This time it was maybe approximately 3:1, simply because I was a little over enthusiastic in adding the filling, and there wasn’t much room left for the cheese, and I was too lazy to remove some of the filling! I’m thinking a ratio of maybe 2:1 might work nicely.
• A tapenade spread sounds interestingly flavorful too.
• As I was eating the sandwich, my mind was racing with ideas of what I would like to try. An assorted mushrooms (enoki mushrooms, golden mushrooms, oyster mushrooms, button mushrooms, cepes…) version with onion marmalade sounds absolutely divine!
• Smoked salmon, chives or dill and cream cheese…
• Even canned sardines in tomato sauce, with onions and strips of fresh red chilli!
• Or maybe a meat version – made from leftover beef stew, braised beef shanks etc. Ooh, yum!
• And I love the idea of a sweet, dessert variation – imagine… thin slices of camembert cheese arranged with alternate layers of thin slices of gorgonzola and thin slices of pears or even nectarines (as inspired by some of the tartine entries), with generous sprinklings of chopped walnuts, pecans or almonds. I think this would make a great picnic item – place the “top” back on the bread roll, wrap the whole thing in tin foil and pop it in the oven, and it should still be slightly warm when it is unwrapped at the picnic.
I have to say, I quite like my edible ramekins. I can even change the flavor of the ramekins as I choose. ![]()
Copyright © 2004 Renee Kho. All Rights Reserved.
Please contact me for permission to copy, publish, distribute or display any of the images or text contained in this article.
06:08 PM in Home Cook: Sandwiched! | Permalink | Comments (8) | TrackBack
Monday, March 08, 2025
Doubly Eggy Steamed Tofu

This is a very simple and healthy dish that we like. Steamed silken tofu with two types of eggs – regular fresh eggs and salted eggs. There is a fairly interesting play of flavors and textures. The neutral blandness of the tofu against the saltiness of the salted eggs. The soft, creamy smoothness of the tofu amidst the firmer, custard-like lusciousness of the steamed egg, interspersed with dense, richly flavorful morsels of salted eggs.
Doubly Eggy Steamed Tofu
1 tube regular silken tofu [for this dish, I like to use the silken tofu in the toothpaste-like tube packing]
2 fresh eggs
2 salted eggs
chopped spring onions/scallions, green part only
½ to ¾ cup water or broth
• Start a steamer going so that the water is boiling by the time the tofu is ready to go in.
• Prepare the salted eggs: scrape off the layer of dark soil, and wash the eggs thoroughly. Boil them for about 10 minutes. Shell the hard-boiled eggs and cut into fairly small dices. Set aside.
• Cut the silken tofu into chunky cubes, and set aside.
• Lightly beat the fresh eggs and season with ¼ teaspoon sugar and pepper to taste. These are the only seasonings that will be going into the entire dish, so season well. No salt is added as there will (usually) be sufficient saltiness coming from the salted eggs*. Also, avoid over beating the eggs as this will create bubbles, and give the final custard a rather “holey” and rough texture.
• Add the water to the lightly beaten eggs*.
• Using a fairly shallow casserole dish or even just a regular round deep plate, layer the tofu at the bottom of the dish. Next, sprinkle the diced hard boiled salted eggs amongst the tofu pieces. Gently pour in the fresh egg mixture.
• Place the tofu in the steamer, and reduce heat to low*. Steam for about 15 minutes. Then, sprinkle the chopped green onions over the tofu, cover the steamer again and steam for another 5 minutes.

* Notes:
• The saltiness of the salted eggs can vary, depending on how “old” the eggs are. The longer the egg has been “steeped”, the more salty it will be. Freshly salted eggs will be significantly less salty. It’s impossible to tell from looking at the eggs when buying them how salty they will be. So, I usually taste the salted eggs after they have been hard boiled, and adjust the dish’s seasonings accordingly. If the salted eggs are somewhat less salty, I just add either a dash of light soy sauce or a pinch of salt to the fresh egg mixture.
• The texture and firmness of the egg custard can be varied by adjusting the amount of water added. For a softer, somewhat more “jiggly” egg custard, increase the amount of water slightly, but not by too much.
• If the heat is too intense during the steaming process, not only will it result in a “tougher”, overcooked custard, but also one with lots of tiny holes throughout.
• Another variation that we make, once in a blue moon, is the “triple eggy steamed tofu” – with fresh eggs, salted eggs, and century eggs. The latter is simply diced, like the salted egg, and also sprinkled over the tofu before pouring in the fresh egg mixture. This makes for an even more interesting intermingling of colors and textures. Not as healthy, but nice for the occasional indulgence.
Copyright © 2004 Renee Kho. All Rights Reserved.
Please contact me for permission to copy, publish, distribute or display any of the images or text contained in this article.
11:12 PM in Home Cook: Soy | Permalink | Comments (2) | TrackBack
More Food Talk
Did a spot of links housekeeping, and have added a few more very interesting links to food-related blogs in the right side menu bar. Some are laggard inclusions, and others are delicious new gems. Check them out!
• pastry school
• put down the donut
• fatman seoul
• umami
• everybody eats: a journal
• let’s eat with meg and ted
• the amateur gourmet
• appetites
• a live one
• the radical chef
• too many chefs
• obsession with food
11:03 PM in Crumbs & Tidbits | Permalink | Comments (2) | TrackBack
Sunday, March 07, 2025
Is My Blog Burning? – The South East Asian Tartine

Blog burning day is here again. This is the day when food bloggers from around the world cook up a storm based on a set theme. The excellent idea was cooked up and served by Alberto last month, and is this month inspired and hosted by Clotilde. The theme? Tartine. Which, as Clotilde elegantly puts it, is “a popular Parisian dish, in which different ingredients are arranged and served on a slice of bread – a sort of open-faced sandwich if you will”. How exciting! This leaves so much space for interpretation and innovation.
As I pondered on the theme, I decided I wanted to bring my Parisian friend, Tartine, to Asia and offer her a distinctly South East Asian experience. But, what constitutes “South East Asian”? I mean, we are such a hodge-podge melting pot of so many different cultures. Chinese food is no more South East Asian than Indian food or Malay food or Peranakan food. Hmmm… So, I finally decided to call upon my friends Roti, Satay and Floss from the Indian, Indonesian/Malay and Chinese epicurean community respectively and to enlist their help in coming up with something that would offer Tartine a tasty glimpse of South East Asia, all encapsulated in just one bite.
I asked but only two requirements of my willing helpers. First, it must not be a jarring culture shock that would send Tartine fleeing back to Paris, never wanting to set foot in Asia again. It had to be a harmonious snapshot of the three cultures. Elegance would be nice but was optional. Harmony and tastefulness were a must.
Second, the entire production must be ready to be served by dinner time. It was already 3 o’ clock on Saturday afternoon, which meant they had just over 4 hours to get the show on the road.
And so they were off…
The Indian Foundation
Roti returned soon after, all flushed and excited, bearing her find. She had found the perfect South East Asian representative of bread, she declared. I looked expectantly into her shopping bag, and pulled out two packs of frozen roti prata – plain and onion. I looked at Roti quizzically. She gushed: “it’s perfect! See, I was inspired by my own name – Roti. It also means “bread”. And roti prata is the perfect introduction to South East Asian breads, and it’s great for putting toppings on, and it tastes great, all crispy, light, fluffy and flakey, and….”
I stopped her before her face became any redder from all that excitement. Oh alright, we would use roti prata for the bread base. But really, I was expecting to make something from scratch, and not use something yanked out of the freezer box of a supermarket. Roti rolled her eyes. “Well”, she asked pointedly, “do you know how to do all that flipping and twirling? Because I don’t.” So, I conceded defeat. Besides, I have tasted this Spring Home brand of frozen roti prata before (yes, I finally admitted it), and it had tasted pretty good. And hey, I was all for ease and speed. So that settled it.
Whilst waiting for the others to return, Roti and I decided to start frying up the pratas. (Directorial aside: remember, this is a production where concepts of time and space are sometimes skewed. In real life, pratas are not amenable to early preparation).
Oh, by the way, maybe we should add at this juncture that roti prata goes by its other name, roti canai over in Malaysia… just in case you bump into it over on the other side of the Causeway, and fail to acknowledge it and it gets all offended and sulky.
Roti prata’s name label had declared that no oil was necessary in bringing it to its peak taste performance. We could heat it up either in a frying pan or in the oven. We opted for the former. But, just so as to ensure a truly tip-top display of taste, we decided a light coating of Pam cooking spray would help roti prata to its peak condition.
It was quite fascinating to watch… as roti prata started to metamorphosize from a flat, ghostly white nondescript being into a bubbly, puffy, tanned, golden brown beauty. Now, the key to keeping roti prata happy is to have the pan all nice and hot before putting it in. Next, don’t bother it once it goes into the pan! Let it sit happily, soaking up the heat. Wait until it starts to turn slightly translucent and starts puffing up with exuberance from all that warmth. Only then should you even dare to take a quick peek on its underside. If the bottom is showing signs of having had enough of the heat, and is all nice and golden brown, quickly flip it pale face down. When face is golden brown too, it’s done. Now, the golden rule (pun intended) here is to ensure roti prata doesn’t get too tanned. Over-do the heating, and you end up with one dark, moody and cranky roti prata which will be pretty much useless for any purpose. So, watch the heat and make sure roti prata doesn’t sit in it for too long. It’s sensitive like that.

Now, isn’t that some beauty?
As we began working on plain prata’s cousin, onion prata, Satay returned with the haul of her own treasure hunt.
The Indonesian/Malay Filler
Roti and I descended on Satay, all eager to see what she had found. Triumphantly, she pulled out a tub of peanut paste, a packet of err… more peanut paste, and erm… some ground peanuts… With our eyes opened wide, both Roti and I chimed in unison, “have you gone nuts??”

“Wait… there’s more”, promised Satay. She pulled out fresh de-boned chicken thighs, some beef tenderloin and some tempeh.
By now I was smiling. Oooh, tempeh! I like! I haven’t had it in a long time. How sweet of Satay to have remembered. Tempeh (cultured soy bean cake) is supposed to be good for you – what with all that protein, minerals and soy isoflavones…
Satay’s voice broke through my thoughts. “… and so I decided I would take inspiration from my name, Satay…” Inwardly, I rolled my eyes (humor me… just pretend this is possible). “We are going to do a combination of influences from the Indonesian salad gado-gado and the Malay satay, but without the sticks”, she continued enthusiastically. Roti and I listened intently. “Here’s the plan… we have the spicy peanut sauce from the gado-gado and satay, we have tempeh from the gado-gado and chicken like in satay. Oh, and since you mentioned that one of the guests doesn’t eat chicken, I got some beef too…”
“But you didn’t even buy taugay (beansprouts)”, I interjected abruptly.
“Oops! Never mind. We will use cucumber… there is cucumber in gado-gado too. And we’ll grate it so that it looks like taugay. How’s that?” She’s good. I’ll give her that. That was fairly quick thinking on Satay’s part. So, I decided to let her off.
“How are we going to bbq the meats?” asked Roti.
“No need for that. We’ll just sauté them in the wok”, replied Satay.
“But that’s not satay”, Roti persisted.
“I said influence of satay. I didn’t say satay”, irritation creeped into Satay’s voice.
“Okay, girls, I think we need to get cracking if everything is going to be ready in time for dinner”, I intercepted.
Phew! And so our attentions were diverted to getting all the stuff ready…
Peanut Sauce
As I examined the peanut pastes that Satay had bought, I thought out loud: “we are supposed to try and make things from scratch you know?”
“Dearie, we are not going to have time to pound all the spices and fry up the rempah (spice mix). It will take us a good 1-2 hours to get really fragrant rempah.” I sighed. Again, I conceded defeat. But it was okay. Afterall, I have been taking the peanut sauce shortcut all these years, so why should this time around be any different. And I was glad Satay had thought to buy the “home-made” version from my regular satay beehoon hawker, who sells her home-made peanut paste in little plastic tubs. Hers was always nicely fragrant with belacan, in addition to the usual spices.
The supermarket-bought pack of “instant peanut gravy” didn’t have belacan – it was a simpler “formulation”, with just the usual spices. It smelt less fragrant. We decided to use both anyway. The former for the chicken and the latter for the beef.
I set two saucepans on the stove, and emptied the peanut pastes into each one. Next, about ¾ to 1 cup of hot water was added to each pot. I normally would add just enough liquid to get the sauce to the consistency I want – sometimes I want it thicker and chunkier for use as a dip, and sometimes I prefer it more liquid when using it as a gravy to pour over bee hoon (rice vermicelli) to make satay bee hoon. (Okay, here’s a little confession. We took a little artistic license here. For aesthetic purposes – you see, we knew Tartine would be wanting to take pictures of the food – we added only ½ cup of water, so that things wouldn’t look too liquid in the photos. But ideally, it would be about ¾ cup to 1 cup. And this is just between you and me.) Now, of course, if you wanted to up the richness level by several notches, you could add more coconut milk instead of water. But that can make the coconut taste too overwhelming. Besides, the peanuts are already rather rich, so my personal opinion is that water works better. Your guests are less likely to feel jelak (our South East Asian lingo for “over-full, over-rich, sick”) too quickly.
As the sauces started to warm up, I rummaged in the pantry for some gula melaka (palm sugar) and dropped a small piece into each pot. I also added, as I normally do, a little more ground peanuts for added fragrance and to, well, make the peanut sauce more erm… peanutey. About five lightly heaped tablespoons was good enough.
And that was it. I allowed the sauces to simmer on low heat for about 15 minutes, and went to check what Roti and Satay were up to.
Satay Chicken
Satay had cut each of three pieces of skinned and de-boned chicken thigh meat into sixteen small bite-sized pieces, and seasoned the meat with about 1 tablespoon of light soy sauce, ¼ to ½ teaspoon of sugar and a little bit of cornflour. (We made enough to serve about 5 persons).
I watched as she heated a little oil in a frying pan and quickly sautéed some minced garlic and shallots. In went the marinated chicken. It was stir-fried until just about half-cooked. Then, right on cue, my peanut sauces were done simmering. One pot of the gravy was added to the chicken, and stirred well. We left the chicken to simmer in the sauce for a few minutes (3-4 minutes) to allow the meat to finish cooking and to absorb the flavors from the gravy.
Yay, the chicken was done.
Satay Beef
We repeated the process with the beef. We sliced it into fairly thin bite-sized pieces, and seasoned it with light soy sauce, sugar and cornflour. We sweated some shallots in hot oil, and added the beef. Again, as the beef reached half-doneness, we added the peanut gravy and left it to simmer for a few minutes.
Now, that was pretty easy… Satay and I grinned in satisfaction.
Tempeh
We looked over to see how Roti was doing. She had already finished preparing the tempeh, which she had cut into thin slices and fried in a little hot oil until they were beautifully golden brown. Very little oil was needed for this – only about 2-3 tablespoons for the entire batch.
The Supporting Cast
Roti had already begun to busily prepare our supporting cast members… the cucumber and onions.
She used one Japanese cucumber. After removing the skin, she grated it into long elegant strips. We were all unanimous on this – Japanese cucumber was definitely sweeter, juicier and crunchier than the normal varieties. Good choice.
Two large onions were also cut into long strips, sautéed in a little hot oil and seasoned with light soy sauce and pepper. We took another creative license here too. Ideally, we wanted to caramelize the onions to a rich brown color, but we were ever aware that this would make the onions less than photogenic. And so we settled for a paler color and hoped Tartine wouldn’t notice the difference in taste too much.
Wow, we were done. The three of us stood in the kitchen proudly surveying our handiwork. Not bad for creativity on short notice we thought. But hey, where was Floss? What was taking her so long?
The Chinese Topper
Right on cue, Floss drifted (like Floss always does) through the door and dramatically placed a red and yellow plastic bag on the kitchen table. We waited, knowing full well a story was about to unfold, whether we wanted to listen to it or not.
“Yeah, yeah, I know I’m late”, Floss begins. “But I was wracking my brains trying to think of what to buy. And then… guess what?!”
“What?” we sighed.
“As I was walking down Orchard Road thinking and thinking, it suddenly hit me, I would bet my bottom dollar that both Roti and Satay would buy something related to their name…”
Suddenly, Floss’ eyes caught sight of the food spread on the table. “Aha! See I was right!” she yelped triumphantly. “Luckily, I too decided to buy something related to my name. Because just at that moment, I was passing by a Bee Cheng Hiang shop. Now, how is that for serendipity, huh? I was so sure it was a divine sign, telling me something. So, I went in and bought… (drum roll…) pork floss!”
“I knew Satay would probably buy chicken, but I don’t like the texture of chicken floss as much as I like pork floss, so I bought pork floss, and so there”, she continued. “Plus, it is krispee pork floss!”
“Pork floss is good, I like pork floss. Krispee pork floss is even better. And it will make an interesting topping for the satay chicken”, I smiled.
The Whole Ensemble
“Okay, girls, we are ready. Let’s get the show on the road”.
Roti and I worked on the satay chicken plating, while Satay and Floss did the beef sandwich.
I topped a nice crispy, flakey plain roti prata with some shredded cucumbers, while Roti arranged pieces of the beautifully golden brown tempeh on top of that…

Next, a generous serving of spicy, fragrant chicken with peanut gravy…

Finally, it was all topped with krispee pork floss…
Just then, Satay looked over and remarked: “it looks like a mountain… why is the floss pointed like that... like some kind of cone?”
“Oi! Don’t you come stabbing your finger into our satay chicken sandwich! You go back there and concentrate on your own beef sandwich.” Roti was on the defensive, brandishing a fork and waving it menacingly in the air. “Besides, it’s called style… you know? Have you seen those fancy restaurants? The higher you pile the food, the classier it’s supposed to be… you know?”
The rest of us could barely suppress our giggles.
“And let’s see you do any better”, challenged Roti.
Satay and Floss had placed some shredded cucumber on the onion roti prata, followed by the sautéed onions… (nice continuity there we thought, and praised the girls accordingly).

And they finished the sandwich off with a generous dollop of beef in satay peanut sauce and a sprinkling of toasted sesame seeds…

We stepped back to admire our creations. Not bad. Now, the test is in the tasting.
Just then, the doorbell rang. It was Tartine. Right on time.
[Fast forward one and a half hours later…]
Throughout the whole dinner production, Tartine had eaten with great concentration, eyes wide as she savored the different tastes and textures of South East Asia laid out before her. As the table cleared of all visible signs of food, she took the final sip of her warm teh helia (ginger tea) and sat back in her chair. Slowly a big smile started to form on her face. “When may I come again?” she asked. “Oh, anytime, we would love to have you back, anytime…” we chimed. Tartine smiled even wider. “It was good. I will be back…”
It was with a little sadness that we saw Tartine to the door. She kissed us on both cheeks, waved a cheery goodbye and walked off into the night.
Roti, Satay, Floss and I smiled at each other. It was a very pleasant evening. The company was scintillating, and our tummies were round and full. We sank onto the sofa, and I reached for the remote. The dishes can wait for tomorrow…
But before the curtain falls on this special multi-cultural South East Asian production, we would just like to highlight to you some of the other roles some of our main cast members play from time to time:
• fabulous Roti Prata often takes on a favorite breakfast role – sans embellishment, au naturel, fresh, hot and crispy, it is sprinkled with or dipped into sugar. Ah! Sweet simplicity!
• and of course, for all times of the day – breakfast, snack, lunch, tea, dinner or supper – Roti Prata is a favored companion of all sorts of curries: mutton, chicken, vegetable, dhal or whatever strikes your fancy. Curry without Prata and Prata without Curry, it just isn’t right…
• sometimes, Roti Prata goes the full hog and indulges in over-indulgence – it is stuffed with minced mutton or other meats, fried onions and egg before being fried to crispy perfection. For such illicit, artery clogging activities, it takes on the name of its alter ego, Murtabak.
• as for Satay Peanut Gravy, well, when it is not providing a warm bath for skewers of Satay Meat or skewers of Satay Celup or providing a spicy blanket cover for Gado Gado Salad, sometimes it likes nothing more than to chill out and spice up a plate of plain beehoon (rice vermicelli). And oh how it is loved whenever it reprises its role as Satay Bee Hoon.
• it is of course equally loved when it tops crispy deep fried tofu and takes on the character of Tauhu Goreng.
• and Floss… well, Floss is so versatile, it would probably take a book in itself to document its numerous and varied roles in the South East Asian culinary scene. So, that will have to be for another time and another place…
With that, we thank you for your patience and attention. The production was lengthier than we had planned. We hope you had as much fun as we did bringing this production to you. Until next time... au revoir!
Copyright © 2004 Renee Kho. All Rights Reserved.
Please contact me for permission to copy, publish, distribute or display any of the images or text contained in this article.
05:27 PM in Home Cook: Poultry & Meats, Home Cook: Sandwiched! | Permalink | Comments (17) | TrackBack
Friday, March 05, 2025
TGIF
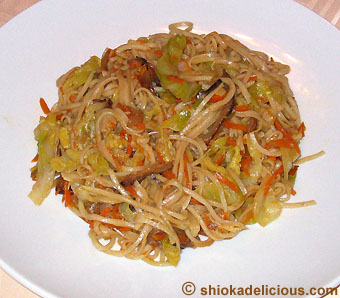
I was going to do a proper post tonight, but it’s been a very, very looooonnnggg day. And I’m feeling rather stressed, very tired and somewhat cranky. So, it will just be a picture of my lunch today… home-cooked vegetarian fried noodles – dried la mian with lots of cabbage, carrots and Chinese mushrooms, and lightly flavored with a little oyster sauce and light soy sauce.
I was supposed to do some work tonight, but it is already after 3am, and I think I’ll be needing toothpicks or something to prop up my eyelids. So, I’m off to bed, or else I’m sure I’m going to give in to my craving for Ben & Jerry’s. There must be some connection between being awake at this hour and craving ice cream. Hmmm…
Okay, I’m rambling… I’m off to bed… G’nite!
Copyright © 2004 Renee Kho. All Rights Reserved.
Please contact me for permission to copy, publish, distribute or display any of the images or text contained in this article.
03:20 AM in Home Cook: Rice, Noodles etc | Permalink | Comments (4) | TrackBack
Wednesday, March 03, 2025
Braised Mung Guang
Some time ago, Maki posted about braised vegetables and the beauty of their simplicity. As I read that post, I was nodding my head in agreement. There is just something quite elegant yet homey and comforting about braised vegetables. Like the Japanese, the Chinese too have a tradition of braised vegetable dishes. Some of my favorites that immediately come to mind are braised radish, sometimes served with pork or beef, and braised turnip. There are of course many other braised vegetable dishes, but these two make it to our dining table fairly regularly, simply because they are easy to prepare and taste good.
We made braised turnips the other night.
First off though, perhaps a quick word about the name of our local turnip. Some people, as is the case in my family, call it “mung guang”, others call it “bang kwang”. Even the different local supermarket chains term the same humble turnip differently. NTUC Fairprice opts for plain language, calling it “local turnip”, while Cold Storage calls it “banguang”. Other names I’ve heard include yam bean and jicama, although I believe both these actually refer to the turnip of Mexican and Central American origins. I’ve never tasted a “jicama”, but I presume it is pretty close to a mung guang. From the picture, it looks a tad different from the mung guang that I know, and there could be very slight differences in texture and sweetness purely due to the climate and soil it is grown in. But hey, a turnip by any other name is well, a turnip.
In South East Asia, slow-cooked mung guang is most commonly used as the filling for the very healthy, Nonya springroll "popiah" (Mandarin: bao bing). Thin strips of turnip are gently stewed with carrots and dried shrimp (hae bee), and wrapped in a soft, paper-thin, almost translucent, crepe-like pancake, together with crushed peanuts, crumbled hard-boiled eggs, boiled prawn slivers, minced raw garlic, fresh lettuce leaves, bean sprouts, sweet fruit sauce and chilli paste. A little more on this later.
The same mung guang mixture can also be used to fill “kueh pie tie” – another Nonya delicacy. This is a deep fried crispy, tall, mini pie shell filled with mung guang and sometimes topped with various garnishes.
I like mung guang for its rather unique texture – somewhat starchy, yet with a delicious slightly sweet crunch, almost like that of a water chestnut without the intense sweetness. Braised mung guang has a nice, soft, tender bite with a light undertone of crunchiness.
When cooking mung guang as a main dish, rather than as a popiah filling, I like to cut the turnip up into bigger chunks, almost like potato wedges or at least like fat fries. I find this gives them a better texture and crunch even after being stewed for a few hours, and makes them a wonderful accompaniment to plain rice congee or freshly steamed rice.
Braised Mung Guang
Ingredients
1 whole mung guang – skinned and cut into long, chunky strips
½ carrot – very finely julienned
4-5 pieces large Chinese dried mushroom – pre-prepped and thinly sliced
finely minced garlic
• Sauté the minced garlic in a little hot oil until fragrant. Add the carrots and mushrooms. Sauté briefly.
• Add the mung guang, and stir-fry for approximately 5 minutes. Season with 4 tablespoons light soy sauce, ¼ to ½ teaspoon sugar and pepper.
• Add approximately 1½ cups of hot water or chicken/vegetable stock. Cover, and leave to simmer, on very low heat, for around 2 hours or until the liquid has reduced to a small amount of rich gravy and the mung guang is tender but still with a slight crunch.
• An optional garnish would be to sprinkle a little bit of deep fried crispy shallots on top.
Variations
• Add dried shrimps (hae bee): rinse the dried shrimps well, and pat dry. Add them to the minced garlic and sauté until fragrant before adding the carrots and mushrooms.
• Add strips of pork or chicken: marinade the meat with light soy sauce, pepper, sesame oil and a little cornflour. Sauté the meat separately in a little hot oil until very nearly cooked, and set aside. Add into the mung guang 10-15 minutes before the latter is done, just to allow the flavors of the meat to meld with the braised vegetables. Adding the meat too early will result in tough, over-cooked meat.
• Add strips of tau pok (deep fried beancurd skin) or tau kwa (firm pressed beancurd): sauté separately in a tiny bit of hot oil, to enhance their flavors. Add to the braised vegetables towards the end of the cooking time, as with the meat.
These variations can also be cooked as main dishes, to be eaten with rice, or can be made into popiah fillings. (For the latter, the mung guang is cut into fine strips rather than chunky wedges).
Popiah parties are great fun! All the ingredients are prepared and laid out on the table, and guests help themselves and roll their own popiah. All that is needed are (good quality) popiah skin, braised mung guang filling, minced raw garlic, sweet sauce, chilli paste, raw lettuce leaves, lightly blanched beansprouts (taugay), boiled prawns, crumbled hard boiled egg and ground peanuts. An optional garnish that requires a little more work but is a firm favorite among Singaporeans is deep fried crispy bits. There are various versions of this. Some people make it from deep frying very small crumbled pieces of dried sole fish. Others mash tau kwa (pressed firm tofu) through a sieve and deep fry this to get crispy tau kwa “crumbs”. Yet others may just used crispy deep fried dried shrimps. Again, as with so many Asian dishes, innovation and personal preferences are the ways to go.
D-I-Y popiah… it’s simple, easy and lots and lots of finger-licking fun!
Copyright © 2004 Renee Kho. All Rights Reserved.
Please contact me for permission to copy, publish, distribute or display any of the images or text contained in this article.
11:57 PM in Home Cook: Vegetables | Permalink | Comments (2) | TrackBack
Tuesday, March 02, 2025
Pasta Goes East
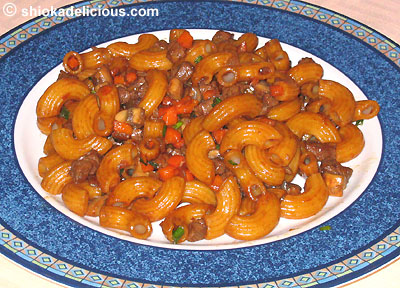
This dish was my first introduction to pasta as a young child. I suspect when my mum first cooked it back then, she probably didn’t know of the “real” ways pasta was eaten by the Italians. Perhaps it did not even occur to her, in a conscious way, that macaroni was Italian. I for one didn’t even realize macaroni was Italian until I was quite old! Imagine that! Macaroni was just very naturally part of my and my family’s epicurean landscape. I simply thought it was Chinese! And I think it would be safe to say that a few decades ago, pastas such as macaroni were simply seen as an extension of, or even part of, the deep-rooted Chinese tradition of eating noodles. And this is perhaps one of the reasons why the Chinese take so easily to pasta. It’s familiar. Just noodles in different shapes and with a slightly different texture and taste. And often, in Chinese families, pasta is prepared in very Chinese ways – in much the same ways as Chinese noodles would be prepared.
Of all the different pastas, it would seem that for some reason or other, the macaroni is the most conducive for “interpretation” and “adaptation”. Or “aberration” as some may see it. The brightly colored, thick and gooey American invention “macaroni and cheese” immediately comes to mind. But other culinary cultures also have various manifestations of macaroni too. And I guess this dish is the Chinese “adaptation”.
I used to think this dish was perhaps unique to my family, what with our sometimes rather strange eating habits, but over the years, I’ve discovered that many Chinese families used to cook macaroni like this, or very similar to this. Friends have shared fond childhood memories of eating fried macaroni regularly, the same way fried noodles was eaten regularly.
My mum cooked this macaroni dish in much the same way she would stir-fry the Chinese noodle “lao shu fen” (Mandarin) or “lou shue fun” (Cantonese). Literally translated, the name means “mouse noodle”, perhaps so called because the short 1½” to 2” noodle looks like a mouse tail, with a round body tapering to a point at both ends. [In Singapore, this noodle is perhaps more commonly referred to as “mee tai bak”, and served “dried toss” (kon lo) or in soup, rather than stir-fried, which is the more common version in Malaysia.]
As a kid, it was always a real treat for me to come home from school to find that lunch was either fried lao shu fen or fried macaroni. To this day, these two dishes belong firmly on my list of “comfort food”. I don’t eat them regularly anymore. But once in a while, I will suddenly think of them, and feel a “need” to eat them. It’s a feel-good thing.
So, here’s the recipe for my family’s version of fried macaroni. This is yet another very flexible dish. It can be altered or adapted to suit personal taste preferences or simply to suit whatever happens to be in the fridge and pantry at the time. Depending on our mood and what we have around when the craving strikes, we alternately use either minced beef or beef tenderloin. (The latter of course gives added luscious tenderness, moistness and flavor). We also alternately cook it “light” or cook it “dark” – whatever takes our fancy when we are standing at the stove.
It has to be said though that I think “black” or more accurately “dark brown” colored noodle dishes are very much part of the “comfort food” psyche of the Chinese in South East Asia. Such dishes seem to strike a very deep chord in us. The various “dark” noodle dishes that we wax lyrical about comes to mind… Malaysian fried Hokkien mee, Singaporean char kuay teow, Singaporean lor mee, and many more. It’s just something about noodles cooked with dark soy sauce, or sweet dark soy sauce (kicap manis).
Stir-Fried Beef Macaroni
Main Ingredients
Macaroni
Beef tenderloin – finely diced; OR minced beef
Fresh button or field mushrooms – finely diced
Carrot – finely diced
Onion – finely diced
Shallots – finely chopped
Garlic – minced
Spring onion/green onion – finely chopped
• Cook the macaroni in boiling water until al dente. Drain and set aside.
• Marinade the beef with some light soy sauce, oyster sauce, sesame oil, sugar, pepper and a little cornflour (optional – but helps enhance the texture of the beef).
• In a little hot oil, sauté the finely diced onion until soft and translucent. Add the beef and quickly sauté for just long enough for the meat to be partially cooked through. Avoid completely cooking the beef at this stage as it will finish cooking together with the macaroni later. Set aside.
• Sweat some minced shallots in the same hot wok or pan, and sauté the finely diced mushrooms very, very quickly. These cook real quick, and we don’t want them to get mushy. Season with a little light soy sauce, sugar and pepper. Set aside.
• Sauté the diced carrots with a little minced garlic until fairly tender and set aside. (I actually find there is no need to add seasonings to the carrots at this stage, as there will be plenty of flavor from the beef, mushrooms and the final seasonings added to the macaroni).
• For the final assembly: sauté a little finely chopped shallots in a tiny bit of hot oil. Add the cooked macaroni and season with some oyster sauce, light sauce, sugar and pepper. (For the dark version, as pictured, also add a dash of dark soy sauce). Mix well. Add the half-cooked beef, together with the pre-cooked carrots and mushrooms. Saute to mix well and just enough to allow all the flavors to meld. Avoid overcooking, as the beef will toughen and become chewy (especially for the tenderloin). Because they are so finely diced, they will cook very quickly indeed.
• Just before removing from the heat, sprinkle chopped spring onions, and toss to wilt slightly. Remove from heat and serve.
Notes:
• I tend to vary the use of minced garlic and chopped shallots depending on how I feel. Sometimes I fry the mushrooms with shallots only, other times with both shallots and garlic. Sometimes I fry the carrots with a little minced garlic, and other times I don’t use either garlic or shallots when pre-frying the carrots. Sometimes, I use just shallots with the macaroni, and other times both garlic and shallots. All permutations work fine.
• A dash of dark soy sauce can be added to the macaroni for just a touch of color, or for really dark color and for a sweeter taste, use a little of both dark soy sauce and sweet dark soy sauce (kicap manis).
• It may seem like this dish will turn out rather oily and greasy, but that is not the case. Miniscule amounts of oil are used to sauté the beef and vegetables. And the final dish usually has barely any feel of oiliness or greasiness.
• Finely diced chicken can be used instead of beef.
• Other vegetables can also be used – such as finely diced celery and so on.
Ah, the memories of childhood… macaroni and beef, it’s a good thing.
Copyright © 2004 Renee Kho. All Rights Reserved.
Please contact me for permission to copy, publish, distribute or display any of the images or text contained in this article.
05:00 PM in Home Cook: Rice, Noodles etc | Permalink | Comments (15) | TrackBack
One Mug, One Fork and One Happy Cook

Spotted this nifty little kitchen tip in The Sunday Times yesterday.
I’m sure we have all experienced this, especially those of us who, like me, have a habit of snipping recipes from magazines and newspapers, or of jotting recipes down on odd pieces of paper here and there… when we are trying to cook with these recipes, the sheets of paper are flying everywhere, or getting flour, crumbs and sauce drippings all over them. This is a neat trick for keeping recipes in one spot, clean and easily readable.
Place a fork, with tines up, in a mug or glass, and wedge the recipe between the tines. Ta-da!
All it takes is one fork and one mug to produce one happy cook! ![]()
Copyright © 2004 Renee Kho. All Rights Reserved.
Please contact me for permission to copy, publish, distribute or display any of the images or text contained in this article.
01:40 AM in Kitchen Tips | Permalink | Comments (7) | TrackBack
Monday, March 01, 2025
BPROS

A.k.a Braised Pork Ribs in Oyster Sauce. Okay, so that is not the most original or imaginative of titles. Oh, alright, that is probably the most downright silly title I could have come up with. BPROS indeed. But hey, it’s a Monday. Lapses of imagination and inspiration are allowed on a Monday.
That aside, this is a rather delicious dish. The ribs are tender and flavorful, and the gravy is super duper poured over steamed rice. It’s a fairly simple dish to prepare. It’s one of those dishes that can be prepared in advance, and given time to slowly cook and to get to its best flavor, leaving plenty of time to do other things and to get on with life. It’s also one of those dishes that taste even better the day after, when all the flavors have melded together even more.
Ingredients
approx. 1.5kg pork spare ribs (or roughly 6-8 pieces whole spare ribs)*
[pork loin back ribs or baby back ribs can, of course, be used instead, for an even more tender result. If using baby backs, simply shorten the cooking time accordingly to get near “fall off the bone” tenderness]
2 tablespoons cornflour
minced garlic
Marinade
1 tablespoon oyster sauce
1 tablespoon light soy sauce
1 teaspoon sesame oil
½ teaspoon sugar
pepper
Sauce
2 tablespoons oyster sauce
2 tablespoons light soy sauce
2 tablespoons dark soy sauce
1 teaspoon sugar
pepper
2 cups hot water
* [the weight is an estimate, as I never know the weight of the ribs I buy. I know this sounds rather silly, but it’s true. Whenever I buy ribs from the wet market, the very kind “uncle” (stall owner) always just asks me: “how many bones?” (i.e. how many ribs I want). And I’ll just say “6” or “8” or whatever number it is I want, and he simply cuts that amount of ribs for me, even helping me chop them into small pieces according to my size specification for the dish I want to cook. And so, I have no clue as to the weight of 6-8 pieces of whole spare ribs, but I would estimate it to be around 1.5kg?]
• Trim ribs of excess fat and skin, and cut into short 2-3” individual pieces.
• Mix the marinade ingredients together, and add the ribs. Allow to marinade for at least half hour or so.
• Lightly coat the marinated ribs with the two tablespoons of cornflour or however much is required to lightly coat all the ribs.
• Quickly flash deep fry the ribs to seal in all the juices. We don’t want to cook the ribs, just to get them to a nice light golden color. Remove from oil, and drain very well.
• Mix together the sauce ingredients, excluding the hot water.
• In a separate wok or large saucepan, heat a tiny bit of oil, and quickly sauté some minced garlic. Add the sauce mixture, followed by the ribs. Give a quick stir, and add the hot water. Mix well and cover the wok or pan.
• Leave the ribs to simmer and braise, on low heat, until very tender, but not quite falling off the bone. For me, it usually takes about 3 hours, but timing can vary depending on the quantity, size and type of ribs you are working with.
I like this dish in that it can be prepared in the morning and allowed to braise while I do other stuff. Then, once ready, it can be kept aside to allow the flavors to intensify and harmonize further. And when dinner time rolls around, it is just heated and served.
Have a “ribbing” good week everyone!
Copyright © 2004 Renee Kho. All Rights Reserved.
Please contact me for permission to copy, publish, distribute or display any of the images or text contained in this article.
11:30 AM in Home Cook: Poultry & Meats | Permalink | Comments (10) | TrackBack


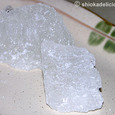
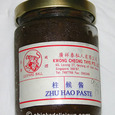
